Bear cubs are popular heroes of fairy tales and cartoons, so the child will happily take on the creation of his favorite character. Knowing how to make a bear from plasticine with your own hands, you can create many different figures, focusing on the basic shape. For example, Winnie the Pooh, a panda, a polar bear, a New Year's figurine or a copy of the baby's favorite plush toy. Older children or even adults can try their hand at real sculpture and make a realistic copy of this animal.
- Step-by-step instructions on how to make a bear from plasticine
- Video on how to make a bear: master classes on modeling bears from plasticine
- Rules for sculpting small parts and recommendations for working with plasticine
- Applications on cardboard for beginners and kindergarten children
- Bear templates for appliques
- Making voluminous plasticine bears: ideas from simple to complex
- Teddy bear with cake
- Winter bear
- Winnie the Pooh
- Realistic sculpture
- Additional master classes
- Photo examples of finished crafts and paintings of teddy bears made from plasticine
Step-by-step instructions on how to make a bear from plasticine
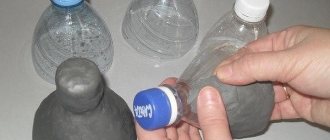
Before you make a plasticine bear, you need to prepare the material. If you don’t have a brown bar of the desired shade, you can mix red with black or other dark colors. Beige comes from combining brown with yellow or white.
You shouldn’t mix all the plasticine at once; it’s better to try on small pieces first to make sure you get exactly the color you want.
Modeling a bear cub from plasticine step by step:
- Form a pear-shaped body from a brown piece and carefully insert a toothpick inside to hold the head.
- Roll a ball of the same color and attach it to the body.
- Form the legs based on the photo.
- Roll out two stick sausages and bend them a little, giving them a more natural shape.
- Sculpt a tummy from a beige piece and attach it to the body. If the head prevents you from making the little bear's belly neat, you can temporarily remove it.
- Glue the legs and arms.
- Sculpt a beige muzzle.
- Glue on the black nose.
- Shape the eyes as shown in the photo.
- Glue the heels and toes to the lower paws.
- Make a light-colored egg and wrap it with a yellow sausage - this will be a bee hive.
- Decorate the part with a green leaf and give it to the figurine.
- Using a stack, carefully shape the fingers, nostrils, eyebrows and the inside of the ears.
- Glue on a small brown ball-tail.
When creating crafts from plasticine, it is recommended to sculpt the largest parts first, and lastly, apply small decor.
Video on how to make a bear: master classes on modeling bears from plasticine
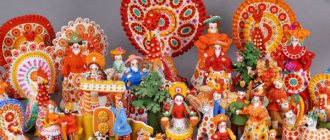
MODELING story based on the Bogorodsk toy
"Shaggy Bear"
Tasks. Continue to introduce children to works of decorative and applied art. Learn to sculpt a bear in the style of the Bogorodsk folk toy (in a sculptural way with the surface being worked in a stack to convey the texture). To cultivate an aesthetic attitude towards everyday culture and objects of folk art.
Preliminary work. Acquaintance with Bogorodsk toys and the art of wood carving.
Materials, tools, equipment. Bogorodsk toys (preferably a bear), album “Wooden toys”; clay (or salt dough, or yellow, brown, gray plasticine), stacks, rotary disks, oilcloths, paper and cloth napkins.
Contents of the lesson. The teacher recalls with the children what and how to make from wood. He says that in some cities and villages there are still craftsmen who make beautiful things from wood. In the village of Bogorodskoye near the city of Sergiev Posad there live craftsmen who have been making wooden toys for a long time. (The teacher shows several toys.) To make such toys, craftsmen use wood from soft trees - linden, alder, aspen. It is easy to cut with a knife and allows you to transfer even the smallest details (fur, feathers, cheeks, claws). First, the craftsmen work with an ax - they cut down a part of the tree required in size, and then use a knife to cut out the intended figure and transfer all the details.
Bogorodsk toys are figurines that depict village residents, ladies, hussars, horsemen, teams, as well as domestic animals, birds and beasts. Masters usually depict them doing something. Many toys have special devices that allow them to move (most often handles (movable bars) with ropes and springs). The most popular subjects are related to the favorite hero of Bogorodsk sculpture - the bear.
Usually he does some kind of work - hits an anvil with a hammer, plays a balalaika, plays football, and even flies into space.
The teacher informs the children that today they will sculpt a bear based on the plots of the fairy tales they read, and
They try to sculpt it so that the bear looks like a Bogorodsk toy.
Bogorodsk craftsmen carve their toys from wood using an ax and a knife, and you and I will sculpt them from clay (salt dough, plasticine) using stacks. We will try to sculpt it in a sculptural way - from a whole piece, without dividing it into parts. This method will allow us to make a toy that looks like a real sculpture. (Partial demonstration of the sculpting method.) And the stack will help you work out the smallest details the way real masters do it. (Demonstration of surface treatment techniques to convey texture - wool.) Using a stack, you can cut or scratch the surface of a sculpted figure so that it looks like wool - a bear’s fur coat. (Comparative display of the Bogorodsk toy and figurine sculpted and processed by the teacher.)
MATHEMATICAL REPRESENTATIONS
Lesson No. 9
Tasks. Teach children to compare objects by weight: heavier - lighter, equal in weight.
Show children the relativity of ordinal counting.
Exercise children in distinguishing numbers and in constructing a number series.
Develop attention.
Teach children to coordinate tempo and rhythm with each other when pronouncing tongue twisters.
Materials, tools, equipment. Demo material:
Three pairs of boxes: the first pair is a box the size of a matchbox and the box is half a matchbox, both are white, the small one contains a pebble; the second pair - boxes of the same size, but of a different color, the pebble lies in the larger one; the third pair is two identical boxes the size of a matchbox, one of them is the color of the first pair, the second is the color of the second pair.
Counting ladder.
A set of numbers from 1 to 5 (magnetic for a board or on cards for flannelgraph, typesetting cloth).
Contents of the lesson. There are two boxes on Both of them are covered with paper of the same color (preferably white). One box is the size of a matchbox. The other is half a matchbox. The boxes differ not only in size, but also in the fact that a small box contains a pebble, and it is heavier than a large one. The children don’t know this: in front of them are two boxes of different sizes of the same color. Educator, education
speaking to the children, he begins with a riddle: “Which of the boxes is heavier, which is lighter?” Children most likely say: the one that is larger is heavier. The teacher is in no hurry to suggest the correct answer. Gives children the opportunity to talk to each other. Maybe one of the children would like to pick up the boxes. The teacher supports this desire. Two or three children come to the table. They take turns each taking the boxes in their hands and saying: “The small one is heavier, the larger one is lighter.” Their answers convince other children that in order to determine and compare the weight of objects, it is not enough to just look at them, you need to pick them up.
The teacher invites the children to close their eyes and instead of the previous one puts another pair of boxes of the same size, but of a different color. Now the pebble is in a larger box and it is heavier than the other. The teacher asks the children the same question: “Which one is heavier, which one is lighter?” Children, assuming that the situation is repeating, will point to a small box. The teacher invites two or three children to come to the table and weigh the boxes in their hands. They weigh it and make sure that the larger box is heavier.
Next, the teacher offers the next pair of boxes, they are empty, the same size, one of them is the color of the first pair, the second is the color of the second pair, but the same weight. This time, the children take turns holding the boxes in their hands, discuss their impressions and gradually come to the conclusion that the boxes are of the same weight: “Equal in weight.” They tell this to other children.
All three pairs of boxes are on the table. The teacher invites all children to come to the table and weigh each pair of boxes in their hands.
Next part of the lesson. The teacher asks five children (optional) to come to their table (or board). They stand behind each other at the back of their heads. The teacher invites them to count in order: first, second, etc. and clarify again who is which: “Katyusha is first, Sasha is second... Vanechka is fifth.” The teacher invites the children to turn around. And now everyone is behind Vanechka, he is the first.
The situation can be repeated twice, three times, or more if desired.
Game "What has changed?"
On a board (flannelograph, typesetting canvas) there is a row of numbers from 1 to 5. The teacher explains to the children the rule of the game: they will close their eyes, and at this time she will change something on the board.
- Close your eyes! - At this time, the teacher removes one of the numbers. For the first time, from the middle of the row, for example, the number 3. And the remaining numbers are shifted so that there is no empty space, which can tell the children that the number 3 has disappeared. It turned out:
Children open their eyes and determine what is missing. The number 3 is put in place. The row has been restored.
The teacher again invites the children to close their eyes and removes the number 5.
For the third time, the teacher removes the number 1.
And on the fourth, also inviting the children to close their eyes, nothing changes in the number series. Children are asked the same question: “What has changed?” And the children say: “Nothing. Everything is in its place."
Reading tongue twisters together
The methodology is described in lesson No. 1. Here you need to take other tongue twisters, for example: “The chicken was admiring the chickens: no matter how smart the chicken is.”
APPLIQUE made of paper
“The forest is like a painted tower”
Tasks. Teach children to convey the features of different trees and bushes in appliques and to compose a collective composition “Autumn Forest” from them, choosing beautiful color combinations. Encourage the search for original ways to create a tree crown (break-off and overlay applique, sliding, slotted decor). Develop compositional skills (arrange cut out elements in tiers starting from the background). Encourage children to embody their ideas, experiences, and feelings in artistic form.
Preliminary work. Creating a basis for a plot composition (a sheet of large format paper with a planned horizon line: 2/з ~~ earth and U3 - sky).
Materials, tools, equipment. Sets of colored and textured paper, color illustrations of old magazines, scissors, boxes for scraps, glue, glue brushes, paper and cloth napkins; the basis of the composition “Autumn Forest”, prepared in advance in independent artistic activity; reproductions of paintings by Russian landscape painters; manual “Leaf Fall” (variants of color combinations).
Contents of the lesson. The teacher recalls with the children I. Bunin’s poem “A forest, like a painted tower.”
The forest is like a painted tower,
Lilac, gold, crimson,
A cheerful, motley wall
Standing above a bright clearing.
Discusses with the children why the poet compares the autumn forest with a painted tower (the forest in autumn is as patterned, multi-colored, elegant, beautiful as a fairy-tale tower). Invites children to examine openwork tree crowns cut out of colored and textured paper.
The teacher displays several landscapes on the easel. Invites children to admire. Conducts a brief conversation about the names of paintings depicting nature (landscapes), the names of artists who paint such pictures (landscape painters), where you can see landscapes of famous artists (in museums, at exhibitions, in art albums, on postcards, etc.) .
The teacher reminds the children that in October they drew sketches of trees, sculpted leaves and turned them into trees. (Selective display of children's works.)
Today, everything that we have learned and learned will be useful to us, because we will create a fairy-tale forest, similar to a painted tower. Let's cut out trees and bushes from colored paper, glue them onto the general background so that there is room in the clearing for the animals that we will cut out in the next lesson.
The teacher shows two paper rectangles - a large and a small one - and asks how best to cut out trees and bushes. Draws the children's attention to the art materials prepared in advance and asks how else they can decorate the trees or how to supplement them. If children find it difficult to answer, ask leading questions: what can be done with felt-tip pens or pastels? (Draw leaves or a pattern on the crowns.) Children cut out or create tree crowns and bushes using cut-out appliqué. As the work progresses, the teacher recalls ways to decorate the image, complicate the shape of the crown, the teacher provides individual assistance, etc. Invites the children to create a forest from individual trees - a “painted tower.”
FICTION
"Hare in Russian fairy tales"
Tasks. Show children a variable image of a hare in different works. Learn to compare images from different works. Develop emotional responsiveness, the ability to convey through movements and facial expressions the character of the hero of the work, the desire to participate in creative dramatization. Repeat the differences between an author's and a folk tale.
Preliminary work. “The Tale of the Brave Hare - Long Ears, Slanting Eyes, Short Tail” by D. N. Mamin-Sibiryak is read to children the day before.
Materials, tools, equipment. Elements of costumes for crows, hares, and dogs.
Contents of the lesson. The teacher reminds the children of a fairy tale read by the writer D.N. the day before. Mamin-Sibiryak "The Tale of a Brave Hare - Long Ears, Slanting Eyes, Short Tail." Conversation on content:
-Who is the main character of this fairy tale?
— How is the hare depicted at the beginning of the fairy tale?
- How did he boast? (The teacher reminds the children of the words from the fairy tale: “...I’m not afraid of the wolf, nor of the fox, nor of the bear.”) Show how he boasted? (Those who wish can act out a sketch with these words.)
- Do you think at the very beginning, did other animals believe the boastful hare? (The teacher confirms in the text that the animals did not believe the hare at first: “The young hares giggled, covering their faces with their front paws, the kind old hare women laughed, even the old hares who had been in the paws of a fox and tasted wolf teeth smiled.”)
- What happened when the hare saw the wolf?
-What did the wolf do?
- Why did all the animals believe that the hare scared the wolf?
- Was the hare really brave?
-Who wrote this fairy tale? (In case of difficulty, the teacher himself names the author.)
- Now let's listen to another fairy tale about a hare. This is the Russian folk tale “The Boasting Hare”, adapted by A. Tolstoy. (Remember what a folk tale is.)
Conversation on content:
Is this hare similar to the hare from the previous fairy tale and in what ways?
Show how the hare boasted (a sketch with the hare’s words: “I don’t have a mustache, but whiskers, not paws, but paws, not teeth, but teeth, I’m not afraid of anyone!”) Several children (optional) play out this phrase.
— How did the crow scold the hare for boasting?
- How did he help the crow later?
Was this hare a coward, like the one from the first fairy tale? What did the crow say about him? (The teacher helps the children remember the words from the fairy tale. If desired and if you have time, you can organize a dramatization of the fairy tale “The Boasting Hare.” The children themselves select the elements of the Costumes. The teacher tells the fairy tale on behalf of the author, the children say the words of the characters in their own words).
In conclusion, the teacher once again discusses with the children how the hares - the heroes of these fairy tales - are similar and how they differ (both are braggarts * but one is cowardly, and the other is brave).
After class. In the next drawing lesson, children will create different images of hares and then use the drawings to design a homemade book.
DRAWING plot
"Bunnies - the coward and the brave"
Tasks . Learn to draw, revealing the theme of a literary work, conveying the character and mood of the characters.
Arouse interest in illustrating familiar fairy tales using accessible visual and expressive means.
Introduce the techniques of conveying the plot: highlight the main thing, depicting it larger in the foreground; convey both semantic and proportional relationships between objects. Develop compositional skills.
Preliminary work. Reading “The Tale of the Brave Hare...” by D. N. Mamin-Sibiryak and the Russian folk tale “The Hare-Hvas-ta.” Review of books illustrated by I. Ya. Bilibin, Yu. A. Vasnetsov, A. M. Eliseev, V. M. Konashevich, V. V. Lebedev, T. D. Mavrina, E. I. Charushin and others. Preparation of the basis homemade books for illustration by children in drawing classes.
Materials, tools, equipment. Homemade books, art materials for children to choose from - colored pencils, felt-tip pens, gouache paints; brushes, jars of water.
Contents of the lesson. The teacher invites the children to remember the main characters of the fairy tales that they listened to in literature class: what are their names, which of the hares looks like, which has what character. (D. N. Mamin-Sibiryak “The Tale of the Brave Hare - Long Ears, Slanting Eyes, Short Tail” and the Russian folk tale “Bragging Hare”),
Then the teacher reminds the children that they have started making their own books based on familiar fairy tales in order to give them to children in the junior or middle group of kindergarten. Conducts a brief conversation about who and how works on the creation of children's books. He clarifies that first the authors write the texts, and the artists draw the illustrations, then the publishing house prepares the book for printing in the printing house, where there are special printing presses on which you can print many, many identical books, so that all children have beautiful, interesting books.
And you and I will prepare our own picture books. From the pictures you can tell who the hero is in this book and what happens to him. Everything in our books will be real: a cover with a title and pages with pictures. We will design the cover at the very end of the work. Today we will draw two
hares that live in this forest. But let’s draw more than just hares, with long ears and a short tail. We will try to show in the drawings what character and what mood each hare has: who is brave and cheerful, and who is cowardly and sad. This is very difficult, but I think that you will cope with this task, like real illustrators of children's books. Open your little books, write a golden clearing and on it two birds with one stone: on one page a coward, and on the other a brave man, as if they had met and were telling each other something.
Children draw, the teacher helps with verbal descriptions of portraits, advice and indirect questions (the brave hare has a wheel-shaped chest, his head is boldly and proudly raised up, his ears are erect, his paws are raised up or spread to the sides, and the cowardly hare has his back bent, his ears are pressed to his back , and the paws are raised to the chest or lowered down).
After class. Children will continue making homemade books next week.
SPEECH DEVELOPMENT
"Encounters in Nature"
Tasks. Encourage children to speak out about topics from their personal experiences.
Convey the content of the story in your own words.
Choose definitions for the word.
Clarify and consolidate the correct pronunciation of the sounds sh and z.
Materials, tools, equipment. Pictures: squirrel, woodpecker, frog, hare, hedgehog, elk, ball.
Contents of the lesson. The teacher asks the children riddles. As he guesses, he shows clue pictures.
And he deftly jumps through the Christmas trees,
And flies up into the oak trees,
And he hides nuts in the hollow,
Dries mushrooms for the winter.
(Squirrel)1
1 See: Illarionova Yu. G.
Teach children to solve riddles. - M.: Prosveshche-e, 1985. P. 127.
He hollowed out the tree for a long time and destroyed all the insects. He didn’t waste his time, Long-billed Spotted... (woodpecker)1.
The little animal is jumping, Not a mouth, but a trap. Both the mosquito and the fly will fall into the trap.
(Frog)2
Touching the grass with his hooves, a handsome man walks through the forest, walking boldly and easily, with his horns spread wide.
(Moose)3
The teacher asks the children what to call a hare, a squirrel, a woodpecker, a frog, and a moose in one word. (Animals.) Why are they called that? Where do they live? (In the forest, in the park.) Have children ever seen forest animals? Invites children to tell how and when they met them.
After this, a game with a ball in a circle is organized:
- Stand in a circle. I will throw you a ball and name the animal, and you will throw the ball to me and name what animal it is: fox - cunning, fluffy, red; bear - clubfooted, ferocious, shaggy. (Words: squirrel, hare, elk, woodpecker, frog, wolf, magpie, crow, jackdaw, mouse, deer, hedgehog.) The ball is passed to each child, the words can be repeated.
The teacher invites the children to listen to E.I. Charushin’s story about a meeting in nature - “The Hedgehog” (see: A book for reading to kids. - M.: Ulysses, 1993. Part 1, p. 55).
Then the teacher asks the children:
—Who did the children find in the forest?
— How did the children manage to pick up the prickly hedgehog?
- What did they manage to do to make the hedgehog show his nose?
Invites children to listen to how this is said in the story. Reads the passage again. He asks the children how the hedgehog managed to escape.
After this, he invites the children to tell this story in pairs: one starts, the other finishes, and listens to everyone.
1 See: Riddles. Book-toy. - M: Vneshtorgizdat, 1990. No. 8.
2 See: Illarionova Yu. G.
Teach children to solve riddles. - M.: Education, 1985. P. 133.
3 See: Ibid. P. 126.
At the end of the lesson, the teacher reads a tongue twister to the children, discusses with them what sound is heard in this tongue twister (g);
what happens if you pronounce the sound
in
a whisper, without a voice
(w)
A large hedgehog needs a mushroom:
The hedgehogs are waiting for a mushroom for dinner.
(I. Lopukhina)1
1Lopukhina I.
Speech therapy. 550 entertaining exercises for speech development. _ M: Aquarium, 1995. P. 97.
NOVEMBER. WEEK 10
Work planning
Direction of pedagogical work. The work started last week will continue. Children will become more familiar with the inhabitants of the forest, gain an initial understanding of the forest as a community of living organisms connected to each other, the diversity of forests and the need to protect them, and the rules of behavior of people in the forest. Children will learn to establish simple cause-and-effect relationships (using the example of making paper from wood), become familiar with the properties of paper and learn about its various uses. They will learn to divide “objects” into two equal parts. Based on the ideas received in different classes, children will convey the characteristic features of objects and natural phenomena in drawing, appliqué, modeling, papier-mâché. Work on the creation and design of homemade books will be completed; special attention will be paid to instilling in children a caring attitude towards books.
| Day of the week | Time periods of the day | Contents of educational work |
| 1 day | Morning | Child-initiated games |
| Classes | 1. Nature. “Forest House” 2. Construction from natural materials. “In a forest clearing” (continued) 3. Physical education No. 10.1. Learning jumping techniques in series (20 jumps, repeated twice). Improving walking techniques with side steps (forward, sideways, backward). Development of speed (training the speed of reaction to a verbal signal - starting a movement in response to various commands: “March!”, “Run!”, etc.) | |
| Walk | Observation in nature* Folk game “Kite” Outdoor game “Aim straight” Games initiated by children | |
| After lunch | Reading the fairy tale “Sister Fox and the Wolf” (preliminary work for a literature lesson) | |
| Evening | Child-initiated games | |
| Day 2 | Morning | Child-initiated games |
| Classes | 1. Fiction. “Fox in Russian folk tales” 2. Plot drawing. “The Fox-Godmother and the Little Fox-Dove” 3. Music No. 10.1. Listening to music: V. Gavrilin, “The fox injured its paw.” Musical movement: sketch “Weasel” (F. Miller “Sketch”), sketch “Let’s Help the Fox” (V. Gavrilin “The Fox Hurt her Paw”), dance “Dance of the Squirrels and Bunnies” (N. Veresokina “Dance of the Squirrels and Bunnies”) __ |
| Day of the week _——— TdemG | Time periods of the day | Contents of educational work |
| Walk | Observation in nature* Outdoor game “At the Bear in the Forest” Games initiated by children | |
| After lunch | Reading the Russian folk tale "The Fox and the Dogs" | |
| Evening | Designing a cover for a homemade fairy tale book (see art activity lesson) Games initiated by children | |
| 3day | Morning | Selection of different types of paper for the “collection” (preliminary work for a lesson on understanding the world around us) Organization of conditions for amateur children’s games |
| Classes | 1. Knowledge of the surrounding world. "From spoon to book." 2. Modeling from paper pulp (papier-mâché). “Spiderbugs” 3. Physical education No. 10.2. Learning the technique of jumping forward on two legs; running techniques, throwing your shins back. Development of dexterity (development of coordination of movements - alternate exercises) | |
| Walk | Observation in nature* Outdoor games: “Pair running”, “Aim straight” Games initiated by children | |
| After lunch | Reading part 1 of the fairy tale “The Frog Princess” (see literature lesson No. 11) | |
| Evening | Acquaintance with works of folk arts and crafts made using the papier-mâché technique (lacquer items: paintings from Palekh, Mstera, Kholuy) Games initiated by children | |
| 4 day | Morning | Games initiated by children Looking at images of animals in encyclopedias, calendars, albums, etc. (preliminary work for the application lesson) |
| Classes | 1. Mathematics No. 10 2. Silhouette application “Who lives in the forest?” (addition to the composition “The forest is definitely a painted tower”) 3. Music No. 10.2. Listening to music: “Snowflakes” (Polish folk song). Singing: chants “I Sing”, “Bai”, “Lullaby of the Little Bunny” (music by V. Karaseva, music by N. Frenkel), “Snowflakes” (Polish folk song). Playing children's musical instruments: “Little Bunny Lullaby” (music by V. Karaseva, music by N. Frenkel). Musical movement: game with singing “Oh, bunny on the senichki” (Russian folk song), dance “Dance of squirrels and bunnies” (N. Veresokina “Dance of squirrels and bunnies”) | |
| After lunch | Reading the 2nd part of the fairy tale “The Frog Princess” (see literature summary No. 11) | |
| Walk | Observation in nature* Outdoor games: “Make a figure”, “Pair running” Games initiated by children |
| Day of the week | Time periods of the day | Contents of educational work |
| Evening | Games initiated by children Physical education leisure: walking with side steps in different directions; jumps in series; Outdoor switchgear with gymnastic sticks; relay races between obstacles; outdoor games: “Pair running”, “By the bear in the forest”, “Cones, acorns, nuts”, “Squirrels in the forest”, etc.; low mobility game “Find and remain silent”, etc. | |
| 5 day | Morning | Child-initiated games |
| Classes | 1. Speech development. “We write stories” 2. Free activity 3. Physical education No. 10.3. Consolidating the ability to jump in series (20 jumps, repeated three times); run, throwing your legs forward. Development of flexibility (“Owl”, “The Sea is Worried”, etc.) | |
| Walk | Observation in nature* Folk game of children's choice Outdoor game “Who will make the least jumps?” Child-initiated games | |
| After lunch | Reading the 3rd part of the fairy tale “The Frog Princess” (see literature summary No. 11) | |
| Evening | Games initiated by children Working with parents: selecting different fabrics for the collection |
*See section "Nature".
Pedagogical support for children's story-based games. Children of this age begin to reflect in play not only real ideas about the world around them, but also those that can be thought out and imagined. In children's games, ideas from different spheres of reality begin to connect. The art of the teacher is to provide support in the development of interesting stories for children, to influence them through the joint creation of improvisations. Its task is to teach children to combine different events. The teacher, with the permission of the children, can become their partner and create a plot together with them, taking into account the children’s interests in certain events, actions and roles (if they are envisaged by the players).
NATURE
"Forest House"
Tasks. To form primary ideas about the forest as a community of living organisms interconnected, about the diversity of forests and the need for their protection, about the rules of behavior while staying in the forest.
Preliminary work. Observations on a walk.
If there is a forest or forest park near the kindergarten, the teacher conducts a “Getting to Know the Forest” excursion with the children.
He asks how the forest differs from the forest. Draws attention to the diversity of plants in the forest: there are trees, shrubs, and herbs (usually even in November in the forest you can find winter-green grasses, evergreen shrubs, for example, lingonberries, and mosses, and lichens, and tinder fungi on stumps, fallen trees). The teacher shows that there are plants of different heights in the forest: which ones are the tallest? Lowest? Invites children to reflect the height of trees by raising their arms up, the height of bushes by extending their arms at chest level, and the small size of grasses and mosses by squatting.
The teacher, together with the children, finds as many places as possible where different animals can live (for example, hollows, cracks in the bark of trees, notches between tree roots, holes in the ground, etc.). Asks the children to be silent and listen to the sounds of the forest. Materials, tools, equipment. Cards with images of different trees (pine, oak, spruce, birch, aspen, maple), dried leaves of these trees, collections of seeds and fruits (acorns, cones, etc.), dry leaves of trees, shrubs, tinder fungi and others natural objects for the game “Parcel from the Forest”, posters, photographs, reproductions of paintings (for example, A. Kuindzhi, I. Levitan) depicting different forests.
Contents of the lesson. The teacher asks the children to remember the names of the trees shown on the cards. What other trees do they know? Offers to play the game "What's what." Children are given the task of picking leaves and fruits from one tree. The game can be played using dried leaves and fruits (seeds) of trees, as well as cards with their images.
There are many trees growing in the forest. If it has the most oak trees, then the forest is oak. If there are many birches, then (children continue) - birch, and if there are many different trees, then - mixed, etc. Trees with ordinary leaves are called deciduous (show cards with images of such plants: birch, aspen, oak, linden, maple) . Forests made from these species are called deciduous in the same way. Trees that have special leaves - needles (spruce, pine, larch, fir) are called conifers, as are forests in which there are many such Trees. Some plants, animals and mushrooms live in an oak forest, others live in a pine forest, and others live in a spruce forest. For example, boletus and porcini mushrooms often grow in pine forests, and milk mushrooms - in spruce forests. Children look at posters, photographs, reproductions of paintings depicting different forests.
The teacher brings to the group a parcel from forest inhabitants (the parcel contains cones, sticks, tinder fungi, lichens, dry autumn leaves, pieces of tree bark, a cone eaten by a squirrel, an acorn, dry rowan berries, etc.). Children carefully study the contents of the message
ki, identify all the items and suggest which animal could send this or that item (squirrel * woodpecker - pine cone, beetle - bark, etc.)' You can add to the contents of the parcel an item that is not related to the forest, for example, a plastic bottle, doll, plasticine. The children are given the task of finding an object that cannot be sent from the forest, and explaining why.
Since the forest has its own inhabitants, it can be called home. Like other houses, it has floors. At the lowest level, grasses, mosses, mushrooms grow, ants, snakes, beetles crawl,
Birds jump, animals run. There are a lot of bushes on the second floor. Some birds build nests in their thickets, spiders weave webs, and beetles crawl along the branches.
And finally, on the very top floor there are trees. And it has its own inhabitants: animals, birds, beetles. The topmost branches of the trees are the roof of the forest house. They protect forest inhabitants from heat, heavy rain and wind. Under the ground, “in the basement,” moles, earthworms, beetle larvae live, and plant roots grow. Each resident also has his own apartment: the squirrel and woodpecker have a hollow, the bear has a den, the fox, mole, and badger have a hole. And they don’t like to change their apartments.
The teacher discusses with the children the rules of behavior in the forest. The forest is a house in which all the inhabitants depend on each other. Why do we go to the forest? (Relax, observe, breathe fresh air, admire nature, pick mushrooms, berries.) This means that we are guests in the forest, and guests must follow the rules. These rules can be displayed in a series of environmental signs. At the same time, the rules of conduct should not be limited only to prohibitions (you cannot tear, you cannot catch!), and signs should not only be prohibitive. Children should have an alternative: what cannot be done, and what can and should be done. There are two types of environmental signs: in red circles (prohibiting) and in green circles (permitting). For example:
— no need to make noise, take a tape recorder with you; you can listen to the silence of the forest, the singing of birds, the rustling of leaves;
- no need to pick flowers; you can smell them, examine them through a magnifying glass, sketch them, photograph them, observe what insects fly to them;
- you can’t destroy anthills, you can watch the ants at work;
- You cannot make a fire on the grass, you can - in a place specially designated for this.
The teacher invites the children to play the game “What is good and what is bad.” Children are divided into two teams. The first participants name everything that is “good” for the forest, the second - everything that is “bad” for the forest. The groups can then swap tasks.
In conclusion, the teacher concludes: the forest is a home for plants, animals, and mushrooms. Forests are different: spruce, pine, oak. They are inhabited by various plants, animals, and fungi. Forest residents have their own “apartments” on different floors. In the forest, everyone is connected to each other. When people come to relax in the forest, they must behave like guests and follow the rules so as not to disturb life in the forest house.
Previous11Next
What does the IS operation and maintenance department do? Responsible for the safety of data (copying schedules, copying, etc.)…
What makes your dreams come true? One hundred percent, unshakable confidence in your...
What to do if there is no reciprocity? And now let's come down from heaven to earth. Have you landed? Let's continue the conversation...
Live by the rule: IS THERE NOT MUCH THING IN THE WORLD EXISTING? It is no coincidence that I emphasize that the space in your head is limited, but there is a lot of information around, and that your right...
Didn't find what you were looking for? Use Google search on the site:
Rules for sculpting small parts and recommendations for working with plasticine
How to make a plasticine figurine more neat:
- You should work only with clean hands, completely erasing the remnants of the previous color from them before moving on to a new one.
- To make the surface of the parts completely smooth, it can be leveled with wet fingers. Before gluing the craft, you need to wait for the water to dry.
- Wool and fur are drawn with a stack or a toothpick in one direction, trying to maintain the same depth of lines. To avoid smearing the applied texture with your fingers, place the part on a toothpick.
Eyes can be made from beads or small buttons.
Applications on cardboard for beginners and kindergarten children
Three-dimensional painting for the preparatory group of a kindergarten.
Plasticine applique “Merry Family”. The craft will look more voluminous if the background elements are painted.
Coloring pictures with plasticine is not difficult and is very useful for fine motor skills: you need to glue small pieces and smooth them out, trying not to go beyond the contours. The finished work can be decorated with three-dimensional elements.
Plasticine bear applique, suitable for little ones. The outline of the picture can be drawn or printed by the mother; the child will only have to fill it with balls.
For kids, you can prepare the plasticine parts themselves in advance.
Complex multi-level plasticine applique for older children. Before starting work, it is recommended to draw a sketch on paper and think about what colors and in what volume will be needed to create the picture.
Bear templates for appliques
Summary of a modeling lesson for the senior group “Bear” lesson plan (senior group)
Summary of a modeling lesson for the senior group “Bear”
Summary of a lesson in artistic creativity (modeling) for the senior group “Bear”.
Educational field – artistic
Goal: To form aesthetic tastes, develop creativity and thinking.
Objectives: Learn to sculpt an object consisting of several parts, conveying characteristic features (ears, muzzle). Reinforce familiar sculpting techniques: rolling, unrolling, connecting parts using the technique of smearing. Develop independence, cultivate interest in modeling.
Integration of educational areas: cognition, physical education, reading fiction, artistic creativity.
Material: plasticine; boards for modeling; images of a bear; toy bear".
Preliminary work:
Reading fiction “Teremok”, “Three Bears”; “Mashenka and the Bear”, a conversation about the wintering of the bear, its food products, its living conditions, looking at illustrations depicting a bear, solving riddles, watching the presentation “Wild Animals”.
Progress of the lesson:
Educator: Guys, a guest will come to us today, but before he appears, we must guess who it is. I'll tell you a riddle, and you tell me the correct answer.
Clubfoot and big,
He sleeps in a den in winter.
Loves pine cones, loves honey,
Well, who will name it?
Children: Bear.
Educator: Correct! Listen, a short excerpt that talks about the bear “Who among us does not know a bear? Big, clumsy, club-footed. This is exactly the opinion we hold about this beast. But in reality the bear is not like that. He is very agile and dexterous. The bear is a formidable forest dweller who will not let anyone down if he is not in the mood. Belongs to the bear family. The bear is a predatory mammal that swims well and climbs trees. One blow and the bear can kill another animal. The bear's legs are thick, its head is massive with small ears and eyes, and the color of its fur is changeable. Although the bear is a typical predator, he also likes to enjoy plant desserts: berries, fruits, grains, grass, plant roots,” but don’t be afraid, our guest is very kind, he came to us from a fairyland.
(there is a knock on the door. The teacher brings in a toy). Guys, we forgot to say hello to our guests, how can we greet beautifully?
Children: Hello, we are very glad to see you!
Educator: Bear told me that he is bored alone in the den in winter, how can we help him?
Children: Let's make little bear cubs.
Educator: But first we’ll play a game with you. The game is called “Teddy Bear”, you need to perform movements in accordance with the text. So, let's go to our clearing and stand in a circle.
A clubfooted bear is walking through the forest,
He collects the cones and puts them in his pocket,
Suddenly a cone fell, right on the bear’s forehead,
The bear got angry and stomped his foot.
“I won’t collect pine cones anymore,
I’ll get in the car and go to bed!”
Educator: It’s still too early for Mishka to go to bed, we’d better go to the table and see how our guys will sculpt the bear cubs.
Children: go to the tables and sit down in their places.
Educator: Guys, what parts does the bear consist of?
Children: torso, head, paws and tail.
Educator: How are we going to sculpt the body, what does it look like?
Children: oval body.
Educator: And the head?
Children: Round.
Educator: Please note that the bear has an elongated muzzle and has ears on its head! How many ears does a bear have? Let's count?
Children: 1 – 2. 2 ears
Educator: Yesterday I made a bear, would you like me to show it to you?
Children: Yes.
Educator: I stretched out the muzzle with my fingers, and made the ears by pinching plasticine. Which part of the body do you think we'll start working on? Explain why you think so?
Children: From the body, because we will attach all parts of the body to it.
Educator: What are we going to sculpt after the body is done?
Children: Let's sculpt the head.
Educator: We will have a torso and a head, do we need them?
Children: Connect.
Educator: In order for our head to hold firmly, we must use the technique of smearing. What remains for us to make so that the bear is ready?
Children: Paws and tail.
Educator: How many paws does a bear have, let's count.
Children: 1, 2, 3, 4 -4 paws.
Educator: We will make them from balls, but we will need 5 balls, what is the fifth one for?
Children: For the ponytail.
Educator: Guys, when you start working, I will play some music for you, it will help you unleash your creative abilities. There is plasticine on our tables, we need to divide it into 3 parts, one part should be a little larger, the other two parts should be the same. From the larger part we mold the body, from the other part - the head, and we need to divide the last part into 5 more equal parts, these will be the paws and tail. Let's get to work. (music is turned on, preferably sounds of nature)
During work, the teacher gives children advice and, if necessary, provides assistance.
Analysis:
Look, guys, what cute little bear cubs you have made.
(Ask the children whose work they liked and why, tactfully draw attention to the shortcomings in some works, offer to try to avoid them next time).
Guys, let's invite our guest to choose new friends. (The little bear happily selects all the children’s works and thanks the children for the gifts). The children invite him to come visit again.
The little bear treats the children to cookies and says goodbye.
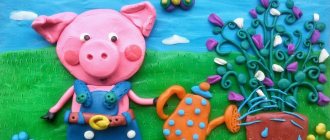
Photo examples of finished crafts and paintings of teddy bears made from plasticine
Knowing how to make a bear, you can collect figures of other animals based on the same pattern. To do this, just take a different color of plasticine and change small parts.