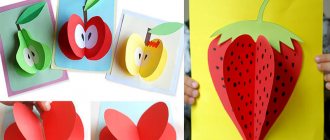
Paper bunny
You can make such a bunny just like that, or you can time the craft for Easter. With the help of parents, the child will be able to make the craft quickly and easily, and a minimum of materials will be required:
- Cardboard for the base and white paper;
- Glue;
- Scissors;
- Felt pen;
- A small piece of pink paper;
- A stapler or thread with a needle to secure the accordion.
Operating instructions:
- Cut a sheet of white A4 paper in half crosswise;
- Place the short side of the sheet in front of you and begin folding it into an accordion. Each fold should not be very wide, about 1 centimeter, or narrower. It is important that the folds are even;
- The same must be repeated with the second half of the sheet;
- Next, the two accordions are glued together and bent in the center. To ensure that the bend point is fixed, you can fasten it with staples or tie it with threads;
- Now you need to get a circle from this accordion. The top and bottom parts are glued together. It turns out the face of a bunny;
- The muzzle needs to be glued onto the base, and then continue to design the craft, cutting out and gluing the remaining parts;
- According to the instructions for children in this craft, ears are then cut out from white paper, inserts into the ears are made of pink paper, and glued to the muzzle on the base;
- Next, a muzzle is cut out of pink paper, a nose and points for a mustache are drawn on it;
- You need to cut out eyes from white paper and draw pupils in them;
- The final stage is the final assembly of all the parts and gluing them to the muzzle.
Applications with sea animals
We have already talked about which animals of hot countries most appeal to children. Now let's talk a little about the mysterious sea inhabitants!
Photo MK
Dolphins are considered the most popular marine inhabitants. They attract people with their kindness and responsiveness. And it is their figures that we suggest you use for applique on a marine theme: Using stencils, dolphins can be formed from colored sheets, napkins or cereals:
Video tutorial applique dolphin from plasticine
Lamb
Since we are still learning how to make animal appliqué, crafts should be simple and require a minimum of materials. In addition, the templates can be downloaded from any source; all that remains is to cut out the necessary parts and glue them to the base.
Therefore, the next craft - a lamb - is also quite simple. And the animal template, printed and cut out, is taken as the basis.
Additionally you will need:
- Glue;
- Scissors;
- Pasta or cotton wool to decorate the fur.
Operating instructions:
- The finished stencil is cut out of paper and pasted onto cardboard. You don’t have to stick it on the base, then the craft will turn out to be a contour;
- You can glue pasta in the form of curls to the place where the fur should be.
- You can glue cotton balls instead of pasta, then the craft will also turn out fluffy.
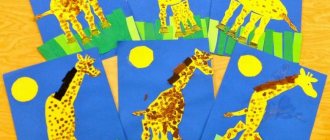
Inhabitants of hot countries and the far north using applique technique
Children are not only inexhaustible “sources” of new ideas, but also little whys. They are interested in everything! Therefore, it is not surprising that little ones are happy to get acquainted with the life of wild animals living not only in our forests, but also in distant countries.
Now, especially for the most curious, we will tell you how to make beautiful applications yourself, without the help of adults, with animals living in the vast expanses of the north and in hot southern countries! And we'll start, perhaps, with creating an elephant!
Elephant applique
Description of work:
- In order for children in the middle group to be able to make a baby elephant on their own, they need to be given templates:
- Having cut out the blanks, preschoolers will have to carefully glue them:
Lion using applique technique
In the African savannah you can also meet lions and funny lion cubs. To make such a cute lion cub you need to prepare in advance:
- Black and red marker or felt-tip pen
- PVA glue"
- Brush
- Scissors
- Paper sheets yellow and orange
Instructions:
- First, cut out the lion cub's head and mane.
- Then glue the head to the mane:
- Place a small orange triangle in the center of the head. It will replace the lion cub's nose:
- Draw the eyes on top with a marker, and the mouth and cheeks on the bottom.
- Set the finished craft aside until completely dry, and then decorate it with a greeting card or gift box!
Penguin
Many children like not only the animals of hot countries, but also the inhabitants of the far north. And so now we bring to your attention a detailed lesson on how to create a funny penguin: To make such a penguin with your own hands, you must prepare in advance:
- Glue
- Rectangles black and white
- Squares: orange, brown, black
- Base sheet
- Scissors
Let's start the lesson:
- Cut an oval from a black rectangle:
- Use white to form a smaller oval:
- Cut all the squares diagonally and glue the resulting shapes in the right places:
- Don't forget to glue on the paper eyes!
bear
The photo of animal appliques shows that voluminous appliqués that can be placed on a table or shelf look very interesting and unusual.
This craft can be brought to kindergarten or school for an exhibition. You need to try it from the simplest, so we suggest putting together a three-dimensional bear.
To work you will need:
- Brown cardboard;
- Orange or white cardboard to decorate the face;
- Black felt-tip pen;
- Glue;
- Scissors.
Operating instructions:
- From brown cardboard along the sheet you need to cut two strips approximately 2-3 centimeters wide;
- You need to glue the strips together at right angles;
- Now you need to fold an accordion from two strips at the same time, gradually placing one strip on top of the other;
- The resulting accordion needs to be glued together at both ends so that they do not stick out;
- The bear's body is drawn using a stencil or a freehand drawing. It is depicted simply and schematically - two paws. You need to cut out two identical parts from brown cardboard;
- Then the parts are glued to the cardboard accordion on both sides. Now the body can be placed on the table, it will be stable;
- Next you need to start decorating the head. A large circle for the muzzle and two small balls for the ears are cut out of brown cardboard. A circle is cut out of white or orange cardboard for a spot on the face where the mouth and nose will be drawn. All parts are glued together;
- All that remains is to finish drawing the muzzle and gluing it to the body. You can glue it without a neck, or you can fold a small accordion from a thin strip - this will be the neck. The craft will look more interesting with it. The bear is ready.
Applications with pets
Before starting MK, it is necessary to talk with preschool children about what animals live in their home and are considered pets. Kids attending the younger group will most likely remember only their pets, but children studying in the older group will tell you that in addition to cats, dogs and rabbits, domestic animals also include cows, goats, sheep and horses.
Having collectively remembered all the inhabitants of houses and garden plots, you can begin to create step-by-step figures:
Kitten applique
Kids can create a kitten figurine using printed drawings:
The blanks from the second picture will need to be carefully cut out. They are quite large, so it will be easy for kids to attach them to the base.
Children studying in the middle group can make a kitten from geometric shapes. To form a figure, teachers will have to print out the necessary parts on a printer: Preschoolers will have to first cut them and then put them together, as shown in the photo:
Puppy applique
Making a puppy is as easy as making a kitten. First you need to prepare the blanks.
So, for example, eyes, a body, and a front leg will be formed from ovals. We will make the head from a whole circle, and the back leg and ears from halves.
Cow applique
Children studying in the preparatory group can use a special template to create an application with cows grazing in a meadow:
It will be difficult for novice craftsmen 3-4 years old to cope with such a task as cutting out small parts. But preschoolers aged 6-7 years will certainly enjoy this activity!
The finished blanks need to be glued to a suitable background. To visually make the picture more voluminous, the background can be made from colored paper in dark green, light green, or grassy green.
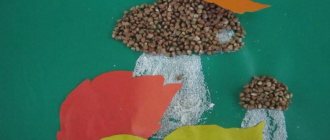
Hedgehog
The process of creating a hedgehog is similar to creating a lamb. Only instead of cotton wool or pasta, you will need to use buckwheat to create needles.
In addition to this, you will also need a cardboard base, glue and an animal stencil.
Operating instructions:
- You can draw a hedgehog yourself, or you can take a ready-made stencil and print it or redraw it onto a base;
- Next, you need to glue buckwheat to the place where the needles should be. The easiest way to do this is to carefully spread glue within the contour, and then pour in the cereal.
- As soon as the glue has hardened and the buckwheat has stuck, you need to carefully remove the un-glued remains. You can stick buckwheat dotted into empty spaces.
Leaf applique: animals
Leaves are a fertile material for crafts. In the summer and autumn, you collect various natural materials (seeds, leaves, ears of corn, acorns, sunflower seeds, flowers), dry them (like a herbarium or in sand), and soak them in glycerin. The leaves turn out to be very brittle using the first method, and glycerin gives softness and flexibility, but changes color.
Any (animals, landscape, people, fish, birds) develops imagination, thinking, logic. The child learns more about the plant world, the properties of natural materials, and ways to interact with them.
Here are some options for making rodents. For the mouse you will need birch, clover, elm leaves, dill or flax seeds, and blades of grass. Glue the birch leaf with the tail down (this will be the body). Place a small elm leaf without a tail on the body. Glue on the clover ears, and then the elm head. You use the seeds to form the eyes and nose, and the grass is useful for the mustache. It turns out to be a full-face view of the mouse.
If the head sheet is positioned perpendicular to the body, then the mouse will be in profile. Glue on the paws, tail, ears, eyes, and nose accordingly. If necessary, adjust the shape of the sheet with scissors.
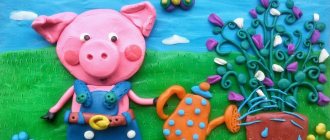
Piggy
Even a preschooler can handle such a simple craft. With the guidance of your parents, you can easily create a funny pig. By the way, such a craft can even be converted into a cap, because its shape allows this.
To work you will need:
- Cardboard or thick pink paper;
- Glue;
- Scissors;
- Felt pen.
Operating instructions:
- For the base you will need a pink paper cone. To fold a cone, you need to draw a circle and divide it into 2 halves, cutting out one of them;
- From this half of the circle you will need to form a cone, adjusting its thickness when gluing;
- The base is ready, now all that remains is the details. Ears, snout, tail and eyes are cut out from pink cardboard. The pupils can be drawn with a black felt-tip pen.
- All parts are glued to the piglet. Below you only need to draw on the mouth, and the craft is complete.
- If you thread a thin elastic band inside the craft, you will get a festive hat.
Application made of cotton wool “Sheep” for the middle group
Application made of cotton wool “Sheep” for the middle group.
Target
: development of creative abilities
Tasks:
Educational
: learn to place decorative elements (lumps) in certain parts of the silhouette. Systematize children’s knowledge on the lexical topic “Domestic animals and their cubs”
Developmental
: develop spatial and figurative thinking, fine motor skills.
Educational
: cultivate a love for animals.
Preliminary work: repeat the topic “Domestic animals and their cubs” with the children. Ask what benefits sheep bring. Consider sheep wool products, illustrations; draw a sheep, sculpt it from plasticine.
Materials
: cotton wool or cotton pads, blue and black pencils, PVA glue or glue stick, thread, coffee beans, green napkin, paper, scissors (if the thread is cut in advance, they are not needed)
If necessary, we discuss with the children the technique of working with glue.
Safety precautions when working with glue 1. Handle the glue carefully.
2. Apply glue to the surface of the product only with a brush. 3. Do not let glue get on your fingers, face, especially eyes. 4. If glue gets into your eyes, rinse them immediately with water.
5. After finishing work, be sure to wash your hands and hands. 6. When working with glue, use a napkin.
Progress of the lesson
Hello children, our sheep recently got her hair cut, so she now has short fur, let's give her a beautiful white coat. To do this, take some cotton wool and roll it into lumps. We use smaller clumps for the sheep's hair to give it beautiful fluffy bangs. And we use larger lumps for the body. Now let's take the glue and smear it on the sheep's head. Let's glue our little lumps onto it. Our sheep's hairstyle is ready. Let's start with the body. We will also coat it with glue and glue large lumps. Now let's take a thread and make legs for our sheep. We coat one end with glue and glue it to the coffee bean, coat the other end and glue it to the sheep. We took a coffee bean because it looks like a sheep's hoof. Our first leg is ready, let's move on to the rest. Our legs are ready. Let's take a black pencil and use it to decorate the sheep's tail, ears and eyes. While we were making a fur coat, our sheep got hungry. Let's make her some juicy grass. To do this, take a napkin, tear off a small piece and roll it up a little, then spread it with glue and glue it at the bottom of the sheet.
Hurray, our sheep is ready, all that remains is to draw the sky for it. To do this, take a blue pencil. What is your sheep's name? What does she like to eat? My sheep loves carrots. Let's hang our sheep so everyone can admire them
Hedgehog
To make a hedgehog you will need:
- Toilet paper roll;
- Brown cardboard;
- Orange cardboard;
- Scissors;
- Glue;
- Felt pen.
Operating instructions:
- A toilet paper roll is covered with orange cardboard - this will be the body of the hedgehog;
- From brown cardboard you need to cut an oval of such a size that it protrudes beyond the body.
- Trim the edge with a zigzag to create needles;
- Then the needles are glued to the body, a muzzle is drawn - eyes, nose and mouth;
- You can also cut out two small strips from orange cardboard - these will be the hands of the hedgehog.
Anteater applique
Anteater Facts:
- They are edentulous animals, meaning they have no teeth at all.
- Anteaters use their long tongues to swallow 35,000 ants and termites every day!
- They find food by smell.
- Anteaters live in tropical forests and grasslands of Central and South America.
- They live for about 14 years and are classified as endangered.
Photos of animal appliques
Origami
How to make paper animals with your own hands without glue or tape?
Origami is a technique of folding shapes. The complexity ranges from the primitive “frog” to infinity. Even an older child will need help if he decides to master origami.
The main thing is to stock up on double-sided colored paper and patience. Step-by-step origami instructions can be found in special manuals.
Origami is an oriental technique that often features wild animals and mythical creatures: crocodile, lion, tiger, cobra, dragon.