Applique is one of the most common types of creativity. It allows children to explore the world around them, gives them an idea of the color, shape, and size of objects. Classes contribute to the diversified development of the child.
One of the jobs offered in preschools is mushroom appliqué. Depending on the complexity and the chosen technique, it is offered to children in the junior, middle and senior groups.
Application options for different ages
Mushroom applications are distinguished by the variety of materials used and the complexity of the work. The teacher chooses an option depending on the abilities and age of the children.
- Junior and nursery group. This category includes children aged 2 to 4 years. The works are characterized by simplicity and lack of details. Number of elements 2-3. All templates are prepared and cut out in advance. The children's task is to smear the parts with glue and glue them in the correct sequence.
- Middle group. This category includes children aged 4-5 years. The application becomes more complex, the number of details increases, and a plot is present. Work can be aimed at studying size and counting. The use of different techniques is allowed.
- Senior group. This category includes children over 5 years old. The works are offered with a variety of details; voluminous crafts and various compositions are of particular interest. For example, a hedgehog applique with mushrooms. The pieces invite children to draw and cut out themselves. At this age, they practice the skill of drawing from a template and cutting out.
To make the work interesting for children, experts recommend choosing bright colors of templates and a variety of subjects.
What can be added to the application?
You can wonderfully complement the mushroom composition with the help of drawing and modeling. For example, children can add butterflies, bugs, raindrops or leaves falling on mushrooms with paints, pencils or felt-tip pens.
By the way, this is how you can implement an individual approach in class. The guys who quickly and efficiently complete the main task will have something to do.
A very interesting idea is to invite children to trace their palms with a felt-tip pen: their fingers will become legs for a family of honey mushrooms or simply for a fantasy mushroom composition. A cut out cap is then glued onto each leg. A basket is made at the bottom or grass is indicated.
As always, you can combine applique with modeling. For example, plasticine can be used to mark white spots on the cap of a fly agaric.
Fly agaric spots are marked with white plasticine
Paper applique
The paper mushroom applique features a variety of techniques and examples of work. Children can be offered classes of varying complexity, aimed at both the youngest and older ages.
To work you will need:
- mushroom template for applique (this can be a separate mushroom or a composition of several elements);
- colored paper;
- napkins;
- scissors;
- glue;
- colour pencils.
Applying templates
The easiest way to create a paper mushroom applique is to use ready-made templates. For the lesson, you will need to prepare in advance sheets on which the details of the mushroom are printed.
Such classes are suitable for younger and middle groups, where the task is to teach children to create a composition of 2-4 parts. The number of blanks should be 2-3 more than the number of children.
The work is carried out in several stages.
- Children are shown a sheet with printed patterns. They discuss every detail, what it looks like, what part of the mushroom it is.
- In the middle group, where children own scissors, they cut out the blanks on their own.
- All parts are laid out on a sheet of colored cardboard. If the picture is correct, then the template is glued to the base.
The use of different compositions allows you to make the work more complex and interesting. You can invite the children to make an applique of a basket of mushrooms or mushrooms on a forest edge.
Tear-off technique
For the development of fine motor skills and the formation of a finger grip, the tear-off technique is of interest. It is based on tearing off pieces of paper that are used to fill out a template.
To apply a mushroom cutout, you will need to prepare a template with an outline, colored paper and glue. The mushrooms should be in the form of a black and white outline, the hedgehog – colored.
Sequence of work:
- Children carefully study the picture. It could be a mushroom in a clearing, a hedgehog with mushrooms, or any other picture. The mushroom is not painted.
- The teacher explains that the children’s task is to fill in the outline of the mushroom. The stem is with pieces of white paper, the cap is brown.
- Children prepare pieces of white and brown paper, opening from a large sheet.
- The prepared pieces are glued with glue (it is better to use a pencil) onto the template.
The complexity of the work and its size are chosen depending on the age of the children.
Lump technique
The lump technique is more suitable for older children. To implement it you will need paper napkins (white and brown or red), glue and a mushroom template.
Sequence of work.
- The teacher explains to the children the features of the technology. To work, you need to prepare a sufficient number of lumps. To do this, open a piece of the napkin and roll it into a ball.
- Children carefully study the pattern. They explain what color the hat is made and what color the leg is made.
- Glue is applied to the leg (PVA is better). The lumps are evenly distributed over the smeared surface and lightly pressed down.
- The steps are repeated with the mushroom cap.
Children in the middle group can be asked to fill only the hat using the lump technique, and color the leg with colored pencils.
Applications for the middle group
For slightly older children, tasks are available that have a larger number of elements, provided that these parts are large enough.
Senior group
For classes in the senior group you will need the following set of materials:
- a sheet of thick paper (or cardboard) as a base;
- sheets of colored paper with drawn squares and circles;
- a sheet of paper with drawn outlines of whole mushrooms;
- a sheet of red paper (future berries), a sheet of green paper (for a branch of berries), a sheet of white paper (for dots of fly agaric);
- colour pencils;
- glue;
- glue brush;
- napkins.
The teacher prepares in advance a version of crafts, rhymes and jokes on the topic, colorful pictures of forests, forest edges, and different types of mushrooms (edible and poisonous).
The procedure for conducting the lesson.
- Children are given a “tour” through the forest using pictures.
- Explain the difference between edible, inedible and poisonous mushrooms. They explain that although poisonous mushrooms are not eaten, when walking in the forest they should not be kicked or knocked down with a stick, since they serve as medicine for animals and decorate the forest.
- They suggest choosing the color of paper for the caps (for example, for fly agaric - red, for edible ones - gray, brown).
- Cut out circles from selected sheets of paper - blanks for hats.
- They show how to make two hats from one circle: fold the circle in half, smooth the fold line well with your fingers, straighten it, cut the workpiece along the fold line.
- They show how you can get two legs from one square: fold the square in half corner to corner, iron the fold line with your fingers, use scissors to round all four edges of the rectangle, bend it and cut along the fold line. They say that this method of cutting is called paired, so you can get two identical appliqué parts.
- Cut out the currant berries. You need a lot of them, so they show you how to cut two or four berries at once: fold a sheet of red paper in half or four, draw a circle - a currant berry, cut this circle with scissors, getting two or four berries in one cut.
- Just like the berries, cut out white circles - fly agaric specks.
- They tell you how to cut out a whole mushroom using a ready-made template. They explain that this template is easier to color first and then cut out. Color the cap and stem with different colored pencils and cut out along the outline.
- Cut out a currant branch from a green sheet of paper according to a pre-drawn template.
- They show how to cut grass from a strip of green paper: make paired cuts diagonally along the upper edge of the sheet.
- Place the applique details on the base sheet. They say that complex parts (a currant branch with berries and a fly agaric cap with specks) can be glued in different orders: first prepare the entire part by gluing specks on the cap and berries on the branch, and then glue the part to the base, or in the reverse order.
- Glue all the prepared parts onto the base.
- They show a little secret: the currant branch can be slightly under-glued and bent a little. Then the application turns out to be voluminous and the currant branches sway like real ones.
Children often make the mistake of cutting off the cap from the stem of the mushroom. In this case, it is best to explain that what happened is easy to fix. To do this, glue the cap and stem of the cut mushroom separately.
Mushroom from cereals
You can teach children to make a similar applique (described above) from semolina with their own hands.
- When working on the mushroom stem, instead of gluing the brown material, you should sprinkle the cereal thickly. Make sure there are no voids left.
- Semolina is also sprinkled on the cap. When the glue dries, paint the top of the mushroom red.
- Specks of a poisonous mushroom are decorated with small pieces of white paper.
- You can glue several blades of grass under the fungus to make the whole composition more natural.
Possible options
To develop the imagination and fine motor skills of children, parents and kindergarten teachers use a variety of compositional structures and materials for creating applications.
In the photographs of the applications, mushrooms can be seen next to squirrels, hedgehogs, bunnies and other animals. The work is carried out from cardboard, corrugated paper, napkins, ropes, etc.
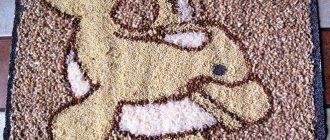
Bulk applique of cereals
Craft “Boletus Mushroom” – applique made from cereals. She develops perseverance and accuracy in her work. Cereals are poured onto parts soaked in PVA glue. The task develops fine motor skills, creative abilities and imagination of children.
This technique is proposed to be used in the middle and senior groups of kindergarten. Bulk appliqué is also recommended for extracurricular work and home practice (during vacations and weekends).
To work you will need:
- base (a sheet of colored cardboard in A-4 format or a small piece of sanded plywood);
- paper for the template on which glue will be applied;
- dark-colored cereals (buckwheat);
- semolina or other light cereal;
- split green peas;
- PVA glue with a brush;
- scissors and pencil.
Completing of the work:
- Cut the mushroom according to a template or any shape, with recognizable contours of the boletus mushroom.
- Glue the stem and cap in the center of the base.
- When the template is fixed, saturate the surface well with glue.
- Sprinkle the coated mushroom cap with buckwheat or other dark-colored grains. If gaps have formed, lightly brush with glue, pour in the cereal and press lightly with your palm. Shake off any excess when the glue has set.
- While the cap dries, soak the stem with glue. Sprinkle semolina or finely ground light-colored corn grits onto it. Brush off excess.
- Apply glue in random order under the mushroom, depicting grass. Pour split peas onto the soaked base (they can be ground in a coffee grinder or cereal crusher). After drying, the work is ready.
Note! If in your picture the cap is open, the pulp of both the top of the porcini mushroom and the stem should be covered with a different type of cereal.
Fungus applique from autumn leaves
Teachers have developed many interesting autumn-themed techniques, including an image with a porcini mushroom and fly agarics.
Helpful advice! Upon completion, complement the traditional “mushroom-boletus” work made of colored paper with natural materials. Small autumn leaves of different colors, acorn caps, and dry berries will add a “natural” look to the picture.
To add variety to the plot, complement the composition with beaded raindrops, or a butterfly flying over mushrooms. The basis of the autumn composition should be small autumn leaves.
Mushrooms from dough
To work, you need to prepare the dough. You will need half a glass of finely ground salt. Hot water is added to the glass with salt and the whole mass is kept in this form for an hour. After this, the solution should be poured into a bowl and add 2 tbsp. PVA glue for fastening strength, as well as flour. A novice master will be required to knead a thick dough.
The stem of the mushroom needs to be formed around the base in the form of a foil rod. The hat can also be wrapped around foil, or you can sculpt it without it. To secure it to the leg, treat the attachment points with water. The molded mushroom craft from salt dough is sent to the oven and dried over low heat for 10-13 hours.
If the composition is very large, then first the stem is dried for an hour and the cap separately, which must then be fixed hot on a support. After fastening, the entire structure goes into the oven. It is recommended to dry the extracted mushroom naturally, for example on the balcony.
Facing technique
This technique for making crafts looks unusual and very beautiful. It is not difficult to do this, but it is quite painstaking. It is work on such crafts that is needed to develop hand motor skills. The child learns patience and accuracy. The finished mushroom is voluminous and has an unusual texture. They can decorate a room for a themed holiday or put it on a shelf in the living room to simply please the eyes of the household.
To make this craft you will need the following materials:
- corrugated paper in yellow, green, red and white;
- a ready-made tube (can be from a roll of toilet paper) or a twisted cardboard tube;
- scissors;
- paper glue;
- green cardboard;
- a sheet of white paper;
- pencil;
- ballpoint pen refill or wooden skewer.
How to do the craft:
1. Cut a rectangle of white paper to cover the sleeve. Make a circle for the hat, the right size. Divide it into 4 sectors and cut one.
2. Roll the circle into a cone and seal the edges.
3. Cut small squares from corrugated paper - side 1 cm. You need red and white colors. Draw many circles on the cap of the future mushroom to indicate white spots.
4. Perform manipulations with each square using the trimming technique: place a skewer in the center of the square, press the tip with your finger and scroll the paper in different directions. The piece should resemble a crumpled bag. Apply glue to the tip of such a bag and attach it to the mushroom cap. Starting from the top of the cap and moving down, cover the entire cap with blanks, skipping the drawn circles. Then fill them with white parts.
5. Cut a circle out of green cardboard; this will be a clearing. Attach a paper sleeve to it. Fill the clearing with green grass and yellow “dandelions” made using the same technique.
6. The final point is to secure the mushroom cap to the stem with glue.
You can liven up the mushroom a little by drawing or gluing eyes and a smiling mouth on the stem.