Simple craft for kids
You will need: models of circles from multi-colored double-sided sheets or candy wrappers, glue, a prepared fish template, made by yourself or printed on a printer from the Internet.
Children glue overlapping circles of different colors onto the workpiece (torso). Here the guys will be able to act not very carefully, which will not affect the quality of the application and their mood.
Aquarium fish
This task is for the older group of kids, but younger children can also cope with it with the help of adults.
You will need: a white piece of paper or cardboard, a set of multi-colored double-sided paper, glue, yellow and blue paints, a sponge (you can take it for dishes), scissors, ready-made self-adhesive eyes (sold in craft stores).
You can take cardboard or a white piece of paper and paint the background blue and yellow. This way you can differentiate between the sandy bottom and the water in the aquarium. Children can do this entire procedure with a sponge. They will like this kind of work. Next comes the work of preparing the blanks.
Fish can be cut out of colored paper according to a prepared template or sketches. Also do everything with algae, cutting them out of a green leaf, corals from brown or pink, and pebbles can be multi-colored.
To make the composition sparkle with bright colors, you need to distribute the details on the dried cardboard.
Such a fun craft can be placed in any room, and it will cheer up both children and adults.
Application “Aquarium with fish”
This application is as simple as possible, so it is suitable for classes in both senior and middle groups. Before making blanks, you should select all the necessary materials.
Here you will need:
- colored double-sided paper;
- glue;
- gouache yellow and blue;
- sponge;
- scissors;
- ready-made eyes (sold in craft stores).
First, prepare the background for your aquarium. For this application, the best option would be yellow sand and blue water. Using a sponge, apply gouache evenly onto a white sheet of paper. In the older group, this process can easily be entrusted to children. But the middle group will not do without the help of adults. Prepare elements for the future application. Of course, you can’t do without colorful fish. They can be printed and cut out using a ready-made template. To create a beautiful composition in the aquarium itself, also make corals from brown paper. An excellent addition to the picture will be algae and sea pebbles of different shades. All that remains is to distribute the finished parts throughout your aquarium. Glue the fish evenly around the entire perimeter to make the design bright. Thanks to this step-by-step tutorial, you can make such an unusual aquarium with your older group. Of course, children should like this sea-themed craft. These colorful fish can decorate a group at any time of the year. They will please the eye and create a creative atmosphere around.
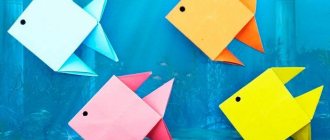
Volumetric fish
You will need: a blue sheet of paper, multi-colored corrugated paper, a toothpick, glue, fish figurines (you can draw, print or take them from coloring books), scissors.
Cut the corrugated paper into small squares. Screw each square onto a toothpick, the work is painstaking. Place the blank figures on the blue piece of paper.
Cover each part of the fish’s body with twisted squares, and then fill the rest of the space of the figure tightly. Then you can add a diverse underwater world to the sheet: algae, pebbles from corrugated squares.
You can also paste over the background with different shades from blue to light blue of the corrugated sheet.
In the same way you can make one large fish. Such applications turn out amazingly beautiful.
Hanging fish
This original craft can decorate a group in a kindergarten, a classroom at school or a room. You can conduct a master class on this craft, which will show children’s imagination not only in production, but also in decorating the space.
You will need: a ruler, scissors, a pen with black paste, a pencil, glue, a set of sheets of yellow, green, orange, red, white, thread.
For the details of the fish, you need to take paper. For example: from a yellow piece of paper, cut out a blank for the body in the form of an elongated oval with tapered ends. The tail can also be cut from an orange sheet, but smaller in size than the body.
The mouth is made from red stripes, and from the green one, make a blank for the fins, also in stripes. The eyes are prepared from a white piece of paper, the pupil is drawn with a pencil or black pen. The part for the body must be folded in half and the ends glued together; the figure should be in the shape of a droplet.
Glue the orange blanks for the ponytail together as well. Glue the tail to the body, with the tapered ends facing each other. Strips of red and green colors must be rolled into tubes and glued together.
Two red tubes are glued to the front of the fish. The sponges are ready. Glue green tubes on top and bottom of the body - these are fins. Then the eye blanks are glued.
It is better to make several colorful fish in this way. Attach these figures to strings and hang them up.
Goldfish applique
Everyone knows that goldfish make wishes come true. You can use various materials to make it; several information catalogs are available on the Internet. It’s both a pleasure to make such a craft and to give it as a gift.
You will need: cardboard, sheets of yellow, white, black, pink and orange (preferably glossy), glue, scissors.
We make a circle out of cardboard, you can use any template, a compass, and even a saucer can be traced. Also cut 2 circles from the yellow and orange sheet. Glue the yellow circle onto the cardboard shape.
It is necessary to cut off a quarter of the orange part in a semicircle. This will be the torso. Glue an orange one onto the yellow circle, the goldfish will have a yellow head and an orange body.
Next, cut out the tail and fins from the yellow sheet, you can use the template. Cut out the eyes from a white sheet, and the pupils from a black sheet and glue them onto the fish. To decorate, cut out small triangles from yellow or gold paper and glue them onto the orange body of the fish.
Lesson on artistic creativity of appliqué in the senior group “Beautiful fish in the aquarium”
Kulkova Yulia
Lesson on artistic creativity of appliqué in the senior group “Beautiful fish in the aquarium”
Lesson topic: “Beautiful fish in the aquarium”
Direction : artistic and aesthetic.
Educational field : artistic creativity.
Program content and purpose of the lesson: to develop color perception; exercise children in selecting different shades of the same color; develop a sense of composition (learn to beautifully arrange the details of a composition - fish, algae, stones); reinforce cutting and gluing techniques.
Equipment and materials: colored cardboard, colored paper, glue stick, scissors, felt-tip pen (pencil).
Preliminary work: conversation about the underwater world, reading stories about fish, looking at plot paintings on the theme of the underwater world.
Progress of the lesson:
Organizing time:
— Guys, you can find out the topic of our lesson by guessing the riddle:
This house is not wooden, this house is not made of stone,
It's transparent, it's glass, there's no number on it,
And the residents in it are not simple, not simple, golden,
These same residents are famous swimmers. (Aquarium and fish).
- Let's talk about what is in the aquarium and who lives in it. How many of you have an aquarium at home?
What's at the bottom of the aquarium? (pebbles, shells)
What shape are they? (round, flat, oval, shells with curls)
Who lives in the aquarium? (fish, snails)
What shape is the body of the fish? (oval)
What is the fish's body covered with? (scales)
What helps fish when swimming? (tail and fins)
What do fish eat? (algae, special food for fish)
What color is the algae in the aquarium? (green)
- Guys, you are great! I suggest you make your own aquarium and place beautiful colorful fish there.
Main part:
We divide a sheet of blue colored cardboard into two equal parts - this is a blank for our aquarium. Using scissors, carefully round the corners at the bottom of the cardboard sheet and give it a shape. We also prepare sheets of colored paper of different colors: brown for pebbles, green for algae, pink, red, yellow, orange for fish. We will also need scissors, a glue stick, and a black pencil or felt-tip pen.
We prepare the main parts of our composition. We carefully cut out round pebbles from brown colored paper; to do this, we fold the sheet of paper several times. We also cut out the algae - fold a sheet of green paper in half or three and cut out the underwater grass.
Let us repeat the rules for safe handling of scissors: you cannot take scissors without the permission of the teacher; cut by holding the scissors with the blades away from you; When passing scissors, hold them by the sharp edge.
Don't joke with scissors
Don’t twist them in your hands in vain,
And holding by the sharp edge,
Give them to a friend.
Now we prepare the blanks for the fish. We will have unusual fish - from squares of colored paper, a large square - the body of the fish, a small square, divided diagonally - its tail. Moreover, if the fish and the tail are of different colors, the applique will turn out even more colorful!
Physical education minute:
The fish swam and splashed (children depict swimming fish with their hands,
In a clean, warm stream.
They squeezed, unclenched (they squeeze their fingers, unclench,
Then they suddenly buried themselves in the sand (they show movements with their fingers, as if they were digging in the sand).
Now we place the parts of our composition in the aquarium - on a sheet of blue cardboard: pebbles from below, algae and beautiful fish. We look at the sample, but we are not afraid to add our own original detail - perhaps the arrangement of the stones will change, or there will be more algae, the fish can swim either towards each other or in different directions.
The next step is gluing the parts of the composition onto cardboard. We glue stones, fish and algae carefully, you don’t need a lot of glue, we sit straight when gluing the parts, and take care of your posture!
After the composition is completely assembled, let's bring our colorful fish to life. To do this, use a colored or simple pencil to draw the fish’s eyes, fins and decorate the tails.
Result of the lesson: evaluation of finished works. All the guys are great!
Accordion fish
This accordion applique is easy to make, but the result is very impressive.
You will need: colored paper sheets, glue, scissors, white and black paper, blue cardboard.
Cut a wide strip. This will be the torso. We bend the workpiece horizontally like an accordion, then fold it in half and the fish will be in the form of a fan. We glue the fold so that the part holds better. We straighten the fan and glue it onto blue cardboard.
We do the same from another colored paper - this will be the tail. We glue it to the body with the narrow end to the wide part of the fish’s body. The applique is voluminous due to the fan-shaped fish.
The fin can be cut out of paper in the form of a quarter circle and glued in the middle closer to the head. We cut out the eyes in a circle from a white sheet, and the pupil from a black one. We fasten the parts together and then onto the applique.
These fish can be made in many different colors and sizes.
Summary of a lesson on application in the senior group on the topic “Fish in the Aquarium”
Summary of a lesson on application in the senior group on the topic “Fish in the Aquarium.”
Target:
Formation of the ability to convey in applique the image of fish, features of the shape of the body, tail (cutting out in parts).
Tasks:
— Summarize children’s knowledge about the underwater world and fish;
— Develop fine motor skills by using familiar cutting techniques (cutting circles from squares, ovals from rectangles, transforming some geometric shapes into others - a square into several triangles);
— To cultivate perseverance, independence, accuracy, to continue to build self-esteem in students;
Materials:
pictures of fish, a model of an aquarium, blanks of geometric shapes made of cardboard, scissors, glue, threads.
Equipment:
tape recorder, audio recording “The Sound of the Sea”, blackboard.
Progress of the lesson:
- Organizing time.
— Guys, listen to the sounds of nature. (Audio recording “The Sound of the Sea”)
-Where can you hear such sounds? What are these sounds? (These are the sounds of water, sea).
- Who lives in the sea? (Fish, shells, jellyfish, etc.)
- How can you call them in one word? (Marine life)
—What can you call the world in which sea creatures live? (Undersea world)
— Leopold the cat claims that we can admire the underwater world without leaving home, what do you think? (children's answers)
House made of glass, with water,
There is a small garden in It. And shells here and there, Fishes live in the house. What kind of house is this, children?
Who will answer the riddle... (Aquarium)
— Has Leopold the cat prepared a gift for us so that we can admire the underwater world without leaving the group? (There is a model of an aquarium on the table)
— You can go to the aquarium right now and admire the underwater world. (The aquarium is empty, there is no one there).
- What do we do? (Make paper fish yourself).
2. Main part
- Look at the pictures with fish, let's take a look? How are all fish alike? (They have a body, tail, fins)
- Right. What shape is the body? (Oval)
- What shape can the tail be? (Triangular)
- What kind of fins do the fish have? (Triangular, oval, round)
- How many fins do fish have? (Two)
- How are fish different? (Color and shape of tails and fins)
— Today we will make paper fish in order to place them in our aquarium.
— In front of you lie cut out geometric shapes (rectangles, large squares, small squares). What do we need to do with the rectangles to get an oval for the body of the future fish? (The rectangle has rounded corners)
- What will we do with the large square to get a triangle - the tail of the fish? (fold the square diagonally and cut along the fold line)
— How to make a circle of small squares to make an eye for a fish? (Let's cut off the corners of the square)
- Great! We glue the finished figures together and get a fish, thread a thread into each fish and attach it to the aquarium.
— Before we fill the aquarium with fish, let's stretch our fingers.
Finger gymnastics
The fish swims in the water . Two palms together depict swimming movements.
The fish have fun playing. Clap your hands
Fish, fish, mischief, clap their hands
We want to catch you. The palms are clenched into a fist one by one.
The fish arched its back, a smooth movement with each palm.
I took a bread crumb. Grasping movements with a “pinch”.
The fish wagged its tail, Smooth converging and diverging movements with both hands.
She quickly swam away.
—
Now our fingers are ready to work. I am sure that with your abilities you will be able to make very colorful and colorful fish, which we will place in our aquarium. Let's get to work.
Practical activities (
The audio recording
“The Sound of the Sea” plays)
(The children begin to cut out. I check whether all the parts are cut out, whether the structure and location of the parts are correctly conveyed. During independent activities, I give the children advice, if necessary, I provide assistance).
3. Summary of the lesson.
- Look what a wonderful sea corner we have created for you! All the fish turned out different, bright, interesting.
— Did you like the lesson?
— What was the most interesting?
— Was it difficult? What was the most difficult?
“I’m pleased with everyone’s work today; everyone did their work with great passion and interest!”
Aquarium
The work on this craft is difficult and long. But the process is very exciting and creative. For the craft, you will need a box that will play the role of an aquarium. The size of the box for this volumetric application is chosen arbitrarily.
You will need: a cardboard box (can be a shoe box), multi-colored paper sheets, paints, a brush, scissors, glue, thread, decorative material.
The box needs to be made into an aquarium. To do this, you can paint the inside blue and the bottom yellow or cover it with paper of the appropriate color. When decorating an aquarium, it is worth showing the full flight of your and your children’s imagination.
You can take a photo from the Internet and use it to assemble a craft. For example, attach shells, pebbles or beads to the bottom, glue sequins or rhinestones (blue, silver) to the walls.
Cut algae and other aquarium vegetation from paper sheets, fabric, corrugation, or use ready-made plastic models. In addition to fish, you can add other sea creatures to the aquarium: seahorse, octopus, stingray, etc.
Templates for this must be prepared in advance and then painted on both sides or printed in color similar shapes twice and glued. Tie a string to the aquatic creatures and attach it to the top of the aquarium.
Create the impression of a real aquarium with sea inhabitants.
There are a lot of applications on the theme of the underwater world. As well as the material from which the craft can be made. These are paper, fabric, plasticine, leaves, etc. And there are a great variety of sea inhabitants.
If you show your imagination and prepare with the children, take care of the delivery of the material in advance, you can create real miracles. Thanks to such activities, children not only learn how to work, but also get acquainted with marine life.
Working together on a craft will give you fun creativity and a pleasant experience.
Application “Fish in an aquarium” step by step with photos. Senior group
Application “Fish in an aquarium” made of paper.
Master class with step-by-step photos for older preschoolers Master class for children, parents, educators, primary school teachers. Author: Selivanova Svetlana Sergeevna, teacher, MBDOU kindergarten “Rybka” in the city of Asino, Tomsk region. Purpose of the master class: making gifts, cards. Applique is one of children’s favorite types of visual arts. While doing applique, your baby will be busy. The process itself and its result will bring a lot of pleasure to the child. Children are pleased with the bright color of the paper, the successful rhythmic arrangement of the figures, and the cutting and pasting technique is of great interest to them. Paper applique for children can be a very interesting and educational activity. The baby develops and improves fine motor skills, which has the best effect on the child’s mental development. During the lesson, the child develops artistic imagination and aesthetic taste, as well as design thinking. Application is closely related to sensory perception and cognitive activity, which also has a huge impact on the development of children’s mental and creative abilities. The development of sensory perception is facilitated by paper processing operations: bending, cutting, tearing and tearing, gluing. Give the children a riddle: The residents of this house are all skilled swimmers.
What kind of house do they have, filled to the brim with water? DIY fish-shaped crafts are great for sharing the creative process with your child. It will not be difficult to make this application from a photo. Creative success! Application progress
Take two squares of different sizes. Fold them diagonally and cut them diagonally. As a result, we get two triangles. We will use the yellow triangle to make the body of the fish, and the purple triangle to make the tail. We fold these triangles like an accordion, starting from the base
Fold the resulting parts in half (from the base to the top). Glue the body and tail onto the cardboard base (choose blue cardboard). Glue the eye.
Glue the shells.
We add more fish, which we perform using the same algorithm class=”aligncenter” width=”627″ height=”470″[/img] We cut out algae from green paper and glue them onto cardboard. Our application is ready!
We recommend watching:
Application made from pencil shavings with drawing elements for children. Step-by-step instructions with photos Application for children 5-7 years old “Goldfish”. Master class with step-by-step photos Panel applique on an autumn theme. Master class with step-by-step photos for children with disabilities Applications with drawing elements for children of the senior preparatory group. Fish. Master class from to
Similar articles:
Modular origami fish. Master class with step-by-step photos for beginners