Theater is a magical world, which is based on an action that is understandable and close to children, such as a game. The sooner a child gets acquainted with the theatrical art, which can quietly teach and develop, the richer his emotions will be.
You can bring a child to the theater for the first time at the age of 2-3 years. And then make interesting crafts on the theme of “theater” and play at home or in kindergarten. All kids like theatrical play.
Important! Schoolchildren will be able to better understand what they saw during the performance if after the performance they make a craft with their own hands and try to reflect their experiences in it.
Puppet show
Puppet theater helps develop a child's speech, imagination, and fine motor skills. Every parent can make a home puppet theater with their own hands, especially if the kids take part in the exciting process.
A puppet theater is made from various available materials, such as:
- paper;
- disposable plastic tableware;
- felt;
- toilet paper rolls;
- socks;
- round cheese boxes.
Do-it-yourself dolls in a home theater can:
- put on a finger;
- put on the hand;
- be stationary.
Non-traditional types of theater
In addition to the usual materials for puppet theaters, alternative types can be used.
These can include plastic and wooden spoons. Images of characters are drawn or attached to them. When painting on plastic, you should use acrylic paint. If you have to paint with gouache, it is mixed with a small amount of PVA glue.
Interesting options are made from yogurt jars and plastic bottles. They are covered with colored paper, images of characters are attached and fragments of scenery are added. The results are voluminous mini-stories. Such figures do not require additional decorations and develop children's imagination.
Playing theater is a useful and interesting activity. It improves memory and develops oratory skills. The child learns to retell the text, highlight the main points, not be afraid of public speaking, and parents have the opportunity to discern the child’s talents.
Felt
This dense fabric is great for making finger puppet theaters. You will need:
- multi-colored felt;
- scissors, thread, needle;
- cardboard.
Felt dolls should be the size of a child's finger, so you need to attach the child's hand and trace it. Let the child draw the characters himself, mom or dad will just have to make a pattern from this, transfer it to felt and sew the parts. Elements of the dolls' faces or muzzles can be glued on.
It’s easy to sew felt theater characters by watching the video with the master class.
The scenery for such a theater is made using felt sheets of A4 format.
Progress:
- Draw a pattern diagram of the scenery (forest, house, field).
- Cut out all the details and sew them onto the front side of the felt base sheet.
- Sew two sheets together on three sides: a base with decoration and a backing sheet of A4 felt without decorations.
- Insert a sheet of cardboard cut to size through the unsewn bottom side. The cardboard should protrude 5-7 cm from the bottom.
- Fold the excess cardboard to make a stand.
Felt doll
Will need
- Sketch of a puppet toy.
- Two sheets of felt, A4 size.
- Small pieces of colored felt.
- Thread and needle.
- Glue gun.
- A sheet of thin cardboard.
We start work by creating a pattern. To do this, draw the sketch onto a sheet of cardboard and cut it out. You will get the main pattern of the figure and individual small details: eyes, muzzle, palms, tummy, ears. The number of details depends on the choice of sketch of the puppet hero.
Then we transfer all the details onto felt. We select the color scheme according to our taste or the content of the fairy tale. The hare can be white, gray or pink, and the fox yellow or orange. If you are doing a craft with your child, let him choose what color the characters in your play will be.
We cut out the parts and pre-assemble the toy, placing all the parts in the places where they should be. If the result is satisfactory, we begin the final assembly. First, we make one main piece out of felt. We sew on all the parts that can be sewn. We sew with a buttonhole stitch. We glue small parts with a glue gun. We put all the parts together in accordance with the sketch.
If the toy has ears, we attach them last. To do this, we fold the two main parts with the right sides facing inward. We apply the ears in such a way that the edges of the part coincide with the edges of other parts, and the tips of the ears look inward. We sew all the details along the edge with a buttonhole stitch and turn the toy inside out. The glove puppet is ready, and the ears will stick out funny on the top of the head.
Paper
This is the easiest way to make a do-it-yourself puppet theater.
Option 1
Draw fairy tale characters on a piece of thick paper. Cut them out and glue them on the wrong side onto cocktail tubes, ice cream sticks, and pencils. Cut out the front side of a children's lunch box to make a screen. Make a slot in the lower part where sticks with heroes will be inserted.
Attach a ribbon to the top of the box and the theater is ready. The child can hang the box around their neck or on a doorknob and perform the show.
A master class will help you create such a theater:
Option 2
Glue together a tube from paper - the torso of a theatrical character. The size depends on whether the doll will be worn on the hand or on the finger.
Glue the muzzle/face elements onto the tube.
Option 3
You can take ready-made toilet paper tubes and decorate them using colored paper.
Shadow play
Setting the stage
List of required items:
- Scissors
- Small ruler
- Simple pencil
- Stapler
- Glue stick
- Cardboard box. Preferably with a width of 15 cm.
The long side of the box must be separated. The process produces a rectangle with one flat plane. It is necessary to measure five centimeters from the edge. Then the screen frame is drawn and cut out. Using a stapler, the coals are fastened in such a way that a structure in the shape of the letter “L” is obtained. Everything unnecessary is cut off.
Then you need to measure, with an allowance for gluing, the paper that will cover the screen. The sides are glued. And the top of the screen can be secured with a stapler.
Characters
Tools for making characters:
- Pencils
- Cardboard
- Scissors
- Stapler
- Drink straw
In addition to characters, you can also make scenery for the theater. Characters are drawn on cardboard. Then they are cut out. Afterwards, the characters must be secured to the straw using a stapler.
Glove
The glove doll should fit snugly on the hand; to do this, having determined the comfortable position of the fingers in the glove, a pattern is made.
To make a doll - the Russian jester Parsley - you will need:
- fleece for the body in 3 colors;
- filler;
- yarn;
- modeling paste or plasticine;
- scissors.
Progress:
- The head is formed from modeling paste or plasticine. A cardboard tube according to the size of your finger is inserted into the middle. Yarn hair is glued.
- Using the mitten pattern, make Parsley's clothes, sew them, insert cardboard tubes into the handles. They are filled with filler and secured with glue.
- Sew a cap and glue it on your head.
Video on how to sew a glove doll:
Important! To sew a puppet theater, it will take time and patience, but the result will delight the kids - their favorite fairy tales will come to life at home, and parents and their children will be able to come up with new exciting stories.
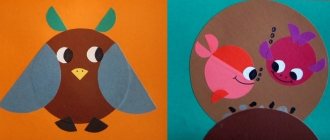
Sock theater
Sock characters are funny, because on a long neck they only have a head with an opening mouth. Geese, snakes and fantasy characters are made from socks.
Interesting theater-themed crafts can be made from plastic spoons, empty plastic cans and much more. Competition at school
School crafts on a theater theme can be made using different techniques.
Option 1
A three-dimensional applique is suitable for a school competition.
You will need:
- colored paper and cardboard;
- velvet fabric;
- glue, stapler.
Progress:
- Print the facade of the Bolshoi Theater and the ballerina.
- Fold the A4 sheet in half, stick a printout of the facade on the top, decorate with columns made of paper (screw it onto a tube).
- Decorate the inside of the folded sheet with velvet, and stick a ballerina figurine on top.
Option 2
A miniature theater with your own hands will attract the attention of spectators who will examine the crafts.
You will need:
- small rectangular box;
- fabric, twisted cord;
- chenille wire;
- plasticine, threads;
- decor – voluminous stars, sparkles.
Progress:
- Decorate the box as a stage. To do this, cut off one of the wide sides of the box to create a stage. The inside is covered with white paper, the floor is made brown or green.
- A small horizontal curtain is placed above the fabric stage; the side parts of the curtains are decorated with fabric. The folds are draped and secured with a twisted cord. They also cover the top of the box to disguise the connection between the fabric and the cardboard.
- The body of the characters is made of plastic, plasticine, self-hardening mass; arms and legs are made separately from the same materials. They are attached to the figurine with chenille wire. Threads are attached to all parts of the figurine, which are led up into the wings, where they are secured. The result is a puppet figurine.
Option 3
Many schoolchildren are interested in origami. This is an excellent material for creating crafts for a competition.
You will need light green, blue and purple stripes, a ready-made mask, glitter glue, and acrylic paints.
Progress:
- Design a mask. Draw the eye in black and the mouth in blue. Around one eye, make fancy patterns of blue and purple colors. Add glitter.
- Roll paper into rolls and make petals.
- Place a mask on the base—a sheet of cardboard—and place rolls and petals around it. Decorate with sparkles.
Option 4
Almost every home has a lot of scraps; they will be useful to make a bright panel on a theatrical theme.
Having determined the plot, they make a full-size diagram of the future panel and select scraps of different colors and textures. Elements are cut out from them and sewn on by hand or by machine.
The combination of flat and three-dimensional elements on a panel looks interesting; knitted or sewn parts are suitable for this.
Option 5
High school students will love the collage idea. The frame is used as a basis, the backdrop is covered with canvas.
The frame can be:
- made of wood, narrow or wide;
- antique tinted;
- baguette with patterns, painted gold.
The frame is decorated with old theater posters, programs, printed faces of actors, masks, and dried flowers. The edges can be decorated with fabric curtains.
Secrets of successful theater productions
How to make a paper theater more durable? After all, paper parts often tear and become unusable. And, most likely, this will happen after the first production of your play. Here is another option for making a theater at home, which, although more time-consuming, will last longer.
The first stage of production remains unchanged - we find templates (you can even draw them yourself if there are no ready-made ones). We print them on a color printer. Then we cut out the largest decorations, glue them to cardboard and additionally seal them with tape - this will add strength to them, and they will not get dirty.
Then we start making fairy tale heroes. At this stage we will need additional materials, namely:
- Small plastic jars for yoghurts like Rastishka or Agusha.
- Wooden ice cream sticks (if you don’t have them, plastic forks or spoons will also work).
- Stationery knife.
We cut out the characters and glue them onto a cardboard base. If your paper is quite thick, then you don’t have to do this. But most often, thicker paper is not “grabbed” by the printer for printing. Keep this in mind and try using different paper weights in your printer.
Be sure to tape it with tape to prevent the parts from fraying. Then we take ice cream sticks or plastic spoons and tape them with tape to the back of the paper blank so that the stick is “behind” the hero and has a free part at the bottom (3-4 cm). Using a utility knife, we make two cuts on the bottom of the yogurt jar - you should get a cross - and then simply insert the stick with the doll into this hole. All is ready! You can start playing!
As you can see, a home theater is a great way to diversify a child’s leisure time without much expense, because printing and cutting out the templates is not at all difficult. In addition, this is a good option for spending time together, which children always like, and also strengthens family relationships.
Competition in kindergarten
Kindergartens often hold competitions, including on the theme “theater”.
Option 1
Most kids aged 3 years and older love to make things out of Lego pieces.
Lego is also useful for creating crafts on the theme of “theater” with your own hands.
You can build a stage and place puppet actors on it:
Another option for using Lego is to make a shadow theater.
Progress:
- You will need Lego elements, a Duplo Lego plate, a white A4 sheet, and a flashlight.
- Use Lego pieces to make a small stage, decorated with decorative elements, with side columns.
- Place a sheet of paper between the columns.
- Behind the sheet, make another scene on which the characters will be displayed.
- Place the flashlight so that the light falls on the figures.
The theater is ready for performance!
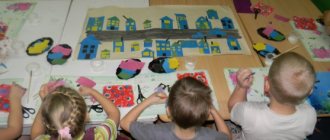
Option 2
Children aged 4-6 years will be happy to make theatrical appliqué from paper and scrap materials. The application is dedicated to the heroes of the fairy tale “The Three Little Pigs”.
Progress:
- Prepare materials - sheets of multi-colored cardboard, scissors, glue, as well as straw and sticks.
- Cut out 3 piglets from pink cardboard.
- Cut out templates of 3 houses from white cardboard. Each house should be decorated differently. Cover one with straw, the other with sticks, the third with bricks cut out of brown cardboard. Don't forget to make the windows and doors out of blue cardboard.
- Glue the parts onto a sheet of bright cardboard. The work is ready!
Option 3
A box from which you can make a stage screen will come in handy. Video to help solve this problem:
Option 4
You will need a picture frame, colored cardboard, scissors, thread, glue.
The characters of the chosen fairy tale are cut out of cardboard - they will be flat. You can decorate them by making hair out of threads and gluing ready-made eyes. The characters are fixed in a frame, it is decorated in the spirit of a fairy tale - trees, flowers, a hut are glued to the sides.
Option 5
For kindergarten you can make an applique from paper “Theater Masks”:
- Cut out the outline of the face from sheet A4.
- Bend it in the middle and cut it - you get a protruding nose.
- Make slits for the eyes.
- The child can paint the mask himself to his liking.
You can make a Venetian mask using cardboard. A cardboard mask can be decorated with beads, sequins, and shiny ribbons. The nose will be a cork from a plastic bottle.
Option 6
If you paint flat stones with acrylic paint, you get a stone theater.
Framed theater
This is a very simple way to make theater-themed crafts.
It is made from handmade materials. The most important thing is to find corrugated cardboard. It can be cut from any box in the house.
Necessary materials:
- Cardboard.
- Scissors
- Curtain fabric
- Satin ribbon
- Glue
- Foam tape
- Black marker or felt-tip pen
- Watercolor paint or gouache.
Manufacturing process:
- A frame in the shape of a rectangle is cut out of cardboard.
- Another rectangle is cut inside for the frame.
- Now the frame should be painted red with gouache or watercolors.
- Cut out two theatrical masks from cardboard. Then these masks need to be painted. One mask should depict sadness, and the second one should represent fun. A variety of emotions can be drawn using a black marker.
- Now you need to make a curtain. It is best if the fabric is red. But any other will do. Preferably bright.
- Then all the parts are glued onto the rectangle base. It is best to stick it using foam tape. The masks are glued in the center of the base. They need to be placed next to each other. The curtain is glued on top using glue. Make a drapery, then tie it with a ribbon and secure the lower part with glue.
- The previously prepared frame is glued on top.
This is how quickly and easily you can make theater-themed crafts for kindergarten.