Autumn painting made of plasticine
Let's start with the most difficult, and at the same time, the most exciting task - sculpting an autumn landscape. To do this you need to prepare in advance:
- a thick sheet of cardboard, preferably blue, which in the picture will depict a blue autumn sky and the same blue autumn distances;
- plasticine of various colors;
- stack (this, if anyone doesn’t know, is a special knife for cutting plasticine, which is usually sold along with a package of plasticine);
- a smooth board without roughness or burrs for rolling out plasticine;
- paints and brush (optional).
Let's start creating.
- From plasticine of all autumn colors (yellow, brown, red) we roll out sticks of different thicknesses and lengths.
- Having prepared plasticine sticks, we begin to make autumn leaves from them. Of course, fashioning a piece of wood from plasticine is a difficult task, but in this case it is not necessary. We make spirals from plasticine sticks (aka “snails”). To do this, the stick needs to be rolled into a spiral - a task that any child can easily cope with.
- Having made a sufficient number of spirals, we begin to stick them to the cardboard, forming the crown of the tree. What exactly the crown should look like in terms of size, contours and color palette depends entirely on the child’s imagination.
- Having finished with the crown, we begin to make the trunk and branches of the tree. We roll out sticks of different lengths and thicknesses from black or brown plasticine. These are fragments of tree trunks.
- By the way, about the color scheme. It is not at all necessary that the trunk be exclusively black or brown. Maybe the child is an impressionist or abstract artist at heart, and sees the autumn forest in his own way - in some other colors. Well, so much the better, and there is no need to convince him of anything.
- We begin to form a tree trunk from the bundles. Of course, it should be below, under the crown. We stick several flagella to this place from top to bottom. We try to keep them parallel to each other. Several flagella under the crown are already a full-fledged trunk.
- We make many more flagella of different colors. Roll them into spirals. These are fallen autumn leaves. We place them below under the tree.
- In this way you can sculpt one tree. Or maybe several at once. You will get a full-fledged plasticine grove.
- We make a circle and thin sticks from yellow plasticine. This is the autumn sun and rays. We stick them on top of the picture.
- If you have the desire and ability, we paint the space between the trees or around the tree in autumn colors. It will turn out great - both plasticine and paint.
- Finally, we prepare a frame for the picture (what is a picture without a frame?). To do this, we make long plasticine strips of any color and paste the picture along the contour. You can do this using simple plasticine strips, or you can weave several strips in the shape of a braid - it will be even more beautiful.
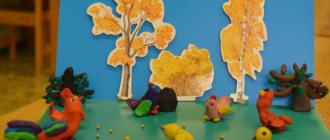
The result will definitely be a highly artistic product - a real autumn plasticine landscape. For example, like the one in these photos.
This video will tell you how best to make a picture from plasticine.
This video will teach you how to sculpt a beautiful autumn tree from plasticine.
Each tree consists of fragments: trunk, crown, individual branches, berries and leaves. They also need to be able to sculpt beautifully. How to do this better, look at another video.
Modeling junior group on the theme of autumn, details with photos
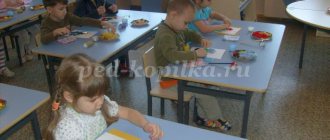
According to the methodology, teaching modeling in the younger group of kindergarten (2-3 years old) is subject-oriented. At first, kids are just learning to feel the material, to give a piece of plasticine simple shapes: a disk, a cylinder, a ball, a cube, etc. Children try to sculpt individual objects and figures (also simple at first) when the basics of modeling have been mastered. However, with your help, your child will be happy to cope with simple modeling on autumn themes.
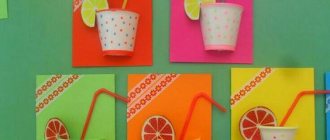
Talk to your child, ask what he imagines when he thinks about autumn. While walking in the park or in the forest, pay your child’s attention to how beautifully the shades of foliage change in autumn, how bright the rowan berries become, how many mushrooms appear at this time of year. Offer to make something “autumn” together. For example, autumn leaves, an autumn tree, a hedgehog, a mushroom.
autumn leaves
What to prepare for sculpting:
- a set of plasticine (red, terracotta, yellow, green);
- a sheet of thick cardboard;
- flexible board for modeling;
- plastic spatula;
- plastic or wooden stack.
Stacks and spatulas for modeling
Sequence of sculpting autumn leaves:
Walking through the autumn park, together with your child we will collect several beautiful, bright leaves of different shades. They will serve as a model for plasticine crafts. It is better to choose simple oval-shaped leaves with a smooth or finely toothed edge. Let's lay them out on the table and ask the kid what colors of plasticine will be needed to make autumn leaves.
Let's make blanks of leaves. Let's ask the child to roll small plasticine balls: dark red, orange, yellow, green. To make the leaves beautiful, for some balls you can mix pieces of plasticine of different colors. For example, red with yellow or terracotta, green with yellow.
We invite the child to carefully flatten the blank balls with his fingers, trying to give them the shape of leaves. Let's correct the result a little: flatten the resulting flat cakes in both directions, slightly sharpen the upper edge.
The next stage of work - drawing veins and teeth on autumn leaves - can be quite difficult for a 2-3 year old child. So let him just watch how we do it. Together with your child, let's look at the veins on the leaves. Using a stack, we will first draw the central vein, and then the side ones.
Using a spatula, cut out the cloves along the edges. We will definitely invite the child to try to design 2-3 leaves on their own.
Lay out the finished plasticine leaves, alternating colors on a sheet of cardboard. It is better to place them with the upper, pointed side towards the outer edge. Lightly pressing with your finger, fasten the leaves together and fix them on the cardboard. Decorate the “picture” with acorns or a sprig of rowan.
hedgehog made of plasticine and seeds (applique)
What to prepare for sculpting:
- a handful of large seeds (sunflower, watermelon);
- plasticine (brown, light gray, black);
- plastic spatula, stack;
- a convenient board for modeling;
- a sheet of white (or other light) cardboard;
- a sheet of light yellow or green cardboard;
- dried or plasticine autumn leaves to decorate the composition.
Sequence of work:
Draw the outline of a hedgehog on white cardboard. You can print the finished template. Cut out the figure along the outer edge of the outline, paste it onto colored cardboard, and dry it. It is important to leave distinct dark outlines to make it easier for the baby to work on the appliqué.
Let's knead and warm up pieces of gray plasticine in our palms. Let's put them on the image of a hedgehog. We invite the baby to flatten them and fill in the contours of the face and tummy. We will also prepare brown plasticine. Let's fill in the contours of the back. To simplify the work, plasticine can be smeared only on the back of the hedgehog, and the muzzle can be left as cardboard and the eyes and nose can be drawn in with paints or felt-tip pens.
Let's make needles from sunflower or watermelon seeds. We immerse the pointed part in brown plasticine on the back of the hedgehog and press it slightly. So we will sequentially fill the entire space with seeds.
Let's ask the child to roll three small balls from black plasticine. Two smaller ones are for the hedgehog’s eyes, one slightly larger one is for the nose. Let's attach them to the muzzle. Let's draw the mouth using a stack. Let's complement the composition with plasticine leaves, apples, mushrooms, etc.
autumn mushroom and caterpillar - video tutorial
Preparatory group modeling on the theme of autumn
oak branch with acorns (plasticine)
What you need for sculpting:
- plasticine (gray-blue, beige, light brown, light green, white);
- flexible board for modeling;
- thick cardboard;
- template “Oak branch with acorns”;
- pencils, felt-tip pens for drawing panel details;
- a set of stacks and spatulas for plasticine.
Sequence of work:
Let's draw the contours of an oak branch on a sheet of thick cardboard (white or light blue). To simplify the work, we use a ready-made template of an oak branch with acorns.
Let's soften the pieces of gray-blue plasticine, spread them in a thin layer on the cardboard - we will create the background of the picture. To make the material more pliable, warm it up a little in lukewarm water. We will “paint” the upper third of the sheet with a more saturated tone, and the lower third with a lighter tone. We roll 3-4 small cylinders from white plasticine, flatten and stretch them on cardboard, cut them into a stack, giving them the shape of clouds.
Sequentially fill the contours of the branches, leaves, and acorns with brown and gray-green plasticine. It’s convenient to “draw” with pre-prepared small balls of plasticine of different colors. The layer of material should be sufficient for a volumetric effect, but not too dense. To obtain the required shades, plasticine can be mixed while kneading.
Let's correct the contours of the drawing with a spatula and a stack. Let's draw or make leaf veins from thin plasticine flagella. Let's do some shading on the caps of the acorns and the bark of the oak branch.
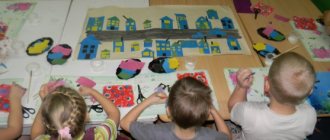
plasticine painting “Autumn mood”
What set to prepare for creativity:
- a set of plasticine (gray, dark orange, blue, yellow, red, etc.);
- modeling board;
- cardboard sheet for the base;
- drawing template;
- pencil;
- set of stacks, spatulas.
How to “draw” with plasticine:
Let's draw the outlines of the picture onto the cardboard. We use a ready-made template. If a suitable drawing is not available online, you can create a similar one from individual parts: a girl under an umbrella, a dog, etc.
Let's decorate the background of the picture - smear slightly warmed gray plasticine on the cardboard, in some areas we will use dark orange plasticine to mark sections of the brick wall. Using a stack (deep pressing) we draw clear outlines of the bricks. For plasticineography, it is better to choose hardening or wax plasticine.
At the bottom of the sheet we attach small cakes of dark gray plasticine, flatten them, smear them a little along the edges, and draw the contours of the paving stones. Using pale blue plasticine (if this is not in the set, mix blue and white) we will depict puddles. To simulate water with a thin stack, draw concentric circles on them.
Let's sequentially fill all the elements of the drawing with plasticine of the required shades - the girl's face, hair, arms, legs, cloak, boots. Let’s “color” the dog and the umbrella with plasticine. Let’s “depict” raindrops. For work, it is convenient to use pre-prepared small balls of plasticine of suitable colors. Before filling in the contours of the picture, it is better to warm them slightly in warm water.
We outline the contours of the finished drawing with a stack. We will remove excess plasticine and correct the details. Leave the picture for a day until the plasticine hardens.