For children of preschool age, you can come up with many entertaining activities, a special place among them is occupied by modeling from plasticine. Thanks to this type of creativity, parents will be able to instill in their child a love of creativity, develop fantasy, imagination, and fine motor skills. In addition, by making figures from plasticine, the baby learns to be independent.
What is plasticine and how is it useful?
clay was used in kindergartens to make handicrafts : the classes were so exciting that teachers often had to wash tables and chairs stained in a fit of creativity, and parents had to wash the young sculptors themselves.
Everything changed in 1955, with the start of industrial production of plasticine, a new material for children's creativity, which was a mixture of powdered clay, wax, animal fat, and ceresite. Special additives prevented the mass from drying out, allowing it to be reused - it was a sensation! The demand for plasticine was so great that its inventor, Joe McVicker, became a dollar millionaire at the age of 27.
Nowadays, the composition of plasticine has changed somewhat and now it practically does not stick to your hands, is painted in different colors, and is even more plastic. Teachers and psychologists advise starting modeling lessons with your child at the age of 2, and then by the age of 5-6 he will independently come up with crafts and implement ideas with his own hands. The benefits of such an activity for preschoolers are difficult to overestimate.
Mental development
Small children explore the world with their hands; they definitely need to touch the object of interest - a simple action develops the nervous and visual systems, coordination. Rolling pieces of plasticine with your fingers makes both hemispheres of the brain work simultaneously and improves several skills:
- Fine motor skills are necessary for the development of speech, stimulation of logical thinking, and the ability to mix colors and change the shape of a craft reveals figurative, abstract perception;
- By creating the details of a new craft with their own hands, children 5-6 years old prepare a brush for writing ;
- Children who are passionate about modeling learn concentration and perseverance;
- The desire to achieve results trains patience and the habit of always finishing what you start.
Having learned to sculpt from plasticine, children 5-6 years old try to remember new interesting images (cartoon characters or people they just like), and then repeat them in detail in their crafts.
Psychological condition
The recommended time for modeling from plasticine at home is evening. A quiet activity reduces the baby’s excitability and helps him fall asleep comfortably. Child psychologists have long taken note of the beneficial properties of modeling:
- Passive dialogue . Plasticine crafts will tell you what children are usually silent about. Conflicts in the family, fears, complexes are reflected in creativity;
- Overcoming fears . If you give your phobia a physical shell of plasticine, you can simply crush it and change it, fashion it into something joyful and good;
- Children, working with plasticine, get the opportunity to express negative emotions (pain, anger, anxiety) in a socially acceptable form, without scandals and hysterics;
- Surprisingly, many unsociable, problem children change their behavior due to a common hobby with their peers, they find friends and become more tolerant of others.
Interest, excitement, joy from success, sadness from failure, hope, satisfaction - this is not a complete list of emotions experienced by a child while making crafts from plasticine. Hobby helps to develop a psychologically multifaceted personality capable of deep experiences.
How does modeling affect a child’s development?
Modeling from plasticine is a fascinating artistic activity that is not just great entertainment for children. Her goals are much bigger. The possibilities of the material as an artistic project are diverse and important for the social, cognitive, emotional, and physical development of the child.
Health and emotional background of the individual
Playing with plasticine is one of a number of sensory games that play an important role in a child’s development. Sight, smell, hearing, touch, taste are all included in sensory play. In fact, it is more than just touch, sensory exploration is a child's way of exploring, discovering, classifying and making sense of the world.
Playing with plasticine helps develop fine motor skills in a child. During modeling lessons, small muscle groups in children's fingers, hands and wrists are trained and strengthened, helping to facilitate the process of learning to write. The control over finger movements used when modeling from plasticine is actually the same as the ability to hold a pen and write with it. Without well-developed fine motor skills, a child may have difficulty not only learning to write, but also performing other tasks such as turning the pages of a book, cutting, drawing, squeezing glue out of a tube, tying shoelaces, or zipping up a zipper.
Modeling calms a child during an “emotional crisis” - it helps regulate internal discomfort, be it boredom, anxiety or another type of excitement. Creating figures, be it a bunny or a kitten, or any other animal, allows kids to feel competent and proud of their achievements (“I can roll out”, “I made a smesharik”). During modeling classes, children communicate with each other, describe what they are doing and how, observe the actions of their comrades and compare actions and objects, which teaches interaction with each other and joint actions.
Mental and Personal Development
Through playing with plasticine, children express their ideas, satisfy their curiosity, analyze and solve problems, and learn symbolic thinking. While playing with play dough, children listen and talk to peers or adults, which helps them expand their vocabulary as they describe their actions, make up stories about their creations, use ideas from books they read with their parents, and refer to what they see in Everyday life.
Psychologists say that children live to play; they learn to understand the world through play. When they play, they explore, control or change their environment, and learn to concentrate on something - all of which provide a preparatory stage for later academic achievements. A child's learning depends very much on his ability to feel and touch.
Clay or plasticine?
Undoubtedly, clay crafts are more durable, but there is also more hassle with clay. This includes not only washing the young sculptor after work; if you want to preserve the clay product, then it must be fired after sculpting. Plasticine leaves virtually no marks on your hands, does not require firing or coating after completion of work, and can also be reused.
At what age do they sculpt from plasticine?
It is believed that it is better to start modeling from the age of 1. Until one year old, the baby would rather try to chew plasticine than become interested in the creative process. But children are all individual, so you can try to show your child the process, and if interest is not shown, then postpone this matter until later.
From one to three years of age, children learn to control their hands; at this age it is good to show the child simple actions with plasticine:
- tear off pieces from plasticine;
- roll balls;
- flatten, crush the balls with your palms or improvised means;
- make sausages of different thicknesses;
- roll sausages into rings;
- combine finished parts into a common craft.
Until the age of three, it is better to use special soft plasticine for babies.
At 4-5 years old, a child already uses his hands quite well and will be able to work with ordinary plasticine, and crafts can be more complex and interesting.
Modeling technique in the middle group
Exercises with plastic materials prepare a child’s hand for mastering the most important skill in the near future - writing. Regular sculpting exercises develop hand flexibility and precision of movements. The kids create crafts by studying various modeling techniques.
Table: methods and techniques of sculpting
| Modeling methods | Techniques | Examples of crafts in the middle group |
| Sculptural/plastic - sculpted from one piece. |
|
|
| Constructive - creating a craft from several parts. | Plastic molded parts are connected to each other. |
|
In the middle group, children master the constructive method of modeling: sculpting and combining parts into a single image
Types of modeling
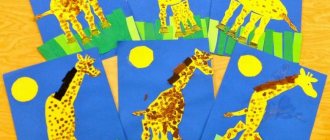
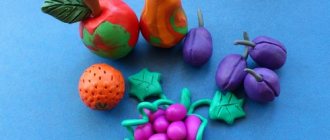
- Subject modeling. In the middle group, children sculpt two- and three-dimensional objects on a plane. They try to convey the shape of familiar objects as accurately as possible. There is always a sample in the classroom - a figurine or toy.
Object modeling also implies the image of living creatures, for example, fish
- Subject modeling. In the fifth year of life, thinking abilities rapidly develop.
The child compares objects in the surrounding world, discovers connections and interactions between them. The first subjects are collective compositions “Round Dance of the Hares”, “Bird Yard”. Collective works have a simple plot, for example, “Ducklings swim on the pond” - Decorative modeling. In the middle group, this type of modeling can be used to decorate “Vase” and “Plate” crafts.
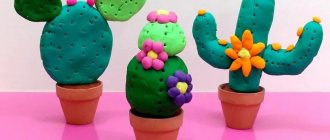
Children 4–5 years old learn to decorate surfaces with a relief pattern, for example, as in the lesson “Miracle Flower”
Materials and tools
- Plasticine is the most malleable material. It is possible to introduce children to clay, but it is recommended to sculpt with it in the senior and preparatory groups (with children 5–7 years old). Occasionally, Play Doh plasticine may be used in classes. This is an expensive material, but bright and unusual. You can use it to decorate gifts for mothers on March 8, for example.
Save leftover playdough from their sets - children will use them later
- The stack is an assistant instrument that children become familiar with in the middle group. The teacher shows how to hold the stack and how to use it to cut off a piece of plasticine/dough.
The stack will be needed to complement crafts with cuts or simple patterns (dots, lines). They represent the eyes, mouth, and nose on the faces of animals. For the middle group, it is recommended to purchase plastic stacks with a rounded end
Unconventional sculpting techniques
- Plasticine mosaic - laying out plasticine balls on a drawn image. In technical terms, the use of this technique in classes in the middle group does not give anything new to children. It is appropriate to do plasticine mosaics during decorative modeling. For example, children will decorate plastic plates or lids with mosaics.
Mosaic is great for decorating plastic and cardboard surfaces
- Plasticineography - drawing or painting over contours by smearing and/or sticking plasticine. In the middle group, small pictures are selected on a thick sheet of paper or cardboard. The task for children 4–5 years old is to “color” the drawing with a thin layer of plasticine, without going beyond the contours. Children choose their own colors for plasticine printing.
Children use plasticine to color simple images, for example, a seven-flowered flower.
- Testoplasty - modeling from salt dough. In the middle group, crafts “Treats for dolls/friends” and “Caterpillar” are made using this technique. Salt dough is a wonderful alternative to plasticine, a completely natural material. The teacher prepares the dough immediately before class.
Salt dough recipe: 1/2 tbsp. cold water, 1 tbsp. flour, 1 tbsp. salt Stir until smooth.
You can add food coloring to salt dough
Salt dough tends to crumble while working. For children 4–5 years old, this material cannot be called pliable. Therefore, to the mass obtained according to the classic recipe, I add 1-2 tablespoons of vegetable oil (odorless). The dough becomes more flexible.
Task differentiation
During the school year, the teacher evaluates the effectiveness of classes. In September, January and May, children's visual abilities are monitored. The level of mastery of practical skills for each student is determined.
Practical skills are formed and consolidated unevenly among children of the same age. This is fine. The teacher’s task is to create favorable conditions for the development of each student. Taking into account personal qualities and the pace of mastering modeling techniques, the teacher develops multi-level tasks.
During the lesson, the child gains new experience and positive emotions; tasks are selected according to their level of development.
Table: examples of tasks of different difficulty levels
| Ability criterion | Main quest | Complicated task |
| The ability to determine what parts and shapes an object for modeling consists of | Make a fly agaric: a cylinder leg, a cone-shaped cap, white dots. | Make a fly agaric, secure it on a cardboard base, add a blade of grass/leaves/stump. |
| Sculpting speed | Make a duckling: plastically mold the head and body, add wings and beak. | Make a duckling, use a stack to make cuts on the wings and tail (feathers), and mark the eyes. |
Multi-level tasks are necessary for each child to demonstrate their skills and feel successful.
What you need to work with plasticine
In addition to a set of colorful clay, consider a work surface for modeling. To prevent the furniture from deteriorating, you can use a special board for modeling, or replace it with a piece of cardboard, oilcloth, or a regular plastic cutting board.
A spatula for modeling will come in handy when working with a stack. Also having a rough idea of what exactly you will sculpt, you can prepare additional accessories for crafts. These can be natural materials, such as nuts, cones and pebbles, or artificial decorations such as beads, it all depends on the ideas of the authors.
Features of modeling for children 5-6 years old
To prevent your child from getting bored with making crafts from plasticine, you need to create the most convenient conditions for creativity and buy the necessary equipment :
- A board made of plastic or wood. It can be plain, but it is better to choose a work surface with a beautiful pattern;
- Knife . Usually, a set of plasticine comes with a small plastic knife for cutting pieces and creating decorations on crafts. If the tool is not in the box, use a teaspoon;
- Stencils for plasticine. They resemble plastic cookie cutters and can be replaced with them. Purpose - cutting out flat figures from material rolled out on a board;
- Oilcloth on the table, apron . If a fidget, carried away, stains everything around with plasticine, it is useless to scold him. It’s better to play it safe in advance by protecting your table and clothes.
Older preschoolers already know how to use a plasticine knife and roll the material into balls and sausages. The time has come for more interesting activities - sculpting simple figures of animals, flowers, people. With the help of your mother, you can master the technique of creating pictures from plasticine. In general, the reasonable participation of parents in the creative process stimulates children, gives significance to their activity and fosters responsibility - looking at adults, the child will try twice as hard. Don't forget to praise your child , your approval is very important to him.
Step-by-step instructions for making candies
Making candies from plasticine is an extremely exciting activity. And they look almost like real ones.
To work you need to prepare:
- plasticine - it can be any colors you like, but the most suitable are white, red, yellow, orange;
- cutting stack or scissors;
- matches or wooden sticks.
Crafts from plasticine (grade 1) - step-by-step production of candies
Execution scheme:
- Using colored plasticine, you need to make a base - balls.
- You need to make long and thin ropes from white and orange plasticine, and then twist them together into one rope.
- This structure is then rolled into a spiral shape. The preparation for the first candy is completed.
- Yellow and white plasticine is also rolled out into thin threads and then placed next to each other.
- Afterwards they need to be carefully twisted into a spiral. The second blank is ready.
- You also need to form 2 ropes from red and orange plasticine, only of greater thickness.
- The bundles must be intertwined. The third blank is ready.
- The last step is to put the blanks on matches or wooden sticks.
Step-by-step description of crafts
So, everything is ready for work, you can start creating. Let's take a step-by-step look at some simple examples of interesting crafts for kids.
Plasticine hedgehog with seeds
This funny hedgehog is easy to make and looks very creative and cool. To work you will need brown plasticine for the body, beads for the eyes and ordinary black sunflower seeds.
- Roll a ball out of brown plasticine.
- On one side we pull the ball out a little so that it looks like a drop.
- The eyes and nose can also be made from plasticine, or they can be replaced with beads.
- Place sunflower seeds on the back of the hedgehog, sharp ends up.
- When the entire back is covered with “needles,” place the finished craft on a piece of cardboard. You can decorate the back of the hedgehog with a miniature plasticine mushroom or apple.
Crafts based on “koloboks”
- Snowman. We roll three koloboks, which we then carefully mold together. We make the eyes and mouth in a stack. The nose can be made into a stack, or you can make a carrot nose with your mother’s help.
- Tumbler. We roll two balls and mold them together. We roll two small buns separately and attach them to the sides as hands.
Caterpillar. We roll small balls - as many as you have patience for. In my opinion, it’s best to make a caterpillar together: the baby makes a few balls, the mother makes a few, and then combine everything together. We make the face in a stack. Attach horns if desired.
Christmas tree. I mentioned this craft earlier in the article “New Year’s Advent Calendar”. For this craft you will need a pine cone, which will be the Christmas tree. The toys on our Christmas tree will be small plasticine balls, or simply pieces of plucked plasticine. At the end of the lesson, mom fixes the Christmas tree on a plasticine base so that everyone can admire it on the eve of the holiday.
Kolobok. The baby, of course, has rolled the bun more than once. This time, invite him to make all the small details from available materials. For example, our little bun has eyes and a nose made of peas, legs made of beans, and a hat made of buttons.
Storing plasticine crafts
The child put a part of his soul into each plasticine figurine, so you can’t throw away a craft, even if it’s far from perfect . Children's creativity must be treated with respect - the neglect of adults greatly hurts young masters.
Of course, you won’t be able to store absolutely all your crafts. Therefore, immediately agree with your child that only the best works , and all the rest will again be turned into mass for modeling. As the “storage” fills up, you can give away some of the exhibits to family and friends, leaving only an emergency supply - figurines that are especially dear to the baby.
It will soon become clear that the “gold fund” collects a lot of dust and needs protection. Available methods for preserving plasticine crafts:
- Plastic containers . Large, convenient containers with transparent walls are ideal for storing plasticine figures: they provide a good overview and protect from dust;
- Varnishing . If the craft is intended for active play, it can be coated with hairspray - once it hardens, it will give rigidity to the figurine. A similar and more durable option is nail polish;
- Photo . An album with photographs of plasticine crafts and their author in the process of creation will delight the whole family for many years. In digital format, crafts will live a long, happy life, and parents will have the opportunity to gradually get rid of products that have lost their presentable appearance. Such a separation is the least painful for children, because the result of their efforts was appreciated and perpetuated.
Useful tips
The most important thing in the process of sculpting with young children is not only to teach them how to perform basic sculpting techniques. The main thing is that they should have fun. Perhaps some of the children will quickly get tired of modeling and will gladly switch to another game. Some people, on the contrary, are very passionate about creative work.
Before sculpting, it is important to ask a child who is four or five years old what he wants to sculpt. You can offer your own option and not interfere with him, if he expressed a desire to make the figure himself, choosing an animated character as the theme, perhaps it will be some kind of fixie, and perhaps even an animatronic Freddy
Plasticine sculpture develops children's creative potential, and we should refrain from any negative criticism, on the contrary, they will encourage creativity as much as possible
If a child is experiencing frustration, it is important to address this by encouraging more practice and experimentation.
In addition to being engrossed in play, a child begins to understand cause and effect when he picks up play dough and manipulates it to change shape. This stimulates the child's creativity and tickles his intellect. From a scientific point of view, sculpting creates many new synapses in the brain, activating neurons through the senses used at work.
Plasticine butterfly step by step
A bright butterfly craft will be an excellent gift for someone close to you or will simply decorate a collection of plasticine exhibits. To make it you will need a set of high-quality soft plasticine, a board and a modeling knife. Children 5-6 years old will quickly complete the task under the unobtrusive guidance of adults.
Body
- Orange block of plasticine split with a knife into 5 parts - a narrow strip and 4 cubes. The photo shows notches in the places of the future incision;
- Make three even balls and one oval from the cubes . Roll the strip into a thin sausage , cut in half
- One of the balls will become the head of a butterfly. First you need to go to him attach eyes, made from flattened circles of white and black plasticine. Then carefully place it on your head horns from parts of the sausage, smooth the joints with your fingers. With a knife designate mouth;
- Connect body parts and the head, pressing well, but not flattening the parts. The body should be docked tightly.
Wings
- Would need two pieces of plasticine - more blue and less green. Both split in half. From halves roll the balls, flatten in the form of droplets;
- Connect the wings - the lower ones should be slightly smaller than the upper ones;
- From small pieces of plasticine of different colors, mold decorative elements - stripes, circles, drops, etc. Symmetrical decorate the wings. The photo shows a design option;
- Attach the wings to the body. The butterfly is ready!
Athlete
Let's look at the technology for making crafts for boys. How to make a football player out of plasticine mass? How to blind him? Don't panic if your child sets such a task for you. After reading our lesson, you can easily complete the task together
It doesn’t matter which team your son is a fan of, he can change the color of the uniform at his discretion. Let's show it using blue paraphernalia as an example.
- We create an oval lump from blue timber. Deforming it with our fingers, we try to give the silhouette of the body.
- The triangle makes shorts. The stack needs to be cut in the middle to show the pant legs.
- We attach short sleeves to the shoulders.
- Roll out flesh balls into hands. We draw finger stripes. We attach them to the body.
- By adding white stripes along the end parts of the tracksuit.
- Let's move on to the head. We sharpen the oval at the bottom for the chin. We attach the nose, eyes, eyebrows, mouth, ears. You can show unshaven stubble with black strokes. Making hair.
- All that remains is to build the legs and white knee socks. Black sneakers will complete the look. You can complement the composition with a soccer ball. Every boy will be delighted with such a useful activity.
Ideas for modeling from plasticine
Having become acquainted with such an interesting material for crafts as plasticine, children 5-6 years old usually do not experience a shortage of new ideas - on the contrary, the creative process does not keep up with their imagination. But you can direct the flow of energy in a peaceful direction by showing your child several photographs of crafts made in different techniques and on different topics.
Caterpillar
A very simple craft that improves the skill of rolling plasticine balls. The caterpillar's body can be made multi-colored, and funny horns can be attached to its head.
Cockerel
The method is suitable for sculpting any bird you like - flatten the oval body from below, place it on flat legs. Make feathers from plasticine sausages, small red circles will become a comb, a droplet will become a beak.
Snowmen
New Year's souvenirs always create a festive mood and the child will be happy to give gifts to all household members.
Application
Children 5-6 years old like to make voluminous applications from plasticine sausages along a contour drawn with a simple pencil. A more complex option is to sculpt flat shapes and attach them to a sheet of cardboard.
Equipment and materials for modeling classes in kindergarten
Typically, kindergarten groups use plasticine, but the possibilities of working with it are limited. The most effective way to use clay in creative work. Fat clay is best. You can sculpt several large objects from it, create objects with subsequent heat treatment for immortalization and paint them. The plasticity of clay can be adjusted with water, which makes the work easier for children.
In education, it is more practical to use clay, since plasticine is intended for small products, and small forms are not able to convey the fullness and clarity of the lines of the details of the figure. Using plasticine complicates activities with young children, since it is quite hard and needs to be constantly kneaded to make it soft, and small children are not always able to do this. Plasticine modeling is more suitable for children with developed finger muscles, at an older age of 5-7 years, but its use should be limited to only a small number of activities.
If the kindergarten has enough budgetary funds, then clay can be purchased at the store, but in rural areas it is easier to dig it up. The clay layer is located directly under the fertile soil layer, so this will not be particularly difficult. Preparing the mixture for modeling is also not difficult. You just need to add water to the clay and knead it, and then put it in a thick cellophane bag, and then the working material can be stored for a whole year. To fire clay, you only need to spend money on a muffle furnace. You will also need paint. Thus, after processing, children's crafts will turn into real ceramic products and souvenirs. Clay itself in its raw form is not a load-bearing material and to make products you will need to stock up on frames.
Ordinary sticks or pieces of wire can serve as frames. The frame must be made in such a way that it can be removed from the product after the clay dries, otherwise the clay on the frame may crack when drying. To draw out individual elements and recesses, you can use plastic knives like in plasticine, spatulas and nails. The better and more conveniently the place for a child’s creative activity is organized, the better the quality of his work. Usually boards are used for the working surface, but it is better to have a rotary machine for ease of working on the product from any side.
In the end, I would like to add that modeling in kindergarten is important for preschoolers for the development of sensory perception. Children must not only see, but also touch objects.
How to make animals from plasticine. Master Class
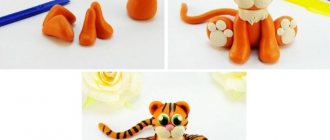
Modeling from plasticine for children 5-6 years old is no longer difficult, since most of the techniques have already been mastered. With the help of step-by-step instructions, a child of this age can easily sculpt a cute figurine of this tiger, consisting of simple parts.
The sequence for creating a tiger is as follows:
- 1/3 of a block of bright orange plasticine is cut off. Both resulting pieces are rolled into balls.
- The small ball will be the tiger's head. From the second ball, part of the plasticine is pulled out into an oblong body.
- Using a toothpick or match, connect the head and body together.
- From the second block of orange plasticine, 1/3 of the part from which the hind legs are made is also cut off. This part must be kneaded and divided into 2 equal pieces, which should be shaped like a cone. Form feet on the wide side of the cone.
- For the front paws, a piece of plasticine is rolled into a sausage, then cut into 2 parts. Paws with thickened feet are made from them.
- Stick the paws to the tiger's body.
- Roll up and stick to the body a long tail made of thin sausage.
- Make small round ears with indentations and attach them to the head.
- Use white cakes and a nose from pink plasticine to create an animal's face.
- The tiger's eyes are made from round cakes of white, green and black, stuck on top of each other. You can add highlights around the edges of the eye.
- Attach a white chest made from a strip of plasticine on which wool is drawn in a stack to the neck.
- White cakes are glued to the hind legs as pads and toes.
- Now you need to create black stripes. A very thin sausage is rolled out of black plasticine, short sections of which are stuck all over the tiger's body. Also, claws on the hind legs are made from them and glued into the indentations of the toe pads made by the stack.
- Using a stack, make cuts to mark the toes of the front paws. 15 Use a toothpick to make dots on the white part of the tiger cub’s face.
The plasticine tiger is ready.
Insects
Your child will be able to make these plasticine crafts on their own. The technique will be very simple. We tear the mass into several pieces and roll it into balls. You need to make sure that each subsequent one is slightly smaller than the previous one. You will need to make two or more blanks - it depends on what kind of insect you decide to sculpt.
If you need to make stripes, roll out the rope and make it flat. To do this, use the body of a ballpoint pen. Eyes and wings are made using the same principle.
Octopus
A child can make such a craft from plasticine in just 5-10 minutes. To do this, you only need to prepare two parts.
Roll into a large ball. Then roll up a long rope. Divide it into five equal parts. Using a clay knife, turn the flagella into tentacles. Add spots to the octopus. Place the tentacles under your head and flatten them. We make a face with a knife or a needle.
Panda
Sculpting a panda from plasticine is a little more difficult, but children can still cope with this task. It's okay if the figurine turns out a little crooked the first time - everything comes with experience.
Roll into a ball and flatten it. Using a clay knife, make indentations for the eyes and work them in black. Add more indentations and place a tiny piece of plasticine or beads in them.
Roll a small ball - we will use it to make the panda’s cheeks and nose. Flatten the plasticine and place it on top. We do the same to shape the nose.
We sculpt the panda's body from a ball. Roll the plasticine into a rope to form the legs. Connect the parts. You can use water.
Owl
Sculpting an owl from plasticine is very simple and fun - not only children, but also you will like it. The figurine turns out so funny that you don’t want to destroy it.
We will need three colors of plasticine. We form the body from a large ball - flatten it a little. Each paw is assembled from three small strands. We roll out the owl's chest and wings from balls of the same size and give them the required shape. We do the same with the eyes and beak.
If the parts don't want to fold, help them with a drop of water. Using a plasticine knife or a needle, make small indentations on the body of the toy - these will be feathers.
Use two flagella to create a “hairstyle” for the owl. Place it on a plasticine branch or on a regular pencil.
Penguin
Even a preschooler can make a penguin. If the child is small, you need to take a large piece of plasticine to make the craft more neat.
Roll three balls: black, white, yellow. Flatten the black plasticine into an oval, and roll the white plasticine into a thin layer and place it on top. We will make the eyes with a knife for plasticine, and from a yellow ball we will make a beak and legs.
Decorate the plasticine penguin figurine with a heart or flower.
You can also make very cute penguins from polymer clay.
Dragonfly
We sculpt this cute dragonfly from plasticine in three colors. You can immediately prepare a piece of cardboard and draw a flower on it so that our beauty can sit where she is supposed to sit.
Roll two even balls. We will make a tourniquet from one: it is thicker at one end and becomes much thinner towards the other. We form the eyes with a plasticine knife. And let your dragonfly smile - this can be easily done with the sharp end of the tool.
We make wings from small balls: we form pear-shaped ropes out of them, and then flatten them. All that remains is to put everything together. By the way, you can even decorate a postcard with such plasticine crafts.
Dog
If you mold a dog, you can even play with it a little: put it down, sit it down, put it down. For this craft, one color of plasticine is enough for us.
Let's roll two balls. The first thing to flatten into the puck is the nose. We will attach two tiny ropes to the second one - this is the head with ears. We'll use a marker to make the eyes. We connect the two parts of the plasticine head.
We sculpt the body of the figure from a large piece of plasticine. It will be difficult for small children to attach paws to the toy, so it is worth helping them. We make them from strands.
We connect everything into one figure. The larger it is, the more options you have to play with it.
Turtle
This is a little more painstaking work, but the child must still cope with it. If the craft seems too complicated, do it in a larger size - it will be easier.
We need to roll two balls from plasticine: small and large. Flatten the larger one and form a shell with your finger. From the second blank you need to draw a pear-shaped figurine.
Push through two dents with a special knife. We make indentations in the plasticine for the eyes and nostrils with a needle or awl. We also roll the paws and tail in the shape of a pear. If the parts do not hold together well, moisten the plasticine or your hands with water (just a little).
Snail
We make the snail from just two parts. Roll out two ropes from plasticine: one of them should be long. We give the first one a curved shape, and the second one we twist into the shell.
Antennae can be made from thin wire or fishing line. Draw the snail's eyes with a marker.
Husky
Everyone knows this wonderful breed of dog. Their charming eyes and unusual colors leave no one indifferent. How to make an animal from plasticine? By following simple instructions, you will master this type of creativity:
- Roll a gray plasticine ball.
- Carefully draw two triangles at the top. Make the same shapes from white and attach to the intended location.
- Cover the lower half of the workpiece with the same shade.
- We make an oblong oval - this will be the muzzle.
- Make a black nose, blue eyes and attach everything to the face.
- We design the red tongue. We attach it below the muzzle. We fix the ears.
- Taking a stack, work out the main features.
- Let's move on to the body. We insert toothpicks into the base and secure the head.
- The dog's belly is white. Two small gray sausages are the front legs. Their lower part is light.
- Curl the ponytail into a crescent shape. Use a plastic knife to sell the fluffiness.
- All that remains is to design the collar. Draw it once all the main elements.
This is such a beautiful dog we got. This craft can be done together with the children at home or in a master class in the preparatory, middle group of the kindergarten. Modeling for preschoolers is a good idea for joint creativity. What else can you make from plasticine?
How to make food from plasticine. Master Class
You can make any culinary product from colored plasticine. In addition, plasticine food can be cut into pieces, which is much more interesting than toy food sets made of rubber and plastic. Making pizza, then cutting it into pieces and serving it to dolls and family members will be very interesting for the child.
Step-by-step plan for sculpting a plasticine pizza:
- Mix brown and white plasticine until light brown. Divide the piece into 2 parts.
- Roll one part into a ball, then flatten it into a flat cake. Roll out the other part into a long rope.
- Place a thin beige cake onto the light brown crust. A tourniquet is attached along its edge.
- Next, the pizza filling is created. To make sausage, roll out a layer of burgundy plasticine and place thin white flagella on it.
- This layer must be rolled into a roll and rolled out in your palms so that it becomes dense.
- Then it is cut into rings.
- Round cakes are created from red plasticine, which are cut in half as
- tomato slices. The texture is drawn on them using a stack or a toothpick.
- Asparagus pods are rolled out of green plasticine.
- Sausage is laid out on the crust, then tomatoes and asparagus.
- Slices of champignons are molded from light plasticine. The relief of a mushroom is applied to them in a stack.
- Numerous dots are made on the sausage using a toothpick for texture.
- Olive fruits are molded from black plasticine. For shine, you can apply colorless nail polish here and there. It should not get on other ingredients.
- For onion rings, pieces of pink and white plasticine are mixed, then rolled out into a sausage. It is divided into small fragments, which are twisted into rings and then flattened.
- The pizza is decorated with mushrooms, olives and onion rings.
- If desired, it can be cut.
How to mold a human head from plasticine. Master Class
Modeling a human head from plasticine tells children 5-6 years old the body proportions.
By taking your child through a step-by-step master class on sculpting a man’s head, you can develop the child’s ability to detail, since the head has many details. If something didn’t work out the first time, plasticine makes it possible to correct all the shortcomings.
Step by step sculpting:
- A ball is rolled out of beige or pale pink plasticine, which is given the shape of a human head and an oval face with a chin and forehead is formed. This is done using techniques of pressing and pulling with the fingers in the right places.
- From the side of the face, symmetrical recesses for the eyes are made with the flat side of a plastic knife.
- A small piece of plasticine is attached to the center of the face, from which the nose is formed. It should start from the bridge of the nose, gradually increasing the tubercle. The junctions between the nose and the face must be smoothed, then the nostrils should be made with a toothpick.
- Next, using a stack of pink plasticine, the lips are drawn.
- The oval whites of the eyes are attached to the eye sockets.
- Blue circles with black pupil dots are molded onto the eyeballs.
- Thin sausages are used to attach the upper and lower eyelids.
- Small oval ears are added to the head.
- Brown eyebrows are applied.
- A set of slightly flattened brown sausages is used to make a hairstyle that covers the crown, temples and back of the head.
- To sculpt an older person, you need to add wrinkles to the face using a stack, and make the hair gray with small strokes of white plasticine.
What you need for the craft
To practice sculpting you will need special tools:
- Modeling board.
- Plastic knife.
- The stack is regular and jagged.
- Toothpicks.
- Pen rod.
- Brush.
- Cardboard for compositions.
For making crafts, regular medium-density plasticine is suitable.
Modeling from plasticine for children 5-6 years old develops fine motor skills and speech
Required colors of plasticine for the presented master classes:
- “Tiger”: two bars of orange plasticine, a little white, black, pink and green;
- “Pizza”: red, burgundy, brown, beige, black, green.
- “Human head”: beige, brown, a little black, pink, blue and white.
- “Dragon”: bright colors of orange, yellow, green, and some black and white.
- “Dinosaur”: 2 bars of green plasticine, a little brown, black and white.
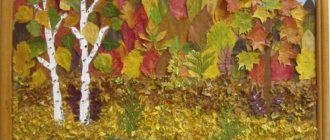
- Composition “Autumn”: gray, black, yellow, purple, blue, light blue, red, orange, beige, brown.
- Composition “Bullfinch”: blue or blue, white, black, red or pink, brown, green.
How to make a dinosaur from plasticine. Master Class
Dinosaurs are unusual animals that lived in ancient times. During the modeling process, the child can be told facts about their life and varieties.
Step-by-step diagram for sculpting a dinosaur:
- Cut off a third of the green block of plasticine and roll it into a ball-shaped dinosaur head. Next, a triangular shape with soft corners is created from the ball.
- For the body you will need a whole block of green plasticine. It must be kneaded thoroughly, then given an oval shape, which should be transformed by stretching into an oblong drop.
- Using a toothpick, both parts are connected together.
- To make massive dinosaur paws, you need 4 green balls of the same size.
- Sausages are rolled out from the balls, then the legs are formed.
- The paws need to be connected to the body; to do this, their edges should be slightly flattened.
- Making a large collar for the dinosaur. To do this, roll out a cake from a piece of green plasticine.
- An arc-shaped strip is cut out of it in a stack, then a zigzag pattern is created along the edge with a jagged stack.
- The collar is glued to the top of the dinosaur's head and the scalloped edge folds back nicely.
- On the head near the collar we attach a pair of beige horns.
- A green horn is glued to the nose.
- Triangular green plates are attached along the back and tail.
- Now you need to make a two-color plate. To do this, roll a piece of brown plasticine into a sausage, which is then wrapped in a thin black cake.
- From the resulting part you need to form a rectangle and cut it into 7-8 strips.
- Stick them on the back of the dinosaur and press it into the body.
- Attach white eyes with black pupils to the head.
- Along the entire surface of the back of the ballpoint pen, the dinosaur skin is given relief.
- In a stack, stripes are drawn along the collar, the line of the mouth and the tips of the paws.
The dinosaur is ready.