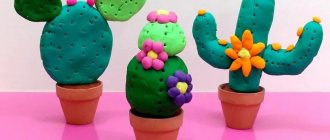
Modeling fruits from plasticine
Another master class on plasticine modeling from our regular author Elena Nikolaeva.
Girls can feed their dolls not only with healthy vegetables, but also fruits , which are also worth learning how to sculpt from plasticine. Two parallel modeling classes will help children quickly navigate and distinguish vegetables from fruits. Of course, the list of such fruits is inexhaustible, so we will learn how to sculpt only a few (the most popular options).
sculpting fruits to coincide with the harvest festival, if we are talking about rural areas, or with the autumn school exhibition of crafts. This could be a standard labor lesson in elementary school or a training session in kindergarten. Even the youngest children can easily find objects to copy among the fruits, choose the appropriate color of plasticine from the box and create a craft, remembering what the object looks like.
In this sculpting lesson we will learn how to sculpt an apple, pear, plum, orange and grape. And then all that remains is to feed your dolls with foods rich in vitamins. For work you will only need blocks of plasticine and stack (photo 1).
How to make an apple from plasticine
To sculpt an appetizing apple, choose green (dark or light), yellow or red. Green may also be needed to form a leaf (photo 2).
The shape of an apple is a ball. Roll it out of red plasticine or another color. To make the fruit more colorful, you can add green or yellow barrels. In this case, prepare a small piece of green plasticine (photo 3).
Make a cake from green plasticine and attach it to the red fruit (photo 4).
Crush the green plasticine with your fingers, smoothing the surface of the ball. Roll the dough again in your hands to get a unique fruit (photo 5).
Make a hole (recess) on one side with the tip of the stack (photo 6).
Insert a brown stalk into the hole and attach a green leaf to make it clear that this is a ripe and appetizing apple (photo 7).
How to make a pear from plasticine
When sculpting a pear, we will not stop at one color, but will mix several suitable shades at once: red, yellow, orange, green and their various shades. Prepare several suitable pieces (photo 8).
Pull all the pieces into sausages (photo 9).
Intertwine and mix the sausages together to get an unusual multi-colored mass (photo 10).
Create a pear by shaping the soft mass into the correct shape, like a light bulb (Photo 11).
Also add a cutting and a leaf, after making a recess (photo 12).
How to make plums from plasticine
To sculpt plums, you can use lilac, purple, blue, green, yellow and other colors of plasticine. Choose any of them and knead (photo 13).
Make several small balls (photo 14).
Draw out the balls into oval pieces. Using a stack or toothpick, apply a longitudinal stripe to each fruit. Prepare very thin gray threads as cuttings (Photo 15).
Make several plums (photo 16). Cherry plums are also made in the same way, only the shape of the parts is better left round, apricots - to make them you will need orange plasticine.
How to make an orange from plasticine
Modeling an orange will not cause any difficulties for anyone. Initially, you should roll an orange ball (photo 17).
Place a small brown dot on the ball. Using a stack or toothpick, start making holes all over the surface of the ball (Photo 18).
Smear the entire surface to obtain a fruit with a thick, rough skin (Photo 19). The same method can be used to make tangerines, only the balls will have to be flattened a little during sculpting.
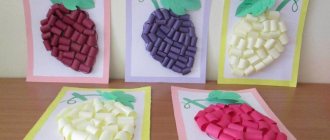
How to make grapes from plasticine
To sculpt a bunch of grapes, you will need two types of plasticine: for leaves and tendrils, and for berries. For example, it could be green and purple plasticine (photo 20).
Roll purple balls (Pic 21).
Make the balls more oblong. Attach them together to form a bunch of grapes (photo 22).
Pull the green plasticine into very thin strands to create antennae. And also prepare round cakes, from which cut out grape leaves in a stack (they are similar in shape to maple leaves) (photo 23).
Glue the stem, leaves, and tendrils to the brush to get very tasty and healthy food for dolls (photo 24).
Our set of fruits is ready (photo 25).
All together they look like real autumn wealth. And after work, the girls will be able to continue playing with their dolls and feed them.
See here for information on modeling vegetables from plasticine.
In order not to forget the address of the page and share with friends, add it to your social networks: Do you want to know news about competitions or master classes?
Tags: Food for dolls, Modeling
Attention! It is better to write urgent questions in the comments on the website (form at the bottom of the page) or, better yet, directly by email. There are no notifications about comments from the VKontakte form! This form is more for feedback. 
Your comment Cancel reply
How to make a horse, cat, dog, lion and pony: diagrams
To sculpt a horse, immediately prepare the material and tools :
- plasticine of different colors;
- cardboard for stand;
- paper, felt-tip pens for making eyes;
- stacks, plank.
Progress:
- Start with the mane and tail. To create them, roll out thin strips of different colors.
- Then make four legs out of white plasticine.
- Roll out the parts on the board: body, neck, head, ears.
- Prepare a stand - stick green plasticine onto cardboard.
- Assemble the horse using toothpicks.
- Glue the eyes.
Next, look at what parts the cat . Make them step by step and connect them together.
The image below shows in great detail how to make a puppy . Follow the step by step diagram and you will have a beautiful dog.
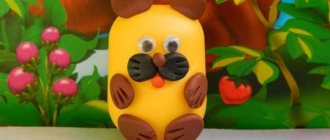
Even with a 3-year-old child, you can make a funny lion cub if you carefully look at the pictures below.
This shows the main components of a pony . All you have to do is divide the pink, black, blue plasticine into parts, mold these parts, and at the end connect them.
But the process is not over yet. Don't forget to glue the mane and tail to the pony.