LiveInternetLiveInternet
Saturday, July 04, 2015 23:41 + to quote book
DIY DYMKOVO TOY Necessary materials: plastic bottle; sculpture plasticine or ordinary children's plasticine; paints; brush; flour; sharp scissors.
Manufacturing: * First of all, you need to cut off the neck of the bottle using sharp scissors. You should have a blank for the future Dymkovo toy (see photo).
* Now you need to cover the resulting blank from a plastic bottle with plasticine. It is very important to make an even and neat layer without streaks or unevenness.
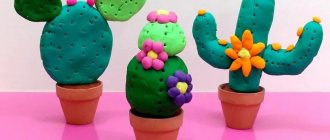
* Then build a small plasticine ball that will serve as the head in the future Dymkovo toy. Be sure to make a tall kokoshnik out of plasticine, braid a braid, wear a wreath, etc. Don’t forget about your hands, as well as all kinds of additional elements: basket, handbag, bucket, child, samovar, etc.
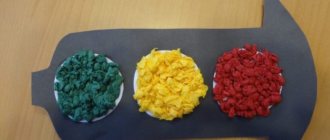
* Now the plasticine mold must be thoroughly coated with flour, this is necessary so that the paint (for example, gouache) adheres well and does not form drops.
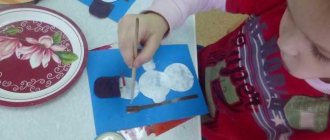
* Now you can start painting and decorating. Before you start painting, be sure to paint the entire figurine a single white color. Wait until the white layer dries and begin the creative process of painting.
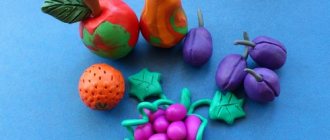
* Below we attach some examples of patterns and colors that are used when decorating Dymkovo toys.
* Russian people have always been famous for their special ingenuity and sense of beauty. Apparently, therefore, the beginning of many decorative and applied arts originates precisely in Ancient Rus'. The News Portal decided to devote this article to another ancient craft that arose in Rus' more than four hundred years ago. We will talk about the famous Dymkovo toy. * The value of the Dymkovo toy lies in the fact that it is unique handmade. There are no two identical Dymkovo toys in the world, because even the same master cannot create two Dymkovo toys that are as similar to each other as two peas in a pod. Dymkovo toys are made from bright red clay, then fired and subsequently painted. * In this article we want to invite you to learn how to make Dymkovo toys with your own hands. Since we don’t have special ovens in our apartments, and it’s also not possible to get real bright red clay, we will make Dymkovo toys from scrap materials.
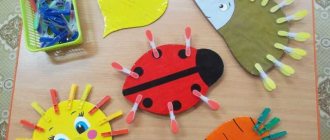
. * This technique will be interesting and understandable to both adults and children. So be sure to try it, and you will end up with something wonderful that you can play with, give as a gift, or place in your room as a piece of furniture.
Series of messages “DO YOUR OWN HANDS”:
Part 1 - Wool street art. Part 2 - Do some crafts! Part 3 - WOODEN TRELLISH - SUPPORT WITH YOUR OWN HANDS Part 4 - Modeling and painting of the Dymkovo lady. Part 5 - Wicker storage box with a lid and handles from old newspapers. Master class. Part 6 — PAVEMENT TILES WITH YOUR OWN HANDS.
Series of messages “Master Classes”:
Part 1 — Tilda’s Master Class “Dreaming Angel” Part 2 — Sewing lessons from Channel 1 “Good Morning” Part 3 — General questions on sewing technology master classes Part 4 — Modeling and painting of the Dymkovo lady. Part 5 - The most complete collection of video lessons from Marat Ka Part 6 - The most complete collection of video lessons from Marat Ka ... Part 12 - Storage box - continued. Weaving of top and handles. Part 13 - Master class on weaving from newspapers: Storage box Part 14 - Master class on weaving from newspaper tubes
Tags:
Dymkovo toy master class folk crafts clay crafts from a plastic bottle Zhostovo gestural Gzhel DIY Pavloposad shawls
Cited 8 times Liked by: 2 users
Like share
0
Like
- 2
I liked the post - Quoted
- 0
Saved
- Add to quote book
- 0
Save to links
Liked2
0
Manufacturing stages
- The basis of the toy. The Dymkovo young lady begins with a big skirt. First you need to knead a piece of plasticine and roll it into a ball. Then make a depression in the lower part and, gradually expanding it, form something like a cup with thick walls. Continuing to enlarge the hole, at the same time pull the plasticine up so that the bowl looks like an elongated inverted vase. Place on a stand and level the surface of the future skirt. This completes the first stage of modeling.
- The body is made from a piece of plasticine shaped like a cone. A ball-shaped head and handles made in the shape of two friends are attached to the top. The base of the doll is finished. All parts are glued to each other so that the toy looks solid.
- Decorative elements. The characteristic wavy frills are the most recognizable feature; the Dymkovo young lady is adorned with them in abundance. To make them you need to stock up on long strips of plasticine. To make them, you need to roll out a thin layer, like a flat cake, and cut it using a ruler and a special plastic knife into smooth, beautiful long strips.
- Gather each strip in your hands, forming frills, and secure their edges on one side. These elements can be placed on the skirt, in the form of cuffs on the sleeves, placed around the head in the shape of a crown, and they can also be used to form an apron on top of the plane of the skirt.
- Additional decorations include various items. For example, a handbag, a rocker with buckets, a basket, a large roll, small children or a small pet that literally stuck to the owner’s hem.
- A tall hat is often used as an accessory. You need to mold it from a small cylinder, which is attached to the head of the craft. Then fields in the form of folded wavy frills are formed from plasticine strips. Now the Dymkovo young lady made of plasticine is dressed up as expected.
- The finishing touch is the design of the face, which consists of small elements, circles made from balls. It is necessary to attach the eyes, nose, rosy cheeks and mouth.
- If the product is made from colored plasticine, polymer clay or baked plastic, at this stage it is considered finished. When working with plain sculptural plasticine, the doll is covered with acrylic paint.
Materials for making folk toys
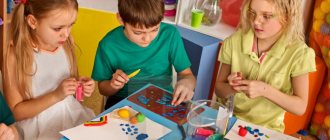
Traditionally, handicrafts are made from clay. But other options are also possible - plasticine and salt dough. In this case, the difference is only in the material; the young lady herself) does it with her own hands in the same way as traditional samples.
In classes with children, when organizing joint creativity, you can choose any of three materials. Each has its own advantages and disadvantages. Modeling the Dymkovo young lady in stages - repeating the same operations.
Clay, the most common material, requires a lot of effort and special equipment, but the products are durable and the most reliable, close to the original.
Children do not really like working with cold, wet and capricious clay, which must be constantly wetted during the work process; they prefer warm and soft plasticine or pliable dough.
Complex coloring pages with a lot of small elements
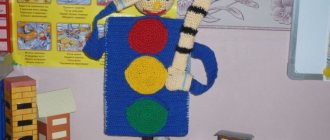
Lesson summary on the “traffic light” application in the middle group
Dymkovo toys (templates for drawing, as well as drawings for coloring, are freely available on the Internet), due to the variety of their options, can be used in work with older children.
For schoolchildren attending grades 3–5, it will be interesting to paint more complex patterns with a lot of small details.
Teachers recommend drawing parents’ attention to the following pictures:
| Sketch for coloring | Description of the drawing and the principle of working with it |
| "Walk". This picture for coloring is a complete artistic composition. It depicts a man and a woman floating in a boat on a river. The task facing the child is to make colorful not only people’s costumes, consisting of small parts, but also the objects surrounding them. These include the celestial bodies, the pattern on the ship and the waves. The main colors that the student will work with are red, blue, white, black and their derivatives. | |
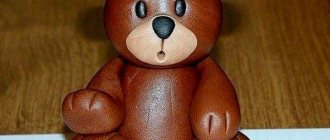
| "The Bears". This sketch shows a family of bears. Animals are depicted in human form: they wear clothes and jewelry. The difficulty in coloring this drawing lies in the large number of small details of the characters' clothing. To complicate the task, you can invite the child to make the picture as realistic as possible (paint the bears in the appropriate colors, as in life, and their clothes in the shades most often found in adult wardrobe items). Typically, children work with this image using blue, red, black, yellow, brown and white colors. | |
| "Rider". This is one of the most popular pictures for coloring, used by teachers when working with them. It depicts a boy standing on a horse. In this case, the child will need to carefully paint the smallest details of the image of the young man, as well as reproduce the color of the animal and surrounding objects. It is recommended to work with brown, black, red, blue, yellow, orange, blue and green. |
Theme and process of making figurines
All family members were involved in the creative stage - each was assigned a specific task and stage of the technological process. The range of colors, shades and patterns were selected individually.
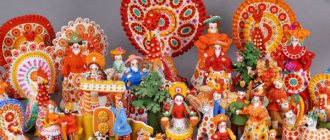
Product appearance
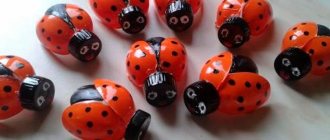
Rich colors were used to decorate clay toys. Among the main shades inherent in Dymkovo painting were: red, orange, yellow, blue, green and gold.
The content of the pattern schemes is dominated by a classic ornament using all kinds of geometric shapes (circle, rhombus, checkered pattern, dots). As an additional decorative element, small drops or diamonds of gold leaf are applied to the finished multi-colored pattern.
Initially, the forms were brief, but over time the appearance and quality of the toys improved, and their range expanded significantly. Dymkovo masters were inspired by objects from life - they sculpted everything they saw around them.
Toy theme:
- Animals.
- Birds.
- Male and female images in Russian national clothing.
- Children in bright outfits.
- Buffoons.
- Water carrier (woman with a rocker).
- Subject images.
In the Soviet era, the folk craft of making figurines was put into production, but there was not enough information. Workshops were opened and created in which craftsmen made clay figurines with their hands, fired them, and then painted them and covered them with egg whites.
Symbolism of the colors of the figures:
- White. Means purity.
- Black. Characterizes lies and mistrust.
- Green. Represents nature.
- Red. Suggests strength, power and health.
- Blue. This is a symbol of the sky.
In the 21st century, the theme of the toy has expanded. Craftsmen create not only standard images, but also heroes of folk tales, products on historical themes, representatives of various professions, household items and antique utensils.
Genre scenes, representing compositions of several figures, depict the current life of the city and village: festivities, holidays, circus performances.
Materials and production stages
The main raw material for making toys is red clay. To obtain a pliable and plastic mass, the material was combined with fine river sand.
Stages of production of figures:
- Formation.
- Coloring.
- Drying.
Each part of the product is created separately: a body is formed from a spherical piece of clay, to which other parts (legs, arms, head, small parts) are attached. All particles are connected by soft transitions.
The product is polished with a finger soaked in water, then dried in fresh air so that the sun's rays do not fall on the product. Small figures are fixed in a couple of days, and large ones in a week or two. Then the workpiece is fired in a muffle furnace, and after cooling it is bleached with tempera paints. The next step is coloring using pure tones. In the old days, natural dyes were used: eggs, milk, soot, vinegar. Nowadays, craftsmen use ready-made acrylic toners. The main requirement of the final stage is brightness and naturalness.
Interesting facts indicate that in the old days craftsmen decorated some parts with gold leaf. The paint was diluted with egg yolk according to the master's secret recipe. A strict sequence of coloring was observed, starting with the hair and ending with the paraphernalia.
The patterns and drawings in the Dymkovo figurine are associated with amulets and symbolism of nature. Solar and lunar signs are applied - indicating the beginning of life, and rhombuses are a sign of fertility, waves - the personification of sky and water.
Bird feathers and thin sharpened sticks were used as painting tools. Nowadays, colorful dyes and soft natural brushes are used to paint toys.
Today, the Dymkovo (Kirov) toy continues to develop and improve. New technologies are created, new ideas are brought to life, but only the manufacturing traditions and the secrets of the masters remain unchanged.
The figurine from Dymkovo is a fine handmade product - a source of pride for the craftsmen. It is difficult to overestimate the historical and cultural significance of folk crafts, which clearly demonstrate the creative potential of the inhabitants of the Vyatka region.
Complex coloring pages with a lot of small elements
Dymkovo toys (templates for drawing, as well as drawings for coloring, are freely available on the Internet), due to the variety of their options, can be used in work with older children.
For schoolchildren attending grades 3–5, it will be interesting to paint more complex patterns with a lot of small details.
Teachers recommend drawing parents’ attention to the following pictures:
| Sketch for coloring | Description of the drawing and the principle of working with it |
| "Walk". This picture for coloring is a complete artistic composition. It depicts a man and a woman floating in a boat on a river. The task facing the child is to make colorful not only people’s costumes, consisting of small parts, but also the objects surrounding them. These include the celestial bodies, the pattern on the ship and the waves. The main colors that the student will work with are red, blue, white, black and their derivatives. | |
| "The Bears". This sketch shows a family of bears. Animals are depicted in human form: they wear clothes and jewelry. The difficulty in coloring this drawing lies in the large number of small details of the characters' clothing. To complicate the task, you can invite the child to make the picture as realistic as possible (paint the bears in the appropriate colors, as in life, and their clothes in the shades most often found in adult wardrobe items). Typically, children work with this image using blue, red, black, yellow, brown and white colors. | |
| "Rider". This is one of the most popular pictures for coloring, used by teachers when working with them. It depicts a boy standing on a horse. In this case, the child will need to carefully paint the smallest details of the image of the young man, as well as reproduce the color of the animal and surrounding objects. It is recommended to work with brown, black, red, blue, yellow, orange, blue and green. |
Dymkovo painting. Elements of Dymkovo painting
The Dymkovo toy is a bright representative of Russian folk clay art. It is precisely this that provides a unique opportunity to trace how this folk art developed over a long period of time, replacing many generations and dynasties of masters.
Dymkovo painting: history
The founder of this folk art was the small settlement of Dymkovo (hence the name), located near the city of Kirov.
Initially, in the painting process, Dymkovotoys used exclusively aniline paints, which were required for dilution. For this, peroxide kvass or vinegar was used. The brush was made independently and consisted of a canvas wound on a wooden stick. This homemade artistic tool was used when it was necessary to draw a line. To draw the mote, the master used the butt of an evenly cut rod.
Production of Dymkovo toys
These toys are still completely handmade. Each representative is the work of one master. To make the figurines, local red clay is used, thoroughly mixed with fine sand. The figurines are molded in parts, then the finished parts are joined and completed.
Finished figures must be dried before firing. This process takes from 2 to 20 days. Roast food in the oven at a temperature of 700 to 800 degrees. Then the surface of the toy is covered with special temperature whitewash. In the old days, chalk diluted with milk was used for these purposes.
This completes the process of making the toy. Next comes the Dymkovo painting. It represents an absolutely unique national style.
Elements of Dymkovo painting
When painting these toys, the master always used strict geometric patterns. Dymkovo painting is a combination of circles, zigzags, strict straight or wavy lines. There are always round spots, cells and just dots.
Elements of Dymkovo painting also include diamonds made of gold leaf or cast, which are glued onto an already applied pattern.
Each master applies ornamental elements to the design in accordance with personal wishes, in different ways and in different combinations. In this case, the product can be almost completely covered with a pattern, and sometimes the author’s laconicism can be seen. Therefore, among all the variety of Dymkovo toys, it is simply impossible to find two identical figures.
Dymkovo painting is characterized by the use of special signs symbolizing the desire for truth, beauty and a healthy lifestyle. All patterns of traditional Mist painting are associated with nature and various amulets.
Each element of the image has its own hidden meaning. So, the wavy line is a symbol of water. The crossed straight stripes represent a log, and the circle with a star in the middle represents the sun. Dymkovo painting, images of which you see just below, also contains various plant elements: grains, berries, leaves and flowers.
Shape of the Dymkovo toy
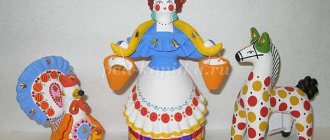
Classics for Dymkovo toys are figures of riders, roosters and horses.
Female figures have flaring bell skirts and high headdresses - kokoshniks. The expressiveness of the details is especially important here: the elegance of the hairstyle and headdress, all kinds of frills, capes, umbrellas, handbags and other women's accessories. The colors of human figures had a certain sequence. First, black hair was used to draw hair, eyebrows and eyes. Three orange or red spots placed on the front of the toy using a beam represented the mouth and cheeks. Then they painted the hat and at least the bright skirt.
Characteristics of animal painting
The painting of the Dymkovo toy has its own characteristics.
Each clay character is painted in a special way. Traditional figures of horsemen, roosters and other favorite people of the people are painted very brightly, even fantastically: a horse can have bright blue apples on its sides, a turkey can have a fascinatingly colorful fan-shaped tail, and a goat can have a red tail with gilded horns. . “Lionfish” ducks have a distinctive feature: a horizontal row of wings. When you look at such a duck, it seems that she is wearing two aprons with a molded frill. In addition, painting the toy requires a certain pattern sequence. The first to be applied is a wide strip running along the duck breast, narrower stripes extending from the neck, and only later are transverse lines forming a traditional checkered pattern.
In the painting of the skate-shaped whistle, vertical stripes are combined with rows of multi-colored polka dots. The shades used are not necessarily in harmony with each other.
Ducks and horses are the most popular images of animals from which the Dymkovo toy is created. Goats, cows, sheep and pigs, as well as poultry, are much less common. Anatomical details, as a rule, are not observed, so all the animals are somewhat reminiscent of Dymkovo horses. Only the shape of the muzzle makes it possible to understand who is in front of us. The painting of these animals is represented by longitudinal rows of dark-colored dots or small peas of different shades.
Dymkovo paints
The patterns of Dymkovo painting are unusually bright.
Blue, red, orange, yellow, crimson, emerald and green shades are the main colors used in this technique. Brown and black paint are used only in small quantities. It should be noted that the selected tones also have their own symbolic meanings. The green color in the image of the common people is closely connected with the concept of life, symbolizing nature and peasant arable land. Moral purity, goodness and truth are, of course, white. The red color symbolizes not only fire, but also personifies health, strength and beauty. Blue color of the sky.
Decoration
The final stage of decorating the toy is applying gilding. This is what distinguishes the Dymkovo toy, bringing unique features to it. In Russia, real gold leaf was used for this, which was a very thin gold plate pushed together with paper strips (this prevented the gold from sticking together). Small rhombuses were cut out of it, which were glued in the right places using egg white.
Real Dymkovo painting
To paint toys in modern production, gouache paints diluted in eggs are used, as well as tempera paints or those specially designed for ceramic products.
A ferret or a core brush is used to apply the design. Today, Haze, unfortunately, has long lost the qualities inherent in folk toys: efficiency and cheapness. Of course, these products contain special plastic. However, due to excessive staticity and detail, the Dymkovo figures became simply beautiful souvenirs.
.