Paper applique
Everyone has such a material as paper in their home. Therefore, making our Traffic Light will not be difficult.
What we need:
- Sheet of cardboard
- Colored paper
- PVA glue
- Scissors
- Stationery knife
- Scotch
- Gouache
- Brushes
- Sippy cup and water
So, let's get started:
- First we need to take a sheet of cardboard, it should be rectangular in shape.
- Dip the brush into water and then into black paint and decorate our cardboard.
- While the sheet dries, let's work on colored paper. We need certain colors: red, yellow and green. It is these flowers that our craft consists of.
- Take scissors and cut out circles. To make them even, you can use a compass or use improvised objects.
- This could be a glass or mug.
- You can add originality to our traffic lights and cut them into different shapes, so that you can then glue them onto our signal circles.
- They can be in the shape of hearts or small flats with which you can decorate everything.
- You can use glitter or eggshells this way. It all depends on your imagination and the imagination of your child. As shown below in the picture.
- In the meantime, the cardboard has dried and we can connect all our parts.
- You need to make marks on the cardboard so that the circles are glued at the same distance from each other.
- Then we smear the colored circles with glue and carefully glue them each into place.
- There is red at the very top, yellow in the middle, and green at the bottom. We wait. Let it dry. And look what we got.
Examples of applications
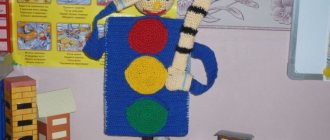
DIY application “Traffic light” for children of the senior preparatory group
Goal: making a “Traffic Light” applique from improvised materials. Objectives: – learn to compose an image of an object from several parts; – develop fine motor skills of the fingers; – teach careful gluing, use glue and brush correctly; – cultivate interest in working with different materials. Materials and tools required for work: colored paper, scissors, household sponge, PVA glue, pencil, cardboard, bullets, corrugated cardboard. Templates STRICT TRAFFIC LIGHT The traffic light told us sternly: - Be careful, there is a road here! Don't play, don't be naughty, just stand and watch! The red light came on at the top: Red light is always dangerous! A tractor and a tram are coming, Hey, driver, don’t yawn! White zebra crossings: Pedestrians wait calmly. The traffic light told us clearly - Red light - it’s dangerous to go! The traffic light winked at us, He blinked his yellow eye. Yellow light and red light: Still no road! The traffic light is on guard, At night it doesn’t even sleep.
Work progress: From colored paper, cut out the traffic light parts according to the template. We glue them onto cardboard.
We outline the “eyes” of the traffic light. We begin to lay out the “eyes” using bullets and PVA glue. We decorate the finished application with a frame made of corrugated cardboard. Here is another option for performing the “Traffic Light” application. We cut out the traffic light parts according to the template, glue them onto cardboard, and mark the “eyes” of the traffic light. Take a household dishwashing sponge of three colors (red, yellow, green) and tear it into small pieces. Lay out the “eyes” of the traffic light, gluing the sponge with PVA glue.
We frame the finished application. These are the traffic lights we got!
Traffic light made from CDs
Such a craft can not only help a child remember the rules of the road. During the process, the teacher or parents can have a conversation about environmental pollution and reusing things.
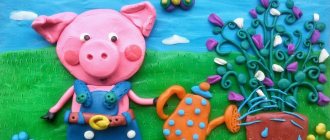
Plasticine traffic light
What child doesn’t like to stretch their hands with plasticine? But don’t just stretch it, create something. In this case we will make a traffic light. For this we need:
- Plasticine
- Chupa Chups stick
- Pen refill
Progress:
- First we need to make the body of our road assistant.
- Let's take a piece of black plasticine and knead it thoroughly, giving it the shape of a rectangle.
- Next you will need to use red, yellow and green plasticine. From these pieces you need to roll into small circles.
- Then, carefully take them with your fingers and flatten them a little.
- And at the end we assemble the traffic light craft. Glue the circles to our body.
- A traffic light, as everyone knows, is mounted on a pole; you can use a candy stick or a pen rod as a pole.
- The fake is ready.
Edible traffic light
Well, everything here is generally very simple. All children love sweets. And here, when making crafts, they can not only enjoy themselves, but will also forever remember the role a traffic light plays in traffic.
- For the base we need a wafer or cookie. Make a rectangular shape and fill it with chocolate.
- Then add red, yellow and green caramels. You can use M&Ms.
That's all! Looks very tasty.
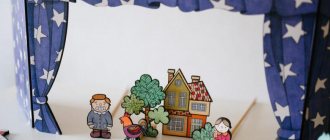
Traffic light from a plastic bottle
This fabulous option is very easy. Let's turn on our imagination. We will need:
- Plastic bottle
- Brushes and paints (preferably gouache)
- Colored paper
- PVA glue
- Scissors
Work progress:
- We choose a plastic bottle, it is better to take the one with a longer neck.
- We paint it a neutral color (meaning not red, not yellow, not green). Let it dry.
- Next, we cut out circles from colored paper for the traffic light itself and details for our fairy-tale character. These are eyes, mouth, nose, ears, hands.
- The bottle is dry. Carefully glue the finished parts and, of course, the circles, making sure that the distance between them is the same.
- But our hero cannot be without hair! We also make hair from paper. Cut into thin strips and twist with scissors.
- We also make the cap out of paper. And look what happened. To fully complete our hero, we will add a rod or a road sign to the handles.
Pasta craft
Spaghetti, spirals, shells and other shaped pasta can be used to make almost any item. Therefore, pasta is often used to create crafts with children.
What you will need for work:
- pasta of various shapes (short tubes, curls, flowers);
- food coloring or gouache paint;
- cardboard;
- colored paper;
- scissors;
- cereal (any);
- glue.
Stages of work:
- Color the pasta with diluted food coloring. You can also leave the craft unpainted and cover the pasta with a layer of gouache at the end of the work.
- Apply liquid PVA glue to the cardboard base. Fill the space with cereal, when it dries, paint it black or gray. It will be asphalt. Some of the grain in the corners and base can be painted green - these will be lawns or flower beds.
- It is not necessary to fill the base with cereal - asphalt can be made from gray paper or the cardboard base can be painted with gray paint.
Start making the pasta machine:
- Glue 4 pasta tubes together.
- Stick 2 over the first two tubes, then 2 more. The cabin is ready.
- The truck body can be made from a piece of cardboard.
- Wheels and headlights made from circles of pasta flowers.
Fabric craft
This version of the traffic light is more suitable for girls and real needlewomen. A sewn fake can also serve as an educational toy if the circles are made with Velcro.
So, let's begin:
- You need to take rectangular pieces of black fabric and lay a small layer of foam rubber between them. Sew it together.
- Next, cut out circles from felt (red, yellow, green). We sew them along the edges. You need to sew one part of the Velcro to the traffic light body itself, and the second part directly to the circles.
- For a more interesting design, you can make a fabric lid on top. Having previously divided it into three parts. Thus, each color will be opened separately, or all at once. The fabric craft is ready.
Lesson in the middle group - Application “Traffic Light”
Lesson notes for the middle group. Application "Traffic light"
Equipment: squares of green, yellow and red colors 60x60; ready-made white rectangle 160x70 (“eyes” of the traffic light); scissors according to the number of children; glue stick; paper napkins, oilcloths for each child; a traffic light model made from waste material;
Preliminary work: reading fiction: “what do road signs say”, “rules of the road”, asking riddles; didactic games on the topic: “Talking alphabet of road signs”, “Road signs”, “Name the same sign”;
Progress of the lesson:
1. The guys stand in a circle, the teacher shows the layout of the traffic light and invites them to play. Children pretend to be cars, and the teacher names the colors of the traffic light - red light - no traffic. yellow - wait, and green - come on in.
The teacher tells the children that in one city the traffic lights have stopped working and their traffic is disrupted. The residents of this city need help. Let's help them, guys. (Yes). The teacher invites the children to sit at the tables.
Educator: Now we will make traffic lights for residents of another city where they are out of order. To do this, you will need colored paper in red, yellow, green to cut out the circles. Find her. What shape will you cut the circles from? (square). The corners of the squares need to be rounded to create circles.
-glue colored circles onto a white rectangle.
In what order will you stick the mugs? The teacher draws attention to the layout. Children say: red at the top, yellow in the middle, green at the bottom.
Educator: Looks like a menacing and serious lanky traffic light, he stands at the intersection and looks at everyone point-blank. Saying the word "crossroads".
Along with the discussion, the teacher shows how to make a traffic light by laying out the details of the traffic light on a magnetic board.
Educator: guys, where will you start making a traffic light? Children talk through a plan of action. First, cut out red, yellow, green circles and glue them onto a white rectangle.
The teacher reminds you of the rules for working with scissors and glue. napkin, draws attention to accuracy in work. Residents of another city need bright, beautiful traffic lights.
Execution of the application. The music sounds calm.
During the work, individual work with children is carried out. In a playful way, he points out children’s mistakes and helps to correct them.
The work has been completed. Before analyzing the work, Svetofor (another teacher in disguise) enters.
Praises children for making traffic lights. Asks: What kind of traffic lights did you get? (strict, tall, beautiful, bright)
How did you do?
Children repeat the action plan.
Thank you guys for your help. I will certainly deliver them to another city so that traffic can improve there.
Do you want to play with me? Go out to the middle of the room. I call the color red - you squat, yellow - you stand up, green - you march. Children play with the Traffic Light, then he says goodbye to them, and the attendants remove the equipment.
Themed traffic light
We all love balloons, but kids especially. Our traffic light is made from these and can be used as an educational game.
Any child will love a party dedicated to Traffic Rules.
For production we need:
- Airy small black balls
- Balls with more signal colors
- A thread
- Rack
Work progress:
- The stand can be made from long balloons.
- First, we inflate black balloons and tie them to our finished stand. We try to give it a rectangular shape. We tie red, yellow and green balls in the middle in the correct order.
- The airy structure can also be decorated with balloons in the shape of cars or road signs, which correspond to our themed party.
DIY flat traffic lights
Such traffic lights can be made in the form of an application that is hung on the wall. Or stick colored circles on cardboard or a box that is placed on the podium.
Younger children need help drawing the circles for the traffic lights and cutting them out evenly. School-age children can do this on their own.
Made from cardboard and colored paper
- Cut out a strip from dark cardboard.
- We glue it between two black rectangular cardboard blanks.
- On both sides of the rectangles we glue three circles of red, yellow and green.
The visual teaching aid is ready and can be taken to kindergarten or school.
From disks
In every home there are three disks that are not used for their intended purpose because they are scratched or have lost their relevance. They can be used to create a traffic light. Moreover, the shape of the disk is round and there is no need to cut such a shape from other materials.
Progress:
- Place a disk on colored paper and trace its outline.
- Cut out colorful circles.
- Stick them on disks.
- On each disc with a certain color you can draw a funny face. For example, on a red disc it will be sad because movement is prohibited. And on the yellow disk, the face takes on a serious expression, which means to prepare for the transition. On the green disk the image is smiling because movement can be made.
- The finished discs are glued in the correct order onto cardboard, plastic and wooden surfaces. You can create the most unusual designs, but the order of colors in a traffic light remains unchanged.
- You don’t have to completely cover the disk, but glue multi-colored bottle caps to the middle to create a traffic light. Or you can stick strips on the disk in the form of sun rays of different colors.
There are many options for making crafts from disks, and the main thing is to show your imagination. If you make pompoms from yarn, then they are glued on a disk instead of a nose in the middle, and eyes and a mouth are glued from paper. The result will be multi-colored clowns, each with its own facial expression corresponding to the color of the traffic light.
From colored bags
To create a traffic light from packages, you need to stock up on packages of the colors present in the traffic light.
Progress:
- Cut off the handles and bottom.
- Lay out the bag in the form of a rectangle.
- Bend it in half.
- Cut into centimeter strips up to the fold line.
- Connect the resulting parts with tape to form a ball.
- The balls can be attached in a hollow box or connected together like a snowman.
- Decorate with a cap cut out of cardboard and glue on the hands. Place the wand in one hand.
This traffic light is pleasant to the touch and looks very interesting.
Traffic light from packages
The option is a little more complicated, but quite interesting.
Required:
- Bags (can be trash or cellophane)
- Scissors
- Plastic cover
- A thread
Progress:
- You need to fold the bags into an even stack, carefully cut off the bottom and top from them to get even rectangles. Cut them into even strips.
- Next, take a plastic lid and cut out two rings from it. We put them next to each other and wrap the polo with nets. Then we cut everything along the outer edge, push the rings apart and tie the pom-poms with thread. Trim the edges to make the pompoms even.
- We should end up with three pompoms of different colors. You need to connect them together with a thread. And our traffic light is ready.
- Very funny crafts can also be made from disks; you can crochet a traffic light, or you can simply make one from balls of thread. Much depends on your imagination, and there will always be enough available means.