Summary of the lesson on modeling “Duck” (based on the Dymkovo toy)
Heresek then byndagy yimdastyrylgan oku kyzmetіnіn abstracts
Summary of organized educational activities in the senior group
Event notice/Date:
04.11.19
Tarbieshi/Teacher:
Bilim take salas/Educational area:
creation
Pәn/Item:
modeling
Overall/Cross-cutting theme:
“The people are the source of art”
Takyryby/Topic:
“Duck” (based on the Dymkovo toy)
Maksattaras/Goals:
1Tarbielik - educational:
Cultivating interest in the toys of other peoples.
2. Damytushylyk - developing:
Development of aesthetic feelings.
3.Okytu - educational:
introducing children to Dymkovo toys (ducks, birds, goats, etc.), paying attention to the beauty of the continuous streamlined shape, specific coloring, painting. Learning the ability to convey the relative size of parts of a duck, the technique of smearing, smoothing, and flattening.
Pedagogical technology / pedagogical technology:
health-saving, person-oriented
Resurstarmen kamtamasyz etu/Resource support:
Dymkovo toys. Clay, modeling board (for each child).
Bilingual component / Bilingual component:
Uyrek - duck
Uyimdastyrylgan oku kyzmetinin Barysy
1.yimdastyrushylyk kezeni/organizational moment
The teacher invites the children to go to an exhibition of clay toys.
2. Negіzi bolіmі/main part
When exhibiting Dymkovo products in front of children, note their unusualness, the beauty of a white toy with a bright, elegant pattern.
Story:
In the village there live craftswomen who make beautiful and elegant toys. They are sculpted by craftswomen from clay, dried, and then fired in a kiln. After firing, they are covered with white paint and decorated with a bright pattern. These toys are called Dymkovo because they are made in the village of Dymkovo.
Ask what the pattern is made of. Invite the children to sculpt a duck.
Bilingual component / Bilingual component:
Uyrek - duck
Examine the toy, ask what techniques they will use when doing the work.
Finger gymnastics “Duck”
| The duck walked along the shore, The gray one walked along a steep path. She led the children with her, | (“They walk” with two fingers on the table, waddling.) |
| Both small and large, | (Bend the ring finger; thumb.) |
| Both medium and smaller | (Bend the middle finger; little finger.) |
| And my favorite one. | (Bend the index finger.) |
Independent work of children. The teacher observes and helps if necessary.
3. Korytyndy/final part
Consider all the images sculpted by the children and choose the most expressive ones.
Dymkovo patterns
The geometric pattern consists of stripes of different thicknesses, wavy lines, rings, circles, peas, and ovals. Characteristic of painting is a combination of large and small elements. Small elements are decorated with large rings, circles, stripes; or scattered between them (dots, dashes, thin lines).
Summary of a modeling lesson in the middle group of the kindergarten "Duck"
Lesson in the middle group.
Modeling “Duck” Purpose: to teach children to sculpt an object consisting of several parts. Tasks: 1. Reinforce sculpting techniques: separate parts from a whole piece and maintain their size when sculpting, roll the dough between your palms, connect the parts, pressing them tightly against each other, practice using the technique of pinching and pulling; 2. Develop fine motor skills of the fingers. 3. Develop the ability to work in a team, causing a positive emotional response to the overall result. Materials and equipment : salt dough;
boards; napkins; for each child); lake is a mirror; duck mask hats for each child; toys - poultry; musical accompaniment; “Worms” marmalade to encourage children. Progress of the lesson.
Educator : Hello, guys! Children : Hello! (The voices of poultry are heard). Educator : I was just about to feed my poultry. Will you help me? Children : Yes Riddles Clucks, clucks, calls the children, gathers everyone under his wing. Children: Chicken Teacher: Well done, guess another riddle: Red paws, pinches your heels, Run without looking back! Children : goose! Educator: And you guessed this riddle! Well, now you can’t guess: She walks in the rain, She loves to cut grass! “Quack! "Shouts, It's all a joke, Well, of course it is... Children: Duck! Educator: Well done, guys, here's another riddle. Amazing child! Just out of diapers He can swim and dive, like his own mother. Children : Duckling! Educator: Well done! So you guessed it. This is a duck and ducklings. They are not in the yard, they probably went to the lake. Let's go look for them. The teacher and the children approach the table on which the lake is decorated. They surround him from all sides. One duck swims on the lake). Educator : Look, guys, the duck is swimming alone, you can see the kids are hiding in the grass. The mother duck felt lonely and began to call them. “Quack-quack-quack! ", but the ducklings do not respond. Mother duck asks you to help find her ducklings. Let's help her! How can we help her, guys? Children : ... you can make ducklings... Educator: of course, you can make ducklings! But first, let's play with you a little. The ducks came out into the meadow, (we walk like ducklings) - Quack-Quack-Quack! A cheerful beetle flew by - Zhzhzhzhzh! (we wave our arms - wings). Geese arch their necks - Ga-Ga-Ga (circular rotation of the neck). The feathers are straightened with the beak (the body turns left and right). The wind swayed the branches (we swing our arms raised up, Sharik also growled - Rrrrr (hands on the belt, bend forward, look in front of us). The reeds whispered in the water - Shhhhhhhhh (raise your arms up and stretch, And again there was silence - Shhhhhhhh... (crouched) Educator : Well done! Now sit down at the tables, we must help the mother duck. Educator: Look, children, what parts does a duck consist of? Children : Head, body. The head is smaller, the body is larger. The head is round, and the body is oval. Educator : What do you think, what is this? Children: Beak, tail. Educator: Well done! First you need to divide the dough into two parts. One piece of dough, which is larger, will be the body; a smaller piece will be the head. To sculpt the body of the duck, we need to take a piece of plasticine, which is larger, and roll it into an oval in your palms. Then we also sculpt the head, only with a ball. Next, we connect these two parts, pressing them tightly to each other. But very carefully so that the shape does not break. Then we, guys , by pinching, we make a beak on the head of the duckling and pull it back a little, and on the body, where the tail should be, we pull it out. Look how I do it. Our duckling is almost ready. Is he missing some eyes or something else? Children: Wings. Educator : Look, you have cereal (what kind of cereal) in your plate - buckwheat, make eyes out of it for the duckling. Carefully! Where the eyes should be, press the grain. (Music sounds, children start the lesson). Educator: Our duck in the pond is really looking forward to her ducklings! (Providing individual assistance to children) (Children finished work) . Educator: Now, guys, let’s go and put all the ducklings on the lake. Our duck is one, but there are many ducklings! Let's count them guys, see if they all returned to their mother! Children count: 1;2;3;4;5;6;7;8;9;10. You guys are great, you did a great job! Look how happy the mother duck is! And the ducklings are happy too, they have returned to their mother! Everyone has fun, and so do we! Educator: So that our guests also have a good mood, let's dance for them together with our duck and ducklings. Please, everyone, stand around the lake, and I will put on duckling hats and masks for you. Now listen to the music and repeat all the movements after me. (Music sounds. Children dance the dance of little ducklings) Educator : What a great fellow you are! Me and the duck thank you for the wonderful dance. And the duck also wants to thank you for returning the babies to her! She handed you the treat. Now let's not bother our duck and ducklings, let's go play.
We recommend watching:
Summary of educational activities for children with parents in the middle group. Do-it-yourself doll Summary of a lesson on speech development on the topic “Toys” in the middle group Methodological development of GCD for the development of communicative activities in children of the middle group Synopsis of a game lesson in mathematics in the middle group of a preschool educational institution
Similar articles:
Lesson in the middle group “Winter clothes”
Math lesson notes “Number 1”. Middle group
Let's decorate the Dymkovo duck
Summary of a drawing lesson in the middle group “Let's decorate the Dymkovo duck”
Target:
continue to get acquainted with the Dymkovo toy and the features of the pattern.
Lesson objectives:
– educational – to develop the ability to paint a Dymkovo toy, conveying the characteristic features of Dymkovo painting;
– developing – to develop cognitive activity, creative imagination, creative abilities, hand motor skills;
– educational – to instill in children a love of folk art, respect for the work of Dymkovo masters.
Progress of the lesson
Educator:
Let's look at the patterns, what do you see?
Children:
Stripes, circles, rings, wavy lines, straight lines, dots.
Educator:
What is this? You know?
Children:
These are all elements of painting.
Educator:
Who knows what kind of painting this is?
Children:
This is Dymkovo painting.
Educator:
Look what's shown on the screen now?
Educator:
That's right, it's a Dymkovo toy! Let's, guys, remember the history of this toy.
Educator:
Why were they called that?
Children:
Because they were made in the village of Dymkovo.
Educator:
Why was this village called Dymkovo?
Children:
Because in winter, when the stoves are lit, and in summer, when there is fog, the village seems to be in a haze.
Educator:
There was a column of smoke coming out of the chimneys, as if everything was in a haze. They gave a blue light, and the large village was named “Dymkovo”. People loved songs and dances there, and miracles were born in the village - fairy tales. All toys are not simple, but magically painted. They themselves are snow-white, like birch trees, and they have bright circles, squares, and stripes on them.
Educator:
Yes, in the old days, in the village of Dymkovo, the Dymkovo toy was born. What did the craftsmen make it from?
Children:
This toy was made from clay.
Educator:
But clay toys don’t look very elegant, so how did Dymkovo ones turn out so cheerful and elegant?
Children:
Because Dymkovo masters painted them with bright patterns.
Educator:
What painting elements did the masters use?
Children:
Circles, stripes, dots, grid, ring.
Educator:
Well done, right. Do you know that there is a secret in these elements: the circle means the sun, the wavy lines mean water, and the intersection of straight lines (rhombus) means the earth.
Educator:
What beautiful toys. Guys, look, these are toys from Dymkovo. Smoke covered the roofs of houses in winter. So they named the village Dymkovo. Every house has bags of clay, chalk, boxes of paints, boxes of eggs and milk - all this is needed for the miracle that you see on the screen. A long time ago, craftsmen sculpted only whistles from clay. But there were many children in the village, and the craftsmen decided to make toys for them from clay. They mold toys and put them in the oven. They come out of the oven hardened, strong, and sonorous. Then they dilute chalk in milk and whiten the toys, putting them in the sun to dry. Then it’s time to paint the toys.
Lesson: “Dymkovo duck” (Clay modeling)
⇐ PreviousPage 4 of 6Next ⇒
Target:
—Continue to introduce children to folk crafts, consolidate and deepen knowledge about the Dymkovo toy.
-Involve in the production of clay toys of the Dymkovo type.
-Teach to see the expressiveness of the form of a toy, sculpt a duck from life in a constructive way (from individual parts), observing shapes, proportions and details.
-Teach how to place the figurine evenly and beautifully on the base.
-Learn to mark feathers, wings and eyes in stacks. Decorate the wings and head with moldings, balls, and cakes.
Material. Dymkovo clay toys (whistles: ducks, cockerels, deer, horses; ladies in kokoshniks and hats). Clay, bowls of water, rags, drinking glasses, modeling boards (for each child).
Progress of the lesson:
Tell the children about the Dymkovo toy: “This toy originated in ancient times in the village of Dymkovo near the city of Kirov. In winter, the houses of craftsmen were full of clay, bags of chalk, boxes of paints, boxes of eggs, and jars of milk. That's pretty much all you need to make clay toys. The craftsmen knew how to turn a piece of clay into a duck or a rooster.”
-Look at the duck with your children.
— Explain how to attach a beautifully curved neck and a high-raised head to the body, and pinch the tail.
-Attach thick short legs-stands to the base body. Remind that the joints of all parts must be moistened with water and smoothed.
-Invite the children to become Dymkovo masters and sculpt such a duck.
-When the toys are dry, they should be covered with water-based paint or white gouache mixed with a drop of PVA glue, and during the drawing lesson, paint the ducks with Dymkovo patterns.
-Arrange an exhibition of works in a kindergarten group for parents.
Lesson: “Cup” (modeling using the “harness” technique)
Target:
-Teach children to sculpt a clay cup consisting of rings and a disk.
— Firmly connect the parts of the product to each other, smooth the surface.
-To strengthen the ability to use a stack. Cultivate compassion and kindness.
Material. Clay, stacks, modeling boards (for each child), visual material.
Progress of the lesson:
Read G. Sapgir’s tongue twister to the children:
The Seagull warmed up the teapot, invited the Nine Seagulls: - Come, everyone, for tea! - How many seagulls? Answer!
Ask the children: “Why did the seagull invite nine seagulls?” (Drink tea.) How many cups do you need for all the seagulls?” (Ten.)
Invite the children to make a beautiful cup for each seagull.
-From a piece of clay you need to separate a small part with a stack for the bottom of the cup.
-Roll it into a ball and flatten it into a disk.
-Divide the remaining clay into equal pieces, roll into sausages, and roll into rings.
-Attach the first ring to the bottom of the cup, then attach all the other rings on top of each other.
-Roll up another roll and attach it to the cup in the form of a handle.
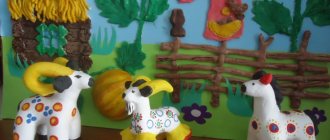
Lesson: Filimonovsky deer (constructive method of modeling from clay)
Target:
-Introduce children to the features of Filimonov modeling.
— Pay attention to the unusualness of the figures: short, thick legs; long, elongated necks and small heads.
-Learn to sculpt a figurine of a deer from separate parts, connecting the parts.
-Learn to dip your fingers in water and smooth out the unevenness of the sculpted figure.
-Continue to strengthen the ability to decorate a product using stacks.
Material.
Filimonovsky clay toys: cockerels, chickens, deer, horses, cows, lambs. Clay, bowls of water, modeling boards (for each child).
Progress of the lesson
At the beginning of the lesson, tell the children about the Filimonovo toy: “This toy was born in the village of Filimonovo. Near the village there were deposits of white clay, and they began to make toys from it.
(Show the children various clay Filimonov products.) The animal figurines have a body that is thinly intercepted at the waist and rounded at the back. Filimonov toys can be immediately recognized by the short and thick legs, long and elongated necks and small heads of the animals.”
Look at the Filimonovsky deer with your children. Offer to sculpt one and then paint it with gouache paints.
Explain the sequence of work:
- roll up a roller,
-slightly narrow on one side and bend it in an arc.
- Cut each side in half with a stack and round it with your fingers - you get legs.
-Make a tail on the thick side of the roller.
— Separately sculpt the neck, head and horns.
-Pinch out the ears with your fingers.
-Make eyes from tiny balls.
-In order for the deer figurine to be stable, its legs need to be slightly spaced.
When the clay dries, the sculpted deer are covered with yellow gouache mixed with a drop of PVA glue.
During a drawing class, the figures are painted with red and green gouache.
⇐ Previous4Next ⇒
Recommended pages: