First option
You will need:
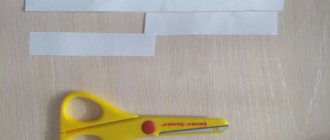
- base sheet
- brushes and watercolor
- cotton pads
- glue
- plasticine
Sequencing:
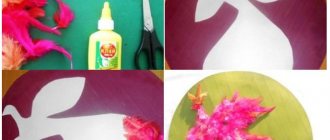
- Prepare the main working material. Paint with gouache and mark the barnyard where the chicks supposedly walk. You can just take colored cardboard.
- Dye cotton pads yellow. Cut them in half or trim rounds to give the body the desired shape.
- Glue the blanks on the base plane.
- Complete your creation with plasticine parts. You can create a beak, eyes and paws from this material or complement the composition of the work with plant details.
We provide several variations of the design of compositions on this theme.
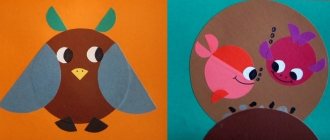
Chickens
In order to make a craft with the image of funny chickens or other poultry, take a sheet of colored cardboard, cotton pads, a brush with paints, as well as glue and plasticine.
- The entire cotton pad will play the role of the head, as well as the body of the bird; if you separate half of the disc, you will get wings or a tail. Pre-paint them with paints and then glue them to the cardboard.
- All other elements (paws, eyes, beak) can be made from plasticine.
- To create a goose or chicken, you need to make a printout with a picture of a bird, and also stock up on a piece of cotton wool and PVA glue.
- Roll cotton balls to fill the image.
- You can also add colors to your work - paint some elements if necessary, add details.
- This way you will get a bird with plumage, the effect of which is created by cotton wool.
Second way
A simplified way to create chickens or geese will be possible even for the smallest.
Sequencing:
- Draw or print a picture of a bird.
- Paint the comb, paws, eyes, etc.
- Take regular cotton wool and tear it into small pieces.
- Using craft glue, attach the white lumps in the places where the feathers should be.
Feather birds
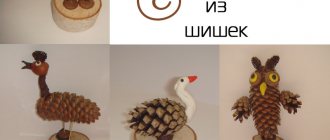
Feathers also make great bird crafts! For example, a craft made from a pine cone, paper and feathers will be an excellent interior decoration.
In order to make such a craft, we will need:
- Cone;
- Multi-colored feathers;
- Thick paper for making the head and paws;
- Glue gun.
Before starting work, the pine cone must be dried in the oven for 20-30 minutes. This will get rid of excess moisture and insects inside.
The dried cone can be painted with paints, or you can leave the natural color and texture. We glue the cut out parts of the paws to the bottom of the cone, and also glue the head to the pointed end of the cone. You can glue toy eyes to your head, or you can draw them yourself. Now all that remains is to attach the feathers. We carefully place them on glue. The more feathers there are, the more magnificent the bird’s “hair” will be.
Related article: Alternative DIY Christmas tree: master classes with photos and videos
There is also another way to make a bird from feathers.
We will need:
- 2 sheets of cardboard (white and any color);
- Glue;
- Scissors;
- Feathers.
Cut out the silhouette of a bird from white cardboard. In our case, this is the firebird. The silhouette, starting from the tail, must be covered with feathers. You can stick them on top of each other. Then we glue the cutout with feathers to colored cardboard. The painting can be framed and will be a great decoration for any room in your home!
Third option
A more complex method for older children.
Sequencing:
Create an original background on a landscape sheet that will match the theme of the work. In extreme cases, the sky and grass will suffice.
Mark with a pencil where the rest of the elements will be located. Cut out parts of the house from colored sheets and glue them to the base, which should already be dry.
Download a black and white drawing of a chicken and a rooster from the Internet. If you know how, you can draw it by hand on a white sheet. Cut out the silhouette.
Prepare colored elements that will correspond to the sizes and shapes of body parts: wings, comb, body, tail feathers, etc.
Glue the blanks and decorate the top with colored paper pieces.
All this work can be done collectively, entrusting the child with the responsible work of gluing the parts in the right places.
Firebird
A fairy-tale character who looks as fantasy suggests. An ideal composition for beginners.
Crafts addition
So that the craft does not seem empty, you need to create the right environment for the birds. For example, for a chicken craft, you can create scattered food around it.
To imitate it, real seeds glued to the base of the craft are perfect. However, gluing small parts is a very painstaking job that requires maximum care.
In addition, working with small parts is not recommended for children under 3 years of age without parental or teacher supervision.
You can also create a small house, make grass, sun and clouds. You can add virtually anything, the child must imagine the environment himself, there is no need to interfere with his creative impulses.
It only makes sense to guide him, telling him how to correctly make this or that detail for his craft.
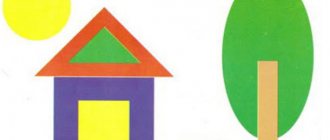
Creating a house
The simplest thing would be to make one or more small bird houses in the background. To do this, you first need to cut out a square or rectangle that will serve as the base.
Next, you need to make a roof; for this, a triangle is cut out in size suitable for a square or rectangle. Its color may differ from the base, at the request of the child.
All this is glued to the base of the craft using a glue stick. Next, you need to make windows; for this, small squares are cut out of white or blue paper, which are then glued to the walls of the house.
To make frames, you can draw classic crosses on top of the window blanks with a pencil or felt-tip pen. All that remains to be done is the chimney, an integral attribute of village houses.
For this purpose, you need to cut a small strip from the same paper from which the roof was cut. Next, you just need to glue it to the roof in any place where it will be most convenient.
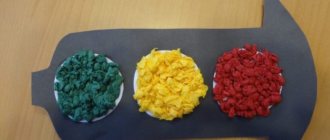
The second method is mosaic
- Choose different colors, but similar tones. For example, different shades of red or orange.
- Cut into pieces close to square, rectangular, triangular shapes, but of different sizes.
- Glue them onto plain cardboard to create the desired image.
This is what a craft made using this method looks like.
Wild birds
This is a method of embodying the lifestyle of untamed winged creatures, as children see them. Most often, such compositions depict keys flying to the south, as well as caring mothers in a nest with babies or in search of food among the foliage of a tree.
A three-dimensional image will be able to convey all the beauty as much as possible.
Sequencing:
- The base must be solid. You can simply take a plain sheet of cardboard or paint it, adding elements that correspond to the character of the product (leaves, flowers, clouds, etc.)
- Fold white A4 in half and along the fold draw the shape of a bird from the side - head, elongated neck, raised wing, tail.
- Cut along the outline and glue on one side only.
- Create several of these birds, preferably of different sizes, so that they are not identical.
- After the glue has dried, “straighten the feathers” of the jamb - slightly twist the part of the wing that is not glued to the outside so that it puffs up. A few cuts symbolizing plumage will also not hurt.
In winter, it will be relevant to implement the idea of winged animals that do not fly to warmer climes. The birds at the feeder will remind you of caring for our little brothers. Bullfinches and tits can be easily recognized by the bright colors of their plumage, and your plans can be realized with the help of decorated cotton pads.
GCD with children of the senior group in application. Birds on a branch
GCD with children of the senior group on an application on the topic “Birds on a Branch”
Author: Irina Filippovna Yumshanova, teacher of the MBDOU “Savinsky kindergarten”, Savino village, Perm region, Karagay district. Description of the material: I offer you a summary of the GCD for children of the older group (5-6 years old) on the topic “Birds on a Branch.”
This material will be useful to teachers of the senior group. The abstract is aimed at developing artistic and aesthetic perception in children. GCD with children of the senior group on application
“Birds on a branch”
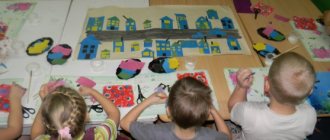
Purpose: Development of artistic and aesthetic perception in children. Objectives: 1. Teach children to work with a stencil and practice silhouette cutting. 2. Develop creative imagination. 3. Cultivate neatness. Materials: Colored paper, bird stencils, foil wood, colored napkins (red, yellow), scissors, glue. Progress of GCD Problem situation Educator: Guys, for the New Year we need to decorate the group’s corridor, but we haven’t figured out how to do it yet. How would you like to decorate the corridor, walls? Children: decorations, tinsel. Educator: Where can I get jewelry? Children: at home, buy in the store. Educator: I suggest you make decorations with your own hands, look, I have a beautiful tree, who would you place on the branches? Children: birds. Educator: of course, we will place wintering birds on the branches. Children examine a specimen of a bullfinch bird. The teacher places a diagram on the magnetic board (the order of the work) Teacher: look, guys, at the diagram and remember the rules for working with a stencil: you need to hold the stencil without moving it, trace two silhouettes of birds (one bird looks to the right, the second to the left), and so that Everything worked out neatly for us, we will do gymnastics for our fingers and prepare them for work. Finger gymnastics “little birds” Little birds Small birds are flying through the forest Seeds are being collected A wild wind has flown in The birds wanted to be carried away The birds are hiding in a hollow It’s dry and warm there (children perform actions in accordance with the words) Educator: choose paper by color, think about what kind the bird you want to make. Let's make a breast for the bird, choose a napkin and make a lump, squeeze it tightly, you get a ball. “One, two, three four You and I made a snowball. Round, strong, very smooth, and not at all sweet.” Children repeat the words after the teacher and roll a ball out of a napkin. Educator: Now look carefully at the diagram again and start making the bird. Calm music sounds. The teacher helps the children and corrects them. Educator: Guys, your eyes are probably tired, they need to rest a little, look. Gymnastics for the eyes The bird flew up (children look up) The bird flew to the right (look to the right) The bird flew to the left (look to the left) And hid on the floor (look at the floor) Educator: What a nimble, brave bird I have, she invites you also play. Physical education lesson “I’m a nimble bird, my name is titmouse I can’t sit still Jump, jump, jump, jump Spun like a top Flew, flew, quickly sat down on the fence” Educator: We’ve rested, let’s finish our work and place the birds on our tree. The children help each other finish the birds, and after finishing the work, I place the birds on a birch branch. Educator: Children, let's count how many birds are on the tree. Children: ten. Educator: Count how many bullfinches and tits there are. Children count. Reflection: Children look, admire the birds, and take them into the corridor to decorate and note that the corridor has become more beautiful, more festive. The teacher reads a poem about a bullfinch or titmouse. Photos for the summary of the educational activity “Birds on a branch”
Children trace the bird using a stencil
Scheme (order of work)
We recommend watching:
Summary of GCD for cognitive development in the senior group. Synopsis of GCD for the senior group of the preschool educational institution. Synopsis of GCD for the senior group. Educational area “Cognition” Abstract of GCD on ecology in the senior group
Similar articles:
Lesson in the senior group. Topic: “Moods and Feelings”
Summary of a lesson on social and communicative development in the senior group according to the Federal State Educational Standard. Topic: "Relatives"
Summary of a lesson on labor education according to the Federal State Educational Standard in the senior group
Summary of a lesson in the senior group on the topic “History of Human Development”
Summary of a lesson on social and communicative development for children of the senior group. Compound
other methods
Tear-off - the picture is assembled from small multi-colored pieces. This technique trains perseverance because it takes much longer than the others. Additionally, fine motor skills are developed, since working with small elements is very painstaking.
Volumetric - the nest is often depicted on a paper plate or papier-mâché craft. The materials from which the product will be made can be very diverse: cotton wool, feathers, threads, dry grass, felt, paper, etc. It all depends on the child’s capabilities and imagination.
The combinations are countless. The miraculous embodiment is practiced not only in kindergartens, but also by art history professionals.
Chickens and geese
These poultry have abundant plumage, which also needs to be indicated on the applique. Depending on the age of the child, applique with these birds can be of different types.
For the little ones, the same approach is used as when making chicken. As a final step, the child will need to place cotton wool on it, which will imitate plumage.
For older children, for example, for the second or third year of being in kindergarten, pre-prepared bird templates are used. They are printed on paper and given to children. And they, in turn, must correctly fill the template with cotton wool where it is needed.
The remaining parts should be colored with felt-tip pens, pencils or colored pens, whichever is more convenient for you.
For this craft you will need:
- Glue stick
- Outline drawings of birds
- Paints, pencils, pens
- cotton wool
- Scissors