Simple technique for beginners
This is a fairly simple drawing technique that even a preschool child can handle.
- In order to draw a hedgehog step by step, the young artist will need pencils and paper.
- Place the sheet of paper horizontally, and then from the center draw a zigzag line that runs along the entire body of the hedgehog.
Drawing the main elements
- Draw the hedgehog’s head, elongated, with a transition to an oval-shaped nose, and ears in the form of semicircles.
- Draw zigzags between the ears. A small arc is the mouth.
- Two ovals are eyes; inside them draw pea-shaped pupils.
- Now draw the lower needles and tummy. When drawing the belly, leave gaps for the legs. Draw the paws in the gaps.
- You can color your creation!
You can paint the body, legs and head of the hedgehog with a yellowish-orange color; give the nose and needles a dark gray color.
Romantic hero
To portray a handsome guy in love, use the following simple drawing technique:
- Draw a vertical oval.
- Draw ears on top, paws on bottom.
- In the upper part, mark the eyes and nose with two bold dots.
- In the middle, draw paws in the form of two unfinished ovals and “hand” a heart in them to the cute animal.
- Complete the look along the contour of the oval with needles.
Hedgehog, step by step instructions
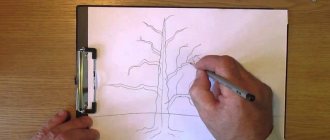
If you are wondering how to draw a hedgehog beautifully with a pencil, this technique of drawing this character in stages with a pencil will help you.
Take a landscape sheet and put a couple of dots on it, there should be about two centimeters between them. Draw the segment vertically.
Mark the middle and a little lower draw a line of the same length in the horizontal direction.
Image of painting details
- Complete this line with a rounded nose. Draw an oval from the nose, slightly lengthening it.
- Also draw two semi-ovals under it - one slightly smaller. This will be the mouth. Above the nose, draw oval-shaped eyes. The pupils will be round.
- From the mouth, draw the cheeks, which turn into semi-ovals above the eyes.
- Move on to drawing the needles. Start under the chin in a zigzag line, then trace it around the entire body of the hedgehog.
- Draw the front paws with toes, then the hind legs.
- Proceed to coloring your masterpiece.
Draw all the details with a black felt-tip pen, and also color the nose, the area of the mouth above the tongue, and draw the eyebrows. Once you have traced all the elements, erase the pencil lines with an eraser.
Fantastic mushrooms with watercolor pencils: step-by-step instructions
We invite you to plunge into a fairy tale and dream a little. What kind of plants would there be if you were, for example, in Wonderland? Big ones? Green? Or maybe all together? You can think about this topic for hours and come up with new images and color solutions. Everyone can have their own idea of the magical world, but we propose to draw our vision.
This is not difficult at all if you carefully read the recommendations and description. We are confident that everyone can cope. Inspired by the work below, perhaps you will create a completely different plot. Unleash your imagination!
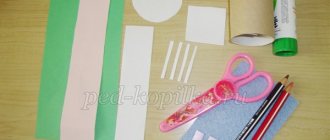
Prepare the necessary materials in advance:
- Watercolor pencils
- Thick paper
- Eraser
Work progress step by step:
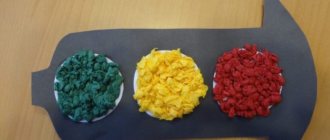
- We use simple shapes to designate mushrooms, one of which we make as large as possible. Our composition is mainly composed of toadstools, and they are characterized by drooping caps and curved legs. Below we outline a little old man with a stick, who slowly wanders towards the real mutants.
- We start painting with the darkest color, namely the dark blue tinting of the edges of the toadstools. Next we move upward to a lighter range, turning into a blue tint. We consistently apply layers to obtain smooth transitions and leave light spots. Our plants may be completely poisonous, but most importantly, they are beautiful.
- We complete the gradient with green pigment.
- We shade the bases of the mushrooms with dirty colors so that they shimmer and emphasize the texture of the paper. We move on to the design of the remaining items using the same technique. Take the time to do detailed work. Show some curves and irregularities here and there.
- We draw shadow areas on the earth's surface. To prevent the toadstools from merging with each other, add more blue in some places and more green in others, so they will acquire an individual color.
- We work on the foreground and sketch out the green grass. Make the silhouette of the resident completely black.
Our truly mysterious picture is ready! You can leave your autograph in the corner of such a masterpiece and then hang it on the wall.
Add color to your work
Take colored pencils.
- A light brown pencil is perfect for adding color to the face and paws.
- A gray pencil will be used for coloring the needles, and a blue pencil will be used for coloring the eyes.
- You can color your tongue red.
- To give the picture completeness, make a pattern of needles in the form of ticks.
If you wish, you can decorate the hedgehog with a butterfly or leaf, and complete the background.
Summary of a drawing lesson for children of the senior group “Hedgehogs in the clearing”
Goal: teach children to draw animals using the poking method. Practice the ability to paint with a brush in different ways, strengthen color perception. Expand children's knowledge about animals, enrich children's vocabulary. Continue learning to answer questions. Fix the preposition “under”. Develop attention, memory, and thinking through the didactic game “Collect a picture,” guessing riddles, and reciting previously learned poems. Fix counting within five, the ability to compare two groups of objects, the name of geometric shapes (semicircle, oval, triangle). Develop fine motor skills (working with a brush), general mathematics through physical minutes, creating game situations. Arouse interest in the activity. Cultivate love for animals, accuracy in work, perseverance. Equipment: Demonstration material: easel, magnetic board, materials for showing the sequence of work (two brushes with soft and hard bristles), children's crafts (mushrooms and apples), paper flowers for the meadow, a picture of a birch, two toy trees. Handout: Landscape sheet, pencil, gouache, napkin, 2 brushes, jar of water, cut-out pictures.
Preliminary work: looking at illustrations depicting hedgehogs, learning poems, making crafts: mushrooms and apples, reading stories by E. Charushin “Hedgehog” and Y. Dmitrieva “Hedgehog”.
Progress of the lesson:
1. Organizational moment. Educator: Close your eyes. I will read a poem to you, and you imagine everything you hear about; beautiful, quiet music will also help you with this.
What is a meadow? A carpet of grass all around. Decorative corollas of flowers, Sonorous grasshoppers, Playful moths, Leisurely beetles, Bees with sweet honey, Quail song. Have you imagined this beauty? Open your eyes: here it is a meadow - in front of you (multi-colored paper flowers are laid out on the carpet) Oh, what is this? (there are envelopes under the flowers), take one at a time. I wonder what's there?
2. Main part: Children look into envelopes and find cut-out pictures in them. I suggest collecting cut pictures to make a whole image. But first I’ll ask a riddle.
He lives in a dense forest, He himself is round and prickly. Guess. Who is this? Well, of course, this is .... (hedgehog)
So your cut-out pictures show a hedgehog. Children work with pictures. Educator: That means who should come to visit us: Hedgehogs. But somehow they are late. Let's look for them in the clearing. We didn't find any hedgehogs. But we saw a Christmas tree and a wild apple tree. And what's that? Children: Mushrooms. Educator: Where are the mushrooms? Children: Under the Christmas tree. Educator: Where are the apples? Children: Under the apple tree. Educator: Count how many mushrooms (five) and how many apples? (five) How can you tell about the number of mushrooms and apples? Children: Equally. Educator: So there was a treat for the hedgehogs, but there were no hedgehogs themselves. Where can I get them? Let's draw?!
Story and demonstration of the method of work, sequence of execution. A sample is displayed. The sample is examined by the children and they clarify the names of the hedgehog’s body parts (torso, head, nose, eyes, paws, needles), and the color is specified. I show that the hedgehog should be drawn large, in the middle of the sheet. I specify the geometric shapes that will be used when drawing: semicircle, ovals, triangle. I show you how to paint the face and paws (soft bristle brush). I focus on how to paint correctly using the poking method (with a brush with hard, short bristles). I invite children to draw a hedgehog in the air with their finger, while pronouncing the names of body parts. Independent work of children: Work with a simple pencil. Physical education minute. Under a huge pine tree, in a clearing in the forest, a pile of leaves where it lies, a hedgehog with hedgehogs is running. We'll look around everything and sit on the stumps. And then we’ll all dance together, anoint our hands like this, wave, spin around, and hurry home.
Work with brushes and gouache (during work, the teacher observes, advises, helps). For those who have already finished their work, the teacher offers to take one apple and one mushroom each and treat their hedgehogs.
Analysis of children's work: On a magnetic birch board. Children themselves determine the name of the tree (white trunk - birch). Then they bring their hedgehogs and use magnets to attach them under the birch tree. Educator: What beautiful hedgehogs! Let's remember the poem? (children read together) Under a birch tree, on a hill, an old hedgehog made a hole, and under a tree lie five tiny hedgehogs.
Indeed, our hedgehogs are as if they were alive. Well done! You are good at drawing! The lesson is over!
Author: Masyutina Lyubov Alexandrovna,
teacher of MBOU Astrakhan "NSHDS No. 97"
Astrakhan, Russia
The article is published in the author's edition
Painting technique
And here are step-by-step instructions for children on how to beautifully draw a hedgehog using paints.
- To repeat this simple drawing technique, prepare brushes with paints and sheets of paper.
- First, dip your brush into white paint and start drawing a circle in the center of the sheet, and then color it.
- Extend it in front to create a nose. Wash off the remaining paint from the brush and paint black.
- We block her body without going into the nose area. Use the same paint to paint the needles.
- After you've washed your brush again, it's time to paint the face with brown paint and use the same color to paint the hedgehog's paws.
- Now you can decorate the hedgehog by painting an apple on the needles with brown and red paints.
- Now take a thinner brush to paint the details. Draw all the elements of the face - smile, eyes, nose.
- Draw the tail of the apple. Draw the needles better.
- Take green paint and paint an apple leaf and grass.
Lesson 1. Simple pencil drawing of a cartoon hedgehog
Tools:
- a simple pencil;
- paper;
- eraser.
Main parts of the drawing
- Draw a small horizontal oval. This is the body of a hedgehog.
- We add a sharp, slightly raised angle to the oval on the left. It should look like an upturned duck beak. Now you need to remove with an eraser that part of the oval that separates this “beak” and the oval itself. The hedgehog's nose is ready.
- We depict an eye. To do this, you need to draw a small vertical oval in the eye area. (The hedgehog is located on the sheet in profile with its left side)
- We use a solid curved line to depict large spines that stick out above the main oval in all directions. Let's draw the spines next. Only now they will be much smaller, turned down and located on the animal’s body itself, as if continuing the lines of the upper spines.
- Use an eraser to remove that part of the oval that separates the upper and lower spines.
Small details of the drawing
- Four small hooks united in pairs at the bottom of a large oval - two pairs of small legs.
- We designate the tip of the nose - draw a small circle on the tip of the hedgehog’s nose and paint over it. We also complete the eye by painting over the pupil.
- We show the mouth with two curved short lines: one is the smile, the second is the part of the cheek adjacent to the smile line.
- Now you can finish drawing a small triangle-eyebrow, funny freckles and an apple on the needles.
The picture is ready!
Hedgehog from your favorite cartoon
Surely your child likes the animated series “Smeshariki”. Then he will be delighted with the idea of drawing one of the characters from this cartoon - the Hedgehog.
You will learn how easy it is to draw such a picture by following the step-by-step instructions.
- Prepare a landscape sheet, markers of different colors and a simple pencil. Draw a circle in the center of the sheet.
- Divide the resulting circle into four equal parts, first drawing a vertical line, then a horizontal one.
- In those areas where the lines and the circle touch, draw inclined segments. In the center from the point of intersection of the lines, draw upward oblique lines.
- Step back a little from the top of the circle and, focusing on the vertical line, draw the forehead.
- Draw your eyebrows a little lower; they are rectangular in shape and slightly inclined.
- Draw the eyes, they should be large, around them draw glasses in the form of circles, inside the eyes add pupils and highlights.
- Complete the glasses by drawing the arms.
- It is better to depict the nose and mouth in a triangular shape.
Hedgehog with an apple
A hedgehog carrying an apple on its back is the image most captured in the imagination. If you don’t know how to draw such a hedgehog with a pencil, prepare paper, an eraser, a pencil itself (colored ones can be) and follow the next steps.
- Draw a horizontal oval.
- From the side, use two straight lines to add an angle to the oval. The sharp part should be directed slightly upward. This is the future nose.
- Inside the oval, mark the ear by highlighting its inner part with a small line. Draw two legs in the form of two ovals located under the body.
- Erase the border of the body and muzzle with an eraser, smoothly rounding off the transitions.
- Color the resulting image brown.
- Take a black pencil and outline the ear (don't forget the inside). Mark the eye with a thick dot, above it - the eyebrow, below the eye - the mouth.
- Draw straight lines for the mustache. Draw the tip of the nose in the form of a small circle (also black).
- Complete the drawing of the animal by drawing needles in different directions with straight lines.
- In addition, “put” an apple on the hedgehog’s back.
Drawing needles
Above your head, start drawing a triangle, but do not extend it to a circle. Draw a line to the right of the intersection of the inclined line and the edge of the circle, then connect it to the next inclined line.
On the left, repeat the same thing, so you get the “needles” of a hedgehog. In the gaps formed between the needles, put a mark and, focusing on it, add another needle on each side.
Adding details
- Under the body, draw pear-shaped legs. Draw oval handles on the sides.
- Now take a black felt-tip pen and trace all the details of the image.
- Erase the pencil sketch and start converting the image to color.
- A black felt-tip pen is perfect for coloring in part of the pupils.
- A purple pencil or felt-tip pen will be needed to color the needles.
- The mouth and glasses will be blue.
- You can color the Hedgehog's eyebrows and nose with a brown felt-tip pen.
- Red pencil or felt-tip pen for coloring the character’s torso, arms and legs.
- Apply an additional layer to the legs and lower body. Smesharik is ready! You can put it in a frame.
There are many ways to draw a hedgehog, and you can use a wide variety of materials - paints, pencils and felt-tip pens, and also choose a technique that is appropriate for any age, both for preschool children, schoolchildren, and adults.
How to draw realistic mushrooms with a simple pencil: a step-by-step master class for beginners
The following instructions are suitable for those who want to learn how to draw in a graphic style. Here we will talk about many important things for a beginning artist, namely the light source, highlights, shadows. However, do not forget that by drawing one picture you will not reveal your talent; multiple repetitions and tests of different drawings and materials are necessary. This is the only way you can get better.
And now we propose to depict two mushrooms using pencils of different softness. You can easily find them in any office supply store.
Let's get creative!
How to draw realistic mushrooms with a simple pencil:
- We outline the first mushroom with a closed top. The second one grows very close, but at an angle and its bottom is turned towards us.
- Below we will mark the grass. The light in our plot will fall from the left side, which means that from the corresponding edge we designate the highlights in a square shape. Showing the shadow cast by a large hat.
- We begin to fill in the objects, placing more dense shading on the right side. Draw a striped structure on the leg. The smaller your lines, the neater your work will look.
- We are creating a clearing.
Advice: Add as many flowers, twigs and blades of grass as possible. So, the picture will look more diverse, it will be interesting to look at it.Let's add texture to the mushrooms by making cross hatching.
If you wish, you can complete the background, for example, tree trunks or a butterfly flying by.
Photos of hedgehog drawings
0