Where to begin
To understand how to draw a dress beautifully, you need to understand what it consists of. To do this, it is worth explaining to the child that we are talking about a female type of clothing with floor-length fabric to cover the body and almost the entire part of the legs.
- The dress consists of a bodice and an underskirt based on one or several parts.
- For example, the crop top look is built on a short top and skirt.
- But it is possible to add a corset, partlet, kirtle, petticoat, stomaki, robe.
- Used for everyday purposes and official public appearances.
It all comes down to what the girl wants to draw. Perhaps this is a copy or invention of your own product as an amateur modeling.
In any case, it is necessary to support the child’s impulse and provide the necessary information, pencils and paper.
A good option is to learn to use computer programs for freehand drawing, thanks to the mouse.
What you will need for a drawing lesson
We will assume that the dress will be drawn by hand, using a pencil. Therefore, let's look at a few step-by-step instructions for children.
In this case, to work you will need:
- A pencil to create clear outlines of the dress and add various details;
- A sheet of paper based on standard A4 format;
- Eraser for erasing unnecessary or erroneous sketches;
- Colored pencils for coloring different sections of the dress;
- To highlight the contours, you may need gel pens of different colors.
This is a simple set of tools to provide a young artist. As skills develop, a larger paper support may be required. It will help you create a more perfect image while standing.
But for a child, the attention and support of an adult with simple tools for work is enough.
Making a fluffy dress
Let's look at how to draw a dress step by step on paper. First, you need to analyze and figure out where it is more profitable to place the drawing on paper.
Artists consider the central part to be the best solution, since there will be no movement up or down.
Next step by step:
- A V shape is applied to form the neck of the dress model. To do this, use straight lines connecting at the bottom. In fact, it looks like a “tick”.
- Lines are drawn from the base to the right and left, but from different sides. The straps of the dress are formed. To express elegance, curved lines are drawn down. The bust is adjusted with a few touches.
- To create a beautiful waist, draw 2 straight lines in the vertical and horizontal directions. This creates a rectangle.
- A long stitch is pulled on each side to highlight the scale of the skirt. The lines are randomly connected at the bottom to form the hem of the skirt.
- For realism, folds are added under the chest and long vertical ones in the skirt area.
- The belt is decorated with a bow. Two ribbons extend down from it.
- Fluffiness of the sleeves is allowed. To do this, add corresponding lines.
- It is necessary to remove unnecessary lines. Now you can color the sketch.
Tip: It is more profitable to create a drawing from top to bottom.
We looked at a simple drawing technique for beginners. This option is available for the youngest girl with adult assistance.
Summary of a lesson in fine arts (drawing) in the middle group “Dress for a doll”
Zastavina Tatyana Ustinovna
MBDOU "Kindergarten No. 7 "Semitsvetik" Guryevsk
Educator
Summary of a lesson in fine arts (drawing) in the middle group “Dress for a doll”
Software tasks:
1. Teach children how to decorate for Katya’s doll
2. Continue teaching children to hold the brush correctly, dip the entire bristles into the paint, and remove the excess drop on the edge of the jar. 3. Develop fine and gross motor skills. Develop visual attention and the ability to visually coordinate your movements. Continue learning to differentiate primary colors. To develop the ability to imitate an adult, finishing words and phrases, to promote speech activation.
4. Introduce children to the type of decorative and applied art “Dymkovo painting” Preliminary work:
Didactic game “Pick a dress for the doll”, conversation on the topic: “What kind of clothes are there?” Looking at illustrations depicting different dresses. Material:
- silhouettes of dresses, gouache (yellow, red, blue) - Brushes No. 5, jars of water, stands for brushes. - Napkins. - toy (doll) Lesson progress.
Part 1
: Preliminary work: Educator:
Guys, we received a telegram from the Katya doll. She writes that today is her birthday. Katya wanted to come to visit us, but on the way she soiled her dress. She was very upset and did not come to us. How can you and I help Katya?
Children: Draw her a new dress!
- That's right, let's help the doll, draw her a new dress so that she can come to visit us. Part 2:
Main part: - Look at my easel, I got these dresses. What's on them? - (children's answers) - Stripes and dots are correct. — Stripes, what color? - (children's answers) - What color are the dots? - (children's answers)
You know, there is a type of decorative and applied art that uses bright colorful patterns - horizontal and vertical lines, patterns - cells, large and small circles, suns. This type of decorative and applied art is called “Dymkovo painting.” And today we will be real artists and decorate Katya’s dress with Dymkovo painting ornaments.
- Now look at how to draw a pattern on a dress. You all have dresses on the table. First watch how I will draw. — I take the brush by the iron skirt, wet it in water, then pick up red paint, remove excess paint on the edge of the can. And I draw a line from top to bottom, without lifting the brush from the dress. Then I draw a second line as well as a third. I rinse the brush in a jar. I take blue paint on the brush, step back a little from the top and draw a line from left to right, without lifting the brush from the dress. I step back a little and draw another blue line from left to right, without lifting the brush from the dress, and another blue line. I rinse the brush in a jar. Now I dip the brush into yellow paint and make dots in the windows (in the middle).
Learn to draw an evening dress
This master class is for beginners, so creating a dress is not particularly difficult.
Let's look at the stages of drawing an evening dress:
- It is worth starting from the image of the stamp for placing the outfit. We are talking about a hanger with a small thickening in the middle part. A pencil is used for the sketch, the contours are drawn with a pen. A hook is created in the middle.
- Straps and an elegant bodice are drawn on both sides for a beautiful figure. The back is indicated by curved lines.
- Create a waist. Two strokes are added, they taper closer to the belt line.
- An oval is drawn in the waist area to create a ballroom skirt in a shape similar to a bell.
- To highlight the beauty of the dress, you need to add a curved line. The inner side is marked and beautiful folds are drawn.
- The sketch is ready. You can paint over an evening outfit for a chic girl. At the final stage, it is allowed to add beads, belts and other decorative elements, depending on the author’s imagination.
Now it’s clear to us how easy it is to draw a chic evening dress with your child. This option will help you have a great time doing an interesting activity.
Detailed instructions for creating dress No. 2
The second master class will describe the evening version of the dress, which anyone can easily and simply depict on a piece of paper.
- In this case, we need to start by drawing a stamp on which our outfit will hang. The stamp is a hanger with a slight thickening in the middle. The sketch is usually drawn with a simple pencil and outlined with a black pen. Draw thicker lines at the top and thinner ones along the edges. There must be a hook in the middle.
- Then we draw thin straps on both sides and a curvy neckline of the bodice. To add volume, we mark the back of the model with a slightly curved line.
- Shaping the waist. To do this, draw two strokes tapering towards the belt line.
- From the waist we draw a ball skirt in the shape of a bell.
- To emphasize the beauty of the dress, let's draw the final curve. Additional folds should be added to mark the inside.
- Now you can start painting over the chic evening dress for the girl. The main tone is chosen to be calmer (for example, sky blue or light purple). Typically, artists paint over the entire dress, and later focus on bright details. Do not press hard on the pencil, draw smoothly.
- The remaining elements are drawn in bright colors, outlined with colored pens.
- A good idea is to add beads or mesh, a belt and other additional elements. Beads can be scattered throughout the outfit: draw circles of different sizes.
- Now the dress is ready. Turn on your imagination and you will get a beautiful outfit for the bride, birthday or any other celebration. By changing the color palette, fittings, decoration and appearance, the artist will be able to develop his creative qualities.
Let's learn to draw a dress for a doll
Many girls think about how to draw a dress for a doll with a pencil step by step? Sometimes they like to change the outfits of their artificial girlfriends.
Let's look at the drawing process step by step:
- Thanks to the oval, the upper part of the dress is created. Auxiliary lines are applied without pressure. In this case, it is not necessary to comply with all proportions.
- The use of a fantasy version is allowed.
- Two curved lines are drawn from the oval to create an elegant dress worthy of a princess.
- For the ballroom version, sleeves and harnesses are not needed. Therefore, the place of the chest immediately stands out. Below the neckline, a “tick” is added.
- Extra lines are removed.
- Decorative elements are added at personal discretion. This may be a bow, ribbons, butterflies, flowers.
- You can play with different colors to create a bright or discreet option; it all depends on the author’s imagination.
Now we know how to draw a dress easily based on different model options. The main thing is to prepare the conditions and calmly sort out this matter together with the girl.
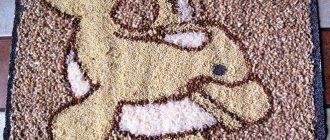
“An elegant dress for Katya’s doll” NOD in the first junior group
Berlina Svetlana Pavlovna,
teacher of the highest qualification category
MAU DO "Sorokinsky Child Development Center - Kindergarten No. 1"
Summary of GCD using non-traditional drawing techniques in the first junior group “Elegant dress for Katya’s doll”
Goal: Development of artistic and creative abilities of children through the use of non-traditional drawing techniques.
- learn to make a pattern by placing round and straight lines, dots on the silhouette;
— continue to introduce children to an unconventional method of drawing (with cotton swabs);
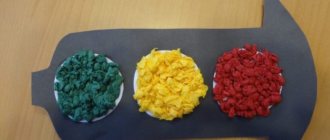
- consolidate knowledge of primary colors (red, green, yellow).
- develop fine motor skills, attention, creativity.
— to cultivate interest in drawing, accuracy, and friendly relations with each other.
Materials: Katya doll , samples of elegant dresses dress silhouette , gouache, cotton swabs, a jar of water, a napkin for each child, a recording of the song “Doll” (music by M. Krasev)
Integration of areas: artistic creativity, cognition, socialization, communication, music.
Progress of educational activities
Educator: Hello, guys, I’m very glad to see you, let’s stand in a circle, smile and say hello to our guests.
Children stand in a circle and say the words with the teacher:
Clap-clap-clap! (clap) Hello, legs, stomp, stomp, stomp! (stomp) Hello, cheeks, (stroke your cheeks) Plop-plop-plop! (slap yourself on the cheeks) Chubby cheeks, (stroke your cheeks again) Plop-plop-plop! (slap yourself on the cheeks) Hello, lips, Smack-smack-smack! (or smack your lips rhythmically three times) Hello, teeth, Click-click-click! (or click your teeth rhythmically three times) Hello, my little nose, (touch the tip of your nose) Beep-beep-beep! (press your nose three times) Hello, guests! (stretch your arms forward) Hello! (wave hand above head)
Educator : Now come to me and show me your eyes, how smart and beautiful they are.
Educator : Children, look out the window, who is it looking out from behind the clouds and looking into our window? That's right, it's the sun. It has woken up and is looking into our window. Let's make a big circle, and this will be our beautiful sun.
Our sun woke up, and all our children woke up and stretched sweetly.
The sun is shining from the sky,
Yes, so pure, clear, radiant.
If we could get him,
We would kiss him!
Educator : Children, show me how big you have grown? (Children rise on their toes and stretch.) Now show me how little you were.
From toes to crown.
We will stretch, we will stretch.
We won't stay small.
Educator : Guys, I see you are tired. Let's sit down on the carpet and rest a little.
(There's a knock on the door)
Educator : Someone is knocking on our door, do you hear? I'll go and have a look. The doll Katya came to visit us . Hello, Katya! Children, say hello to the doll Katya.
She came to us in a smart dress,
Katya doll with a white bow !
Play with us together
Dance with us!
Educator : Look how beautiful Katya is. What kind of eyes does the doll have? Tell me, Polya. That's right, the doll has blue eyes. What color are the sponges? (red). Masha, what is the doll wearing? That's right, in a green dress. What's on the doll's legs? That's right, white shoes.
Educator : So we met. Children, Katya came to us for help. Katya is going to a party, but she doesn’t have a beautiful dress. - What to do? How to help? Children's answers. Let's draw her a beautiful dress. Educator: Children, go to the tables and sit down.
Educator: Look how I decorated the dress for Katya (there are multi-colored circles and dots all over the dress, and multi-colored stripes on the sleeves).
Educator: Guys, look, you have white dresses on the table that you will decorate. What do you think you can use to draw with? (children's answers)
Educator: Well done, that's right, but there are no brushes, today we will paint with cotton swabs. There is paint in sockets on your tables. What color is the paint? (Red, yellow, green). Now I will show you how we will draw.
Photos of dress drawings
0