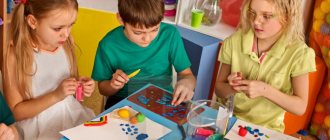
In this article you will find many ideas for modeling from plasticine with step-by-step instructions and photos, as well as what crafts you can do with a child at different ages.
Working with plasticine has a beneficial effect on a child's development. These activities improve memory, attention, have a good effect on thinking, develop fine motor skills of the hands, which in turn contributes to the development of speech, form the imagination, open up creative abilities, and force one to exercise imagination. You will learn more about the benefits of practicing with plasticine and other materials in the article Let’s sculpt with children from plasticine. Plasticineography
Age category
It is recommended to start making simple crafts from plasticine from the age of one. However, each child needs an individual approach. First you need to show your child how to make a craft from plasticine, and if he shows interest, then you can continue the process with him. Otherwise, leave your classes for a later time.
From 1 to 3 years old, children begin to control their hands; at this age it is advisable to accustom the child to simple activities:
- Knead the plasticine;
- Tear off pieces from it;
- Roll into balls;
- Crush and flatten the balls with your palms or suitable objects;
- Roll rolls of various thicknesses and lengths;
- Wrap the rolls in rings;
- Sculpt a whole craft from individual parts.
For children of this age group, it is advisable to purchase air plasticine.
From 3 to 5 years old, a child already has full control of his hands and can sculpt from ordinary plasticine, and he can make crafts that are more complex, interesting, and carry some meaning.
Recommendations from psychologists and teachers
Plasticineography is designed for children of junior, middle and senior groups. It is necessary to choose the right teaching methodology so that children will not only find it interesting, but also simple enough to understand.
Basic teaching methods:
- Display of finished works. Here it is important to interest the kids by showing them the illustrations, as well as the actions that they will have to perform.
- Verbal technique. You should talk to children, clearly explaining all actions.
- Practice. You need to perform the exercises first in a playful way, showing techniques for processing plasticine, and then experiment with simple drawings.
For middle and senior groups, classes are conducted to improve the knowledge acquired, and I am allowed to make fantasy drawings.
A child loses interest in work if:
- he was given low-quality material (plasticine that was too hard, greasy, or had a strong odor);
- he is left to his own devices (you must definitely help and talk with him);
- too high requirements (jobs should be selected according to age);
- long lesson (it is necessary to take breaks).
Children drawing together on cardboard with multi-colored plasticine can strengthen their relationships. You just can’t single out someone’s work as the best. It should be explained that everyone sees the world in their own way, and it is as diverse as their images.
Subjects
You can play grocery store with your children by making food crafts from airy plasticine. The child will really like this game, especially if you choose plasticine in bright, beautiful colors for this purpose.
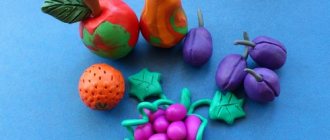
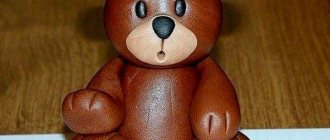
You can mold anything from any plasticine. The main thing is that the baby likes it. Most often they make crafts from plasticine on the topic:
- Animal world. A popular topic among children of different ages and genders.
- Vegetable world. The types of crafts depend on the imagination and age of the child.
- Food. A theme for any age. Little kids can make vegetables and fruits, and older children can make cakes, pastries, and restaurant dishes with beautiful decorations.
- Thematic figures. For each event, you can create symbolic figures that can lift the spirits of adults and children.
To make crafts you will need a special plastic tool. Often it comes complete with plasticine.
How to teach children to sculpt
Emphasizing the importance of the individuality of a small person, many parents and teachers are of the erroneous opinion that given the texture of a material such as plasticine, a small child will learn and create a sculptural object on his own. Great idea, but unfortunately this is not the case and is largely up to parents and teachers to provide adequate stimulation or motivation based on the child's own experiences
First of all, when we sculpt with plasticine with children, we teach how to form their basic shapes:
- ball;
- egg (ellipsoid);
- hemisphere;
- cake;
- sausage;
- cylinder;
- cone;
- brick;
- tourniquet;
- spiral.
After they master these forms and the names for each of them, it is easier for us to give instructions on how to sculpt figures, animals, fairy-tale and cartoon characters, for example, fixie, and so on, then gradually move on to compositions. A child, depicting the volume of an object (and its other features), gets an idea of such a concept as proportion. Modeling, for example, a snowman or a Smesharik, the child understands that the object is round and to create it you need to roll balls. In this way, the ability to generalize objects and form develops.
Age 2-3 years
This age group gets excited when they see bright plasticine and what can come out of it. What do we sculpt from plasticine with 2-year-old children? Little explorers can be offered simple artistic objects; make, for example, a bright green-brown caterpillar.
- Cut out a leaf shape from a sheet of white paper. We ask the little one to color it.
- Together with the baby, you need to make balls from green and brown plasticine, which we collect together.
- Let your child try to roll two or three balls and connect them on his own.
- Using yellow and black plasticine, we make the eyes and mouth of the caterpillar on the first ball, and from red plasticine we roll out two small sticks for the antennae, which we place on the head.
We place the molded caterpillar on a form cut out of paper so that it appears to be crawling along a sheet
It is important to comment on the modeling process; it is useful to accompany it with songs, rhymes or an interesting story corresponding to the topic
What do we sculpt from plasticine with 3-year-old children? They have already acquired a certain linguistic vocabulary and you can teach them to sculpt Smesharik, Losyasha, Krosha or Nyusha, explore a shape such as a cone and make ice cream out of plasticine. Other ideas for sculpting: any animal, hare, cat, even a beetle or spider; food, such as a fruit platter or pizza.
Modeling in this age group usually takes no more than 20 minutes.
Children 4-5 years old
At this age, children are actively interested in the world around them.
Modeling from plasticine is an excellent way to develop children and, for this age group, it can already be divided into subject, plot (logical composition of different figures), and decorative features. When a child forms a figure, he actively uses his imagination. What do we sculpt from plasticine with children aged 5? Ideas:
- mushroom meadow (a sheet of cardboard will serve as the basis for placing the composition);
- lawn with lake;
- fruit basket (make a small basket from flagella, then fill it with tiny fruits, using basic shapes and plasticine of different colors: apple, melon, banana);
- a fairytale house with tiny furniture;
- a composition with “fake snow” (made of cotton wool) and “fake ice” (made of foil), in which to place fur seals or walruses molded from plasticine;
- a “game board” for tic-tac-toe in the shape of a pond made of blue plasticine, on which “draw” four thin sausage rollers; "Tic Tac Toe" in the shape of 10 green turtles. For each figure, roll a large and a small ball, flatten them on one side and connect; roll out the sausage roller and cut it into four short pieces for the legs, which are attached to the body of the turtle. Make eyes from yellow plasticine. Use yellow to make 5 “X”s and 5 “Os” and stick them on the backs of the turtles.
- compositions combining various objects with plasticine (straws, buttons, shells, pebbles) - ideas designed for middle and older ages.
When depicting objects, children reproduce not only shapes, but their characteristic features, firstly, color.
Materials and tools for modeling
In addition to the spatula, it is worth thinking about preparing the workplace.
Suitable working surface:
- Special board;
- Oilcloth;
- Sheet of cardboard;
- Kitchen cutting board.
Some natural and artificial materials may also be useful, such as:
- Cones;
- Nuts;
- Pebbles;
- Beads;
- Rhinestones, etc., it all depends on the intended product.
Progress of the lesson.
Ask the children which of them likes which toys.
Discuss the most interesting and accessible toys for depiction, decide which
You can use sculpting methods. Encourage interesting ideas and ensure that correct, varied ways of creating images are used.
At the end of the lesson, admire all the works, choose the most interesting ones, and draw the children’s attention to their beauty and expressiveness. Physical education minute
Physical education minute
Connections with other activities and activities. Children playing with toys.
"Vegetables on a plate"
Program content. Teach children to sculpt complex-shaped vegetables of different sizes from life, using finger sculpting to create indentations and narrowing of the shape characteristic of certain vegetables. Learn to select the desired color of plasticine and size of the craft while working. Strengthen the ability to sculpt a plate based on a plasticine ball.
Material. Models of vegetables with complex shapes: eggplant, peppers, beets, turnips, etc. Plasticine, stacks, modeling boards (for each child)
.
Step-by-step description (instructions)
Having prepared everything you need, you can start working. It is advisable to create crafts from plasticine step by step, paying attention to each stage of the process.
During your first lessons with your child, it is better to create simple figures from plasticine. You can start by teaching him how to roll balls. Afterwards it is possible to make various insects or a miniature zoo out of them.
How is plasticineography useful for children?
Educators know that this type of art has a positive impact on the intellectual, emotional and physical development of the child. It awakens interest in creativity and develops creative thinking.
Modeling from plasticine develops such useful qualities as perseverance and accuracy. This activity develops fine motor skills of the hands and enhances the tactile sensitivity of the fingers.
Candy on a plasticine stick
Plasticine lollipops will attract kids with their various bright colors. To work you will need a set of plasticine and skewers for canapés.
- You need to roll colorful balls.
- Roll them into thin sausages.
- Then you can make lollipops of different shapes from them.
For example, twist two sausages into spirals, braids, etc. String the finished candies onto sticks.
Tips for creating plasticine applications
There are no generally accepted standards for making applications from plasticine. While developing a creative idea, you can turn on your imagination to the fullest. Various techniques can be easily combined with each other. For example, an outline of flagella can be filled with smudges or beads.
You can choose any picture as an idea for an application. It can be used as a template. Ready-made templates for applications can be found on the Internet. To work, you will need to download and print them.
If you get your child interested in creating plasticine applications, he will spend time usefully, developing his creative abilities and fine motor skills.
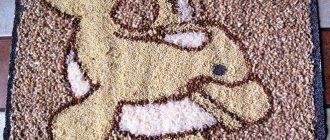
Hedgehog with plasticine seeds
Making a hedgehog is not difficult; you will need brown plasticine for the body, beads for the eyes and nose, and seeds for the spines.
- Roll a ball out of plasticine.
- Pull it out on one side to create a teardrop shape.
- Attach eyes and nose.
- Place the seeds all over the hedgehog's back, sharp side up.
- You can place a miniature plasticine apple or mushroom on the needles.
Types of modeling for the older group
By the age of 5–6 years, children are familiar with all types of modeling. Therefore, in the senior group they enrich their experience in each of them.
Table: types of modeling with features of work in the senior group
| View | Nuances of use | |
| Subject | It assumes an accurate representation of the shape and proportions of the depicted object. | Older preschoolers practice creating objects from their environment from memory. For example, when depicting a washing machine or vacuum cleaner, they do not see these devices in front of them. |
| Decorative | Aimed at creating decorations for figurines, for example, plates, cups as part of the study of topics on folk crafts. | Children learn to make thin, very small details for painting. |
| Plot | It is aimed at sculpting objects, which are then included in a single plot, for example, kids sculpt minions and then come up with adventures with them. | When making crafts, children learn to take into account all the details that are necessary for the plot. |
| Plasticineography | Involves creating a design using plasticine. | Children make images of varying degrees of relief. Details of this type of modeling can be found here. |
Bouquet of flowers made of plasticine
Plasticine bouquets can be very diverse, you just need to show your imagination. For the simplest option you need:
- Take pink, red and green plasticine.
- Roll thin green sausages and cut into seven pieces of equal length.
- Roll a pink sausage and flatten it, forming a strip.
- Cut the strip into seven parts, which must be rolled into spirals (buds).
- Plant the buds on green stems.
- Collect a bouquet and decorate with a red plasticine bow.
Ideas for drawing with plasticine using template pictures
Previously, the child simply smeared the plasticine, filling in the contours of the templates, or stuck pieces of plasticine on paper, as shown in the pictures:
For a 4-5 year old child this is boring. Invite your child to create semi-volume images like the following samples:
Another interesting technique for drawing with plasticine using templates is not to smear the plasticine inside the outline, but to lay out the drawing. To do this, you need to roll thin long sausages of the colors you need and place them inside the outline. It turns out very impressive:
To make it easier for you to navigate choosing a template for any of the techniques, we have selected several samples for your baby:
The templates are selected so that it is convenient to create a design using rolled sausages, placing them inside the outline of the design. At the age of 4-5 years, children already have some sense of beauty and a certain aesthetic perception. Encourage your baby to make smooth transitions between colors, as if the baby were painting with a brush.
Christmas tree made of plasticine
On the eve of the New Year, you can create a beautiful Christmas tree with your child. All you need is green plasticine, a bamboo stick and scissors.
- Make a green cone of any size from plasticine.
- Place it on a stick that acts as a stem.
- Using scissors, cut the sides of the cone, creating needles, then slightly bend them upward.
Modeling methods
How to sculpt from sculptural plasticine? Let's figure it out.
Separate the required amount of material from the common plate. Then place it in warm water or some other warm place, this will help it become softer and much more pliable.
(function(w,n){w=w||[];w.push(,]);})(window,'adfoxAsyncParamsAdaptive');
(function(w,n){w=w||[];w.push());})(window,'adfoxAsyncParamsScroll');
The main thing is not to overdo it! If you heat it for too long, it will become very hard and brittle. All its necessary qualities will disappear: flexibility and plasticity.
It will be simply impossible to sculpt from it. However, there is one secret: to restore its plasticity, you need to make the plasticine more liquid and add Vaseline or oil to it (just a little bit is needed). And to restore strength, simply add elements such as flour (but only from potatoes) or talc to it.
Large figures from this plasticine are connected using wire. You need to make a frame out of it. It must support all elements of the sculpture so that they do not sag under the influence of their own weight or float under the influence of air temperature. The main caveat: copper wire is not suitable for such modeling.
The chemical composition of this plasticine contains certain components that begin to react with non-ferrous metal and corrode them. But this material does not pose any danger to people.
The softer the type of plasticine, the more suitable it is for sculpting massive figures. But it’s easier to make small parts or figures from the hard type - it doesn’t stick to your hands and won’t smear, even if taken in small pieces.
Plasticine turtle
A great idea would be to make a funny turtle out of plasticine together with your children.
- Roll a green plasticine ball (head).
- Make five more balls of only a smaller diameter (legs and tail).
- Roll a large brown ball and form it into a shell.
- Stick on small brown flattened plasticine circles, creating a semblance of shell texture.
- Attach the head and neck, paws and tail to the shell.
- Apply something sharp to the nostrils and mouth.
- Stick eyes.
The craft is ready!
Plasticine mosaic
Children know what a mosaic is and how to play it from the age of three.
Therefore, it is not difficult for them to understand how to fill silhouettes from the inside with plasticine balls.
- Adults can only prepare templates for drawing and visual material in the form of pictures.
- The difficulty of appliqués made from small pieces is that the manufacturing process takes a week.
- But such a drawback does not affect the mood of preschoolers; their interest in the craft does not disappear.
Plasticine kitten
You can trust your child to make a simple figurine of a kitten himself. All you need is regular plasticine.
Step-by-step actions:
- Tear off a small piece of plasticine of a suitable color.
- Roll out well into an oval shape.
- Form the body of the kitten.
- Roll a small ball (head) and stick it to the body.
- Make the legs by rolling four sausages.
- Attach them to the body.
- Make two pink triangles (ears).
- Roll out the sausage for the tail.
- Make eyes and nose. That's all!
If something is not clear, then photos of plasticine crafts can serve as a visual aid.
Useful tips
The most important thing in the process of sculpting with young children is not only to teach them how to perform basic sculpting techniques.
The main thing is that they should have fun. Perhaps some of the children will quickly get tired of modeling and will gladly switch to another game. Some people, on the contrary, are very passionate about creative work. Before sculpting, it is important to ask a child who is four or five years old what he wants to sculpt. You can offer your own option and not interfere with him, if he expressed a desire to make the figure himself, choosing an animated character as the theme, perhaps it will be some kind of fixie, and perhaps even an animatronic Freddy
Plasticine sculpture develops children's creative potential, and we should refrain from any negative criticism, on the contrary, they will encourage creativity as much as possible
If a child is experiencing frustration, it is important to address this by encouraging more practice and experimentation.
In addition to being engrossed in play, a child begins to understand cause and effect when he picks up play dough and manipulates it to change shape. This stimulates the child's creativity and tickles his intellect. From a scientific point of view, sculpting creates many new synapses in the brain, activating neurons through the senses used at work.
Photos of plasticine crafts
0
Plasticine painting from flagella
A subject or subject picture with plasticine flagella looks much more realistic than a simple applique. Thin sausages are rolled out from pieces between the palms or squeezed out using a syringe.
The second method is beyond the capabilities of younger preschoolers, so adults make such preparations themselves. And the children twist them into a spiral or snake and glue them onto cardboard.
Craft materials:
- Outline illustration from a coloring book. You can also draw your own design on cardboard by hand or using templates.
- Soft plasticine in the desired colors.
- Medical syringe with a volume of 5–10 ml.
- Container with hot water.
Flat and volumetric applique
Three-dimensional pictures on cardboard are created from molded parts, flagella and mosaics. The background is drawn with pencils, watercolors or made from plasticine using the smearing technique.
The most interesting topics for children are: “Birds and Animals”, “Nature”, “Based on Fairy Tales” and “Underwater World”.