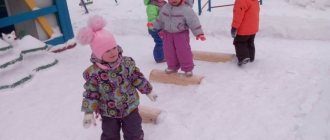
Theme of the week: “Summer is coming”
Theme of the week “Summer is coming”
Lesson 36. Summer sky
(Drawing with wax crayons and a brush. Watercolors)
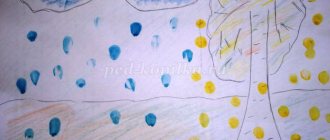
Target. Teach children to draw a sun with wax crayons, consisting of a circle and short lines; tint paper.
Handout. Landscape sheet, wax crayons, watercolor paints, brush, jar of water.
Ask the children: “What time of year is approaching? (Summer.) Why is it warm in summer?” (The sun warms the earth more strongly.) Read the poem by F. Tyutchev:
The sun is shining, the waters are sparkling,
Smile in everything, life in everything,
The trees tremble joyfully
Bathing in the blue sky.
Ask: “What season is described in the poem? What sky? (Blue.) What does the poem say about the sun?” (The sun is shining.)
Invite the children to draw the sun with wax crayons. Show how to hold the crayon with three fingers. First, children must draw a yellow circle, color it in and draw rays. Then take a brush, dip it in water, pick up blue or blue watercolor and tint (paint over) the landscape sheet. The sun remains unpainted.
This text is an introductory fragment.
Continuation on liters
Drawing with watercolors on wet paper
To do this, you will need a sheet of thick paper (preferably watercolor), the watercolor itself and a brush. Moisten the entire sheet evenly with water so that it is thoroughly wet, but not so that there are no puddles. Put some paint on your brush and start creating. Any stroke spreads one to two centimeters across the paper. Now is the time to show your child how colors are mixed and explain what shades are.
If the paint does not want to spread, then the sheet is dry; if it spreads in all directions, it is too wet. We need to find a middle ground. In this lesson, show your child that all movements are made easily and smoothly. There is no need to press the brush into the paper, as many children like to do. A light touch is enough.
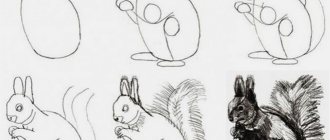
The web in the right picture was drawn using a wax candle. Read about this below.
This technique works well for drawing backgrounds. Especially water. And after drying, you can continue to draw fish and algae as usual.
Read also
Topic of the week: “My Home”
Theme of the week “My Home” Lesson 22. House for a bunny and a rooster (Plasticine modeling) Program content. Strengthen children's ability to bring a product to the desired image using plasticine. Learn to retell fairy tales based on illustrations. Demonstration material. Heroes
Theme of the week: “Summer is coming”
Theme of the week “Summer is coming” Lesson 36. Beautiful butterfly (Applying plasticine to the surface) Program content. Continue to teach children to apply plasticine to the surface in a thin layer inside the outline of the design and decorate the product. Develop speech and thinking. Teach with
Theme of the week: “Summer is coming”
Theme of the week “Summer is coming” Lesson 36. Swan on the lake (Modeling from plasticine using natural materials) Program content. Strengthen the ability to combine natural materials and plasticine in crafts. Practice connecting parts. Learn how to complete a craft
Theme of the week: “Goodbye, summer”
Topic of the week: “Goodbye, summer” Lesson 1. How I spent the summer (Free choice of material) Program content. Bring back pleasant memories of summer. Give children the opportunity to independently choose the material and method of conveying their impressions. Develop
Topic of the week: “My Home”
Topic of the week: “My Home” Lesson 41–42. Houses of the Three Little Pigs (part 1–2) (Drawing with pastel crayons, sanguine, charcoal, wax crayons) Program content. Continue learning how to make illustrations for fairy tales. Develop the ability to arrange objects on a sheet of paper. Learn
Theme of the week: “Summer is ahead”
Theme of the week “Summer is ahead” Lesson 69. Khokhloma patterns (Gouache painting) Program content. Expand knowledge about Khokhloma fishery. To cultivate interest and love for the art of Khokhloma masters, to teach how to highlight plant and grass patterns. Continue to teach children
Theme of the week: “Soon to school”
Theme of the week “Soon to school” Lesson 71. My first letter (Drawing with felt-tip pens) Program content. Strengthen children's ability to draw large and accurately. Teach children to make a decorative pattern from a variety of elements. Exercise children in choosing beautiful
Topic of the week: “My Home”
Theme of the week “My Home” Lesson 21. Houses for nesting dolls (Drawing with colored pencils) Program content. Teach children to draw small and large objects consisting of a square and a triangle. Continue learning how to compose a plot composition. Cultivate responsive
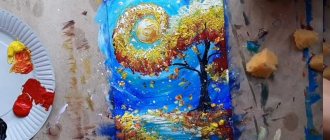
Summer cocktail: step-by-step drawing
Cocktails are refreshing, thirst-quenching mixes. They will also strengthen the immune system, give vigor and good mood. Let's depict this delicious drink. Anyone can cope with this with the help of detailed step-by-step instructions. Arm yourself with brushes and paints and let's start creating! And instead of a regular white sheet, you can take beautiful craft paper.
- Paint the bottom of the canvas with a pink tone. We use whitewash to designate the checkered pattern on the tablecloth. Make lines diagonally.
- Without a sketch, we begin to draw what is inside the cocktail. We outline the orange segments with orange color, and outline the peel with a darker shade. We draw the lime pieces with light green pigment, also drawing the edge separately. Let's draw a thin diagonal and an oval - this is the future umbrella in our glass. Let the image dry a little.
- Draw a light blue tube directly on top of the slices. We highlight its lower part in a blue tone, indicating a shadow. We depict a glass tapering towards the bottom, and then an oval bottom. Draw the veins of the fruit with thin white lines.
- We fill the water with a pale blue tint. Make the fill a little transparent, and try not to get into pieces. Don't be afraid if something spills, because when we look at a cocktail, the liquid distorts the contours. We draw details on the decorative umbrella. Use whitewash to highlight the edge of the water and highlights on the glass.
- Let's complement the image with the shadow of the glass in a dark tone. Let's make white and pink splashes around. We decorate with curved branches and spirals. Make sure your composition looks complete.
Summary of a drawing lesson in the first early age group “Summer”
Oksana Ladikainen
Summary of a drawing lesson in the first early age group “Summer”
Summary of OOD on drawing in the first group of early age (2 years)
.
Theme "Summer "
Author: Ladikainen Oksana Vladimirovna
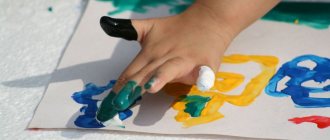
Goal: Continue to develop an understanding of the main signs of the summer season, learn to convey the image of rain by applying plasticine to paper with your finger.
- develop fine motor skills of the hands;
- cultivate attention, instill interest in the drawing ;
- teach how to draw vertical stripes ;
Equipment: sun toy, yellow paints, cotton swabs;
Stamps
Also quite a popular technique for early ages. You will need any object that you don’t mind and gouache or any other paint (but it’s better not to take watercolor). The technique is simple - dip an object in paint and make an imprint on paper.
Stamps can be made from apples, potatoes, wine corks, threads, pine cones, shells and many other materials. The easiest way to make this is with potatoes if you have metal cookie cutters. Simply press the mold into the potatoes and carefully trim the excess pieces around the edges with a knife.
It can be made even simpler. Take a small box, sponge or cork, glue various materials to the side surface or wrap it with threads in a chaotic manner.
Rollers with a pattern are also of interest. They are sold in construction and craft stores.
The leaf prints are especially delightful. Select leaves of various shapes, paint them and press them onto the paper. The entire texture of the sheet will be clearly imprinted on the paper.
OOD progress:
1. Main part. Surprise moment.
Educator: Guys, someone is knocking on our doors! Let's see who came to us!
The doors open, the teacher brings in the sun.
Educator: Guys, look, the sun has come to visit us. Let's go together
Children: Hello, sunshine!
Sunny: Hello guys (sad)
.
Educator: Our sun doesn’t smile today, doesn’t warm us with its rays.
I think my sunshine is missing something?
"Blotography" and "spraying"
In the "blotography" technique, children take a large amount of paint onto a brush, splash it on the drawing in a chaotic manner, then try to understand what it looks like. With a sufficiently developed imagination, you can get a whole plot. Details are completed with colored pencils.
The spray technique is similar. Only spraying is done using a toothbrush and a ruler. Put paint on the brush and run it with a ruler towards you. If you do everything correctly, there will be no paint splashes on yourself. But there may well be around the leaf. Therefore, you need to think in advance about what the sheet will be attached to and how to secure the space around it.
Abstract of GCD in the second junior group on artistic and aesthetic development. "Drawing summer"
Abstract of GCD in the second junior group in art
Strengthen the ability to draw simple objects and phenomena
reality. Using straight, round, inclined, long,
Identify knowledge of primary colors and shades as a means of transmission
variable attribute and emotional and moral characteristics
Strengthen the ability to use paint, brush, napkin, stand
under the brush, rinse the brush in a glass of water, dry
Continue to cultivate an interest in drawing and a love of beauty.
Preliminary work: Drawing straight, round, long, short
lines. Coloring contours with colored pencils and paints. On
classes in art activities, outside of class, individual work.
-The teacher brings in a large beautiful tassel decorated with a ribbon
and paint. Guys, do you know who came to visit you today? Right,
This is a brush, but not a simple one, but a magical one. She can draw very beautifully.
Can your brushes paint? We'll check this now. My brush
dipped in paint. Which one? That's right, green. What can you draw
green paint? Of course, grass. Here is my magic brush painting the grass
(short vertical lines) – teacher’s display. And now your tassels
They will draw exactly the same grass (children draw on their own).
— After painting with green paint, the brush got dirty. What do you need
do? (Rinse, dry).
- Help your tassels, well done (children put their tassels on
The flower goes to bed
— What other paint do you have on your table? That's right, red.
— What can you paint with red paint? Berries, flowers (show
teacher of drawing with round lines). - We draw flowers by touching the brush.
— And now your brushes will paint flowers and berries (well done).
— And there is also blue paint. Let's draw the blue sky with straight lines
long lines at the top of the leaf. We draw without lifting the brush from the sheet,
from left to right. My brush painted the blue sky, washed in
glass and dried on a napkin.
- Now you will paint with your brushes a beautiful blue sky, well done.
You already know how to paint and wash your brushes yourself, well done. I took a walk
The brush is magical for paints and is tired. Let's put her to rest on
Then the children admire their work
Material number: DB-027667
Didn't find what you were looking for?
You might be interested in these courses:
Refreshing ice cream: drawing on the theme of summer with colors
Drawing is the best way to relax, relax and become happier. To clear your mind of pressing problems, we recommend doing something creative with your children in the evening after work. Now you will learn how to draw the most delicious summer sweet - ice cream in a waffle cup! It is truly refreshing, saving you from heat and thirst. Here's what you can draw in the summer:
For work we need:
- Watercolor paper A5 size
- Pencil and eraser
- Liner
- Brushes and paints
- Water
- Palette
Let's get creative:
- Let's start by building our composition. To do this, put a notch in the center and draw a line of symmetry. We designate the sizes and parts of the future ice cream. We outline the trapezoidal shape of the cup and the delicacy itself resembling a cone.
- Now we draw all the lines of the cup more roundly, so we convey the volume. Let's denote the checkered texture of the waffle by drawing diagonals in one direction and then in the other. Draw the ice cream in light waves to create swirls. We add a loop on top.
- We outline all the contours with a liner. To create a subtle color effect, dilute the lilac shade with plenty of water. Let's go over it on the right side under the contours of the curls. While the top part is drying, let's work on the bottom. We fill the glass with translucent ocher, leaving empty spaces in some places. We highlight the right side with a more saturated tone, since the light in our composition falls from the left.
- Using purple pigment, we once again go over the treat, blurring the boundaries. We’ll create a pink halo around it, without a clear outline; we should get a slight haze.
Our illustration is ready. After completing this, you will definitely want to buy a real ice cream in the store!
What other drawing options are there: video master classes
- Master class for those who want to draw a summer landscape with a simple pencil:
- A summer image in a non-standard technique that kids will definitely like. We will draw using a regular sponge. This method will develop imagination and fine motor skills:
- A very simple and cute picture of a watermelon, which is so refreshing in hot weather. Children from 3 years old can cope with the work:
A master class on drawing spring with a pencil will also be useful to you.
Leave your comment
Gift certificates
Responsibility for resolving any controversial issues regarding the materials themselves and their contents is taken by the users who posted the material on the site. However, the site administration is ready to provide all possible support in resolving any issues related to the work and content of the site. If you notice that materials are being used illegally on this site, please notify the site administration using the feedback form.
All materials posted on the site were created by the authors of the site or posted by users of the site and are presented on the site for informational purposes only. Copyrights for materials belong to their legal authors. Partial or complete copying of site materials without written permission from the site administration is prohibited! The opinion of the administration may not coincide with the point of view of the authors.
Source
Collage
This is not really drawing, but only an intermediate stage. Surely, you have old postcards at home that you don’t need, but it’s a shame to throw them away. It's time to use them. Cut out individual elements and let your child arrange them on the paper. Newspaper and magazine clippings are also suitable for this purpose. After the child decides on the location of the objects, hand him a brush and glue and give him the opportunity to glue everything himself. Ready-made elements will be very useful for children under three years of age. After all, they still don’t know how to draw complex objects, but they will definitely be able to add details to them.
Drawing with plasticine on glass
This will require a little preparation - you need to place a drawing under the glass and use a marker to draw all the contours on it. After this we begin to “color”. To do this, softened plasticine is applied inside the contours, without going beyond the edges of the parts. To soften the plasticine, you need to warm it. This can be done by kneading it with your hands or simply placing it in the sun or radiator.
On the working side, everything doesn't look very neat. But on the reverse side there is a beautiful color drawing with clear contours. The finished picture is inserted with the reverse side into a frame with a background made of colored cardboard.
Before starting work, do not forget to seal the edges of the glass with tape to protect the child’s hands.
If the child has not yet mastered this technique, it is better not to spend money on frames. It makes sense to purchase a regular coloring book with a large pattern.