Creative techniques for learning the rules of the road
The selection describes effective, inexpensive types of crafts. These are techniques that kids can understand and use accessible materials.
Craft games
Applications
Application according to traffic rules is an important method in the preparatory group. Through this technique, children are introduced to the structure of traffic lights, the meanings of road signs, and street layouts. To build a paper traffic light, prepare:
- white and colored sheets;
- markers;
- rulers;
- pencils;
- glue;
- scissors (for older preschoolers).
The influence of family upbringing on the formation of a child’s personality
The basis of the craft is a blank sheet with a drawn rectangle and three circles inside. Paper figures are glued on top in the correct order. The rectangle can be shaded or painted over. At the end of the work, the little master explains the order of the colors and what they mean. The student uses a ruler or draws lines with his naked hand, improving concentration and fine motor skills.
Important! Before classes, a conversation is held about safety rules.
Modeling from plasticine
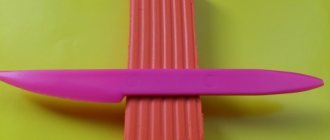
Three-dimensional figures are molded from plasticine and spread over the shape. This is how road signs are made. Use:
- stencils;
- rolling board;
- stacks;
- white plasticine.
Step-by-step instruction:
- Knead the plasticine with your hands.
- Pinch off pieces.
- Attach them to the base and rub.
- Fill in the signs by smearing white plasticine over the template.
- Plasticine that has gone beyond the contour is removed in stacks.
The group makes the same sign to consolidate knowledge about it.
Drawings
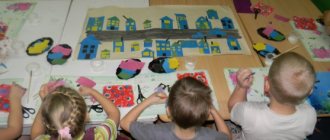
Younger preschoolers in kindergarten draw scenes based on traffic rules, objects, and explain them. Children, if desired, depict signs, zebras, cars on the road. Drawings can be used as a basis for game layouts. In this case, they are supplemented with structures, toys, figures made of plasticine and other materials. In the kindergarten, in warm weather, images are painted with crayons outside in a designated area. Older children invent and draw correct and incorrect situations and comment on them.
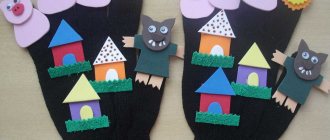
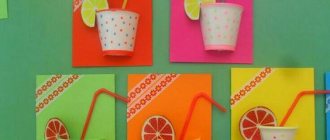
Crafts from cereals and pasta
Cars, houses, plants, and animals are made from pasta of various shapes. They choose interesting types: horns, shells, straws, long noodles. Purchase products in natural colors and with dyes. Prepare a flat, roomy base on which the figures will be fixed. It could be a board, cardboard. In groups, the children create a didactic panel in the form of a town. Multi-colored cereals are used as a material for modeling and drawing. Dry porridge is sprinkled on the “streets” and “roads” of the compositions.
Master class on making a pasta truck:
- Prepare liquid glue, pasta in the form of horns, short tubes, flowers, “ruffles”.
- Assemble the “cabin”: glue 3 tubes together to form a rectangle. Repeat the action.
- The rectangles are glued together with the flat side.
- On one side of the product, two more are attached to the lower tube, one after the other.
- Glue another rectangle from 6 of the same pasta. It is glued to the back of the cabin. This is the body.
- The body walls are made from “ruffles”.
- Wheels—horns—are attached to the bottom of this structure.
- There are 2 “flowers” installed in front of the body - headlights.
Note! The child, analyzing the shape and structure of cars, comes up with his own versions of pasta technology.
Organizing a crafts exhibition in kindergarten
Exhibitions of children's creativity are mandatory educational events. Their goals:
- improving the baby's self-esteem;
- developing a sense of responsibility;
- formation of taste;
- strengthening the connection between children and parents through joint creativity;
- familiarizing participants with each other’s creativity, stimulating healthy competition.
Exhibition on traffic rules
Exhibitions are joint celebrations where the entire school and parents are invited. They are held several times a year. Families take pictures and communicate. The best exhibits are sent to a permanent exhibition.
Children's songs for dancing with repetitive movements
During the organization of the event:
- set a date;
- choose a topic;
- notify children;
- Invitation leaflets are prepared upon request.
To summarize, posters are prepared with photographs of the works and masters.
Important! During the exhibition, discipline is controlled by the teacher. Crafts on traffic rules for parents and kids
The selection includes master classes on creating game panels on various topics. They will serve as an illustration of traffic rules.
Crossroads
You will need:
- toy cars;
- rulers;
- pencils, felt-tip pens;
- glue;
- scissors;
- cardboard;
- multi-colored paper;
- base from the bottom of a cardboard box.
Stages of work:
- They construct buildings from boxes covered with colored sheets. You can make a school, a residential building, a store.
- They glue and draw windows and roofs.
- Cut the white sheet into strips 5cm wide. Glue them onto black cardboard to create a zebra.
- Cut off two long white stripes and 8 short ones. They are glued to gray cardboard - this is a road with markings.
- They are making trees, 4 traffic lights (on each side of the crossing).
- The crafts are attached to the base and the cars are placed.
You can use a real intersection known to your child as a model. Thinking through an idea is no less important than implementing it.
DIY crossroads
Parking
You will need:
- a pair of hard cardboard boxes;
- glue;
- scissors;
- blue, white paper;
- a simple pencil;
- cars, helicopter.
Stages of work:
- They create a three-story base: 3 identical sheets (from boxes) are attached horizontally to another vertical sheet. Make sure that the distance between floors is the same.
- A long, wide ribbon in the shape of a semicircle is cut out of cardboard. It should connect the 1st and 3rd floors. This road is connected to the lower floor on the right, and to the upper floor on the left.
- On the platform they place a cardboard tube with a “lid” - this is a place for a helicopter.
- Markings are made by gluing white stripes (spaces for cars) and blue tapes with arrows (traffic indicators).
- Cars are being arranged.
The process is discussed with the child so that the child sees the logic of what is happening.
Application “Traffic light” in the senior group of kindergarten made of paper step by step with photo
Application "Traffic light" made of paper for children 5-7 years old. Master class with step-by-step photos
Master class for children, parents, educators, primary school teachers.
Purpose of the master class: making paper crafts, gifts, souvenirs.
He has three eyes, three on each side, and although he has never looked at them all at once, he needs all the eyes. It has been hanging here for a long time. What is this? ... Well, of course, it's a traffic light. Traffic literacy should begin to be taught to children from preschool age, because the health and life of a child may depend on this knowledge. What teaching methods are used? Of course - gaming. Thus, children remember any information perfectly. Books will also be good helpers. Of course, you shouldn’t look for traffic rules for drivers, because now there are a lot of publications with bright illustrations and poems that are easy to remember. It is useful to periodically recite with your child some lines from the poems: “If it’s red, there’s no way, the light is red, you can’t go” and “If the light turns red, it means it’s dangerous to move.” You can also use role-playing games - use toys to simulate various situations, explain which characters behave correctly and which do not, and learn new rules. During walks and trips, pay your baby's attention to road signs. Maybe a child has no need to know about the designations of the main and secondary roads (although many boys are interested in this), but such signs as “pedestrian crossing”, “underground passage”, the meaning of traffic lights, etc. It’s quite possible to show it. Tell the kids about the role of traffic lights and the designation of signals when making such a craft. Tools and materials: scissors, glue, double-sided colored paper, cardboard, pencil, stencil (circle with a diameter of 6-7 cm).
Cut out three circles (red, yellow and green) with a diameter of 6-7 cm
Fold them in half
Cut out three black circles of the same diameter and fold them in half.
Glue black and colored circles together in pairs.
Cut out a rectangle from black paper
Glue the circles
The traffic light is ready!
This watchful traffic light prevents traffic jams. He watches the machines, he directs them. If yellow gives light, Brake - there is no progress, Wait for the next signal, Yellow warned you.
If the red light flashes, traffic is prohibited,
And it will light up green, The path is clear - all forward!
(O. Borisova)
We recommend watching:
DIY traffic light applique for older children. DIY paper applique for kindergarten. Traffic light Construction from waste material. Traffic light. Master class for children 5-6 years old DIY “Traffic light” application for children of the senior preparatory group
Similar articles:
Traffic light - do-it-yourself tablet. Master Class