For younger children
Crafts for children 3-4 years old seem like something magical to them. Children are proud of the work they have done and are happy to show it off to others. When choosing an idea, remember that children's motor skills are different from those of adults. Details should be large and simple. It is advisable to prepare the preparations in advance.
Children of primary preschool age should be creative. This contributes to the harmonious development of personality. Preschool educational institutions conduct weekly group classes. The task of parents is to reinforce these skills.
Crafts from plasticine
Children 3-4 years old do not know how the learning process works. There is no need to rush when working together. All movements must be slow and accompanied by a voice explanation.
Application “Summer lawn”.
Materials you will need:
- a sheet of green cardboard;
- plasticine 6-8 colors.
The goal is to create an interest in sculpting.
The lawn is a sheet of cardboard. We talk with the child that in the summer flowers grow in the meadow and the sun shines brightly. We show how to sculpt flowers, such as daisies, from plasticine. The middle can be made in a different color. We make a sun in the right corner.
For middle group children
Children of middle preschool age pay attention to details. The creative process becomes more meaningful. Applications on the theme of summer are becoming more diverse. The child begins to fantasize and add details on his own. When setting a topic, use your imagination with your child.
From colored paper
At the age of 4-5 years, children own scissors. This skill needs to be encouraged. The development of motor skills is directly related to brain processes. A wonderful way to reinforce a skill is through joint creativity between a child and a parent.
Application "Hello Summer".
Materials:
- A sheet of colored cardboard for the background (blue, green, white);
- Colored paper;
- Glue;
- Scissors;
- Black felt-tip pen.
The goal is to consolidate the skill of working with colored paper and cutting.
- Cut a sheet of white paper in half. Fold half the sheet several times. It should look like a tube. This will be a birch trunk.
- Glue a paper birch trunk onto a sheet of cardboard. Draw strokes on the trunk with a black felt-tip pen that imitate the color of a birch trunk.
- Cut out leaves from a sheet of green paper. They can be of different shapes and sizes. Glue them around the top of the trunk.
- To create a landscape, you can cut out flowers, the sun, butterflies. They are also glued to a sheet of cardboard.
Application “Hello, summer!” from colored paper
Watch the video on how to make a simple summer application “Bee” from colored paper:
From cotton swabs
Cotton swabs are a wonderful material for creating compositions. In summer applications they can be conveniently used as flower petals.
Application "Daisies".
Materials:
- A sheet of colored cardboard for the background;
- Green colored paper;
- Cotton buds;
- Yellow plasticine;
- Glue.
The goal is the development of fine motor skills, the development of spatial thinking.
- Cut out stems and leaves of daisies from green colored paper. To do this, first draw an outline with a simple pencil on the back of a sheet of colored paper. Glue the resulting stems and leaves onto a sheet of cardboard.
- Roll the yellow plasticine into a ball, pressing it lightly. The yellow circles will be the centers of the daisies.
- Cut the cotton swabs in half with scissors. Stick the resulting “leaves” into yellow plasticine.
“Chamomile” applique made from cotton swabs
Don't rush your child. At this age, children pay great attention to the smallest details. It’s not surprising if the baby spends 20 minutes inserting cotton swabs into the plasticine.
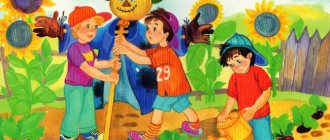
Man in motion
The appliqué of a person in motion helps develop a child’s creative abilities and imaginative perception. The difficulty of this task is that rectangles and squares of different sizes are used for the work.
For the application you will need:
- blanks of squares and rectangles made of paper;
- cardboard;
- glue.
The work consists of several stages:
- The child is asked to choose cardboard - the base on which he will stick the figure.
- The adult pronounces the pose that will be depicted in the form of an appliqué. He explains how the arms and legs are positioned in this pose, and what features there are. For example: a person runs, bends over, jumps.
- The child takes the prepared templates and lays them out in the desired position on the cardboard. If you have completed the figure correctly, then glue the rectangles with glue.
- If mistakes are made in a pose, the adult tells you how to correct it.
The application of a person in motion will be useful for children of primary school age and art students.
Applications for children of senior and preparatory groups
Children 6-7 years old master all creative techniques. At this age, they are able to independently come up with and implement a composition. The Hello Summer application will not cause any difficulties for children.
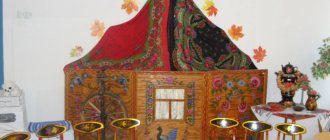
From cardboard
Application on the theme of summer made of cardboard has many variations. Trust your child to choose what he will do. Believe me, the work will turn out wonderful.
Application "My yard".
Materials:
- colored cardboard;
- scissors;
- glue.
The goal is to develop fine motor skills and develop imagination.
Children of the preparatory group feel like adults. Give the children a theme for playing in the yard. Ask them to make a composition from colored paper or cardboard of the yard in which they live or the area in the kindergarten.
Each yard has a slide, swings, carousels, a sandbox, and trees. Making them from colored paper or cardboard is not difficult. Every child will be able to show their imagination and create a beautiful composition.
Watch the video on how to create a voluminous summer paper applique:
From cereals
Bulk material is loved by all children. A kindergartener will do this type of creativity with pleasure.
Application “At the Sea”.
Materials:
- a sheet of white cardboard;
- semolina;
- millet;
- buckwheat;
- glue.
The goal is to develop three-dimensional thinking.
- Take a sheet of cardboard and cover it completely with glue.
- Sprinkle with semolina - this is the beach.
- At the top of the sheet, use glue to draw the sun and sprinkle with millet. Shake off the remains.
- At the bottom of the sheet, similarly, using glue, draw shells and sprinkle with buckwheat. Carefully remove any remaining residue. The work must dry thoroughly.
Application “Sea” from cereals
Shell crafts
A trip to the sea is probably the most anticipated event of the summer. There are so many interesting things you can do on the sea beach: sand castles, figures decorated with shells and seaweed. And how you want to bring a piece of the sea home. If you brought back a whole bag of seashells and pebbles from vacation, do not rush to hide them in the pantry. See how you can use them in an original way!
Seashell photo frame
Vacation photos always take pride of place in the apartment. And often there are so many of them that you have to hide them in a photo album. Now, you don't have to choose the best photo to put it in a suitable frame. You can make as many original frames yourself as you need. And create a whole island of summer memories in your apartment.
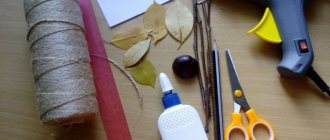
To work you will need:
- thick cardboard;
- decorative varnish;
- glue (silicone, polymer or “moment”);
- scissors; brush;
- pencil;
- shells and pebbles.
Sequence of work:
- Initially, determine what size your frame should be. Cut out two blanks from thick cardboard, which should be 1.5-3 centimeters larger than the size of the photo on each side. Next, place the photo in the center of the first blank and trace its outline, subtract half a centimeter from each side and cut out the resulting window.
- Glue shells and pebbles to your liking on the resulting blank and let them dry well.
- When the glue is completely dry, the frame should be covered with a layer of varnish and allowed to dry again.
- Now you need to build a leg out of cardboard - a support or a strong loop, if the photo frame will hang on the wall, and glue it to the second blank.
- Connect the two cardboard blanks so that the glue does not interfere with the place where your photo will be.
The sea photo frame is ready!
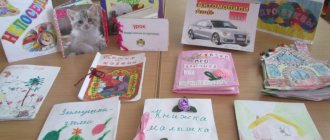
Seashell card
Sea postcards are perfect as homemade items on the theme “how I spent my summer” for school or kindergarten. And it does not require special skills. Just let your imagination run wild!
Prepare thick cardboard of the desired size and color. Select whole shells and pebbles. By combining shells you can get beautiful butterflies, beautiful flowers or a whole marine composition of the water world. Algae can be made from knitting threads and ribbons; ready-made three-dimensional stickers can be used as fish, or you can cut them out yourself from paper.
Use your imagination to the maximum!
Funny turtles
If your child loves modeling. Then such a homemade product will be to his taste.
For creativity, prepare:
- multi-colored plasticine;
- shells;
- stack.
Step-by-step master class:
- To begin, make blanks from plasticine: a torso, a head, a tail and four legs.
- Form a mouth in a stack, you can make the turtle smile. Eyes can be made from white and black plasticine.
- Next, we collect all the parts together, thus sculpting a turtle, and attach the shell to the back. The sea turtle is ready!
For children 1-2 grades
An application on the theme of summer in grades 1-2 is a favorite task for teachers. You can also practice at home. Children at this age can make their own applique. The adult’s task is to teach new techniques.
From napkins
This technique requires patience and perseverance. This is an ideal option for schoolchildren.
Application “Summer meadow”.
Materials:
- Sheet of cardboard;
- Napkins of different colors;
- Glue.
The goal is to develop attention and perseverance.
- Prepare the material for the applique - roll small balls of different colors from napkins.
- On the background, draw a diagram of the arrangement of elements with glue. It can be anything: flowers, rainbows, sun, trees, mushrooms.
- Then lay out the prepared small balls. You will get an interesting three-dimensional picture.
Application “Summer meadow” from napkins
Man in motion
The appliqué of a person in motion helps develop a child’s creative abilities and imaginative perception. The difficulty of this task is that rectangles and squares of different sizes are used for the work.
For the application you will need:
- blanks of squares and rectangles made of paper;
- cardboard;
- glue.