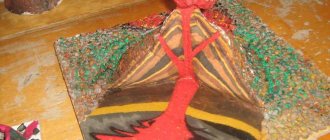
Matches experiment
For the first experiment with water for preschoolers, you will need a glass glass, watercolor paints, a deep plate, and plasticine. An experiment using water will clearly show how air pressure changes during combustion.
- You need to pour water into a glass, add any color of paint to it with a brush and stir, this is necessary for the clarity of the experiment.
- Next, put a piece of plasticine at the bottom of an empty plate, into which insert two matches.
- Pour colored water from a glass into a plate.
- Under adult supervision, you need to light these matches and cover them with an empty, dry glass.
As a result of a simple experiment, the matches go out, and the colored water begins to rise up. This happens because during combustion the air pressure in the glass becomes less than outside.
Experiment with water of different temperatures
For the next experiment you will need four glass beakers and paints. This water experiment for preschoolers shows the properties of water at different temperatures.
- You need to pour cold water into two glasses, warm water into the other two.
- You can add yellow to cold water, and black to warm water.
- Place one of the glasses with yellow cold water on a plate. Cover the glass with warm water with a plastic card and turn it upside down and place it in this form on a glass with cool water, that is, the glasses with different water will be mirrored, with a plastic card between them.
- Then you need to very carefully pull out the card, while making sure that the glasses do not move, and hold them in their original position.
Here you can see that cold and hot water have not mixed, this happens because heat tends upward and cold tends downward.
There are still two glasses left, you can try to do this experiment in reverse - put hot water down and cold water up. In this case, the water will mix.
Card index of experiments and experiments with water
Anastasia Leskova
Card index of experiments and experiments with water
EXPERIMENTS AND EXPERIMENTS WITH WATER
Water, like all liquids, does not have its own form. If you give her free rein, she will take up all the possible space. Water flows downward under the influence of gravity, and when falling from a height, its force can be converted into electricity. Slowly and imperceptibly, water rises up the trunk of the plant, supporting its life.
With the help of tests and experiments, you will be able to verify the extraordinary properties of water: the ability of penetration, the force of water pressure and its ability to move when heated.
Experiment No. 1
Target:
show children that in the world around us there are heavier and lighter objects
water.
Equipment:
bath with water, objects made from various
material.
Progress of the experiment:
Pour water into the bath and lower objects made of different materials one by one. We observe which objects float and which ones go to the bottom.
Result:
some objects sank, and some objects remained floating on
water surface.
Explanation:
We are surrounded by different objects, some of them are lighter than water, others are heavier.
Experiment No. 2
Target:
Show children that the weight of an object in water decreases.
Equipment:
steelyard, apple, thin and strong rope, deep basin, water, paper and pencil.
Progress of the experiment:
1. Tie an apple and weigh it on a steelyard, write down the result.
2. Fill the basin with water. Without removing the apple from the steelyard, lower it into the water and measure its weight again.
3. Write down the result and compare with the previous one.
Result:
when the apple is immersed in water, the steelyard shows less weight.
Explanation:
An apple, immersed in water, displaces a certain amount of it. The displaced water strives to take its place and puts pressure on the apple, trying to push it up. Therefore, the weight of the apple in water decreased.
Experiment No. 3
Target:
Show children that air is lighter than water.
Equipment:
sparkling water, glass, grapes.
Progress of the experiment:
Pour sparkling water into a glass and drop the grapes into it.
Result:
The grapes first sink to the bottom. Then gas bubbles will stick to their surface, and they will begin to rise upward. Gas bubbles on the surface will burst and the berries will begin to sink. Until the water runs out, the grapes will sink and float.
Explanation:
air is lighter than water, it sticks to the grape and pushes it out
water.
Experiment No. 4.
Target:
introduce the properties of salt water.
Equipment:
large glass, water, finely ground salt, spoon, two eggs.
Progress of the experiment:
1. Fill the glass halfway with water. Using a spoon, carefully lower the egg into the glass.
Result:
the egg sank to the bottom of the glass.
2. Remove the egg from the glass and add 10 teaspoons of salt, stir until completely dissolved. You will get a brine.
3. Place the egg in the glass again.
Result:
the egg will float to the top.
4. Add fresh water very slowly until the egg begins to sink.
Result:
the egg is in the middle of the glass, as if suspended.
Explanation:
The egg is denser than water, so it sinks. Salt water is denser than fresh water, so the egg floats to the top. In the latter case, fresh water is located in a layer above salt water (its density is less). Therefore, the egg stopped in the middle: the density of the egg is greater than that of fresh water and less than that of salt water.
Experiment No. 5.
Target:
show children how the same object, but in different positions, can
swim or drown.
Equipment:
plasticine, pan lid, basin, water.
Progress of the experiment:
1. Fill a bowl with water.
2. Make a boat out of plasticine and put it on the water.
3. Pull out the boat and scrunch it into a ball.
Result:
the boat floats calmly in the water, and the lump of plasticine immediately
sank to the bottom.
4. Take the lid from the pan and lower it onto the water, first in a horizontal position, and then in a vertical position.
Result:
in a horizontal position the lid does not sink, but in a vertical position it immediately sinks to the bottom.
Explanation:
the more water is displaced by an object during immersion, the more
with greater force the object is pushed upward.
Experiment No. 6.
Target:
introduce children to the concept of “surface tension of water.
Equipment:
tweezers, needle, glass, water.
Progress of the experiment:
Fill the glass to the brim with water. Use tweezers to take the needle and carefully place it on the surface of the water in the glass.
Result:
the needle lies on the surface of the water.
Explanation:
molecules on the surface of water form a film that can support the weight of a light body. This phenomenon is called “surface tension of water.”
Experiment No. 7.
Target:
continue to introduce children to “surface tension of water.
Equipment:
handkerchief, elastic band, glass, water.
Progress of the experiment:
1. Wet and wring out the handkerchief.
2. Fill a glass with water and cover it with a wet handkerchief, secure the handkerchief with an elastic band.
3. Quickly tip the glass over (work over your pelvis).
Result:
the water does not pour out of the glass, as if the scarf were made of impenetrable fabric.
Explanation:
when they moistened the handkerchief with water, it filled the entire space between
fibers of the fabric and, thanks to surface tension, created an impenetrable barrier for water from the glass.
Experiment No. 8.
Target:
continue to introduce children to “surface tension of water.
Equipment:
basin, cardboard triangle (boat, liquid soap, water.
Progress of the experiment:
1. Fill a bowl with water. Place the boat in the corner of the basin, with an acute angle towards the center.
2. Wet your finger with liquid soap and place it in the water behind the boat.
Result:
the boat instantly begins to move towards the opposite edge
basin.
Explanation:
At first, the boat stands motionless, since surface tension
holds it on all sides with equal force. The soap reduces the tension behind the boat, and it moves in the direction where the tension force is stronger.
Experiment No. 9.
Target:
Show the children that hot water always rises and cold water always goes down.
Equipment:
transparent container, small glass jar with a lid, colored ink, water.
Progress of the experiment:
1. Fill the container with water. Place a few drops of ink into a small jar filled with hot water and cover it with a lid.
2. Lower the jar to the bottom of a large container and remove the lid.
Result:
colored water comes out of the jar and rises up. After a short time, the colored water mixes with the cold water and falls down.
Explanation:
water is made up of small particles called molecules. Heat increases their speed. Water becomes less dense and therefore lighter. This is why colored hot water floats above cold water. Once the water cools, it will mix with the rest of the water.
Experiment No. 10.
Target:
introduce children to the process of moisture evaporation.
Equipment:
two glasses, water, film.
Progress of the experiment:
Pour water into two glasses and mark its level, cover one of them with film, then put the glasses away for a day. Check the water level after 24 hours
Result:
the next day the water level in the open glass will become significantly lower, but in the closed glass it will remain almost unchanged.
Explanation:
in the glass not covered with film, there is less water because it has evaporated. There was no less water in the glass covered with film, because the film prevented evaporation.
Experiment No. 11.
Target:
introduce children to such a natural phenomenon as the water cycle in nature.
Equipment:
large plastic vessel, water, small jar, film.
Progress of the experiment:
Pour water into a large plastic container and place a smaller jar in it. Cover it all with film and place it in the sun.
Result:
The sun's heat will heat the water, it will begin to evaporate and, rising, condense on the cool film, and then drip into the jar. This is exactly how the water cycle occurs in nature.
Explanation:
Under the rays of the sun, water evaporates. Steam particles rise
up and settle on the film. There they cool and turn into droplets
water that flows back down.
Experiment No. 12.
Target:
Show children the process of cloud formation.
Equipment:
three-liter jar, hot water, ice tray.
Progress of the experiment:
pour hot water into a three-liter jar (about 2.5 cm). Place a few ice cubes on a tray and place it on top of the jar.
Result:
We observe how the air inside the jar, rising upward, begins to cool. The water vapor it contains will condense to form a cloud.
Explanation:
The experiment simulates the process of cloud formation when warm air cools. Where does rain come from? It turns out that the drops, having heated up on the ground, rise upward. There they get cold, and they huddle together, forming clouds. When they meet together, they increase in size, become heavy and fall to the ground as rain.
Experiment No. 13.
Target:
Show children that water expands when it freezes.
Equipment:
plastic jar with lid, water, freezer.
Progress of the experiment:
Fill the jar to the brim with water. Place the lid on top, but not
twist. Place the jar in the freezer and wait until the water
will freeze.
Result:
the water froze and lifted the lid.
Explanation:
When water turns into ice, its volume increases and,
therefore, there is not enough room for it in the bank.
Experiment No. 14.
Target:
show that the air around us contains water vapor.
Equipment:
glass, freezer.
Progress of the experiment:
1. Place a completely dry glass in the freezer.
2. After half an hour, remove the glass from the freezer.
Result:
the glass is fogged up. After a few minutes, small droplets of water form on its walls. Touch the glass with your hands - your fingers will become wet.
Explanation:
In the freezer, the walls of the glass have cooled. Just take it out
glass from the freezer, as its walls begin to cool the surrounding air. The water vapor contained in the air is converted into tiny droplets of water and settles on the walls of the glass.
Experiment No. 15.
Target:
show the relationship between quantity and quality from size.
Equipment:
a basin of water, two ice floes of different sizes.
Progress of the experiment:
Place a large and small “ice floe” in a bowl of water. Ask the children which one will melt faster. Listen to hypotheses.
Result:
The small “ice floe” melted faster than the big one.
Explanation:
The larger the ice floe, the slower it melts, and vice versa.
Experiment No. 16.
Target:
Show children that ice does not sink in water.
Equipment:
balloon, water, container with water.
Progress of the experiment:
fill the balloon with water and put it in the freezer. When the water freezes, cut the ball and place the ice block in a container of water. Children see that a small part of the ice is above the water, and the rest is under
water. It turned out to be a mini iceberg.
Result:
The ice first sank under the water, and then most of it floated to the surface.
Explanation:
When water freezes, it expands and therefore becomes smaller
dense. That's why ice doesn't sink.
Experiment No. 17.
Target:
Show children what happens to water in the cold.
Equipment:
straw, soap solution or ready-made baby bubbles.
Progress of the experiment:
You just need to go outside in severe frost and blow a soap bubble. Immediately, ice needles will appear in a thin film of water; They will gather before our eyes into wonderful snow stars and flowers.
Explanation:
In the cold, water crystallizes into bizarre patterns.
Experiment No. 18.
Target:
show how soap bubbles are made.
Equipment:
solution for soap bubbles (it is advisable to put it in the refrigerator for several hours before use). Straw, smooth work surface (glass).
Progress of the experiment:
1. Wet the work surface with water.
2. Dip a straw into the soap solution, blow out a bubble and carefully place it on the glass - you will get a dome.
3. Soak the straw well in the soapy solution, carefully pierce the first dome and blow into the straw - a smaller dome will form inside.
4. Repeat the procedure a third time (be careful, the new dome should not touch the previous one).
Result:
each subsequent bubble takes place in the center of the previous one and
leads to its increase.
Explanation:
There is air inside a soap bubble. The emergence of a new bubble
increases the volume of the previous one thanks to the elasticity that soap gives it.
Experiment No. 19.
Target:
show how water acts on wood.
Equipment:
matches, water.
Progress of the experiment:
break the matches in the middle, then drop a few drops of water onto the bend.
Result:
the matches gradually straighten.
Explanation:
Water, due to capillarity, penetrates into the smallest voids in the space between the fibers of the wood and fills them. The wood swells, the bends straighten out, and the match straightens.
Experiment No. 20.
Target:
Show children how sugar crystallizes.
Equipment:
glass, sugar, spoon, water, paperclip, pencil (or straw) and
thick cotton thread about 10 cm.
Progress of the experiment:
1. Fill a glass with very hot water and add sugar, stirring with a spoon until it stops dissolving. You need to do this quickly so that the water does not have time to cool and dissolve more sugar.
2. Fasten the thread at one end in the middle of the pencil, and tie it to a paper clip at the other end. Place the pencil on the glass, tie the thread, plunge into the solution and remain taut.
3. Place the glass in a cool place for several days.
Result:
After a few days, the thread will become overgrown with sweet-tasting crystals.
Explanation:
the sweet water solution rises up the thread. The water evaporates.
All that remains is sugar, which forms crystals.
Experiment No. 21.
Target:
Show the children how salt crystallizes.
Equipment:
finely ground salt, 2 glasses, cotton thread, saucer, spoon, water.
Progress of the experiment:
1. Pour hot water into both glasses, and, stirring constantly, pour salt into each glass until it stops dissolving.
2. Place the glasses at some distance from each other, connect them with a thread so that most of it hangs between them, and the ends touch the bottom in each glass. Place a saucer under the sagging thread.
3. Leave in this position for several days.
Result:
you will see salt crystals growing on the thread and saucer. So it is possible
grow entire stalactites and stalagmites!
Explanation:
the salt water solution rises up the thread. The water evaporates.
All that remains is the salt, which forms crystals.
Experiment No. 22.
Target:
introduce children to such a property of water as stickiness.
Equipment:
two sheets of paper, water.
Progress of the experiment:
take two sheets of paper and move them across the table. The paper slides freely in any direction. Then moisten the sheets with water, lightly press them against the table, this way we remove excess water, after which we try to move the sheets again.
Result:
dry sheets of paper move freely on the table in any direction. Wet paper doesn't move.
Experiment No. 23.
Target:
show how the properties of paper change when wet.
Equipment:
paper flower, bowl of water.
Progress of the experiment:
make flowers out of paper. Twist the petals into the center of the flower, then lower the flowers into the water.
Result:
the flower will gradually open.
Explanation:
Water, due to capillarity, penetrates into the smallest voids in the space between the fibers of the paper and fills them. The paper swells, the folds straighten out, and the flower blooms.
Experiment No. 24.
Target:
will introduce children to the power of water pressure.
Equipment:
2 plastic bottles, water, tape, awl.
Progress of the experiment:
1. Using an awl, make a vertical row of holes on one bottle and a horizontal row on the other. Then seal the holes with tape.
2. Fill the bottles with water and remove the tape.
Result:
streams of water ejected from a bottle with horizontal holes will be of the same length. In a bottle with vertical holes, water is thrown farthest from the bottom hole, and closest from the top hole.
Explanation:
water has weight, it presses on the walls and bottom of the bottle. Therefore, it is squeezed out of the holes with a certain force. This force will be greater, the greater the weight of water above the outlet.
Rainbow water
To make experiments with water more entertaining for preschoolers, it is better to paint the water in different colors using ordinary watercolor paints. For the next experiment you need paints, granulated sugar, a glass glass, water, a syringe, and four small glass cups.
- There is no need to pour sugar into the first glass, half a teaspoon of sugar should be thrown into the second, a full teaspoon of sugar into the third, and one and a half teaspoons into the fourth.
- Now you need to add water to each glass and stir the sugar.
- For the first, take red and mix it, for the second - green, add black to the third, and add yellow to the fourth.
- Then you need to take a syringe and draw water from the first glass of red water without sugar. Pour the contents of the syringe into an empty prepared glass.
- Next, using a syringe, draw green water from the second glass, in which half a teaspoon of sugar is dissolved; the syringe must be lowered to the bottom of the glass with the red water collected and slowly release the water with green paint.
- Now the same procedure should be carried out with the third glass, where the water is black and contains one spoonful of sugar. You need to release it from the syringe in the same way as the previous step.
- And there was a fourth glass left. Everything is the same - water is drawn from it using a syringe and released to the bottom of the glass.
At the end of the experiment, you can notice how the glass turned out to be “rainbow water”; all the colored layers of water did not mix, but were located one after the other, having clear boundaries. The more sugar added, the greater the density of the water, which explains the lack of mixing. The more colors you use, the more colorful and visual the experience will be.
Experiments with water for children 5–7 years old
Larisa Penkova
Experiments with water for children 5–7 years old
Experience No. 1
"The water is clear"
There are two glasses in front of the children: one with water , the other with milk. Place chopsticks or spoons in both glasses. In which of the cups are they visible and in which are they not? Why? In front of us are milk and water, in a glass of water we see a stick , but in a glass of milk we do not.
Conclusion: water is clear, but milk is not.
Experience No. 2
"Water has no taste"
Invite children to try water through a straw.
Question: does she have taste?
Very often children say with conviction that the water is very tasty. Give them milk or juice for comparison. If they are not convinced, let them try the water again. You must prove to them that water has no taste. The fact is that children often hear from adults (including in kindergarten) that water is very tasty. Explain that when a person is very thirsty, he drinks water with pleasure, and to express his pleasure he says: “ What delicious water!”
, although in fact he does not taste it.
But sea water tastes salty because it contains many different salts. Her man can't drink.
Experience No. 3
"Water has no smell"
Invite children to smell the water and say what it smells like (or doesn’t smell like it at all)
.
As in the previous case, with the best intentions, they will begin to assure you that the water smells very nice. Let them sniff again and again until they are sure that there is no smell. However, emphasize that their tap may have an odor as it is treated with special substances to ensure it is safe for your health.
Experience No. 4
"Ice is solid water"
Bring the icicles indoors, placing each one in a separate bowl so that the child can observe his or her icicle. If the experiment is carried out in the warm season, make ice cubes by freezing water in the refrigerator. Instead of icicles, you can take snow balls.
Children should monitor the condition of icicles and ice cubes in a warm room. Draw their attention to how the icicles and ice cubes gradually decrease. What's happening to them? Take one large icicle and several small ones. Watch which one melts faster.
It is important that children pay attention to the fact that pieces of ice that differ in size will melt over different periods of time.
Conclusion: ice and snow are also water.
Experience No. 5
"Steam is also water"
Take a thermos with boiling water. Open it up so the kids can see the steam. But we also need to prove that steam is also water. Place a glass or mirror over the steam. Droplets of water will appear on it, show them to the children.
If you don’t have a thermos at hand, take a boiler and boil water in the presence of children , drawing their attention to the fact that as the water boils, more and more steam appears.
Experience No. 6
“Water is liquid and can flow.”
Give the children two glasses - one with water , the other empty, and ask them to carefully pour the water from one to the other. Is water flowing? Why? Because it's liquid. If water were not liquid, it would not be able to flow in rivers and streams, nor would it flow from a tap.
In order for children to better understand what “liquid”
, invite them to remember that jelly can be liquid and thick. If the jelly flows, we can pour it from glass to glass, and we say that it is liquid. If we cannot pour it from glass to glass because it does not flow, but falls out in pieces, then we say that the jelly is thick. Because water is liquid and can flow, it is called a liquid.
Experience No. 7
“Some substances dissolve in water, others do not dissolve”
Take two glasses of water . Children will put regular sand in one of them and try to stir it with a spoon. What happens? Has the sand dissolved or not? Let's take another glass and pour a spoonful of granulated sugar into it, stir it. What happened now? In which of the cups did the sand dissolve? Remind children that they are constantly stirring sugar in their tea. If it did not dissolve in water, then people would have to drink unsweetened tea.
We put sand at the bottom of the aquarium. Does it dissolve or not? What would happen if they put not regular granulated sugar on the bottom of the aquarium? What if there was granulated sugar at the bottom of the river?
Invite children to stir watercolor paint in a glass of water ? It is advisable that each child has his own paint, then you will get a whole set of multi-colored water. Why did the water become colored? The paint has dissolved in it.
Experience No. 8
“Water can be warm, cold, hot”
Give children cups of water at different temperatures . Let them try with their fingers to determine in which glass the water is the coldest, the warmest.
In rivers, lakes, and seas, water has different temperatures: both warm and cold. Some fish, animals, plants, snails can live only in warm water, others - only in cold water. Fewer different animals live in cold seas and rivers. There are such unusual places in nature where very hot water comes out of the ground to the surface. These are geysers. They, like a thermos with hot water , also produce steam.
In reservoirs, water has different temperatures, which means different plants and animals live in them.
Experience No. 9
"Water has no form"
Have the children look at a piece of ice (ice is solid water)
.
What shape is this piece of ice? Will it change its shape if we put it in a glass, a bowl, or put it on a table or on our palm? No, it will remain a cube in any place (until it melts)
. What about liquid water?
Let the guys pour water into a jug, plate, glass, or onto the table surface. What's happening? Water takes the shape of the object in which it is located, and out of the blue it spreads into a puddle. This means that liquid water has no form. The experiment can be supplemented by the following observations: a shaped ice cube melts into a liquid and spreads over the surface of the saucer.
Experience No. 10
"Everyone needs water"
Give each child two peas or two beans. He will place one of them on a saucer in a soaked cotton wool and will constantly keep it moist. He will place the second pea on another saucer in dry cotton wool and will not wet it at all. Saucers should be placed in the same conditions, for example, on a windowsill. Which pea will have a sprout and which will not? Why? As a result of such observations, the child will clearly see the role of water in the development and germination of plants.
Experience No. 11
"Plants "drink"
water"
Place a bouquet of flowers in colored water. After some time, the stems of the flowers will also color.
Conclusion: plants “drink”
water.
Experience No. 12
"The plant has water inside"
We say that plants drink water, they have water inside them. To prove this statement, take one flower from the bouquet and leave it without water (you can dry it on paper)
.
After some time, compare the flowers in the bouquet that drink water from the vase and the dried flower. What is the difference? The water “left”
the dried flower and evaporated.
Experience No. 13
"Ice is lighter than water"
Place a piece of ice into a glass filled to the brim with water . The ice will melt, but the water will not overflow.
Conclusion: The water that ice has turned into takes up less space than ice, meaning it is heavier.
Experience No. 14
"Friends are enemies"
Oil and water are liquids that never mix with each other. But if you add dish soap, you get a milky mixture.
Soap prevents a drop of oil from merging and forming a dense layer.
Experience No. 15
"Match Captive"
Place the match on the ice. Sprinkle a little salt on top and you will see the match freeze into the ice. The salt causes the ice to melt, but the resulting water immediately freezes.
Experience No. 16
"Two-color flower"
Split the stem of a white flower into two parts and immerse each half in colored water. After a few hours the flower will become two-colored. There are small channels inside the stem through which the colored water is absorbed by the flower.
Experience No. 17
"Match Race"
Place four matches in a plate of water . They will lie there, not moving. Due to the mutual attraction of molecules, an invisible film is formed on the surface of the water.
Place a piece of sugar in the middle: the matches will move closer to each other. The sugar begins to absorb water and a current arises, which brings the matches closer together.
Repeat the experiment with soap : the matches will “scatter”
. Soap changes the surface of the water around it and repels matches.
Experience No. 18
"How to get away with it"
Crumple the paper and place it at the bottom of the glass. Quickly turn the glass over and immerse it in water. Now take out the glass: the paper remains dry. Water did not penetrate into the glass because it is filled with air.
Experience No. 19
"Life-giving properties of water"
Cut off branches of trees that bloom quickly in advance. Take a vessel and label it “Water of Living”
.
Look at the branches with your children. After this, place the branches in the water and explain to the children that one of the important properties of water is to give life to all living things. Place the branches in a visible place. Time will pass and they will come to life. If these are poplar branches, then they will take root, and you will show them to the children in the topic “Trees”
.
Experience No. 20
"Surface Tension of Water"
The jar is filled to the top with water . What happens when you carefully place a paper clip in a jar? The paperclip will displace a small amount of water. The water will rise above the edge of the jar. However, due to surface tension, the water will not overflow, only its surface will bend slightly.
Experience No. 21
"The ship sails on the water"
Make a small boat with a sail out of a walnut shell, place it in a bathtub and blow on the sail so that the children can watch the boat sail on the water. You and your children can model different winds: soft, gentle, violent.
Experience No. 22
Take very fine sand, dust or flour and sprinkle with water : you can see how droplet balls form, i.e. dust particles collect small droplets of water around themselves and form one large drop - a ball. Or spray the leaves of indoor plants with a spray bottle. When many tiny droplets fall on a leaf, they gather together to form a large drop or even a small puddle.
Experience No. 23
"Rainbow"
You can show the children a rainbow in the room. Place the mirror in the water at a slight angle. Catch a ray of sunlight with a mirror and point it at the wall. Rotate the mirror until you see a spectrum on the wall. Water acts as a prism, splitting light into its components. At the end of the lesson, ask the children what the word “ra-arc”
?
What is an "arc"
?
What is she like? Show the rainbow with your hands. From the ground, a rainbow resembles an arc, but from an airplane it appears to be a circle. And if people first saw the rainbow from above, they might have called it “ra-circle
.
Experience No. 24
“Water protects plants from low temperatures”
Fold the foil so that it can serve as a kind of pencil case for a thermometer. Place each thermometer in your pencil case with the end on the outside. Wrap each pencil case in a paper napkin. Wet one of the wrapped pencil cases with water . Make sure that water does not get inside the pencil case. Place the pencil cases on saucers and place them in the freezer. After about two minutes, compare the thermometer readings. Monitor the thermometer readings every 2 minutes for 10 minutes. A thermometer placed in a pencil case wrapped in a wet cloth shows a higher temperature. Why? The freezing of water in a wet napkin is called a phase change. At the same time, thermal energy also changes, due to which heat is released or absorbed. Thus, you can protect plants from low temperatures by watering them with water .
Experience No. 25.
"Droplets"
Drop a few drops of water from the bottle onto the saucer. Hold the dropper high enough from the saucer so that the children can see what shape the drop appears from the neck and how it falls.
Experience No. 26
"Turning into Water"
We bring a bucket of snow from the street. We remember the transformation of snow in the cold and in the heat. It's cold outside, but the room is warm. The snow melts - there is less of it, and more water. The water is cold at first, but after a while it warms up. Snow, ice, icicles melt in the room from the heat and turn into water.
colorful lamp
Such spectacular experiences with preschool children are especially popular.
- Mix half a glass of sunflower oil with the same amount of water, add dye.
- Take an aspirin tablet and drop it into the bottom of the container with the resulting mixture.
The aspirin begins to fizz and mix the oil and water, and the paint droplets begin to dissolve. A very beautiful sight. For illumination, you can direct the beam of a flashlight.
Bringing to a boil
Take a glass of water and place it in the microwave until the water almost boils.
Attention! You should only remove it using an oven mitt; the glass will be hot.
Immediately place a pencil into a glass of boiling water, and you will see how amazingly the water boils until air bubbles form upon contact with a foreign object. In addition to a pencil, you can place anything in the water: it can be a toy dinosaur or an ordinary spoon.
The fact is that in a microwave oven, steam bubbles cannot form in a transparent glass of water; there is simply no room for them. Why? The temperature of a glass container, in this case a glass, which is transparent to microwave microwaves, is much lower than the temperature of the water in it. Therefore, if there are no bubbles in the water, then it can neither cool nor heat up.
But if you place an object there, it heats up to the temperature of the water, while allowing it to cool, due to the thermal conductivity of the water, so it begins to boil. Steam is released.
Such experiments for preschoolers should be carried out with special caution.
Experiences and experiments for children of senior preschool age
Equipment:
A piece of granite, an alcohol lamp, a container of cold water.
Progress:
Heat a piece of granite in the flame of an alcohol lamp and throw it into a glass of cold water. After 1-2 minutes. Remove the piece from the water, heat it again and put it in cold water again. Heat and cool the granite again. Now try to break a piece of granite. It will crumble into small pieces.
Conclusion:
When heated, granite particles expand and when cooled, they contract. The connection between them is broken, and granite becomes fragile.
Experiment 2.
Topic “Soil quality”
Purpose:
Show the dependence of tulip growth on soil quality; develop thinking, memory, attention; cultivate a love for nature.
Equipment:
Two tulip bulbs, a pot of sand, a pot of black soil.
Progress:
Examine the tulip bulbs and make sure they are the same. Plant the bulbs in different pots: with sand and with black soil. Place on the same windowsill and provide the same care. After two weeks, compare the tulips.
Conclusion:
Plant growth depends on the quality of the soil; in the black soil the tulip grew large and beautiful, but in the sand it grew small.
Experience 3.
Topic “Soil Properties”
Purpose:
Show what soil is made of.
Equipment:
The soil.
Progress:
We put a little soil on a sheet of paper, examine it, determine the color, smell, rub the lumps of earth, find the remains of plants. Looking at it through a microscope.
Conclusion:
Microbes live in the soil (they convert humus into mineral salts, which are so necessary for plants to live).
Experience 4.
Topic “Soil and Air”
Purpose:
Show that there is air in the soil.
Equipment:
Soil samples (loose); cans of water (for each child); The teacher has a large jar of water.
Progress:
Remind that in the Underground Kingdom - the soil - there are many inhabitants (earthworms, moles, beetles, etc.). What do they breathe? Like all animals, by air. Suggest checking to see if there is air in the soil. Place a soil sample in a jar of water and ask to see if air bubbles appear in the water. Then each child repeats the experience independently and draws appropriate conclusions. Everyone finds out together who has more air bubbles in the water.
Conclusion:
There is air in the soil.
Experience 5.
Topic “Soil pollution”
Purpose:
Show how soil pollution occurs; discuss the possible consequences of this.
Equipment:
Two glass jars with soil samples and two transparent containers with water; in one there is clean water, in the other there is dirty water (a solution of washing powder or soap so that the foam is clearly visible).
Progress:
Invite the children to look at the water in both containers. What is the difference? Say that one contains clean rainwater; in the other there is dirty water left after washing. At home we pour this kind of water into the sink, but outside the city we simply throw it on the ground. Invite the children to express their hypotheses: what will happen to the earth if it is watered with clean water? What if it's dirty? Water the soil in one jar with clean water, and in the other with dirty water. What changed? In the first jar, the soil became wet, but remained clean: it can water a tree or a blade of grass. And in the second bank? The soil became not only wet, but also dirty: soap bubbles and streaks appeared. Place the jars nearby and offer to compare soil samples after watering. Ask the children the following questions.
Ice Formation
In this experiment you will need a 0.5 liter plastic bottle with a cap containing distilled still water.
- The bottle should be placed in the freezer at -25 degrees for 2 hours.
- After this, take out the bottle and hit the bottom on the table - the water will begin to freeze right before your eyes.
The whole process can be explained by the fact that there are no crystallization centers in distilled water, and moreover, it is at rest in the freezer. But as soon as you shake it sharply, air bubbles appear in the water, which provoke the crystallization process, and the water begins to harden and turn into ice.
We suggest you conduct these simple but interesting experiments for preschoolers at home or in kindergarten. We are sure that they will interest not only children, but also adults.