3D model of a steam locomotive
Method No. 1
This train looks most impressive when combined with carriages and a decorated background. The advantages of the options, on the one hand, are in the simplicity of the design, on the other hand, in the ability to change the background “landscape” to illustrate the journey. To make it you will need:
- A4 colored paper. Depending on the size of the figure, take a whole sheet for the base or cut it to length. As a rule, the longer the train, the smaller its parts. You also need paper for window decoration;
- scissors, ruler, glue;
- colored cardboard, watercolors, felt-tip pens for creating a landscape.
Action plan:
- Fold a rectangular sheet of paper in half lengthwise and unfold it.
- Fold the right and left edges to the middle.
- Straighten the structure and glue the workpiece.
- Cut out rectangular or square windows from paper of a different color and glue them to the carriage. You can glue figures of people and animals into the windows.
- To decorate the cabin of a steam locomotive, take a small rectangle, fold it in the same way and glue it on top.
- A paper tube is also added.
- The wheels are cut out of black and white paper, or preferably cardboard, and glued at the same level at the bottom of the cars.
- In this case, a sheet of Whatman paper was used for the landscape; cardboard would also work. For decoration, just cut out more small circles from double-sided colored paper, folding the sheet several times. They are folded in half and the desired shapes are created.
Method No. 2
This option couldn’t be simpler, and it’s also collapsible. All you need is a paper towel or toilet paper roll, cardboard, scissors, pencils or markers.
Procedure:
- Draw a steam locomotive on cardboard or thick paper, color and cut out.
- Cut 2 cylinders 3 cm wide from the sleeve.
- Make a half-thick slot in the middle and insert a cardboard locomotive into it.
Using the same technology it is possible to equip it with carriages.
Method No. 3
Such a simple model will require skill and accurate measurements. The base of the locomotive is still the same bushing, only this time it’s intact. In addition to it, you need paper, pencils or markers, scissors and glue.
Action plan:
- Place the cylinder on its side and measure the distance from the floor on one side to the floor on the other using a flexible measuring tape or using a thread and ruler.
- Also measure the approximate height of the cabin and pipe.
- Using these data, draw the parts of the locomotive, leaving a small margin for gluing, cut and assemble.
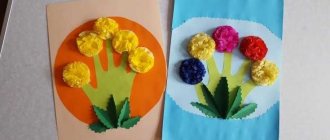
Applications
Method No. 1
For children who are just learning how to make appliques, a simple train is perfect. You need to prepare:
- thick paper for the base and plain paper in two colors;
- scissors;
- glue.
To make it, you just need to cut out 3 rectangles, cut off about a quarter from one of them, cut out the windows, make wheels and glue the pipe.
Method No. 2
For older children, an applique is suitable, which involves up to 6 different colors depending on the creative idea, plus you need paper to create a background, scissors, a glue stick, as well as skills in cutting out small parts.
Step-by-step instruction:
- Depending on the size of the base, cut out strips of brown and black paper to decorate the railroad.
- Make clouds out of blue paper, preferably of different sizes. Yellow – the sun with rays.
- Next, the locomotive and its cars are individually decorated from rectangles of colored paper, adding square windows, frames for them, bright stripes, and roofs. The locomotive will need a pipe, a spotlight and a drive for the wheels.
- After gluing the railway track, clouds, sun and train, wheels cut from circles of 3 sizes are added. The drive is glued on top of the locomotive.
Making a bright locomotive for the soul or for a competition is not a problem. You just need to choose a suitable master class, stock up on the necessary materials and patience.
Cars in the city
This composition can be offered to children of the older group, and everyone can perform it together. It is enough to fix a sheet of whatman paper on the board and prepare the necessary materials and tools.
At this age, many children already know and distinguish between car brands and will be happy to talk about their favorite car.
Step-by-step implementation of the application
For each child, it is advisable to prepare a sample car (this can be a drawing or photo) and stencils of its parts.
From colored paper (children must choose the color themselves), cut out the parts of the car. To do this, a stencil is applied to paper of a certain color, outlined with a simple pencil and cut out.
A sheet of whatman paper should be designed in the form of a roadway: paint over a little more than half of the plane with gray watercolor paints (asphalt) and let it dry.
Decorate the second part in a blue tone (sky). After the paints have dried, place houses on the line connecting the road and the sky (cut and paste rectangles and squares of different sizes, adding windows and doors).
The road can be divided into two parts by sticking thin narrow strips in the middle (two-way traffic).
Children make their own car in their seats and stick it on the road. In this case, the teacher should focus the child’s attention on the different positions of the car, so that in the overall composition the vehicles move towards each other.
You can finish the lesson by familiarizing yourself with the Rules of the Road.
For kids, wonderful applique kits on the theme “Necessary Cars” are suitable. They contain illustrations of machines that are human assistants. These sets are suitable for small children.
Because large parts are easy to stick on, and the thick paper from which these parts are made does not wrinkle or get wet from the glue. By gluing the car onto cardboard, you can complement the plot with various hand-drawn components (houses, traffic lights, clouds, trees, etc.).
This type of work is fun to do with the whole family. On our website you can get acquainted with catalogs of similar kits and kits and choose according to the age of the child.