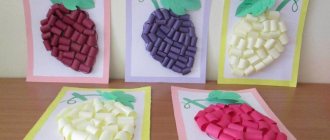
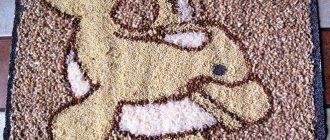
Application with plasticine
Children at two years old do not yet know how to hold scissors and brushes in their hands. But their children's hands easily roll plasticine balls. Exciting activities to make colorful fruits bring joy to the process.
After all, beautiful stucco pictures are created right before your eyes. Such crafts last a long time, so they are suitable for decorating play corners.
Stores sell applique kits at prices starting from 58 rubles. The set for the little ones includes four pictures with fruits, multi-colored plasticine, and stacks.
As a backup option, you can use: thick cardboard, disposable plastic plates, yogurt or sour cream lids. Using a felt-tip pen, draw the outlines of fruits familiar to children. The following actions accompany the display:
- Small pieces are plucked from plasticine.
- Roll balls and stick them to the base.
In older preschool age, coloring books are often used for creativity. Silhouettes are cut out from the book and glued onto cardboard. Then they roll the balls and stick them to the outline pictures. Children are also taught to use several colors of plasticine in one craft.
Circle applique
The first paper products that even three-year-old children can make are fruit appliques from multi-colored circles. Riddles, songs, counting rhymes, sayings and proverbs on the topic will help to interest the kids.
Creative activity will not be boring if you make a note that reflects what goals you need to achieve:
- Talk about the benefits of the fruit.
- Learn how to glue round shapes using glue.
- Fix shapes and colors.
- Instill neatness.
Preschoolers do not yet master concepts and think only in visible, concrete images. Therefore, for practicing applique, visual material is prepared: apples of three colors of different sizes on a plate. Adults also cut out blanks from paper:
- A white circle with a radius of 20 cm is for the base.
- Yellow, red and green circles are for fruits.
With children, they look at each apple on the plate, analyze the sizes and differences. They offer to capture them by accurately laying out colored circles on the base.
Then they begin the practical part: they are introduced to the simple technique of paper appliqué. They show how to smear parts and press them onto paper using a napkin.
Notes on the “Still Life of Fruit” nodes (application)
Summary of GCD in the senior group
“Still life of fruit” (applique)
Prepared by: teacher Belkina O.V.
Goals:
improve the technique of cutting out round shapes from paper folded in half, respecting the proportions; develop a sense of color when choosing colors, compositional skills; give the concept of foreground and background; to cultivate an aesthetic attitude towards nature in the surrounding world.
Equipment: fruits or their dummies (orange, banana, apple, plum), colored paper, scissors, glue, brush, napkin, markers, bag.
Preliminary preparation: conversation about the benefits of fruits; examining fruits to determine their shape; solving riddles about fruits.
Progress of the lesson:
- 1.Creating gaming motivation.
- Educator: Today we will paint a still life. Who can tell me what is depicted in a still life? (children's answers)
That's right, a still life is a genre of fine art, a painting that depicts objects: vases, flowers, vegetables, fruits, etc. What will be depicted in our still life? Guess it! - The teacher invites the children to identify the fruits lying in the bag by touch. You can use riddles as a hint:
- Balls hang on the branches -
- Turned blue from the heat. (plum)
- Round, rosy,
- I grow on a branch:
- Adults love me
- And little children. (apple)
- Bright, sweet, poured,
- The cover is all gold.
- Not from a candy factory -
- From distant Africa. (orange)
- -Yes, today we will create a still life of fruits, and we will do the work using the appliqué technique.
- 2. Updating knowledge.
- Educator: In order for our applique to turn out beautiful, we need to arrange the fruits correctly. When laying them out, you must remember that large fruits should be in the background, that is, behind, but smaller ones should be placed in front. What happens if we do the opposite? ( children's answers)
Yes, small fruits will not be visible then.
Offer your options for staging a still life, not forgetting about the combination of colors. It is hardly appropriate, for example, to place a yellow orange and a yellow-green banana next to each other. (children complete the task)
What a beautiful still life we created! Now you can cut out the applique details. - 3. Demonstration of working methods.
- Educator: In order to cut fruits out of paper, you need to know what shape they have. Tell me. (children's answers)
Do you know how to cut a circle from a square?
(children's answers)
What geometric shape can you cut an oval from?
(children's answers)
Yes, we will cut out an orange and an apple from squares folded in half, and a plum from a rectangle. How to cut a banana? First we will draw it, and then cut it out along the drawn outline. - After we cut out the necessary parts, we lay them out on a sheet of paper the same way we have fruit on the table. Then we glue the distant parts first, and then the near ones. Spread a little glue on the parts to make the applique neat. The missing small details can be completed with a felt-tip pen.
- The teacher shows techniques for making an applique.
4. Practical work.
Assignment: complete an appliqué of a still life of fruit.
5. Summary of the lesson.
Children's works are exhibited at the stand.
Educator: What amazing still lifes you have created! These fruits should be on your tables every day, because they contain so many vitamins and other beneficial substances. If you eat them daily, you will be healthy and cheerful.
Broken applique
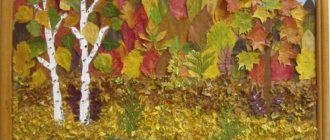
At 4 years old, a child is introduced to mosaic techniques and taught how to create pictures from pieces of torn paper. Autumn themes that are understandable at this age: vegetables and fruits. Children are given templates of an apple, pear, plum, and orange. Then they are shown the procedure for making the craft:
- Contours are drawn on a landscape sheet.
- Tear the paper into small pieces.
- Spread glue on the leaves and stick pieces of green paper on them.
- Color the tails of the fruits with a brown or black pencil.
- Apply glue to the apple. Glue pieces of red paper first along the contour, and then fill the entire middle with them.
- Step 5 is repeated with pear, plum and orange.
The work is decorated with a colored border. Cut out 4 strips 1 cm wide and glue along the edges.
MAGAZINE Preschooler.RF
Summary of an open lesson in the senior group “Autumn still life-collage”.Target:
- Teach children to create a composition according to their own ideas, using various materials.
- Form artistic thinking. Enrich children's ideas and knowledge about the fine arts.
- Develop fine motor skills when creating a collage.
- To cultivate a feeling of love for the beauty of our native nature.
Activation of the dictionary: collage, still life.
Material: blank baskets and vases, various natural and waste materials: paper, fabric of different colors, glue, brushes, napkins.
Preliminary work: looking at paintings about autumn, memorizing poems and riddles about autumn, didactic games “Find out by touch” , “what is missing” , “pick up a word” , “Guess by smell” , excursions to the park.
Progress of the lesson.
To the music, children enter the hall and stop near the paintings that hang on the wall ( "Still Life" by I. Grabar, "Golden Autumn" by I. Levitan. The teacher reads a poem by A.S. Pushkin: "A sad time! The charm of the eyes!" ...
It's a sad time! Eyes of charm Your farewell time is pleasant to me. I love the luxuriant withering of nature In the crimson and gold clad forests.
Guys, what time of year was A.S. describing? Pushkin in these lines?
-Autumn. Right. Look at the paintings and tell me what the artist painted on them?
That's right, in the paintings we see trees, the sun, the sky, colorful leaves falling.
Guys, autumn can be different, early, and what else? - late. Let's play a game, “name autumn in one word .
Alyosha, what is autumn like? - that’s right, autumn can be gloomy, joyful, tearful, magical, mysterious, sad, generous, sad.
Guys, why is it called generous?
That's right, because in the fall people harvest crops, collect vegetables and fruits in their gardens, grain growers harvest bread in the fields, in the fall they prepare vegetables and fruits for the winter, cook compotes and jams, and collect mushrooms and berries in the forest. This is how rich and generous autumn can be.
Guys, artists paint this beauty, vegetables and fruits, berries, mushrooms, nature. (I open the “still life” ).
Do you know what these paintings are called?
Such paintings are called still life.
What does the artist draw on them? Tell me, Olesya? — that’s right, the artist paints vegetables, fruits, mushrooms, household items, etc. on them.
Listen guys, I'll read you a poem:
If you see in the picture a Cup of coffee on the table Or fruit drink in a large decanter Or a rose in crystal
Or a bronze vase. Or a pear or a cake. Or all the objects at once Know that this is a still life.
The artist helps us understand this mysterious life of objects. People will eat the picked fruits and berries, but the paintings created by the artist will live forever.
Guys, let's relax and play.
Psycho-gymnastics “I am a maple leaf” . Guys, close your eyes and imagine that each of you is a maple leaf. He was hanging on a tree, but suddenly the autumn wind blew, a leaf came off the branch, and the wind carried it far, far away.
We were autumn leaves hanging on the trees. The wind blew - they flew, and sat quietly on the ground.
Again the wind ran through and picked up all the leaves, they spun and flew, and sat quietly on the ground. (voluntary movements).
But then the wind died down, the leaf sank to the ground and remained lying with other leaves, waiting for the next opportunity, when the wind would blow again and take it to another place.
A surprise moment - Autumn enters.
Hello guys. Do you recognize me? I heard you call me generous, so I came to you not empty-handed, but with a basket and a vase. Do you know what I can put in my cart? -That's right, vegetables. What vegetables? -cucumbers, tomatoes, zucchini, onions, potatoes. Well done, you know vegetables well.
What should we put in the vase? -That’s right, we’ll put fruit in the vase.
What fruits do you know? - Well done, these are pears, apples, oranges, kiwis.
Guys, do you know what artists call paintings on which household objects, flowers, berries, vegetables are painted? -Such paintings are called still life.
Now, everyone, come up to the tables and see what’s on the tables?
Yes, there are various objects on the tables: paper, fabric, buttons, seeds, candy wrappers. I suggest you today create a still life from these materials, but a still life in an unusual way. Very often in the house
you can find unnecessary items: beads, pieces of fabric, boxes, various natural materials, candy wrappers, etc. By putting these little things into action, you can create amazing things called collages. Look, are our materials suitable for crafts? What can you make from taupe fabric? - Correctly, you can make potatoes from such fabric. Where should we put it in a basket or in a vase? That's right, we'll put the potatoes in the basket, because they're a vegetable. What should we put in the vase? - We will put fruits in the vase correctly.
Guys, to make a still life collage beautiful, you need to make a pencil sketch.
Think about what you can put near the vase? BASKETS? ON THE SIDE?
Guys, now think about what you want to do and let’s get to work (during the children’s work, I use instructions, help, and individual work).
Well done, Seryozha, he quickly glued the carrot, but what can you use to make a tail for it? - that's right, from paper.
(Autumn approaches the children and is very surprised)
Oh, it turns out I’m not the only sorceress, but you are wizards too. What beautiful still lifes you created. Who wants to talk about their still life?
Dasha, tell me, what will you call your still life? ( “vase of flowers” , “autumn basket” , “gifts of autumn” , etc.). Well done, guys, your work turned out beautiful, because you all worked together, helped each other, listened to each other.
Educator: Autumn, but everything worked out for us thanks to you. Thank you.
Autumn: Guys, it’s time for me to leave, and as a souvenir I want to give you these gifts - leaves, cones, seeds. Make new still life collages out of them, make me happy. Always be attentive to nature and she will generously share her secrets with you.
Goodbye.
| Next > |
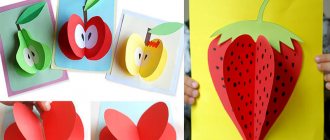
Volume applique
Preschoolers are taught about the technique of volumetric appliqué at an older age. With the help of adults, they learn skills that will be useful to them in labor lessons at school.
In junior grades, children are asked to perform the composition “Fruits on a Plate.” For crafts, stock up on cardboard, a set of multi-colored paper, templates, hard glue, pencil, scissors, and felt-tip pens. The application is performed in the following sequence:
- Two squares of different colors are cut out of cardboard, one for the background, with a side of 20 cm, the other for the frame.
- A yellow sheet of paper is folded in half twice. A pear template is applied to the workpiece and the outline is drawn with a pencil. Cut along the line and get 4 parts.
- Step 2 is repeated using your own color of paper for plum, apple, kiwi and orange.
- Fold all the parts of the fruit in half, ironing the fold lines.
- Apply glue to the first part of the pear. Two halves of the second and third parts are glued to it, aligning the fold lines in the center. Spread the last part and glue it to the glue-free halves.
- Step 5 is repeated with the apple, plum, kiwi and orange parts.
- A plate is cut out of paper according to a template.
- Glue it on cardboard, and on it - voluminous fruit.
- Draw branches with a brown felt-tip pen and decorate them with leaves.
- The work is placed in a frame: the applique is glued onto colored cardboard.
The plate is decorated with an ornament, pattern or flowers from circles prepared using a hole punch.
Lesson summary on fine arts “Appliqué “Still Life””
art
Subject:
Application "Still Life".
Target:
consolidate students' knowledge about still life;
develop children's cognitive activity, creative imagination, artistic taste, creative imagination, imagination, ability to understand and appreciate beauty;
cultivate artistic and imaginative thinking, interest in the fine arts; expansion and deepening of knowledge and ideas about beauty.
Lesson type:
combined.
Equipment:
reproductions of paintings, examples of works, cardboard, colored paper.
During the classes
I. _ Organizing time.
Organization and preparation of students for the lesson.
The long-awaited call was given -
The lesson begins.
- Let's check if you have everything ready for the lesson: album, colored paper, colored cardboard, scissors, glue, a simple pencil.
II . Updating basic knowledge.
— Guys, today in class we continue our acquaintance with fine art, its genres and types. But to find out the topic of our lesson, guess the riddle.
If you see in the picture
Cup of coffee on the table
Or a vase in crystal,
Or a bronze vase, or a pear, or a cake,
Or all items at once,
Know that this is... (still life).
— What did you see at the exhibition near the board? (Examples of still life works).
III
.
Motivation for learning activities.
-Today we will talk about still life, and also do interesting work.
— Tell me, in what types of fine art is the still life genre common? (painting, graphics). But not only. Still life is also found in decorative and applied arts, in techniques such as appliqué. What is an application? (making a drawing from glued pieces of colored paper). Now, what work do you think we will do today? (Still life using appliqué technique).
IV . Conversation on the topic of the lesson.
As you know, Still Life is a genre of painting, the depiction of inanimate objects: household items, musical instruments, furniture. In addition to inanimate objects, still life also depicts objects of living nature turned into things: fish on the table, flowers in a bouquet. In still lifes, people and nature are never depicted. Still life appeared in Holland. The word "still life" has acquired a broad meaning. The theme for still lifes was a variety of things surrounding a person: flowers, dishes, books. Everything that surrounds us in life - all this can be the hero of a still life.
The artist, before painting a still life, thinks about how to beautifully arrange objects so that they are visible and decorate each other.
(Demonstration of works).
Objects are laid out on the table. In order to draw a still life, you first need to create the right composition. I propose to divide into three groups, each group will draw up its own still life (For each group, templates are laid out that are considered necessary for drawing up the composition, and those that are unnecessary).
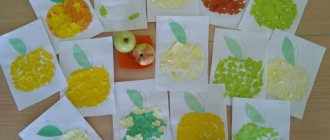
Fruits made from colored accordion paper
Applique fruits in a vase or vegetables on a plate as a kitchen decoration is one of those interesting ideas that delight children. Making such crafts from colored accordion paper is a useful form of creativity for developing fine motor skills.
Preschoolers of the preparatory group aged 6–7 years will cope with the task. Materials and tools that will be useful for creativity: double-sided colored paper, cardboard, a simple pencil, felt-tip pens, scissors, hard glue, a compass and a ruler.
How to make apples
To make 1 fruit, cut two strips 5 cm wide and 21 cm long. 2 accordions are folded from green, yellow or red blanks according to the instructions:
- On the narrow side, make a fold forward, 5–7 mm wide.
- Use your finger or pencil to smooth the fold line.
- The workpiece is turned over and a fold of the same dimensions is made again.
- Steps 1 and 2 are repeated with each strip until accordions are formed. Then they are glued together, spreading the narrow edges. The result is a tube 5 cm high.
Now the tube is placed vertically on the table and pressed with your palm on top. At the same time, hold the craft with the other hand, otherwise you won’t get a flat, round shape. A cardboard circle of the same color, but 1–1.5 cm smaller in size, is glued onto it.
The top is decorated with an even smaller piece, similar in shape to the slice of an apple, cut out from light yellow or beige paper. Seeds are drawn on it with a felt-tip pen. The applique is completed by gluing a green leaf.
How to make pineapples
All fruits follow the same pattern:
- Accordions are made from two strips of colored paper.
- Spread the narrow edges and glue them together.
- Press the tube with your palm.
- A smaller circle is glued to a flat round base.
- The applique is complemented with details characteristic of the fruit.
For example, for a pineapple, a green Christmas tree with a long top is cut out of cardboard. The yellow circle is glued to the accordion from the front side, and the Christmas tree turned upside down is glued to the back side.
Complete the applique by drawing intersecting lines on the yellow round center.
How to make other fruits
The technique of folding paper accordions allows you to make all sorts of round-shaped fruits or berries. For example, a lemon applique consists of three parts:
- The accordion is the basis.
- The white circle is the middle.
- Yellow drops are slices.
For the cherry, a red circle and a branch with leaves are cut out, and the watermelon is decorated with a red center, gluing it to a green accordion.
Notes on application in the preparatory group “Autumn Still Life”
Notes on application in the preparatory group “Autumn Still Life”
Notes on application in the preparatory group “Autumn Still Life”
Goal: Implementation of independent creative activity of children (constructive-model).
Program content
Educational objectives: teach children to create plot compositions using the entire area of the sheet;
Developmental: develop children's creative abilities, fine motor skills;
Educational: to cultivate interest in artistic creativity; independence; artistic taste.
Preliminary work: Excursion along the ecological trail. Consideration of autumn compositions.
Vocabulary work: reading poems about autumn by A. S. Pushkin “The sky was already breathing in autumn”, A. Fet “In autumn”, K. Balmont “Autumn”.
Materials and equipment: scissors, cardboard of different colors, colored paper of different sizes and shapes, glue, glue brush, napkins; autumn leaves, rowan branch, vase.
Progress of activities
1 part. Organizational
Educator: Guys, look what's new in our group?
Children's answers: Autumn bouquets, rowan branches.
Educator: Children, what is autumn?
Children's answers: Autumn is when the leaves on the trees turn yellow or red, they fall and cover the paths in the park, the tropics in the forest... There are a lot of fruits and vegetables in autumn. Collective farmers are reaping a rich harvest. They take him in cars to the city.
Educator: Why do you think the harvest is brought to the city?
Children's answers: People and pets need vegetables, fruits, and grains for nutrition.
Educator: What do birds and animals in the forest eat?
Children's answers. Berries, mushrooms, forest apples.
Educator: That's right.
Part 2. Practical
Educator: Children, you would like to create an autumn still life.
Children's answers.
Educator: But first, remember what colors autumn gives us.
Children's answers: yellow, red, brown.
Educator: Okay. Try to create an autumn composition yourself. Children, you can create the same still life, only with paper, scissors and glue.
Children's answers: Yes, we'll try.
Educator: Guys, our leaves are square. How to make berries from them?
Children's answers: Cut off the corners and you will get a circle. It will look like a berry.
Educator: Well done. Please look at our composition. What shape are the leaves?
Children's answers. Carved, oval.
Educator: Yes, they are carved. Guys, aren't you tired? Isn't it time for us to get some rest?
I ask you to rise this time.
The head turned - that's two.
Hands up, look forward - that's three.
Let's spread our arms four wide.
Squeeze your fingers with force, unclench them - that's five.
All the guys sit down quietly - it's six!
Educator: Guys, what do we have left to make an autumn composition?
Children's answers: Cut out a vase, a basket.
Educator: Correct.
Part 3. Independent work of children
Educator: Let's prepare our fingers for difficult work with paper.
One two three four five! (bend your fingers, starting with the thumb);
We will collect leaves. (clench, unclench fists);
Birch leaves (bend your fingers, starting with the thumb);
Rowan leaves,
poplar leaves,
Aspen leaves,
We will collect oak leaves.
Let's take an autumn bouquet to mom! (“walk” on the table with the middle and index fingers
fingers).
Educator: Have you rested? Fine. Before we get to work, let’s say the magic words: “I’ll sit up straight, I won’t bend, I’ll get to work.” Now you can get to work.
Part 4 Final
Educator: Well done, guys! Look how beautiful our pictures turned out! What are the names of these compositions?
Children's answers: Still life. "Autumn still life"
Educator: Correct. Children whose work did you like best? Why? What should we do now with our still lifes?
Children's answers: You can make an exhibition; I can hang my work on a stand so mom/dad can see my work.
Fruits in quilling style
Twisting narrow strips into spirals is a labor-intensive process, but understandable to older preschoolers. Fruit slices are made using the quilling technique.
Materials that will be useful for creativity: colored paper, disposable cardboard plate, glue. Tools: pencil, ruler, scissors, toothpick.
How to make kiwi slices
For 1 slice, cut 8 green strips 0.5 cm wide and 30 cm long:
- Alternately twist onto a toothpick with a spiral.
- They are formed into drops by squeezing one part of each shape with your fingers.
The center of the kiwi is made from a white strip of the same width and length. A tight roll is made from it, loosened slightly, and then flattened with the palm of your hand.
Last step: 4 brown strips are glued together with one long strip. A ring is made from it, which is glued to the base. Inside, fix a white center in the center, and green drops around them, placing them in a circle.
How to make orange slices
Cut strips of white, yellow and orange paper:
- Combine the yellow and white stripes into one.
- Screw onto a toothpick, starting from the yellow end.
- Form a triangle - squeeze the spiral in three places with your fingers.
- Glue the blanks together to form an orange slice.
Three orange stripes are combined into one strip and pasted around the triangular blanks.
Looking through photos of children's crafts, you might think that stunning still lifes are created by young talents.
Paper fruits made using different techniques are simply impressive in appearance.
I want to decorate the walls of my apartment with appliqués and decorate the New Year tree. And also give as a gift to relatives and friends from the whole family.
Fruits in a box
Instructions for children on how to make fruit applique may vary depending on the wishes of those involved in the craft.
For example, when creating this craft, you can try to make two options - with or without the cheerful face of the fruit.
The following materials will be required:
- Glue;
- Scissors;
- Colored paper;
- A small piece of regular craft paper; if you don’t have one, corrugated cardboard or regular colored paper will do.
Operating instructions:
- Using a stencil or immediately drawn by hand, two silhouettes of fruit are cut out, for example, an apple and an orange;
- Three long strips are cut out of gray paper to glue together a box;
- In the first option with cheerful faces, you need to add arms and legs, as well as eyes, a mouth and a nose. You can also draw them;
- Next, strips for the box are glued down onto the cardboard base;
- A little behind the box you need to glue future fruits;
- If this is a “live” option, then you need to glue on the face and arms with legs. You can simply draw them;
- The first option looks more interesting and fun than just fruit in a box.