The word “Khokhloma” has several meanings. Khokhloma is the name of one of the most famous and popular types of Russian folk craft, which has been practiced by residents of the Volga region for several centuries. This type of painting is widely known both in Russia and abroad. Golden Khokhloma is the name given to the works of folk decorative art themselves, fiery-bright, full of gold and rich ornamentation. And finally, “Khokhloma” is the name of an ancient Russian village in the Nizhny Novgorod province, a shopping center where nameless craftsmen brought their wooden works of art. Then the merchants transported the products throughout Russia and to many countries.
Types of folk crafts and paintings
Russian regions are rich and diverse both in their landscapes and in their customs and traditions. Many places even have their own dialect. All this shaped the culture and artistic creativity of every corner of our country. For a long time, different traditions of folk crafts have developed. The most famous include the following:
- Dymkovo, Filimonovskaya, Bogorodskaya toy;
- Gzhel ceramics;
- Vologda and Vyatka lace;
- Tula samovars;
- Rostov enamel;
- Mstera, Fedoskino, Palekh miniatures;
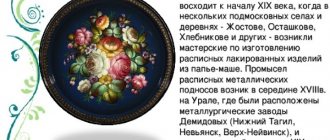
- Zhostovo trays;
- Gorodets, Khokhloma painting.
Each of them is very original and unique, but they all reflect the culture and spirituality of the Russian people.
What objects are decorated with Khokhloma painting
Traditionally, any household items made of wood were made in this style:
- spoons;
- nesting dolls;
- trays;
- dishes;
- caskets;
- chests;
- barrels;
- boxes;
- spinning wheels;
- handles and handles;
- vases;
- cutting and decorative boards.
In its modern version, when interest in Russian folk motifs is quite high, Khokhloma painting sometimes appears on very exotic surfaces:
- fabric (for bed linen, for example);
- nails;
- keychains;
- lighters;
- screen and panels of a smartphone or laptop;
- body (tattoo and body art);
- cars (airbrushing);
- bags (paper and plastic).
Thus, almost any object can now be decorated with Khokhloma painting.
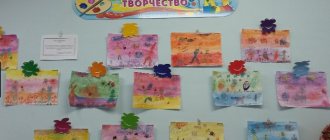
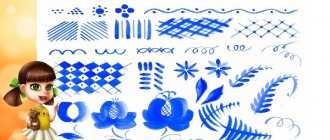
Samples on paper
If you are new to this business and are just starting to master the basics of drawing Khokhloma painting, it is better to practice on ordinary Whatman paper. As exercises for positioning your hand, choose simple elements: berries, leaves.
All of them are based on certain movements of the brush. Even if you later work on the finished pencil outline, the circles and curls should be even. It is better to do them in one go.
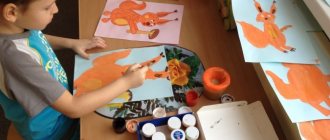
If you want to know how to learn how to draw a crested child, it is best to master this technique with him, also on paper. The same type of exercise in the form of leaves and berries quickly gets boring for children, so suggest depicting a round tray, plate, spoon or vase. Make the shape of the object yourself, and give your child the opportunity to decorate the object.
Khokhloma coloring page for children
How to work with coloring books Khokhloma patterns.
Anyway, paint it red, black and yellow and live and be happy that children are getting involved in folk art, what more could you want?
Well, you and I understand that everything is not so simple. If we take on coloring, it’s with a clear, realistic goal. I’ll tell you right away - children do not remember the features of these folk toys, paintings, patterns... So we “go through” several classes according to the program, and then six months later ask what kind of hobby or lady this is, one or two people from the class will remember. So let’s not delude ourselves, children do not gain any such closeness to folk roots and origins from looking at toys and utensils and painting templates according to a model.
And therefore we will set ourselves other goals. Of course - the development of hands and eyes. Here there is already something to try for. Now I’ll tell you how I do it.
So, let's take a coloring book with Khokhloma patterns. For example:
First, let's outline with felt-tip pens. Black and red. Khokhloma, of course, is golden, but circling it in yellow along the gray lines is of no use, nothing is visible (although children usually do not notice this).
Circled:
Outlining is a very useful thing. At every opportunity, I try to make sure that the students do not just paint something, but before that they clearly outline the drawing - the children develop a very faithful hand. But now it's time to paint. We will work with either felt-tip pens or colored pencils.
I foresee the question - why use pencils and not paints? After all, Khokhloma painting is the idea. Working with a brush also develops your hands great.
But here I will answer this: I know from experience that this is not an option; you cannot master the features of folk painting with coloring books.
Now I’ll make a lyrical digression on the topic. Once they took us on an excursion to a workshop for painting wooden utensils with Khokhloma patterns. I watched the craftswomen for a long time: some painted right away, without a sketch, relying only on instinct and eye. You understand that the characteristic curls are obtained like this: first, thinly - with the tip of the brush, then pressure - and the stroke expands, then without pressure - again thinly. This comes with experience. With a long experience of constant training. The second category of craftswomen in the workshop acted like this - they drew patterns on the bowls and cups with a pencil and then shaded them, as it were, with a brush. It's a hassle!
I myself, without a drawing, just drew it out of my head (to argue with myself) like this:
But I will paint the finished coloring book with small strokes, because you can’t go beyond the outline:
Using a brush to fill a clearly defined contour is a waste and a profanation of the idea. Yes!
Therefore, let's return to our felt-tip pens - there will be more benefits for your hands.
Don’t rush, first I’ll say parting words that we are now going to train the arcuate movement of the wrist, and then a picture with a lot of curls is selected. You need to paint in an arc, along the curls. If you don't tell your students this, they will quickly color it like this:
Therefore, we show the method of correct shading:
Well, now the main thing is not to rush and not to go beyond the contour:
So we painted the Khokhloma coloring book. The goal has been achieved - fine motor skills have been trained.
And here’s another Khokhloma coloring book for you - for a change you can practice with it.
Marina Novikova told you how to color Khokhloma correctly and usefully.
Tags: folk painting, educational coloring books, Khokhloma, Khokhloma patterns
Purchasing materials
Choose the right base. The shape can be round, rectangular, square, or complex carved. It is better if the board has a hole to hang it on a nail or hook. Avoid using plywood or untreated wood. The surface for applying the pattern must be smooth, without depressions, notches and burrs. The easiest way is to buy a high-quality base at a craft store. If this is not possible, but there is a board ready to size, properly treat the surface with sandpaper. If this is not done, all the unevenness will remain after applying the paint. They can interfere with the perception of the drawing and will interfere with drawing.
Pattern selection
Choose a suitable ornament motif. It doesn’t matter whether your Khokhloma painting will be simple or complex. Step-by-step drawing of each element will help you depict any object from a combination of twigs, leaves and berries to an exclusive bird of paradise. You just need to do everything piece by piece from simple to complex. Given the availability of computer technology, anyone can find the necessary image on the Internet, print it, for example, on film, and transfer the contours to a wooden base. It is more difficult to draw lines on a round surface. However, in this case, you can simplify your task by making several stencils of repeating elements.
LiveInternetLiveInternet
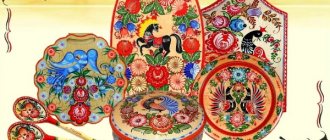
Gold, red and black — you can find this combination of colors on many objects of ancient Russian applied art and works of folk craftsmen. For “Khokholoma” these colors are especially important: red gives warmth and softness to artificial gold, A black enhances its radiance. In addition, the round surfaces of objects do not have sharp contours and diffuse light. It is characterized by two types of ornament: "horse painting" And painting “to match the background”. The leading place in painting is occupied by herbal patterns: branches, long stems, “grass,” leaves, berries, flowers. The traditional coloring of Khokhloma products is a combination of gold with cinnabar and black.“Golden Khokhloma” - painting to match the background.
Step #1
Sketch
Step #2
On tracing paper, make a composition of flowers, leaves and fruits. Don’t forget to leave a 1 cm frame. Use ready-made compositions from the books and coloring books I have posted on this topic (in the “drawing, painting” section). Then place the tracing paper with the drawing on the board and translate, tracing the drawing with a non-writing pen. It will leave a pressed mark on the acrylic layer.
Step #3
We begin with black color (with the addition of green so that the color is velvety) with brush No. 1 to outline the outline of the design, not forgetting about the stem, tendrils, and berries.
Step #4
We paint over everything unnecessary with the same black color, without painting the frame (with brush No. 2). We make a black background on the leaves and on the bottom of the flowers (“horseshoe with a beard”) with a brush No. 1.
Step #5
On the top of the flowers, add black “brackets”. color (brush No. 1).
Step #6
Now we will write in red. We paint the strawberries with red, and the smaller round berries with red mixed with yellow (so that they are slightly different in color from strawberries). Leave the moon-shaped highlight on them unpainted. Let's brighten up the flowers with the elements “horseshoe” and “bracket” with red. We will outline the frame in red, leaving a golden stripe of 0.5 cm.
Step #7
Using matches or the back of the brush, place the pokes: red - on the beard (3 on each), black - under the brackets (3 under each), yellow - on the round berries. On the strawberry, use a brush No. 1 to paint it with “droplets” of yellow color.
Step #8
Make a break with green
on the top of the strawberry (arbitrarily) in the form of droplets or blades of grass.
Step #9
Using the same green, we begin to draw the grass along the stem and in the free places. It’s as if we are pulling the droplets away from the leading stem. The more perpendicular the droplets, the more graceful the bush will be. You can start it with a long tendril, around which droplets will then be added. It’s better to paint pot-bellied grass, apply pressure on the middle, just at the turn, and slowly raise the brush, adding the tip of the blade of grass with the tip of the brush. The grass alternates with tendrils and droplets. In some places we’ll just extend long antennae.
Step #10
Let's dilute the pink color (from white and red). Using a cotton swab, place pokes (5 pokes in a circle) on the free places and elongated tendrils, forming a flower.
Step #11
When the pink “poke” flowers are dry, we will place yellow “poke” on their centers.
Step #12
Next is the varnishing process. The first layer is 2 hours, the second is 12 hours, the third until completely dry, sand between layers. Do not try to cover the product with a thick layer of varnish for the first time. It is better to do the first treatment with a thinner varnish. Let it dry thoroughly and then lightly sand the surface. If greasy stains remain on the skin, it means that the varnish is not completely dry. Remember that the varnish may not stick, but it will still be “alive” inside. There is a “nail test”: if, when pressing on the varnished surface, no trace remains, it means that the varnish has completely dried out. “Varnish-drying-skin-varnish.” By following this formula, you will always have well-honed products.
Box “Bird of Paradise”
Which color to choose?
You will need paints that are suitable for wood surfaces. The simplest and cheapest option is gouache. However, it does not form a waterproof surface once dry. It is necessary to add PVA glue to it, about a quarter of the volume of pigment, but not every color will respond well to this combination. It’s better not to take risks, but simply coat the finished product with transparent wood varnish. This will protect the drawing from moisture and other adverse factors. Another option is to use acrylic paints. They are waterproof and suitable for wood. Moreover, after such a layer has dried, you can even apply gouache on top. This means that the black background can be done with acrylic, and the pattern itself can be done with gouache.
Buy several brushes with fine tips. Squirrel, kolinsky and synthetic numbers from the first and above are suitable. The quantity and size depend on your design. You will need a thin brush in any case, and you can determine the maximum size visually depending on the planned design.
Khokhloma: manufacturing technology
The process of beautiful wooden products occurs in several stages:
- Receiving “linen” - white, undyed products. The master shapes future spoons, tea cups, boxes and souvenirs from prepared wooden blocks, removing shavings from the wood with a lathe. Then the finished product is dried at a temperature of 22-28 ° C for 3-20 days.
- Vapor putty - unpainted items are coated several times after drying with special purified clay and left for 7-8 hours.
- Primer – drying oil 3-4 times (coated with layers of boiled linseed oil). Products are manually impregnated with drying oil, rubbing it in with special leather swabs. After the next impregnation, it is dried in a special cabinet at a temperature of 40-50 ° C. Then, after cooling, it is lightly sanded.
- “Tinning” - giving the product a silver or golden background. For silver color, aluminum powder is manually rubbed into the surface using leather sheepskin swabs. For gold, ground tin is applied. Then they are coated with special mixtures and fired several times in the oven until a sunny golden color is obtained. After which the product falls into the hands of master artists of decorative and applied arts.