Fragments of notes from an open lesson on painting in the senior group - table
| Author and topic title | Name of the lesson part | Progress |
| Lapekhina Tatyana, “Gorodets painting” | Organizing time | <...Guys, look at these painted wooden products. Who knows what this painting is called? …><…Guys, do you know why it’s called that? |
| Main part. Presentation of a new topic | Educator: On the banks of the Volga lies the ancient city of Gorodets - the oldest Russian fortress city. Here, a long time ago, people began to make dishes from wood and paint them with various patterns. These could be scenes of feasting, festivities, trips and hunting trips were depicted. They also painted garlands of flowers or a large flower with leaves radiating from it. There were other options, with motifs of birds and cats. Battle scenes were depicted - they were whole pictures. Someone carved spoons, cups, bowls, salt licks, and the suppliers sharpened them on a lathe. Someone made tools for spinning and weaving. There was a spinning wheel trade. At the same time there was a factory. Factory for the production of children's furniture and other household items: children's chairs, tables, rocking horse, boxes, cups, cutting boards, dishes, bread bins. Currently, the natural yellowish color of wood is used as a background. Guys, tell me what colors are in Are the paintings used by Gorodets masters? The colors in the pattern are few, but in very bright combinations - red, blue, green, rich orange and its shades. White and black colors in painting have a special meaning. These 2 colors have the ability to influence the sonority of the colors and contribute to their favorable combination. Guys, what elements do the masters use in painting? Answers from the children (clarification of names: rose, kupavka, berry, leaves, horse, birds). This is a rose, this is a kupavka, this is a chamomile. Look carefully at these flowers, they can be in blue and blue tones, or pink-red. Chamomile is easy to recognize. It has many thin petals. The center of the kupavka is shifted. Guys, would you like to try yourself as a craftsman and learn how to perform elements of flower painting? Okay, let's get to our jobs. | |
| Practical work | On the board you see a sample of writing a flower called a daisy, its step-by-step implementation. Stage 1 is called “underpainting” (an image of a blue circle in the center of the sheet, stage 2 is called “shading” (a circle in the center and chamomile petals with blue paint) and stage 3 is called “revival” (swirls and dots are made with white and black paint). You have on the table there are sheets pre-painted yellow (you can offer children a choice of different shapes of dishes: vases, cutting boards, etc.). Let's proceed to the first stage of execution. Take the blue color and draw an underpainting - a circle in the center of our work While our circle is drying, we will draw more green leaves, creating a composition. Now we move on to the second stage of execution. We use blue to shade: draw a blue circle in the center of the flower, and now we place the petals opposite each other in a circle. Who can tell me how to do this? (by dipping the brush). Before starting the third stage, you will need to wait a little for the paint to dry. We do physical exercises or gymnastics for the eyes. The final stage is “revival.” We will apply white and black paint in the form of dots, droplets, curls with a thin brush. | |
| Bottom line | Children lay out their work on one table, choose the ones they like best, share their impressions and express their wishes about what element they would like to learn to perform in the next lessons. Poems learned in advance are read. Exhibition of children's works...> | |
| Quote By: | https://www.maam.ru/detskijsad/konspekt-otkrytogo-zanjatija-v-starshei-grupe-po-teme-gorodeckaja-rospis.html |
Summary of a drawing lesson in the preparatory group “world of wild animals”
Decorative drawing based on Gorodets painting.
– On the left bank of the Volga there was a large village of Gorodets. These places were profitable for trade. Various crafts developed among the population. In Gorodets there were blacksmiths, gingerbread makers, and dyers. There were especially many carpenters and woodcarvers: the forest provided cheap material.
The peasants of all the surrounding villages were engaged in fishing: they carved spoons, sharpened bowls, cups, and made tools for spinning and weaving. Women spun threads from flax and wove canvases for sale, so there was plenty of work for carvers and painters. The products were painted with floral patterns, in which white strokes separated the rose flower, leaves, and branches. From the old heritage, modern masters are developing individual traditional motifs: flowers, horses, birds. Factories produce wooden children's furniture (tables, chairs),
decorative plates, toys.
Painting is done with oil paints on wood and colored backgrounds of furniture. The unique appearance of this painting is given by elastic branches and bouquets formed by decorative flowers. Look at the patterns on the products. What is the name of a design that decorates an object? (Ornament.)
You and I made ornaments, but from geometric shapes. In Gorodets painting, a floral pattern is most often repeated. These flowers are called rosen and kupavka. They are the main elements of the floral pattern in Gorodets painting. For many decades, craftsmen have been perfecting the techniques of decorative cutting of flowers - roses, baths. With a few movements of the brush, the artist determines the silhouette of the flower in the shape of a circle. The circles for rosana are larger, for kupavka - smaller. The characteristic colors are red, orange, blue, green, white and soot. The next step is to determine the center of the flower. For roses, the center is drawn in the middle of the flower; for kupavka, it is shifted to the left or right. The center is painted with pure paint without white. Flower petals have the shape of semicircular arches. The color of the arms matches the color of the center of the flower. The final stage of painting is revitalization - linear cutting of the spot. In Gorodets painting it is often done with white. White strokes seem to illuminate the flowers and make the entire drawing glow festively. Let's draw elements of the floral pattern of Gorodets painting on the templates.
Summary of the lesson.
– Which products of Gorodets craftsmen did you like most?
– What items can be decorated with rose and kupavka?
– Our journey with the bee is over.
Lesson 4 COMPARING THE NUMBER OF OBJECTS. CHILD WITH KITTEN
Implementation of the program content in educational areas: “Cognitive development”, “Speech development”, “Artistic and aesthetic development”.
Types of children's activities: gaming, cognitive-research, communicative, visual.
Objectives: to introduce the quantitative composition of the number 9 from units; consolidate the idea of the number 9; learn to depict a simple composition in modeling - the child plays with an animal, conveying the movements of human and animal figures; consolidate the ability to convey the proportions of the animal and human body; practice using basic modeling techniques.
Targets of preschool education: knows the quantitative composition of the number 9 from units; conducts comparative analysis of numbers; knows the concepts of “more”, “less”, “same”, solves one-step problems involving addition and subtraction; sculpts human and animal figures in motion according to a model, using various sculpting techniques.
Materials and equipment: cards, geometric material and items for counting; clay.
Contents of organized children's activities
Introductory word from the teacher. Introduction of the game moment.
- Let's play with our kitten today. What tasks has he prepared for you!
Subject painting
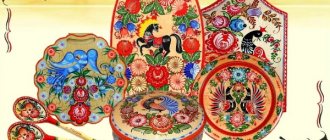
This can be a painting in two or three tiers, traditional for the craft. In this case, the main plot is written in the upper part (feast or festivities, for example), while in the lower part there are plots that allow the theme to be revealed. The middle part is usually represented by a floral stripe. If the boards do not have a completely elongated shape, the artist can do without the lower tier: he depicts only the main plot scene, which is surrounded by a floral stripe.
The horseman symbolizes the groom in Gorodets painting
A male figure on a horse is the groom, a modest girl near a birch tree is the bride, with this reading everything is simple
Please note that in scenes of feasts the table is always carefully drawn, and in principle it is not empty, there is a samovar on it, a vase of flowers as a symbol of prosperity
The faces of the heroes of the plot compositions (and this is striking) are turned to the viewer; people turned to three quarters are extremely rare. We can say that the owner of the box or board sees himself (a loved one) in the plot in the circumstances he desires.
You can view all of the above types of Gorodets painting compositions using the example of finished works in the video presented.
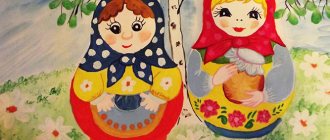
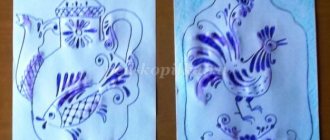
Photo gallery: examples of children's work
Pupils of the senior group quite adequately depicted the Gorodets bird Pupils of the senior group quite adequately depicted the Gorodets bird Focusing on the step-by-step drawing scheme, the guys can quite well depict a bird The original basis for work is a template of a wooden spoon The original basis for work is a template of a wooden spoon To begin with, the guys can practice creating a pattern on rectangular base, and then on a dish template Each board has a border of a certain color, which makes it more beautiful Each board has a border of a certain color, which makes it more beautiful The flower arrangements turned out bright and juicy Blue flowers in the Gorodets style look very elegant Blue flowers in Gorodets style look very elegant. The semicircular floral pattern on the plate looks wonderful
Gorodets painting will give preschoolers a lot of positive emotions, because fairly simple elements allow you to create incredibly beautiful compositions. The teacher only needs to think through interesting topics for classes, choosing a suitable basis, and be able to interest children as much as possible in this type of Russian folk craft.
Basic techniques
There are three stages of the technique of drawing pictures in Gorodets painting. Prepare a base of wood and cover it with yellow, less often red or black. On it, with a pencil, the master outlines the location of the main elements and their size. Experienced artists paint with paints without a sketch.
Next, with one movement of a wide brush, draw a circle, highlighting the main parts of the composition, for example the base of a flower. This stage is called “underpainting”. To draw a pattern, use pink, blue, or dark blue paints. They also use yellow, red, burgundy, and black.
The name of the second stage of Gorodets painting – “shade” – speaks for itself. A brush with paint of a darker color carefully draws important details:
- clothing lines;
- petal brackets;
- veins on the leaf.
At the final stage of Gorodets painting, strokes, arcs, and drops are applied with the tip of a thin brush. With their help, the work acquires elegance, the pattern becomes animated. Hence the name of the stage – “revival”. They paint with white and black paints.
To protect the painting from damage, the dried painting is coated with colorless varnish in several layers.
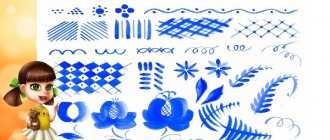
There is also a technique for drawing patterns when the artist wants to depict only flowers. The following elements are used:
- rosean (the largest round flower);
- bud (small rose);
- rose (added bud);
- kupavka (the center of the flower is to the right or left of the center);
- chamomile (many petaled flower with unpredictable color).
To make a rose, you first need to draw a circle with red or pink paint. It is depicted with a wide brush with one or two strokes. Then they begin to “shade” - with a thin brush, using darker paint, highlight the center and the petal-brackets around the entire circle. At the end, they make a “live-up” with white - they apply a lot of dots, droplets, and strokes.
Kupavka is similar in Gorodets painting technique to rosan. The pattern begins with underpainting - a circle is drawn, then its “shadow” begins. Only in this case the center is shifted to the side, the top of the bud is made in the shape of a ball. Next, semicircular petals are drawn from the center to the edges - the closer to the bud, the smaller the petals become. The “revival” is done with white paint; all elements of the interior of the pattern must be drawn.
To depict a rose, draw a bright circle. Petals in the form of semicircles or leaves are added to it, also decreasing towards the bud. In this case, it is not necessary to do “shading”; you can immediately move on to “giving life” using white or black paint. The center is decorated with small brackets and dots. Petals can be “revitalized” with drop strokes.
The easiest way to draw a chamomile. Using a medium-sized brush, make a circle and mark its center. Drop-shaped strokes are drawn from it to the edges. Next comes the “revitalization” of the petals with white paint.
In addition to flowers, Gorodets works always contain a lot of leaves, different in size and shape. They are located in groups of several. The shape of the simplest leaf resembles a pumpkin seed.
Gorodets painting is one of the brightest artistic crafts. Despite the fact that at the beginning of the 20th century it almost ceased to exist, talented craftsmen and artists were able to preserve the traditions of the Gorodets style. In many countries around the world, visitors to museums and exhibitions can see animals, birds, flowers, as well as entire scenes depicting the life of peasants on painted objects. Now this art is national pride.
We also recommend watching a video on our topic.
Art of Gorodets. Origins and modern development of the fishery.
- https://ru.wikipedia.org/wiki/Gorodets_painting
- https://womanadvice.ru/gorodeckaya-rospis-chto-eto-takoe-istoriya-osnovnye-elementy-i-cveta-kakie-est-vidy
- https://www.gpa.cfuv.ru/attachments/article/3566/Painting%20on%20wood%20Seagull%20N.M..pdf
What you need to know when preparing for a decorative drawing class
The success of a drawing lesson on the theme “Gorodets painting” with children 5–6 years old largely depends on how carefully it is thought out. And, of course, this mission falls entirely on the shoulders of the teacher.
Choice of colors for “Gorodets”
First of all, it is worth clarifying: only paints are used for painting; no pencils, felt-tip pens or markers can imitate original motifs. The choice between watercolor and gouache leans towards the second. The fact is that a distinctive feature of the Gorodets craft is bright, thick strokes for the pattern. You can't achieve this effect with watercolors. If we talk about paint colors, then these are:
- red;
- green;
- blue;
- orange.
For a favorable combination of bright colors, white and black colors are used.
The main color for Gorodets painting is red
Difficulty in drawing elements of Gorodets painting in the senior group
The drawing in this technique has its own characteristics, which consist in dividing the image into 2 or 3 tiers (the third tier is used in large panels):
- the top one is the location of the main plot (feast scenes, mass celebrations, hunting trips);
- girdle - a tier that separates the top and bottom (flowers or a flower with leaves that diverge in different directions are depicted here);
- the lower tier is dedicated to battle scenes, giving the picture grandeur and battle-like quality.
This is interesting. Sometimes birds or cats were painted on the “belt”.
Decorative drawing classes are an integral part of the learning process for children in kindergarten. However, not all children have pronounced abilities in the visual arts. That is why, as a rule, simple plots are taken to master the elements of painting:
- bud;
- rosean;
- kupavka or rose;
- chamomile.
Video: how to draw Gorodets kupavka
What to use as a basis for drawing
For older children, a sheet of paper is offered as a basis; it is desirable that it be painted in a yellowish color, imitating a wooden surface. Since the teacher, before starting work, talks about the history of this painting, always mentioning that initially these motifs were used to decorate dishes, then on the base sheet you can depict a vase, cutting board or plate as a stencil.
Gorodets masters of painting glorified their region with rich and picturesque drawings (flowers, scenes of feasts, hunting trips, etc.), which they applied to wooden dishes.
A cutting board cut out of paper can serve as the basis for the design.
As for painting specific objects, you need to use oil paints, which is not recommended in a child care facility due to their high toxicity.
What techniques are used
First of all, it is worth considering the age of the kids. Although this is already a senior group, they are unlikely to be able to build the composition of the drawing on their own. Therefore, the teacher draws several squares and rectangles on the basis, which will help the child navigate where each element should be. Each stage of work on Gorodets patterns has a certain originality in the technique of execution.
- Underpainting. This stage involves drawing the main elements of the picture in one color.
- Shading. Taking a different color of paint, we apply half-arcs, giving the drawing the image of a fairy-tale flower.
- Revive. Working on the small details of the image: the edges and veins of leaves and petals, the core of the flower.
- Live-out. The final stage involves working with white and black paints.
Video: drawing berries using the Gorodets technique
Suitable materials
To implement all levels of work on the plot, children will need:
- gouache;
- “squirrel” brushes No. 1, 5;
- container with water;
- wet wipes to remove excess paint and dirt from the skin of babies’ hands;
- sheets of paper (with templates of kitchen utensils, for example).
To imitate painting, you need to use gouache, as it gives a more saturated color
Form of work
There are 2 forms of working with children in kindergarten: individual (when each child makes a craft independently) and group (when the little ones complete individual elements of the drawing). As a rule, during the lesson the teacher uses a combination of these methods of organizing working time. In particular, to complete the tasks in the introductory part, children discuss the answer options in chorus. But the craft should only be done individually. But at the end, you can all together make a list of the most successful works.
How to interest children
As you know, it is better to see once than to hear a hundred times. This principle is especially relevant when working with children. Especially when it comes to working on a drawing using a certain technique. Therefore, the palm among motivating techniques is occupied by samples of Gorodets dishes. However, it is not always possible to show children these items “live”, so it is worth considering other ways to interest the kids.
Presentation and pictures
In the older group, children can already concentrate quite well on what they see on the screen. So a good way out is to show them presentations with pictures and sample paintings that can be found on the Internet. The teacher must comment on the slides or video clips about the history of the emergence of this trend in folk art. In addition, you need to hang posters or pictures of household items painted with Gorodets motifs, as well as with enlarged images of the patterns themselves.
Conversation based on the poems listened to
As already noted, any work in the senior group should be aimed at developing speech. So conversation is an integral part of the lesson. However, for a dialogue with the audience to take place, children must learn something about this direction in painting. To do this, you can offer several poems:
- Gorodets painting - how could we not know it? There are hot horses here, well done. There are such bouquets here that it is impossible to describe. The stories here are like nothing in a fairy tale.
- Yellow evening, black horse and bathing like fire. Birds look from the casket. Miracle painting of Gorodets.
- Our Russia is great and our people are talented. There is a rumor all over the world about our native Rus' and its craftsmen. Gorodets patterns are so much joy for the eyes. Craftswomen are growing up, perhaps among us. You play my harmonica, you, friend, sing along, glorify the masters of Great Rus' at the top of your voice!
Questions for conversation
- Where did this painting come to us from?
- What is shown in the patterns?
- How famous is this painting?
It is better to preface these questions with a more detailed study of the tradition, for example, looking at pictures.
Schemes for working on Gorodets patterns
In drawing classes, simple plots are used to master the elements of painting. But each job must be done in a certain order.
"Bud"
Work on this variety of flowers is carried out in accordance with the instructions.
The color of the buds can be varied, but only within the color scheme of Gorodets painting
- We start with the underpainting. We take red paint with a wet brush, remove the excess and dip it in water again so that the color is washed out.
- Draw a circle - apply pressure with the brush, then draw a semicircle and lower the brush down.
- Next, we do the shading - we take concentrated red and draw half-arcs on the buds, draw dots. Don't forget to hold the brush strictly vertically.
- We use green paint to spice things up - green leaves.
This work can be spiced up, that is, elements can be added.
"Chamomile and Kupavka"
Instructions:
- First we work with daisies.
- We do the underpainting with pink paint (we blur the red paint).
- Using rich red we create a shade - strokes located along the diameter of the daisy. Don't forget to hold the brush perpendicularly downwards.
- Let's start reviving. Making the red core of the flower.
- To brighten it up, use white paint to dilute the shade - alternate black strokes with white ones, and also make dots in the middle.
- We create the underpainting of the kupavka - draw a circle.
- Shading is a drawing of the middle.
- Let's make a preparation - draw white veins-petals in the form of two semi-arcs with jumpers.
"Rozan"
Now we will describe the instructions for working on the “rosan” variety:
- For the underpainting we make a red circle and two leaves on the left and right.
- Using white paint we draw semi-arcs in the upper third of the rose.
- We connect them with strokes.
- We make petals emanating from the lower semi-arc.
- We make vertical strokes in each petal.
- We draw vein lines on the leaves.
Lesson note plan
The work takes place within a standard 30-minute lesson. And during this time, children should not only get acquainted with theoretical aspects (the history of the tradition), but also try themselves in practice as Gorodets masters. Before allocating the time that will be spent on each stage of the lesson, it is necessary to formulate goals and objectives. The goal-setting aspects are:
- acquaintance with the history of painting;
- learning to write individual elements of the Gorodets technique (for example, rosean, leaf, kupavka, etc.);
- strengthening the skill of working with paints and brushes.
Tasks include:
- continued work on developing the ability to build a composition of a drawing;
- training in working with technical elements (dots, animations, dashes, etc.);
- education of aesthetic perception of folk art.
An approximate timing would be:
- introductory part - 7 minutes (story about the history of painting with viewing of presentations, conversations about what was seen or heard, if we are talking about looking at pictures);
- main part - 18 minutes (work on drawings according to the teacher’s instructions with breaks for finger exercises, physical education);
- final stage - 5 minutes (drawing up a spontaneous exhibition of children’s works, choosing the most similar one, brief self-analysis: “What happened?”, “What caused difficulties?”, praise from the teacher).
The teacher must control each stage of the drawing, showing how to apply pressure with a brush correctly