Russian nesting dolls outline of a drawing lesson (preparatory group) on the topic
ON DECORATIVE DRAWING
Purpose: To introduce the history of the emergence of the matryoshka doll,
features of Russian matryoshka painting.
To develop children's cognitive interest, interest in the history and culture of Russia,
creativity and imagination, observation. Develop independence in coming up with a design for a sundress and an apron for a nesting doll.
To foster in children a sense of collectivism and a desire to jointly achieve the desired result. To cultivate aesthetic and artistic taste.
Related tasks: In the process of joint work, to form in children
the desire for active knowledge of reality.
Materials for the lesson: Wooden nesting dolls, silhouettes of nesting dolls for each child, gouache paints, visual aids.
Preliminary work: Examination of illustrations depicting Russian nesting dolls, didactic games “Collect a whole”, “Loto - nesting dolls.”
Educator: Guys, today we have an unusual lesson. Today we will become real toy painting artists. And we will paint these toys. (Drawing the children’s attention to the exhibition of nesting dolls). Guys, do you know these toys? What are their names? (answers).
This matryoshka doll is very loved by children and adults; it is special and can be disassembled into two parts. Everyone is happy about the toy. It's too good! It’s friendly, and there’s a whole family sitting inside. Sometimes 60 nesting dolls fit into one doll. The last one is the smallest - about the size of a pea. There are nesting dolls your size too. Listen to the nursery rhyme about the nesting doll:
Matryoshka dolls walked along the path
There were a few of them
Two Matryonas, three Matryoshkas
Let's find out how and who invented the nesting doll, where and how such toys are made.
Where did such a toy come from in Rus'?
— The first nesting doll was made 100 years ago in the ancient Russian city of Sergiev Posad. The prototype of the nesting doll could be “pysanka” - wooden, painted Easter eggs, they have been made in Rus' for many centuries. They are hollow inside, and the smaller is put into the larger. Another prototype of the Russian nesting doll was the Japanese ritual doll “daruma”, inside of which several more figures were placed.
— At the end of the 19th century in Abramtsevo, based on a sketch by artist Sergei Malyutin, local turner Zvezdochkin turned the first wooden doll. And when Malyutin painted it, it turned out to be a girl in a Russian sundress, in a headscarf, with a rooster in her hand. According to legend, someone, seeing the doll, laughingly exclaimed: “How similar it is to our Matryona!” Since then this toy has been called a matryoshka.
Today, the nesting doll is already known all over the world. It has become a symbol of our country, a traditional Russian souvenir.
Guys, we have some delicate work ahead of us. Therefore, before we start, let's train our arms and legs too.
We are funny nesting dolls
We are funny nesting dolls -
We have boots on our feet,
In our colorful sundresses,
We look alike, like sisters
Okay, okay. (Arms are bent at the elbows, the index finger of the right hand rests on the right cheek. When pronouncing the words “okay, okay,” children clap their hands each time, show the “boots” on their feet, alternately place each foot on the toe, on the heel and click their heels. Then on the count of “one-two-three” they spin around, hands on the belt.)
Summary of visual activities in the preparatory group “Russian Matryoshka”
Prokopets Natalya
Summary of visual activities in the preparatory group “Russian Matryoshka”
summary of visual activities in the preparatory group
theme: “Russian nesting doll”
Integration of educational areas:
1. Cognitive development
2. Artistic and aesthetic development
3. Physical development
Types of visual activities: drawing
Preliminary work: examining images of different types of nesting dolls, drawing children’s attention to the painting of nesting dolls, features of the use of colors; drawing patterns, drawing nesting dolls in my free time.
Handout: ready-made outlines of nesting dolls, colored pencils.
Demonstration: A sample of the finished nesting doll and colored pencils, drawings depicting nesting dolls, wooden nesting dolls.
Educational: Introduce children to different types of nesting dolls (Semenovskaya, Sergievskaya, Polkhov-Maidanovskaya).
On the topic: methodological developments, presentations and notes
Summary of a lesson on familiarizing children with their surroundings. Topic: “Toys. Getting to know the Russian nesting doll" - from a series of integrated lessons on the topic: "Matryoshka".
Long term project. For preschool teachers.
Application for the middle group of kindergarten, from the “Our Motherland” section.
Program content: Educational objectives: Tell about the most popular folk wooden toy, nesting dolls. Teach children to distinguish between different techniques for painting nesting dolls. Develop children's creative imagination.
Introduction to Russian folk culture should be introduced from early childhood.
Source
On the topic: methodological developments, presentations and notes
Summary of a comprehensive lesson on visual arts in the preparatory group of the kindergarten “Visiting Spring.”
A summary of visual activities (drawing) will be useful for teachers of the senior group.
Summary of educational activities in visual arts in a preparatory group for school Topic: “Frosty patterns” Educator.
“On a visit to spring” Integration of educational areas: Cognition: To consolidate children’s knowledge about spring, its signs, characteristics, to be able to understand the signs of spring. Cultivate a love of nature, interest in health.
Topic: “Magic Paper” Goal: Continue to expand, form and consolidate the foundations of knowledge and ideas about the properties of paper. Teach children to conduct experiments and experiments with paper. Tasks: Images.
Topic: “Water Sorceress” Goals: 1. Clarify children’s knowledge about water, its properties (shape, color, solvent, smell, reflector, fluidity, etc.), signs and different states. Objectives: Educational: Give.
Summary of educational activities educational area socialization “Journey to a fantasy land” preparatory group of kindergarten.
Source
With paints
To paint a nesting doll with paints, you will need the following tools:
- a jar of water;
- brushes No. 3, No. 5;
- paints (watercolor, gouache);
- round objects;
- eraser;
- A4 sheet of paper;
- a simple pencil;
- cotton buds.
Matryoshka drawing for children with paints
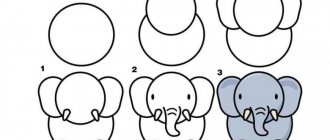
To complete the drawing you need to complete the following steps:
- Place the sheet vertically and place round objects on it end to end so that there is a larger circle at the bottom and a smaller circle at the top. Trace both objects with a pencil.
- Connect the circles together.
- To make the toy stable, you need to draw a base from below.
- In order to draw the doll's face, you need to take another round object. Its diameter should be smaller than the head of the nesting doll. Place it on your head and outline it with a pencil.
- Next you need to draw the knot and ends of the scarf.
- Then mark the hair.
- The next element will be the hands. You need to draw the sleeves, mark the cuffs, outline the hands.
- The eyes and mouth can be depicted as three circles.
- Eyes: The pupil should be smaller than the iris.
- Draw the lips with a bow.
- Place a flower in your hands.
- Use wavy lines to make a border along the edge of the scarf and the hem of the sundress.
- Draw eyebrows, cheeks, a smile.
To paint the resulting toy, you need to mix shades of white and ocher.
The result will be a flesh color.
- Use the resulting flesh-colored paint to paint your face and hands.
- Before taking on a new color, you need to wait until the previous one dries.
- Paint the sundress with a bright color, without touching the lines of the scarf, hands and flower.
- Paint the scarf a different color.
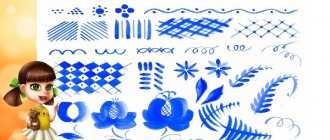
- To make it easier for your child to draw patterns (polka dots, flowers) on the fabric of scarves and dresses, you can use a cotton swab.
- Use light paint to paint the shirt, core and lace of the sundress. And make the hem dark.
- Decorate clothes with straight and wavy lines, circles or other patterns.
- Color your hair and eyebrows brown, make your eyes blue, your lips scarlet, and your blush pink. You can liven up your eyes with highlights made using a toothpick and white paint.
The child can dress the doll in any modern outfit. This idea will awaken the imagination of the young artist.
On the topic: methodological developments, presentations and notes
Summary of an integrated lesson on decorative drawing in the preparatory school group “Journey to the world of folk craftsmen.”
Since artistic creativity inspires me and interests me very much, I offer my classes on the site.
Program content: Continue to teach children to stick pattern elements in the center of a round shape and along the edges. Reinforce the concepts of “top”, “bottom”, “left”, “right” Develop a sense of rhythm by alternating elements.
Program content Teach children to correlate the plan of the room with the real room. Develop the ability to move in the direction indicated by the arrow. Teach children to use given substitutes for objects and p.
Decorative drawing based on the fairy tale “Ryaba Hen (based on Dymkovo painting)” Purpose: To consolidate children’s knowledge about Dymkovo painting, developing the ability to create patterns on their own.
OD summary on appliqué in the junior group “Decorative Saucer”.
Source