Print Thank you, great lesson +6
All children know what a beautiful birch tree looks like.
This is a tall tree with a thin black and white trunk, and its crown consists of small light green leaves. To make a birch tree from plasticine, we just need three shades - light green, white and black. Trees can be made in different ways, for example, in the form of an applique on cardboard, because colored plasticine allows you to create 3D drawings. In this tutorial we will show you another interesting way. Based on it, it will not be difficult for you to reproduce an entire birch grove. Other lessons on trees:
Step-by-step photo lesson:
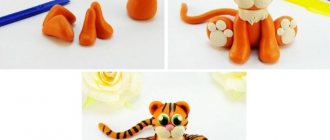
Prepare plasticine of the indicated colors for modeling. It is advisable to choose a dense texture - the hardest, inexpensive plasticine that is sold in the store. This is especially true for sculpting the trunk, because otherwise, the tree simply will not hold its shape - the stem will bend under the weight of the crown.
Soften the white plasticine.
Stretch the white plasticine into a long, uneven sausage. To make the tree more stable, you can use a small cream or ketchup lid. Fill the lid with black or brown plasticine, insert a stick or toothpick. And stick a white uneven trunk on top.
Soften green plasticine to create a crown.
Press the green mass into a flat cake. Pressing on the sides with your fingers, give it a characteristic shape.
Treating the entire surface of the green workpiece with the tip of a spatula, make an imitation of leaves. The same should be repeated on the reverse side.
Use a spatula to cut through the top of the trunk.
Insert the crown into the cut and secure with your fingers.
Carefully apply black spots on the trunk in a random order.
So the plasticine birch tree is ready. This slender tree will perfectly complement any composition, for example, a house in the village.
05. 12.2017
Blog of Ekaterina Bogdanova
My dear friends and readers, we have already learned how to make an autumn paper appliqué with an image of a succulent paper so familiar to all of us with our own hands. In this lesson I also want to talk about how to make another craft, just as fabulous and a little sad. An autumn applique awaits us - a birch tree made from plasticine. We will depict on it a lonely tree with yellowed, flying leaves, a gloomy, rainy sky and gray wet earth. Of course, you will immediately have a question about how to put all this together on one application and make it using plasticine. Everything is very simple. We will use an interesting technique called plasticineography, which allows you to paint wonderful paintings, landscapes, still lifes and even portraits, as if using oil paints.
I propose to make the central tree a birch - a delicate and tremulous Russian beauty, which many associate with the homeland and rich nature. If we are talking about a birch tree, then it should have a white thin trunk with black marks, thin branches hanging in clusters almost to the ground, and small leaves.
To work on creating an autumn landscape, prepare:
- cardboard - the most ordinary, waste cardboard, cut from any old unnecessary box;
- plasticine - small pieces of gray, brown, blue, dark blue, dark green, brown colors to create an autumn background;
- white and black plasticine for a birch trunk;
- gray plasticine for thin branches;
- yellow plasticine for autumn yellowed leaves.
MAGAZINE Preschooler.RF
GCD for visual arts in the preparatory group “Country of Birch Calico”(drawing, cut applique, relief modeling)
Completed by the teacher of the MDOU “TsRR-kindergarten No. 10” Zybina Anna Viktorovna, 2015. 2
Target:
- introduce children to the life and work of the Russian poet S. Yesenin;
- generalize knowledge about birch trees; consolidate skills in working in various techniques: painting with paints, cut-out appliqué, relief modeling;
- consolidate the ability to work with paints and brushes, develop fine motor skills of the fingers;
- to cultivate love for the Motherland, the nature of the native land, and neatness.
Developmental environment:
- tinted sheet of A4 size, pencil, gouache, brushes, jar of water, palette, paper napkins, colored paper, glue, plasticine, modeling board, technological cards “Step-by-step drawing of birch with paints” , “Step-by-step execution of birch using the cut-out applique technique” , “Step-by-step execution of birch with plasticine” , presentation.
Preliminary work: observing a birch tree while walking, looking at illustrations, photos, reproductions of artists depicting a birch tree, reading poems about a birch tree, memorizing A. Yesenin’s poem “White Birch” , learning physical education lessons, round dance, drawing a birch tree according to
memory, didactic games: “Collect a picture” , “Complete the picture...” .
Contents of the lesson.
Today, we will visit the poet. Guys, do you know who the poet is? (A person who writes poetry). And we will visit Sergei
Alexandrovich Yesenin. In the old days there was no electricity and people lit candles, let's go back to the time when the poet lived and light a candle.
Birch tree, birch tree, birch tree, What a good girl you are! Our Seryozhka Yesenin loved you - His soul grew in love for you.
Sergei Alexandrovich Yesenin (1895-1925) - Russian poet. In the very heart of Russia, near Ryazan, on the banks of the Oka River, lies a picturesque village
Konstantinovo is the birthplace of our fellow countryman-poet. And we are proud that we were born and raised on this land. Soon, Yesenin’s father left for Moscow and got a job as a clerk, so Yesenin was sent to be raised by his maternal grandfather’s family. My grandfather had three adult unmarried sons; they loved their nephew very much and participated in his upbringing. The poet learned to read at the age of 5 under the guidance of his uncle, so reading became his most favorite pastime. Poetry
He began composing his own compositions early at the age of eight or nine. According to his friends, these poems were about nature.
In spring and summer, Sergei spent whole days in the meadows making hay with shepherds, herding horses at night, where he creatively retired and fantasized.
The poet loved his sisters Katya and Shura very much, and in the future he largely replaced their mother and father. Yesenin was always very attached to his family and constantly helped her.
Sergei Yesenin is a singer of Rus', and in his poems, sincere and frank in Russian, we feel the beating of a restless and tender heart. In them
“Russian spirit”, they “smell of Russia”. It’s as if he was created specifically for poetry. The poet’s sweeping, surprisingly melodic poems are full of heartfelt warmth,
sincerity, passionate love for the boundless expanses of native fields.
Birch tree, birch tree, birch tree, Your twig-branch-cupid's arrow... Russia - mother is proud of her beauty - Since ancient times you have been the ruler of hearts!
The birch tree attracts the poet's attention with its slenderness, white trunk, and dense crown decoration.
Educator: Why was birch so popular in Rus'?
Children: birch is a symbol of Russia.
Birch is perhaps the most common tree in Russia, slender, white, with spreading branches and leaves rustling in the light wind.
Birch has always accompanied the Russian people. In summer, in the shade of a birch tree one could hide from the sun; in winter, birch firewood warmed well;
they wrote in ancient times, boxes and boxes were woven from it, and it’s impossible to count how many ancient Slavic rituals and customs are associated with birch! Tree
is a symbol of strength, power, wisdom and fertility. Each country has its own symbol among the trees. They reflected the soul of the people, their history and traditions. Russia is called the land of white-trunked birches. She inspired Russian poets and artists to create beautiful works.
Educator: Today the children prepared for us a poem by Sergei Yesenin
"White birch" . Children: White birch tree Under my window Covered with snow,
Exactly silver. Brushes blossomed on fluffy branches like a snowy border
White fringe. And the birch tree stands in sleepy silence, And the snowflakes are burning
In golden fire. And the dawn, lazily walking around, sprinkles the branches
New silver.
Educator: Well done!!! Children, tell me, have you ever seen a birch tree?
Children: In the forest, in the courtyard of a kindergarten, in parks, etc.
Educator: Our people love the green beauty for her beauty. All birch trees
unusual bark. How is she unusual?
Children's answer: White, with black stripes. 5
Educator: The birch is called white-trunked for its bark. The white bark is called
birch bark (shows birch bark). Birch bark is a protective layer of wood against water,
harmful human influences. But there are black lines in the white bark. They
are called lentils, through which the birch tree breathes.
Physical education minute.
Birch trees grew in the field It's good to grow in the field! (Stretching arms to the sides) Everyone tries,
Reaching towards the sky, towards the sun. (Stretching hands up) A cheerful wind blew. The branches began to sway immediately.
(Children wave their hands) Even thick trunks. They bent down to the ground. (Hands on the belt, squatting).
Right, left, back and forth - This is how the wind bends the trees (Tilts right and left) He turns them, he turns them.
When will there be rest (Rotation of the body) The wind died down. The moon has risen. There was silence.
(They lower their arms to their sides.)
They not only wrote poems and sang songs about the Russian beauty, but also painted pictures.
famous artists, and today I propose to draw with different techniques
birch tree 6
Let's remember how to draw a birch tree with paints:
- Place the sheet vertically, mark the line of the ground, and use white gouache to draw a slender trunk.
- We add graceful branches to the trunk that hang down and draw black lines on the trunk.
- Now we must show that the branches are strewn with snow - we will depict the snow by applying the brush to the paper, using white color, and
pale blue, pink. Using the same technique, we depict snow on the ground under the birch tree.
The next technique is appliqué. Let's remember how to make a birch tree in a broken applique step by step.
- Place the sheet vertically, mark the ground line, and use your fingers to tear out the shape of the trunk from the white paper without the help of scissors.
- Add graceful branches of black colored paper to the trunk that hang down and add black lines to the trunk.
- Now we must show that the branches are strewn with snow - we take white paper, blue, pink, tear off small pieces and sprinkle it on the birch tree. Using the same technique, we depict snow on the ground under the birch tree.
And the last technique we use is relief applique. How to make an image of a birch tree from plasticine?
- Place the sheet vertically, mark the line of the ground, and use your fingers to sculpt the shape of a carrot from previously kneaded white plasticine - this is the trunk.
- Add graceful branches of black plasticine to the trunk - these are thin sausages that hang down and glue black dashes - balls of
Apply black plasticine to the trunk and flatten.
3. Now we need to show that the branches are strewn with snow - we take white plasticine, we also need light blue and we get pink
by mixing white plasticine with a small piece of blue and red, tear off small balls, apply to the branches and flatten. Using the same technique, we depict snow on the ground under the birch tree. Educator: Very good, we remembered all the stages of work in different techniques. Now let’s get to work, but first tell me how we will position the image on the sheet at the bottom, or maybe move it to the left?
Children: no, we will draw a birch tree in the center of the leaf.
Educator: that’s right, now I want you to sit down at the tables and make your own birch tree with your own hands using the chosen technique, show
what a Russian beauty she is.
Summarizing. Let's make a mini-exhibition for our guests. We have a real birch grove in which you want to take a walk,
listen to the birds singing, lean against a cool tree trunk to gain strength and health from it, admire the miracle created by mother -
nature.
At the end of the lesson, I invite you to dance in a circle.
“Oh yes birch tree!”
We stand around the birch tree in a round dance, the children take colorful handkerchiefs and joyfully and loudly everyone sings, walking in a circle to the right, holding hands.
Hey, birch tree, white trunk! Children walk in a circle and raise their hands up.
Greener, greener foliage! They walk back with their hands down.
We will take bright handkerchiefs in our hands. The children walk in a circle to the left, holding hands near the slender birch tree and starting a dance.
Hey, birch tree, white trunk! Children walk in a circle and raise their hands up.
Greener, greener foliage. They walk back with their hands down.
By evening we will say to her together: “Farewell! Standing in a circle, waving handkerchiefs.
Don’t be bored in the field without us, birch tree!”
Hey, birch tree, white trunk! The children are coming
in a circle, raise their hands up.
Greener, greener foliage.
Today we visited the poet, let's put out the candle and go back to kindergarten.
| Next > |
How to make an autumn applique - birch from plasticine
Initially, prepare a creativity kit, which will include a box of plasticine or individual pieces if you have already worked with this material before. The cardboard for the background can be cut out from the same box or taken separately.
To make an interesting drawing, as if painted in oil, take different pieces: dark ones for the background, yellow ones, white ones for the birch tree. All this can be successfully combined in one application in the future.
Let's start from the top of the drawing. Let's create a dark, impenetrable autumn sky. Apply gray and dark blue plasticine with your fingers, smearing it onto the cardboard. The mass must be very soft so that it is ideally distributed over the surface of the cardboard.
Fill the top part of the picture with light blue, blue, dark blue, gray. Spread gold in one place, showing the meager rays of the sun peeking through behind the lead clouds. Also decorate the second part of the picture (bottom), but with brown and orange colors, showing wet ground covered with dry leaves.
Roll a sausage out of white plasticine. Glue it in the center of the picture, bending it, stretching the lower part with your fingers, showing the slender trunk of the birch. Stick on small black spots.
Make very thin gray sticks and glue them on as tree branches.
Create many small leaves from yellow plasticine.
Glue the leaves to the branches, distributing them evenly. Also add foliage to the base of the tree.
A unique autumn application in the form of a plasticine pattern is ready. Now, dear friends, you know how to make another autumn-themed craft with your children. Subscribe to updates and share information on social networks.
Video content called “” was posted by the author of “Poznavayka” for 3 years. ago, it was already viewed 4,858 times. The video was liked by 55 people and disliked by 3 users.