Application “Autumn tree” made of colored paper
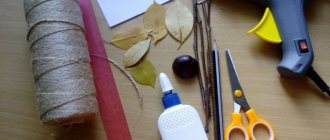
To work, prepare a set of colored paper and decorative cardboard, office glue, a ruler, scissors, and a simple pencil for marking. Do the job like this:
- Take brown paper. Draw the outline of a tree trunk. Or you can draw a trunk on a white landscape paper using paint or pencils in different shades of brown to create a beautiful woody texture.
- Cut out the resulting trunk. Its approximate height should be 18-20 cm, considering that the background will be in landscape format.
- To make leaves, cut out squares with a side of 3 cm; they should be of different autumn colors: red, red, burgundy, yellow, green. Also cut out the grass-covered ground from green paper into a long, narrow rectangle.
- Fold the grass like an accordion along the short side. Turn multi-colored squares into “accordions” too, but fold them from one corner to the opposite.
- Fold the folded squares in half and glue them in the middle to make cute ribbed leaves.
- Use a light blue cardboard sheet as a background. Glue a tree trunk on it.
- Glue the grass parallel to the bottom edge of the background, stretch the accordion so that it takes up the entire distance between the right and left edges of the cardboard.
- Glue leaves on the branches. The distribution of colors should be arbitrary so that the crown looks variegated. You can glue several leaves to the grass, as if they had fallen.
- Cut out clouds from white or pale blue paper and glue them above the tree.
Family tree making technology
If you want to try something new in your work, I suggest you work on a shared tree application. In this case, it is advisable to make the crown of the tree solid; voluminous leaves are not suitable here. In this photo they look very sloppy.
What will be on the crown depends on your imagination. You can stick apples on which children will write members of their family (suitable for a preparatory group) or flowers. You can also ask parents in advance to bring photographs of family members in the form of small circles. Such a craft can even take pride of place in the living room and become a family heirloom. There are many options, choose according to the age of your students.
Autumn tree made of leaves
For this lesson you will need leaves collected in the fall and dried; they must be neat, without holes or signs of rotting. You also need decorative cardboard for the background and office glue.
Instructions for creating an application:
- Cut the leaves into thin strips and triangles.
- Draw a tree trunk on a background cardboard sheet.
- Carefully coat the branches of the tree shown with glue.
- Immediately, before the glue dries, sprinkle the chopped leaves on it.
- Leave the application to dry.
Autumn tree in the younger group
For the activity, prepare a cardboard background sheet, strong glue, clean pumpkin seeds, a tree trunk template, and gouache paints.
Do the job like this:
- Place the seeds on oilcloth or newspapers, paint them with gouache in autumn colors: red, burgundy, red, yellow.
- On a sky-colored background cardboard, draw a tree trunk according to the template.
- Carefully glue the dried seeds to the branches.
DIY “Autumn Tree” craft
The activity is suitable for younger preschoolers. The purpose of creating an autumn applique is to teach children 3-4 years old the skill of working with available materials, developing imagination and fine motor skills. For the lesson, take gouache in 3 autumn colors: red, yellow, orange. It is not advisable to use watercolor paint, otherwise the application will turn out faded. You also need cotton pads, 12-15 pieces.
Making the craft is as easy as shelling pears:
- Lay out the discs on oilcloth.
- Dilute gouache paint with water in 3 separate containers.
- Use a brush to pick up the diluted paint and drip it onto the discs. You can drip a certain color onto each disc, or you can mix colors to create beautiful stains.
- On the background sheet, draw a tree trunk with brown gouache.
- When the discs are dry, glue them onto the top of the trunk so that they partially overlap each other. Leave the craft to dry.
Application “Autumn tree” in the middle group
The applique is made using an interesting technique, when the elements of the composition are made from paper scraps. For work, prepare a set of colored paper, pencil glue, colored pencils, and a tree template.
To make an application:
- On the background sheet, color the tree according to the template using colored pencils in different shades of brown.
- Take colored paper in red, yellow, and light green colors. Tear it into small pieces of arbitrary shape.
- Glue paper pieces in random order onto the tree branches to form a crown, and onto the bottom of the background to create the ground covered with fallen leaves.
Autumn trees
The next application is more complex. It can be done with elementary school children (2nd grade, 4th grade).
To make it you will need:
- Cardboard;
- Leg-split;
- Corrugated cardboard;
- Colored napkins in yellow and red colors;
- Scissors;
- PVA glue;
- Tree crowns of reduced shape.
Cut out several trunks from corrugated cardboard. Wrap one of them with twine.
Glue the trunks onto paper. Decorate them with spiral-twisted napkins and pieces of twine. Cut out a frame for the applique from cardboard. Glue decorated trees onto it. Let the application dry.
Job completed!
For more liveliness, you can use real dried leaves collected during a walk in the autumn forest for decoration. Then such a craft can be made for kindergarten, on the theme of applique from natural materials.
Application “Autumn Tree” in the senior group
To make a three-dimensional applique, take a set of colored paper, white or blue background cardboard, PVA glue, scissors, and a cut out template of a small maple leaf. The optimal template length is 3 cm.
To make an autumn applique:
- Cut out maple leaves according to the template: 10-12 pieces each in red, yellow, burgundy, light green, orange.
- From brown paper, cut out 6-8 strips 28-30 cm long and 1 cm wide.
- Having outlined with a pencil, cut out the tree trunk, only its lower part, without branches. It should be about 10 cm in height.
- Glue the trunk to the background cardboard sheet.
- Glue the strips to the top of the trunk, but not completely, but only one of their edges.
- Twist the strips into a spiral. Then glue their second free edge onto the background. You will get “curly” tree branches.
- Glue maple leaves on the branches in random order. Leave the application to dry.
Application options
Many people believe that such a craft can be made exclusively from colored paper, but there are other ways. You can attach cotton wool, cotton balls or any other element. In this case, the result will be completely different. Therefore, we recommend experimenting, introducing your child to creativity and developing an original approach to creating things.
Flat paper applique
The standard way to create an autumn forest. To complete it you will need:
- Take a sheet of paper of any color - white, blue, green.
- Glue a strip of paper along the bottom to imitate the terrain. Most often they choose brown or green. Choose this color only in contrast with the background.
- Make several trees of different colors. It can be yellow, orange, dark green, brown, mustard. Here the child must draw the outline of the future tree on the back of the paper, then carefully cut it out.
- Be sure to cut additional logs for each tree.
- Gently lubricating the back side of each part, glue them to the prepared sheet so that the logs lie on the ground.
- Then have them use a black or dark brown marker to draw the branches directly onto the construction paper.
The technique is simple and convenient even for small children. Used in children's rooms.
Volumetric techniques
By working not only on a specific theme, but also with texture, you can achieve a certain effect when creating an appliqué. There are several techniques for creating volumetric applications. Let's try to look at the main and most effective ones.
Working with cotton wool
This method involves sculpting pieces of cotton wool of the required volume. Attach them to the main sheet. And then carefully paint the entire surface to create a specific color scheme for the entire composition.
This is done in the lesson as follows:
- A piece of cotton comes off.
- Cut out logs from paper and glue them under a cotton swab.
- Dipping your fingers into the water will give the cotton a certain look and shape.
- You need to prepare a small container of water to make it easier for the cotton wool to shape it.
- Lubricate or dip a piece of cotton wool into glue, then attach it to the paper in the desired location, creating a tree crown in the process.
- Take a brush with sufficiently voluminous and thick bristles and dilute the paint of the appropriate color with a sufficient amount of liquid, using precise movements to paint the cotton wool in the desired color. It is not necessary to achieve a solid tone. Just apply it in a timely manner.
Application with cotton pads
It is necessary that the child is asked to take cotton pads and paint them in the desired color. Please note and warn your child that the final application will seem more effective if you paint several shades of the same color on the cotton pads at the same time.
Cut out a trunk from colored paper and glue it to the main sheet. Now start gluing cotton pads around and on top of the trunk to form the crown of the tree. Please note that if you place them on top of each other, with a slight overlap, you can get a larger volume of the composition and its effectiveness.
Make several of these Christmas trees, preferably coloring cotton pads in different colors.
Composition of rolled strips of paper
In this case, a colored sheet of paper needs to be cut into thin strips of short length and glued into rings. Cut out the trunk and glue it to the base.
Place a drop of glue on the rings, preferably where there is a seam on the paper. And fasten it around the trunk in this way to make a crown.
Please note that the rings can be glued both vertically and horizontally. In this case you will get completely different aspects of the tree. Therefore, it is possible to combine multiple methods simultaneously in one application to achieve greater consistency.
Using the technique of creating autumn forest sconces, you can organize a real master class for your child, both at home and during lessons in the garden or at school. However, there are other ways that a teacher should consider when recording relevant lessons.
Application “Autumn Tree” in the preparatory group
Completing this application is simple, but painstaking and will require perseverance and patience from the preschooler. The lesson develops imagination, introduces the possibilities of using scrap materials, and teaches how to sew buttons to fabric.
To make an applique, collect unnecessary buttons of different sizes, but be sure to be flat and painted in autumn colors: yellow, beige, ocher, red, red, brown, burgundy. Also for the background you need a piece of canvas, preferably a light shade.
Instructions for creating crafts:
- Cut out a tree from thick dark brown colored paper.
- Paste it onto the background. You can also draw the trunk and branches directly on the fabric with a brown felt-tip pen, but if you don’t have artistic skills, it’s better to do it using a template.
- Sew the buttons with matching threads to the top of the trunk, forming a lush crown.
The finished application turns out to be extremely beautiful and interesting, worthy of hanging on the wall in a prominent place in a frame.
Bright cockerel
Another applique on an autumn theme is the “Rooster” craft made from autumn leaves.
A bright applique using leaves of different trees will definitely please your child and is suitable for display in a kindergarten. To create it you will need:
- White sheet of cardboard;
- Colored paper;
- PVA glue;
- Scissors;
- Leaves;
- Ashberry.
- On the background (sheet of cardboard) draw a rooster (or glue a prepared clipping). Older guys can lay out the bird right away with leaves.
- Methodically glue leaves of different shapes, colors and shades to create the rooster's plumage.
- Cut out the eye and eyebrow from colored paper. The pupil will be a rowan berry.
- When all the parts are glued, place the finished applique under the press for several hours.