Features of organizing modeling classes in the middle group of preschool educational institutions
Current types of modeling
Children 4–5 years old find it easier to work with plasticine; their stronger muscles make it easy to tear off and knead the material. Although there remain difficulties with sculpting small parts and connecting parts of an object to each other (without flattening), the crafts are already quite similar to real objects and have certain proportions. With each lesson, preschoolers' skills improve.
Creating a fish refers to object modeling. Preschoolers generally love to sculpt animals and people - objects that they can later play with (and not just admire). Although, it should be noted, the depiction of plant-shaped objects is easier for them.
Since pupils in the middle group do not yet have a clear idea of the structure of the body of a living creature, the teacher’s task is to teach children to display the key features of an object and its striking features, for example, in a fish this is an elongated body, a pointed head, a curly tail and fins.
In addition to traditional modeling with its three-dimensional forms, in the middle group you can already introduce children to bas-relief - modeling on a plane. This is especially true if the teacher organizes group work “Aquarium” (the role of an aquarium can be played by a cardboard box lid). In this case, the relief figures of fish will be attached to the surface, protruding half or more (remember that the bas-relief has varieties - the actual bas-relief and the high relief).
In addition, children 4–5 years old can already be introduced to counter-relief modeling, when a drawing is cut into plasticine, occasionally including its elements in a traditional lesson.
Modeling methods
When sculpting such an object of living nature as a fish, preschoolers of the middle group can use various sculpting methods. Of course, the easiest way for kids is to use the constructive method, when an object is formed from separate parts (head, torso, tail, fins, eyes, mouth). The child mentally thinks through the image, determines what parts it consists of, and gets to work. As a rule, the process begins with the creation of the largest part (torso). It should be noted that with the constructive method of modeling, pupils in the middle group do not convey proportions very well and difficulties arise in connecting elements to each other. By the end of the year, these skills are improved: the number of details increases, their elaboration and connection becomes more thorough.
The sculptural method is more difficult for children of this age group (it is also called plastic). This is the modeling of an object from a single piece of plasticine. This requires more precise movements, a good eye and a clear idea of the desired shape. If the children have to sculpt a fish in this way, it would be good to draw it first - this will allow them to clarify the shape, proportions, and features of the transition from one part of the body to another.
A piece of plasticine is initially given a certain shape. If it is a fish, then you need to make an oval. Having outlined the key shape of the animal, it is necessary to form its parts using the technique of pulling and flattening (head, tail, fins). Once the basic shapes have been sculpted, you can move on to working out finer details.
It is good to show preschoolers two fish, sculpted in a constructive and plastic way, and show their differences. The teacher must demonstrate modeling techniques in front of the children, constantly commenting on their actions.
It should be noted that in classes in the middle group, one of these methods of sculpting in its pure form is rarely used. Much more often, one method is complemented by another - the so-called combined method. As a rule, the largest parts are created using the sculptural method, while the smaller ones are sculpted separately and attached to the main form. With normal development, children in the preparatory group themselves come to this method as the most accessible and universal.
Techniques
As you know, there are many sculpting techniques. However, in the middle group, when creating the image of a fish, the following will be relevant:
Rolling is a technique that creates spherical objects. At the same time, the child’s hands make a circular sequential movement clockwise, with the left hand at a slightly slower pace.
Then the shape of the ball is transformed into an oval: to do this, you need to slightly stretch on both sides.
Since the fish's body is slightly flattened, the oval is slightly flattened . This technique is carried out by slightly squeezing the oval with your hands on both sides. The effort should be minimal, otherwise we will end up with a flat cake.
To shape the fish's mouth, we use the pinching - a small part of the plasticine is squeezed with three fingers.
By pulling and flattening, the fish gets a beautiful tail. To make it look especially impressive, you need to cut it in half a little in a stack. We use the same technique to form the fins.
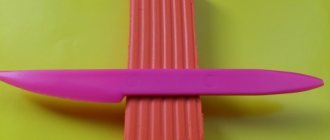
If children sculpt a fish in a constructive way, then when attaching the parts to each other, they use the technique of smearing , in which two pieces of plasticine move towards each other, pressing and aligning the fastening points.
Independence of children 4–5 years old when choosing the color of plasticine and using a stack
Pupils of the middle group can already show a certain independence in modeling classes. So, according to the lesson plan, they choose the color of the plasticine. If you plan to sculpt a “golden” fish, then it will, of course, be yellow, which can be decorated with elements of a different shade. If the children are collectively decorating an aquarium, the teacher advises the children to make multi-colored fish - and then they choose a variety of colors.
With preliminary training and guidance from a teacher, preschoolers 4–5 years old actively use the stack during productive activities during the modeling process. Applied to the Fish theme, this tool can be used to beautifully draw scales or design the tail and fins. Using a stack you can “draw” the mouth and eyes of a fish.
Plasticine goldfish step by step
In the middle group of kindergarten we suggest making a goldfish. The “Prestige” set for children's creativity includes not only yellow, but also gold plasticine. In this case, your fish will be truly golden. We show you step by step how to do this.
You will need: plasticine, plastic knives for it and a set of toothpick sticks.
Roll a small ball out of plasticine.
Flatten it with your finger to make a circle.
Using a spatula, cut a circle on one side and turn the cut plasticine to the left and right sides, then use your hands to shape the turned pieces into triangles. The tail is ready.
Make another ball and attach a tail to it.
Make another ponytail and divide it in half. You now have a fin for the back. Attach it on top.
Make the circle smaller. Cut it in half, flatten it and mold each half into leaf-like figures.
It turned out to be two fins.
Attach them to the sides of the fish. Now take a toothpick and draw stripes on the tail and fins.
All that remains is to make the eyes. Form six small balls: two larger white ones, two smaller blue ones and two very small black ones.
Flatten the balls and stick large white circles on the goldfish’s head, then attach smaller circles to them and place black dots in the very center.
Do the same with the second eye.
The goldfish is ready. Stick it onto a piece of blue cardstock. Decorate the cardboard with pebbles and shells.
Variations on the theme: individual and collective compositions
Traditionally, fish sculpting in the middle group is carried out in the first half of the year (November), then the children draw an aquarium composition. In general, the task of this lesson (“Different fish”) is to teach preschoolers to sculpt fish of the same shape, but differing in proportions. During such activities, children reinforce the modeling techniques they have previously learned.
However, different interpretations of this lesson are possible. You can designate its theme as “Goldfish”, having previously told the children, for example, the famous fairy tale by A.S. Pushkin. This craft will be slightly different from traditional fish: firstly, with its unusual color scheme, and secondly, with fabulous magical details (a crown on the head, a magic wand, etc.).
Children of middle school age are already able to understand the relationship between objects and objects; it is quite possible to introduce plot modeling. For example, propose a collective composition “Aquarium”. Such an activity will, of course, require preliminary preparation. The teacher prepares the base in advance - it can be a real empty aquarium or some other glass or plastic container of the required size. You can offer 2-3 small aquariums, dividing children into subgroups.
A possible variant of a modeling lesson is “Fish House”, in which each child makes his own aquarium. In such a lesson, in addition to plasticine, children can be offered cardboard (cut by the teacher into squares or rectangles of the required size - the walls of an aquarium), which the children will fasten with plasticine. One side of such a house should be made transparent by offering preschoolers pieces of plastic. Subsequently, the children “populate” such an aquarium with plasticine fish.
Appropriateness of using additional materials
Modeling a fish opens up great opportunities for using additional, natural or waste material. To effectively designate scales, you can use cereals (rice, buckwheat, pearl barley) or seeds. If the guys create a fabulous fish, foil or finely chopped bright candy wrappers will be useful to decorate its body.
In addition, modeling in class can be successfully combined with appliqué: a plasticine fish can have a tail or fins made of colored cardboard.
Implementation of an individual approach within the theme
In the middle group, many children show increased interest in modeling. Of course, such students need to be encouraged by offering them complex individual tasks. For example, if a child quickly and efficiently completes a task, the teacher can offer him to sculpt another fish, but only of a different shape, color and size. Another option is to decorate your fish, for example, using a felt-tip pen cap to make a beautiful design of scales or make it more colorful using scrap material.
Options for a motivating start to a lesson
Like any productive activity, modeling should begin with a motivating moment. Most often, some fairy-tale character or just a toy fish comes to visit the children, talks to them and asks them to solve its problem. For example, it’s boring for a goldfish to swim in the sea, because it’s the only one so unusual, but it so wants to have friends and girlfriends. Some other sea creature may also appear in front of the guys - it could even be the Little Mermaid doll, popular among girls, who has no one to play with. There are many options here, it all depends on the teacher’s imagination.
A rubber fish that “comes to visit” preschoolers
You can play with a fairy-tale character in a fish sculpting class
To lead preschoolers to create a bright image, before class you can organize an exhibition of toy fish. It is ideal if in a group or in a living corner in a kindergarten there is a real aquarium with fish.
The best option is your own aquarium in a group room
An alternative to a real aquarium - a model created by a teacher
The group's developmental environment should include an album with illustrations of river and sea fish, which children can take out to look at at any time.
Modeling fish should be preceded by reading fairy tales, stories and poems on this topic. These may be fragments of the work of A.S. Pushkin "The Tale of the Fisherman and the Fish". The following poems can be recommended:
E. Chepovetsky
In a quiet river In a quiet river at the pier A fish met a fish: - Hello! - Hello! - How are you? - I was fishing, I fished for a fisherman, Uncle Petya - an eccentric. - Where is your fisherman? Gotcha? - No, he left, you cunning one! Lost it!
Yu. Mogutin
Ruffs Above the river In the silence The reeds rustle. And in the water there are six cocky ruffs among the reeds. Don't be irritable, you rashers. It's better to hide in the reeds. The pike is waiting for you little ruffs by the reeds.
V. Orlov
Goldfish Semolina is poured into a jar for the fish. The fish are burning with gold. They cook porridge for me from semolina early in the morning and they repeat that I too will be golden from that porridge.
E. Stewart
Pond At sunset the pond sleeps. Circles float on the water - These are small fish Playing out here and there. It’s nice to splash them with water, to flash their scales for a moment, - for fish to jump into the air It’s the same as for us to dive.
L. Rashkovsky
Fishes fish use their fins to muddy clean water. Have lunch - Thank you Never say. They live like this for centuries. And wherever you look, the fish only move their fins gratefully. Why such fish? Yes, they have water in their mouths! And they will never be able to say thank you.
https://deti.ledibashkirii.ru/stixi-pro-rybok
On the eve of modeling, you can show the children cartoons on a marine theme. These are “In a Blue Sea, in White Foam” (1984) or “Wow, a Talking Fish” (1983). They will certainly interest the kids, and they will want to create sea creatures with their own hands.
Outdoor games also need to be connected to a marine theme - these are “The Fisherman and the Fishes”, “The Sea is agitated once...”.
Lesson summary of fish sculpting in the middle group
| Author's full name | Title of the abstract |
| Temereva L.M. | “Goldfish” Educational objectives : learn to sculpt a fish from plasticine, convey its characteristic features, improve the techniques of pulling and flattening, designate fish scales using a stack and a felt-tip pen cap, learn to maintain proportions between parts. Developmental tasks : clarify ideas about the appearance, lifestyle, habits of fish, develop imagination. Educational objectives : to cultivate perseverance, patience, and the desire to discuss the results of one’s work. Integration of educational areas : “Artistic creativity”, “Cognition”, “Communication”, “Socialization”, “Health”. Demonstration material: pictures of fish, seascapes, audio recording of the sound of the sea. Handouts: plasticine, stacks, modeling boards. Course of the lesson: Relaxation moment: at the beginning of the lesson, pleasant, calm music sounds. Children stand holding hands in a circle. The teacher wishes everyone good morning and offers to pass on a piece of his warmth to each other. The teacher invites preschoolers to go to the land of Fantasy, where they can learn a lot of new and unusual things. The sound of the sea surf sounds - the children “find themselves” on the seashore. The teacher reports that in the land of Fantasy there lives a kind sand prince who protects her from evil. He knows many fairy tales and games, but will only play with those who follow his rules. A surprise moment - the Sand Prince doll appears, who tells the children that in his country it is forbidden to fight, bite, or offend others. A character asks a riddle about a fish. I have wings, but I don't fly. I have eyes, but I don’t look at the sky. I have a mouth, but I don't speak. I shine in the clean river, with a silvery back. Who am I? (Children's answers) The teacher shows the children a toy fish (a fish is also offered to each child). They examine it, clarify its properties: color, size, body shape. The children and the teacher find out that it is a goldfish. In addition, they name other fish known to them (pike, perch, crucian carp, catfish, etc.). There is a conversation about why fish need a tail, fins, whether they have eyes, what the body is covered with, whether the fish can speak. Physical education |
| Show me how fish swim. The fish swam and dived in the blue sea water. They will come together, they will separate, and then they will bury themselves in the sand. | hands in front of the chest with folded palms, running in all directions, bending, approaching, diverging, squatting |
The Sand Prince informs the children that there are fish that are edible for humans, and there are dangerous ones that can inject or give an electric shock. The following is a short experiment to find out how fish see in water: you need to bring a jar of water close to your eyes and examine the objects that lie in it - their shape is distorted and their size increases. Next comes the direct motivation for productive activity: The Sand Prince asks the children whether it’s boring for one fish to swim in the sea. He offers to make friends and girlfriends for her, with whom the goldfish will not be lonely. In addition, they will fulfill the wishes of children. Demonstration by the teacher of modeling techniques ( sculptural method ). You need to roll the ball, then flatten it into an oval. You need to pull off the nose from one end, and the tail from the other. Using the stack, the tail and fins are drawn. You can use a felt-tip pen cap to stamp the scales, and mark the scales using cereals (barley, rice or buckwheat). Before productive activities, the teacher conducts finger gymnastics “Fish” with the children.
| The fish swims in the water, the fish has fun playing. | With their palms clasped together, children depict how a fish swims. |
| Fish, fish, mischief | they shake a finger |
| We want to catch you | slowly bring your palms together |
| The fish arched its back | again we depict how the fish swims |
| I took a bread crumb | make a grasping movement with both hands |
| The fish waved its tail. The fish quickly swam away. | sailing again |
Children can work independently while listening to calm music. The teacher guides the preschoolers and gives advice. At the end of the lesson, the crafts are analyzed, the teacher asks what the children would like to ask the goldfish for. Children talk about their desires, and the teacher writes them down.
Gorbenko N."Different fish" The lesson begins with a riddle about fish. The teacher tells the children about fish and specifically dwells on those that live in the aquarium (goldfish, angelfish, parrot fish, etc.). An aquarium is a whole world, there are pebbles, shells, and underwater plants. Next is a physical education session “There are clouds in the blue sky...”.| A river runs under the mountain | crouched down, arms extended forward |
| Early in the morning, fishermen are pulling nets from the river | imitate movements - as if sorting through a network |
| Caught a lot of fish | arms spread to the sides, |
| We cooked delicious fish soup | Circular movements with your hands, as if stirring your ear |
Preschoolers sit at tables, each has a picture of a fish, they look at them and discuss with the teacher the color, structure, purpose of body parts. The teacher demonstrates to the children the techniques of sculpting a fish ( using a constructive method) : the head, body, fins, eyes and mouth are formed separately. After independent productive activities, children are given physical education again. Markova N.V. “Fish and algae in the underwater world” (collective composition) One of the objectives of the lesson is to decorate fish figures with moldings and cut-out designs (counter-relief). A special feature of the lesson is that the teacher prepares in advance the basis for the composition - an aquarium (as an alternative - 3-4 transparent jars or glasses). In addition, to create crafts you will need cocktail straws, toothpicks, caps from pens or felt-tip pens. At the beginning of the lesson, the teacher conducts a didactic game “What has changed”: he lays out several fish from geometric shapes on the board, then asks the children to close their eyes and changes some details. Preschoolers must guess what has changed. Another game “Make a fish”: an oval (the body of a fish) is placed on the board; tails and fins of different shapes can be attached to it. Then the teacher switches the children from a conventional schematic image to an artistic one and demonstrates 2-3 fish that he sculpted in advance. The teacher explains sculpting techniques and invites the children to sculpt beautiful fish to fill the aquarium with them together. Preschoolers sculpt fish in any way (constructive, plastic or a combination), and then decorate them to their liking: with spots of flattened plasticine balls of a different color, plasticine flagella, sparkles, seeds, cereals. The teacher also shows how to decorate the craft with a stack or a felt-tip pen cap. For the children who quickly completed the task, the teacher advises them to make algae and pebbles for the aquarium so that the fish can live comfortably. At the end of the lesson, the fish are placed in a common aquarium. Some of them are attached to the walls (slightly pressed), others are strung on cocktail tubes or toothpicks attached to the bottom).
Clown fish - step-by-step master class
Among the beautiful aquarium fish there is a clown fish. It is characterized by bright stripes on its body. This job is more difficult than the previous ones. We suggest making such a craft with children in the senior group of kindergarten or first grade students.
Take 3 pieces of plasticine - white, yellow and red and a plastic knife.
Form a wide sausage from red plasticine, one end of which is slightly wider than the other.
Roll into small balls. Leave one, and make leaves of different sizes from the rest. Connect two larger ones into a ponytail, make a dorsal fin from four small ones, and a lower fin from the largest last one.
Attach all the parts to the body of the fish.
Using a knife, draw stripes on the tail and fins.
Decorate the fish with yellow stripes of different lengths and widths, as shown in the picture.
Use the end of a knife to make indentations-scales.
Add an eye, cut out a mouth. Your clown fish is ready.
Or this simple master class on sculpting a clown fish.
Various options for crafts with comments and descriptions of execution methods
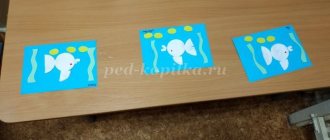
Most of the fish (photos 1–6) are made using a combined method: the head and body are sculpted from one large piece of plasticine, while the remaining elements (tail, fins, eyes) are attached separately.
The fish in photo 4 “Goldfish” looks very impressive - a beautiful long red tail, detailed scales and bulging beady eyes.
Photo 5 “Aquarium with fish” shows modeling using the bas-relief method - the fish are attached to the surface, protruding approximately halfway. The original composition is complemented by pebbles, shells and algae.
The “Magic Fish” craft is of interest (photo 7): the body is made of a twisted flagellum. The gradient color (transition from pink to lilac) will look interesting.
Photos 9 and 10 show volumetric aquariums. Sea creatures are attached to the walls of the cans or fixed in the center on special fasteners.
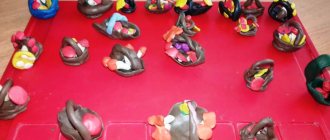
Photo gallery: finished works of children
Crafts from plasticine
Crafts from plasticine Crafts from plasticine
Plasticine with bead decoration
Bas-relief modeling
Crafts from plasticine
Fish created using an unusual technique
Crafts from plasticine Crafts
Craft
Video: sculpting “Goldfish”
https://youtube.com/watch?v=SaqF0GjJJ-0
Video: plasticine fish
https://youtube.com/watch?v=oPxRnrAsDeo
Video: cartoon “Wow, the talking fish” (1983)
Video: cartoon “In the blue sea, in white foam” (1984)
https://youtube.com/watch?v=wCpIuwelvwk
Video: “The Tale of the Fisherman and the Fish” by A. S. Pushkin
Most preschoolers love to sculpt, because this is an opportunity to create a new toy for themselves. Object modeling, which includes creating a fish, will certainly captivate children in the middle group, especially if the teacher introduces them to various options for creating the image of sea creatures. And the use of additional materials will make the lesson bright and memorable.
Plasticine aquarium (craft)
When my eldest daughter was four years old, she and I made an aquarium with plasticine fish in a plastic cup.
A couple of days before, I needed something to keep my child occupied for a while. I cut a green plastic bottle into pieces and showed my daughter how to melt them over a candle flame (this can only be done under adult supervision, observing safety precautions). She held pieces of plastic to the candle with toy pliers. She enjoyed the activity and we ended up being the proud owners of a handful of clear green plastic “jewels.”
My daughter came up with the idea of using melted pieces of plastic as the tail and fins of a fish. It turned out unusual. She completely molded the rest of the fish and the octopus from plasticine, and I made eyes for them.
We glued together some pieces of melted green plastic with plasticine and attached them to the pebbles - we got algae for the aquarium. One of the algae bushes looks more like a Decembrist houseplant, but in the photographs with the aquarium it is almost invisible.
We poured several small stones and pieces of mother-of-pearl from river mussel shells into the bottom of a transparent plastic chocolate paste cup. Lastly, they placed the stones with algae attached to them.
Plasticine fish were glued to the inside walls of the glass. One of the fish was glued to a mother-of-pearl “underwater rock”, and another one was glued to a short thin strip of transparent plastic, the other end of which was attached with plasticine to the stone. The stone with this fish was placed at the bottom of the glass in the center. And then they poured water into the glass. To prevent the water from evaporating, the glass was closed with a transparent lid.
How to make an aquarium from plasticine in a jar
Such an aquarium can be made in a glass jar with a screw-on lid: a baby food jar, a coffee can, a half-liter or even a three-liter jar.
Glue fish and algae from plasticine to the inside of the jar, mold stones (or put real ones on the bottom), pour water, close the jar with a lid.
You can “place” several fish in the aquarium.
Or just one fish.
The jar can be placed with the lid up or, conversely, with the lid down.
Aquarium in a jar with plasticine goldfish
Older children can make a goldfish from plasticine.
To sculpt a goldfish you will need orange, yellow and black plasticine. Tools include a glass and a drinking straw to make scales. The manufacturing principle is the same as described in the third method - sculptural modeling.
In a jar of water, such a fish looks almost like it’s alive, especially when viewed from afar.
Aquariums made of plasticine on cardboard, lid, disk, etc.
It’s even easier to make fish for flat crafts with aquariums: just smear plasticine on the surface (as in the “Underwater World” craft).
But you can make fish separately using any of the methods described above, and then glue them to a cardboard aquarium.
Or make an aquarium from a transparent plastic lid from a dairy cup (before this, prepare the background by tearing off small pieces of blue or blue plasticine and smearing them on the lid).
In the same way, you can make aquariums from computer disks, disposable plates, polystyrene foam containers, etc.
An aquarium made from a disk can be placed on a stand made of a piece of plasticine or a cardboard ring (read how to make it in the article “Triangular Christmas tree made of cardboard”).
It is convenient to make flagella for algae with a syringe (article “Flagella from plasticine”).
I suggest you look at other articles:
- about crafts made from plasticine (salt dough),
- about crafts with fish,
- about books on plasticine modeling.
© Yulia Valerievna Sherstyuk, https://moreidey.ru
All the best! If the site materials were useful to you, please share a link to them on social networks - you will greatly help the development of the site. Posting site materials (images and text) on other resources without the written permission of the author is prohibited and punishable by law .
Check out other interesting articles:
- Bullfinch - a Christmas tree toy made of self-hardening plasticine
- Children's craft for the New Year from plasticine: Christmas tree
- DIY food for dolls: pizza. Master Class
- Braided fish made from strips of paper or ribbons
- DIY miniature dishes for dolls
- Plasticine monkeys
- Pigs are magnets (2 options)
- Crafts from Kinder surprises: pig
- DIY Christmas magnets and Christmas tree decorations
- Plasticine butterfly
- Plasticine horse - children's craft
- Pine cone - DIY kinder Christmas tree toy