DIY educational games
It would seem that now you can buy almost any toys.
Why reinvent the wheel and engage in amateur activities? But games made by mother’s hands always enjoy special love from the baby, and even if they turn out not quite perfect, they are certainly original and with a considerable share of mother’s warmth and love. Plus, in the current uncertain economic climate, homemade toys can help you save some money to buy something more worthwhile, like children's books.
I admit that I do not belong to the category of handicraft mothers, rather the opposite. But with the birth of my daughter, the situation suddenly changed: I wanted to create something (or at least try to do it), tinker, invent. As it turned out, this requires a minimum of time and material costs, and the child’s enthusiastic reaction is the most pleasant reward.
Tactile bags
To make them you will need some colorful scraps and various fillings: cereals, beans, pebbles, rustling polyethylene, cotton wool, salt, small coins, etc. It is advisable to choose fabric of bright colors and different textures. You can also sew two-color bags.
Just cut out squares from the fabric, for example, 8x8 cm + 0.5 cm for allowances on each side. Sew the bags, leaving a small hole, turn them inside out, fill them with stuffing and sew up the hole. The baby will be interested in exploring rustling, ringing, crispy bright toys.
DIY educational games and aids
I would like to show our games for the development of auditory perception, promoting the development of speech and hearing, training in the development of color perception, intelligence and memory.
I'll start, perhaps, with such a thing as auditory perception. I wrote in detail here. Montessori noise cylinders.
The age stated by Mrs. Montessori for playing with noise cylinders is 3 years and above. We started at 2 years old, adapting it to suit our age. I made only 4 cylinders under the red markings and the same 4 cylinders under the green markings.
That's enough for us for now. As practice has shown, you can start with 2-3 things to begin with. If you start carefully, your child will be unstoppable. I don’t know why, this game reminds me of our children’s “Broken Phone”.
We play like this: I show Arina how I take out and listen to the cylinder: I bring it to one ear and shake it, then I do the same at the second ear. I suggest she do the same. She listens to all 4 cylinders in turn. I ask questions: “Which one is louder and which one is quieter? What does the noise sound like? Then we try to look for the same noise among the cylinders with green markings (they contain exactly the same fillers).
I ask questions as she holds two different cylinders in her hands: “Do they make the same noise?” If the cylinder makes a different noise, put it back in the box and take another one. And so we take it out until we pick a pair.
Nikitin squares. Official site .
Nikitin squares are a wonderful tool for developing intelligence. I am also interested in the fact that the gradual solution of problems of the first level smoothly leads to the next, more complex ones. I made the diagrams in the Coral program. Download.
Of course, at 2 years old, we solve first-level problems. But, day after day, there are results. And they make you happy. First I made these squares on magnetic paper.
Nothing worked right away (even for me).
In practice, I realized that they must be voluminous and not cardboard. Therefore, I made it from foamiran 3-4 mm thick. These are very comfortable.
Foam kitchen napkins are also suitable. This is how we put it together. So far, 2-3 squares at a time.
The Nikitins have developed a whole system of classes with these things. He suggests starting by sorting by color. To do this you need to have squares of different colors. We have been sorting by color for a long time, we are no longer interested.
Cuisenaire sticks. I think no one will be indifferent to these little bars. We are no exception. At first we arranged them by color.
Then we found diagrams on the internet. Download. Upon closer examination of the diagrams, it turned out that they were complex for a 2-year-old. I began to draw diagrams “by hand” on checkered pieces of paper, having first measured the sticks themselves.
Then I drew beautiful ones in the Coral program. Download.
The game itself is a good tool for learning mathematics, quantities, and segments. Develops imagination.
Collection of educational toys for developing fine motor skills
1. DIY game for children made from boxes and straws
Very easy to make with your own hands in 10-20 minutes.
Materials: shoe box and a set of straws.
Make holes in the bottom of the box and color them with different colored markers to match the color of the tubes.
Ready! The educational toy for kids is ready! The child will be happy to play every day for 20-40 minutes a day, develop fine motor skills, remember colors and get acquainted with new objects.
2. Developmental game for children 3-4 years old
Easy to do with your own hands.
Materials: colorful bottle caps and cards.
Make cards with circles of certain colors. Now on each card you need to arrange the lids by color. If you have 2 children, play for a while and be sure to reward the winner and support the losing child.
3. Do-it-yourself educational toy for kids 2-4 years old
Manufacturing time: 10-15 minutes.
Materials: colored paper, album sheets, glue, stationery.
Draw or stick circles of different colors on a piece of paper. Make strips of paper in different colors. Ready! Children must glue the ends of the strips into circles that match the color.
4. Labyrinth toy for motor skills development
On A4 sheet or cardboard, draw or stick a labyrinth. Color it. Now the child must use his fingers to reach the end of the maze. Children love this game very much!
5. Tube game for kids
Materials: tubes and toilet paper roll base.
At the base of the toilet paper roll, make circles the size of the tubes. Ready! It turns out in 7-10 minutes! Now the baby must insert the tubes from the hole of the roller. We develop fine motor skills and learn colors.
5. DIY game made from clothespins and a box
Today we are building a house out of clothespins. Each wall should be a certain color. The child must attach clothespins to the sides of boxes of certain colors. We develop attentiveness, logic, fine motor skills and have a good time!
6. Puzzles with sticks, repeat the pattern
Draw on paper examples of what the child should build from sticks. The game develops not only finger mobility, but also logical thinking.
6. DIY board game “Labyrinth”
Make a labyrinth out of material or paper as shown in the picture. By the way, you can draw the labyrinth yourself with bright colors or felt-tip pens. And now the child must guide a ball, a small toy, or a button through this maze. A very exciting development for motor skills, logic, and the thought process.
8. Homemade educational game from pasta tubes
A simple game when you don’t know what to do with your child. Glue large pasta onto a sheet and thread a string through it. The child must thread the string through the pasta to create a beautiful design. You can draw a diagram in advance for your baby to follow to thread the lace. This game is fun and will keep your child busy for more than 20 minutes. Develops logic, fine motor skills, and grasping skills.
9. Finger motor skills development for kids
Make a ladybug or apple applique as shown in the picture. Glue the corks to the image as in the photo. Now the child must decorate the photo by threading a string through these curlicue plugs.
10. Developmental game for children 3, 4, 5 years old to learn letters.
Mark the letters on the clothespin and box, as shown in the photo. And now the child will look for the correspondence of the letters on the box among the clothespins. When he finds the right letter, have him name it. You can also use this development tool to study syllables. Write the syllables on the box and the baby will look for the necessary letters and read the syllables.
Do-it-yourself educational games: Tatiana Aleksandrovna Barchan’s toy library
In April, I added to my collection of ideas for educational games made by myself. I was lucky enough to attend an amazing event organized by the “Native Path” website: a game meeting with Tatyana Aleksandrovna Barchan.
She has an unusual story: a biochemist by profession, she worked at a research institute and did not think that she would come up with and create educational games for children with her own hands. But everything turned out differently: Tatyana was asked to work with gifted children 6-7 years old, and this is where her career as a teacher and inventor of educational games began.
Now Tatyana runs the Rebus Center for Education and Creative Development, and is the author of many games that have been recognized by experts as one of the best (quality mark “Child Psychologists Recommend”).
Tatyana Aleksandrovna captivated me with her creativity and elegance of solutions for children’s development in play. I listened to her and realized that 90% of all the ideas I had read on the Internet in recent years were different variations of her games, invented back in the 90s. I wrote several sheets of paper, sketched diagrams and ideas. Now I have found the time and am ready to share some sketches with you.
DIY educational games
1) Box with tracks for a magnet . The point is that for the game you need two magnets: one larger, it is hidden under the boxes (on the other side), the second is smaller, it will walk across the playing field. We move the small magnet with the help of a large one, which is not visible. Wonderful miracle for kids.
We take a small candy box as a “playing field” (so that it is comfortable for the child to hold in his hands), add a path, obstacles, and other elements. As a variant of the game situation: the car is driving on business, you need to stop at a gas station (which element), then across the bridge to a car wash (next element), etc.
2) A bone for the dog. You need several boxes, different in size, covered with different colored paper. There is a dog who is looking for a bone (we can easily change it to a character that you have at home).
We hide the bone in one of the boxes and give a hint: “the bone is in the box between blue and red” or “in the box above the yellow one.” For older children, it can be more difficult: “not in red, but above blue.”
Aerobatics - let the child hide the bone and ask such a puzzle for you.
3) A simple thermometer model . Everything ingenious is simple! A rectangle cut out of cardboard, numbers signed, a regular elastic band inserted, part of the elastic band painted over. If you pull the rubber band on the other side, the temperature on the thermometer rises; if you pull it in the other direction, it drops.
4) Another look at puzzles for kids: cut not a rectangular picture, but a circle into sectors. It is more difficult to assemble such a mosaic on one side, but easier on the other. In any case, a useful variety for training attention and thinking.
5) Children's library . We take 12 identical boxes, make them the same color, stick a number on the spine and a picture on the cover. By the way, the old calendar can be used as a source of numbers for this and other benefits. All books are stored in a large box for 12 books. There are a lot of options for games with such a library. You can develop speech by guessing from the picture on the cover what this book is about, what the plot is, what the story is. You can train the number series: collect books in order, find which book is missing, put it in reverse order, ask for the “next to the fifth” book, etc. As soon as I find suitable boxes, I will definitely make such a “library” for us.
6) Lotto for the difference between flat and three-dimensional figures. To do this, you will need sheets for filling and the actual volumetric figures. Tatyana made them herself from a special modeling mass.
The players’ task is to determine what shape the object pulled out of the bag resembles (a button is a circle, a ball is a ball, etc.).
It is very useful to pass all geometric concepts through your hands, to feel them in the literal sense of the word.
7) Comparison problems. Tatyana suggests interpreting the “more” and “less” signs as an arrow, which always points to the little one, to the baby, and recommends starting with pairs: mother and baby.
I really like this positive “arrow” because it is usually supposed to represent a crocodile that eats those who are smaller. First we play with a full-fledged arrow: from mother-baby we move on to the number of objects, then to numbers.
Then the arrow “loses” the stick and the “more”/”less” sign remains in its familiar form. Then we continue to play with cards with the usual sign.
 Game "Capricious buyer" . We officially allow kids to be naughty???? To play you need many different figures of different colors. These are goods in a store where a capricious buyer comes.
On his card it is indicated what he wants to buy, but something like this: not red, not round, but square. It is necessary to remove those cards that the buyer does not like and leave only those that meet the criteria.
In this way, kids learn the basics of set theory without noticing it themselves.
I showed you only a small part of the games that we discussed at the game library (only those where I have photos). It is clear with what care and love for children all the benefits are made.
In addition to ideas for developmental aids, Tatyana generously shared her gaming experience, tips on organizing games, making durable toys (her own creations passed through the hands of many children over several years), features of mastering mathematics, reading, and pedagogical tricks.
Tatyana is an amazingly enthusiastic person; after the game library, all the participants came out with sparkling eyes and full shopping bags, because In addition to homemade games, there are already many “ready-to-play” games. I am absolutely delighted with some of the acquisitions, Pasha too ????
Popular innovative games for children
Interactive children's sandbox
It is a training complex for the best development. The sandbox consists of a laptop, a wooden structure, a projector and a depth sensor. The image on the sand may change; to do this, you must select the appropriate mode. With the help of the sandbox, educational and psychological classes are held that comply with the educational standard of the Russian Federation.
The sandbox has four modifications:
• islet;
• clearing;
• house;
• diamond.
The sandbox is a leader among innovative developments. During classes, children play with sand, which allows them to develop fine motor skills and relieve stress. Sandbox activities help develop: thinking, imagination, memory, attention and speech.
Interactive complex for children “Play and develop”
Developmental complex - an innovation for preschool children. Modern children are quite familiar with computers, many use them every day. Using the complex, you can conduct training in a playful way. Preschoolers remember better, use and develop muscle memory. Using the monitor's touch screen, kids can play various games. Innovation will help teach people how to cross the road correctly and start learning foreign languages. The main feature of the innovation is the learning process while playing.
"Big Chemical Laboratory"
A fun innovation for kids. The game consists of chemical elements, laboratory equipment, and necessary reagents. Kids get acquainted with chemical reactions and see the interaction of reagents. The learning process will become interesting and informative.
Set "Fire, water and copper pipes"
• Consists of 22 exciting experiences. The innovative game will allow you to learn a lot of new and interesting material.
• Fire and Water. Children will learn in detail about the interaction of the two elements.
• An unpredictable ending to innovative experiments that will amaze not only schoolchildren, but also adults.
The innovative set is safe, but it is better when schoolchildren study under the supervision of elders. Conducting experiments is quite interesting and exciting, so parents will not be bored. The main advantage of all components is natural material, it is non-toxic and harmless.
With this innovative game, children will gain interesting knowledge and skills.
Innovative kit “Young Perfumer”
Created for lovers of fragrances and travel. The young chemist will be able to reproduce the best aromas of Italy and recognize the popular smells of Venice and Tuscany. To do this, you need to correctly mix several components from the innovative set. The finished perfume can be used independently or given to close friends. Thus, children will feel like real creators of exclusive fragrances.
Main features of the set:
• it is possible to create any signature perfume at home;
• a professional set will allow you to mix different oils and allow you to plunge into the world of perfumes;
• the instructions describe in detail all stages of perfume production;
• innovation will make it possible to create more than 25 popular flavors of Italy.
• such activities contribute to the future choice of profession.
Innovation for children, set “Candle Studio. Sea Mystery"
Using the play set you can create scented gel candles. The set includes: multi-colored decorative sand, glass glasses, accessories, decorations and gel used for combustion.
The game will help develop hand motor skills; its components are absolutely safe. The candle will become an interior decoration or a good gift.
Set for making exclusive soap “Soap Workshop”
It will help to interest schoolchildren in such experiments. Helps develop motor skills and perseverance. Parents can spend more time with their children conducting experiments. After experiments, you get beautiful figures from natural soap. Soap can be stored in the bathroom; it will remind you of the work done and motivate you to further experiments.
The game includes the following components:
• glasses for soap base;
• natural dyes and flavors;
• ceramic bowl;
• soap mold;
• chopsticks and gloves.
Innovation for children, set “Colored polymer slimes”
Thanks to chemical experiments, children create new bright toys. The game will entertain and put you in a cheerful mood. During the experiment, kids will see how multi-colored slimes and worms appear. This will attract further educational research, as well as arouse interest in chemistry and the environment. Promotes motor development.
Young chemists will make their own toys to play with. Joy will have no boundaries.
The composition is absolutely safe and includes the following components: colored solution, worm activator, container for liquids, pipette, measuring spoon and gloves.
Innovation for children, “Taming the Fire” set
The experiments will involve fire, so children should not be left alone, without parental supervision. Young chemists will gain a lot of new knowledge during the game. Experiments will make it possible to learn about the laws of the elements, and schoolchildren will learn to assimilate new and necessary information.
The house will turn into a laboratory where fire will be tamed. The game includes 6 experiments, consists of the necessary reagents, laboratory equipment and detailed instructions for use.
Do-it-yourself mathematical didactic game for the younger group
Children's development largely occurs through play. Children 2-3 years old, who are just joining the ranks of preschoolers, begin to spend a lot of time in a group of peers, gaining new knowledge. Do-it-yourself didactic games are especially valuable in preschool educational institutions. This is the warmth and care of a master who puts his soul into each child, as well as the opportunity to give children sensory development and first skills in mathematics and logic. We present to your attention a master class on creating a bright didactic game with a mathematical bias for the younger group of preschool educational institutions, which older preschoolers will also enjoy playing. The process is accompanied by pictures, so it will be easier for you to create.
Do-it-yourself didactic games - mathematics can be interesting
To make a didactic game with your own hands, you first need to prepare and, which is very important, calculate the material.
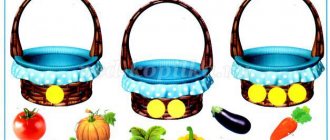
Let's call it "Harvest" - the guys will be able to put three types of fruit on three different trees, and then collect them in plates, leaving the leaves.
When the kids grow up, they will be able to play this didactic game with a different interest: count which fruits they have collected more or less, and distribute equally to all children.
For preschoolers in kindergarten, it is important not only to play, but also to learn new knowledge. In the didactic game “Let's Harvest,” preschoolers come to the idea of what kind of fruits grow on trees, what exactly these are fruits. They can tell what fruits taste like in each individual case, share their opinions about them, and this is the development of speech. Let's get started!
Creative materials
Anything you have can be useful. In total, you need to make three trees, several fruits of three types (for us these will be plums, pears and apples), three plates for them, and also, if desired, leaves. In order for children to develop their sensory skills as best as possible, it is worth making parts from different materials. It could be:
- Felt. Do-it-yourself didactic games made from this material are considered one of the best, since it is wear-resistant, has many beautiful colors and is easy to create.
- Rubber (or rubberized colored paper).
- Cardboard (thin and thick).
- Self-adhesive paper.
- A box or casket in which you can put parts of a didactic game.
- Of course, for the DIY process you will need scissors, a needle, colored threads (preferably floss), and a ruler. We also used green gouache to paint the back of the trees.
Source: https://mojdetskijsad.ru/pedagogam-na-zametku/matematicheskaya-didakticheskaya-igra-dlya-mladshej-gruppy-svoimi-rukami.html
Master class “MAKING DIDACTIC GAMES FOR SENSORY DEVELOPMENT OF PRESCHOOL CHILDREN”
MBDOU Chernobaevsky kindergarten "Beryozka"
Starozhilovsky municipal district, Ryazan region
Master Class
“Making didactic games for the sensory development of preschoolers”
Prepared by Chernobaevsky's teacher
kindergarten "Berezka" Vinogradova E.V.
2019
Master class “Making didactic
games for sensory development of preschoolers"
(The abstract was compiled for conducting a master class at a methodological seminar for preschool workers in the Starozhilovsky district of the Ryazan region)
Master class topic:
“Making didactic games for the sensory development of preschool children”
Target:
To promote increased interest among teachers in finding interesting methods and technologies in working with children to develop fine motor skills. Increase the level of professionalism of educators.
Plan:
1. Information part. Master class topic message.
2. Introducing teachers to an exhibition of games on the sensory development of preschoolers.
3. Practical part:
- Making educational games from waste material.
- Games together with teachers.
4. Final part.
Equipment:
Colored and white cardboard, scissors, buttons of different colors, blanks with patterns - diagrams, clothespins of different colors, presentation “Using didactic games in special moments,” didactic games.
Progress of the event:
Information part
.
Good afternoon, dear colleagues! It's no secret that sensory skills are the foundation of children's mental development. Kids learn about objects in the world around them through sensations, smells, and touches. The child's readiness for school depends on his sensory development. In order for a child’s sensory development to be complete, it is imperative to teach him to listen, feel, and examine. It is important not only to introduce the child to the subject, but also to its qualities and features. properties. In the sensory development of children, didactic play is very important. Children get acquainted with the properties of objects in the surrounding reality, expand their horizons, and learn about the world around them. In my practical work, I use a large amount of didactic material for the sensory development of pupils. Today we will reveal the secrets of making didactic games with our own hands on the sensory development of children of early preschool age. Please answer the question. What do children like to do most? Of course, play! Children play at home, in kindergarten, on the street, at parties. Any exciting activity is designated for them by the word “game”. Through play, a child learns about the reality around him, his inner world. Toys for a modern person evoke associations with the latest technologies. A smartphone, a laptop touch screen, and a wireless mouse have long become favorite toys for adults and children. And the task of teachers is to create as many conditions as possible for children’s play activities, including through didactic games.
The purpose of creating didactic games
: development of cognitive and creative abilities, sensory development, development of fine motor skills of hands and speech of children of primary preschool age.
Here are some games that I want to introduce to you:
Show presentation.
Slide 1: “Use of didactic games in special moments”
Slide 2
:
Ira with buttons.
By playing with buttons, children's understanding of shape, color, size, and material expands, and their aesthetic taste, creativity, and imagination are formed. Ideas about the world around us expand, and the simplest relationships are established.
Slide 3:
Game “Wonderful Bag” (Children are given cards of different colors. The presenter takes buttons from the bag, also of different colors. The one who fills out the card the fastest wins.)
Slide 4:
Game "Post the drawing." (Children are given cards with pattern diagrams. Along these lines they lay out the pattern with buttons.)
Slide 5:
Game “Seasons” (Children are given models of trees cut out of white cardboard, and are asked to make an autumn or winter tree from buttons of the desired color.)
Slide 6:
“Button massage” (These are massage mats in the shape of bear paws for foot massage. After a nap, we walk on these “paws”)
Slide 7: Games with clothespins.
Develop sensorimotor coordination and fine motor skills of the hands.
Slide 8 - 9:
Game “Funny Clothespins” (The goal is to teach the child to pin clothespins on his own. To make the game interesting for the child, you can attach clothespins according to the theme (that is, rays to the sun, needles to a hedgehog, rain to a cloud, grass to the ground, etc.).
Slide 10:
Game “A flag is a friend of a clothespin” (Flags of different colors are cut out and strung on a string. We give the child 2 clothespins, and he must find a flag of the same color and attach clothespins to it)
Slide 11:
Didactic game "Bed". (Invite the children to plant onions in the garden. In order for onions to grow, you need warmth and light
(children find a sun blank, clothespins, it turns out to be a sun).
For good plant growth, you need to water the garden bed. Let's invite a rain cloud: rain, rain, water - there will be a good harvest
(children find a blue cloud and complete the task).
The teacher draws the children’s attention to the fact that while it was raining, the seeds sprouted and more vegetables grew in our garden bed: carrots, beets, turnips and sunflowers (the children find the appropriate clothespins and complete the preparations).
Remember: the more varied the children’s activities, the more successful the child’s diversified development! Every educator can make the basic types of didactic games. I really wanted to diversify and increase the number of games. Today I will tell you how you can quickly and easily, without much expense, make exciting manuals with your own hands - interesting, varied games. The parents of my group helped me create educational games. This includes collecting materials for games, making games and massage mats. (show material)
Practical part.
And so, dear participants of the master class! You had the great honor to take part in the “Skillful Hands” master class.
- Our first task is to work in pairs.
- Lay out the beginning of the pattern on the diagram.
- Transfer the started work to a partner in order to continue working according to the model.
Equipment: cards with diagrams, buttons.
Well done!
- Next work in pairs.
We take the leaves.
Let's draw a tree.
We decorate the tree with buttons so that we can identify the time of year.
Equipment: leaves, markers, buttons.
Well done!
- Game "Vegetables".
We choose cardboard of a certain color (depending on what vegetable you will be making)
Cut out a vegetable from cardboard.
We make tops from clothespins.
Well done!
- Game "Bed" This is a collective game. While you were making vegetables, I made the sun and cloud.
Let's make a garden bed together and plant your vegetables on it.
Well done!
The final stage.
A child of early preschool age is able to develop his senses with unprecedented speed. Sensory development in preschool children is considered a priority task, which is extremely difficult to overestimate. Thanks to learning in the form of play, the baby learns to explore the world around him. The child receives a huge flow of information about various concepts: color, size, shape. Sensory is aimed at the harmonious and holistic development of the child.
Thank you for your active participation and creative work! Thank you all very much! Goodbye.
Slide 12.
Thank you for attention!