A preparatory group for preschoolers is a great opportunity to instill in your child a love of creativity and the skills of basic techniques that will definitely be useful to him in labor lessons at school. Handicraft classes develop not only children's imagination, fantasy, but also fine motor skills, and also help the child to form a correct picture of the world around him. Let's look at several master classes and ideas for paper crafts on the theme of ships, which are perfect for craftsmen starting their creative path.
Making a boat using a template
This is one of the simplest options for making a panel applique, which a child can handle even in kindergarten. The essence of this craft is to cut out the details of the ship according to a pre-printed template, and then paste them onto the prepared background.
Needed for work
- Cardboard for background;
- Colored paper in the shades you want to see on the boat;
- Paper glue;
- Scissors.
To make this application yourself, just follow a simple diagram:
- We print out the details of the boat on a piece of paper (this can be done immediately on the back of sheets of colored paper) or transfer their outline from the computer screen onto the sheets and cut them out.
- Glue two waves onto the background.
- Now the main part of the boat and its mast.
- To give the picture a sense of volume, glue another wave on top of the base of the ship.
- We attach the sails and flag to the mast.
- The last step is to complement the composition with clouds and a flying bird.
You can also make three-dimensional versions of appliqués from simple geometric details. For example, creating a sail fluttering in the wind is very easy.
Applications for primary schoolchildren
The theme of applications from geometric shapes for schoolchildren is animals and birds, insects and natural objects. Teachers can simplify any task by showing ready-made samples of work and handing out prepared stencils (templates).
Depending on the child’s age, they are asked to assemble a picture from ready-made circles and squares or cut them out themselves.
Further, the task can be complicated - lay out the fragments symmetrically or change the shape, but so that the image becomes recognizable.
We offer a gallery of the best works of preschoolers and applications made from geometric shapes by children in grades 1-2.
Making the applique “Boat and Steamship”
Schemes for creating an applique with a steamboat
Applications consisting of a large number of parts are suitable for making by children in the older group.
Step-by-step instructions on how to make a steamer applique with your own hands:
- First, we prepare the applique pieces by cutting them out from colored cardboard or paper. To do this, you can use stencils with different geometric shapes.
- For the base of the steamer, you need to cut a trapezoid. We fold the red blank in half and cut off a part from the edge at an angle. We unfold it - we get this figure.
- Next, glue a trapezoid onto the background and an orange rectangle above it.
- We cut the yellow rectangle into two parts and get two identical squares - these are the windows of the ship.
- The yellow rectangle at the very top is the steamer's chimney. We draw a bright stripe on it. At this stage you can add waves and seagulls.
- The last thing the ship lacks is portholes. We cut them out of light paper.
Children in the middle group can be asked to make an applique using a ready-made template. You don’t need detailed instructions for this, children just need to cut out the parts of the steamer, and then glue them step by step onto the background
Application "Steamboat". (Senior group). outline of a lesson on applique, modeling (senior group)
Educational field "Artistic and aesthetic development", Application "Steamboat". (Senior group).
Goal: To strengthen children’s ability to cut out the necessary parts to create an image of an object.
Tasks: - teach children to connect parts according to the model and demonstration of the teacher, learn to cut out and paste an object, using previously acquired skills: cutting corners of rectangles, cutting out other parts of the ship and parts of various shapes (round, rectangular, etc.); practice cutting out identical parts from paper folded like an accordion; consolidate the ability to beautifully arrange images on a sheet of paper;
-develop hand motor skills, memory, speech and imagination of children, creative thinking;
- to cultivate independence, confidence in one’s skills, accuracy, to cultivate interest in learning technology and reflecting acquired ideas in artistic activities.
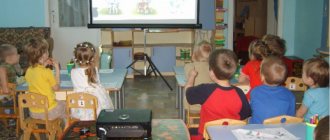
Preliminary work. Examination of images of the ship; constructing a steamship from paper strips and construction kit parts; reading a riddle, showing slides on the topic “Water transport”.
Materials and equipment: colored paper for cutting out ships; cardboard of different colors for the sea (to choose from); pictures of steamships, stories about ships, projector, laptop, presentation, PVA glue, glue brushes, napkins, oilcloth.
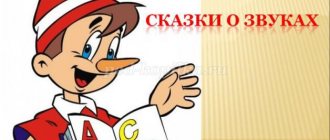
Progress of the lesson. I. Introductory part. - Guess the riddle and you will find out what we will talk about today and what applique we will make. - The sea, seagulls, ships Hear my whistle in the distance. The port is behind us, the journey home will be long. I proudly swim forward! My name is (steamboat!) - That's right, this is a steamboat (subject picture steamship).
Educator: - Who is in command on the ship? (Captain).
-Tell me, what should the captain and sailors on a ship be like? (Strong, brave, honest). II. Main part.
1. A conversation about water transport - a steamship.
— What type of transport is the steamship? (to water modes of transport)
-Where can a steamship sail, on what expanses of water? (by river, by sea)
- Name the parts of the ship. (hull, wheelhouse (where the captain is located, pipe and windows, which are called portholes)
Educator: Guys, the very first ships were made of wood. The first ship is in front of you. Then the ship's hull was replaced with an iron one and modern ships appeared.
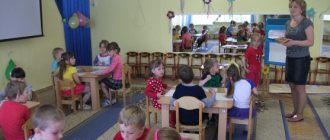
Slide show on the topic “Water transport”.
Educator: Guys, let’s take a look at what types of water transport are being created in our time. What do you see on the screen?
Children: motor boat, cutter, motor ship, yacht, scooter, ship, catamaran, steamer.
Educator: - What weather do ships sail in?
-What background should you choose for work if the ship is sailing in a storm or at night? (Navy blue).
-What if the ship sails during the day and the weather is calm? (light blue). Educator: Guys, we looked at pictures of modern ships. Let's make a steamboat with our own hands. But before we get to work, let’s remember about safety precautions during appliqué classes. How should you work with scissors? (Do not direct towards yourself or a friend, but keep away from yourself).
—What do you put the glue brush on? (On the brush stand).
— What is a rag napkin for? (To smooth out the glued sample, in order to remove excess glue).
- What is a wet wipe for? (So that after finishing work, you can wipe your hands).
Educator: What geometric shapes are in front of you? Children: - Rectangles, circle.
Educator: - What size are they? (Large, medium, small)
- What color are they?
Educator: - That's right, guys. — I fold the largest rectangle in half and cut off a corner on one side. You will get a figure called a trapezoid: this is the hull of our steamship. I coat the body with glue and glue it in the middle of the sheet. Now I take another rectangle and glue it in the middle of the steamer body. This is the wheelhouse - the room in which the captain is located. I take the remaining small rectangle. This is a pipe. From the smallest rectangle I will make chopping windows, fold the rectangle in half, and cut it into two parts. I fold a strip of paper into an accordion, round the corners, cut it, and I get porthole windows, which I glue to the hull of the steamer. I will complement the picture with waves and seagulls (blanks for each child).
Physical education minute.
Blue water (wave-like movements of the arms at chest level to the sides) Field without a trace,
Without end and edge (spinning in place) Blue water, Where are you in a hurry?
Where are you in a hurry? (sat down, clasped their shoulders with their hands) To the blue sea,
Where the waves are strong. (stand up, arms extended up) Where the waves are strong
They always splash. (wave-like movements of hands up and down) To the blue sea, quickly carry me, quickly carry me,
Blue water. (spinning in place)
3. Independent activity of children. 4. Analysis of work. III. Reflection. — Do you like your work? — What was the most difficult part of making the appliqué? — Guys, what will you name your ships? —Who will you give the painting to?
We create an applique with a boat from cereals
Another fascinating tutorial is creating appliqués from cereals. You can use buckwheat, rice, millet and even semolina.
A step-by-step description of the process of creating a panel with a boat from cereals:
- We prepare the necessary materials: cardboard for the base, PVA glue, various cereals, as well as a drawing of a ship.
- Then the boat is transferred to the base with a simple pencil, and work begins on filling its contours with cereal.
- To begin with, a contour is laid out. The base is smeared with glue, grains are glued to it.
- Then the inside.
- The remains of semolina and other cereals are shaken into a bowl or carefully blown away.
Using the same principle, you can make a warship out of sand:
Stencils for applications with boats
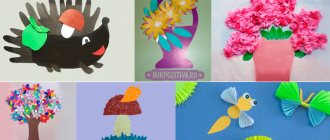
Several ideas for boat applique
In this work, the triangular sail received a curved shape by twisting it with an ordinary pencil: And here the triangle was bent in half, and one half seemed to float freely in the sea wind: In this boat, a rectangular sail was used, glued in such a way as to create a bulge in the center: In addition This means that in the preparatory group, children can create boats using other techniques, for example, origami, and then create from them compositions with chaotic “ragged” waves:
And instead of colored paper or cardboard, you can use bright fabrics with unusual patterns, cutting out the same geometric details from them. Fabric appliques can be used not only to create panels, but also postcards, decorate clothes, pillows:
It is easy to interest children in the younger group with such an unusual game: each of the children independently makes an appliqué boat, and then all the works are combined together into one large panel.
Such a lesson will teach children to work in a team, and each of them will understand that they are responsible for the overall final result.
On the topic: methodological developments, presentations and notes
Explanatory note Preschool age is the foundation of a child’s overall development, the starting period of all high human principles. It is at this age that the foundations of everything are laid.
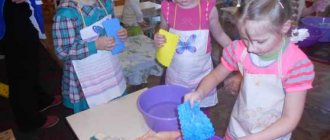
Drawing by touching, getting to know colors.
Work experience on the topic: “Inspection as a method of developing skills in drawing objects in the senior group of kindergarten.”
Goal: to consolidate children’s knowledge about primary colors (blue, yellow, red), to introduce them to the process of obtaining new colors (green, orange, purple) by mixing primary colors, develop.
The memory of the blockade is a very difficult memory. It is almost impossible to remember, difficult to write, difficult to talk about. However, we all understand how important it is to preserve this history and bring it to new people.
Summary of educational activities for speech development in the senior group. "Literary Kaleidoscope".
Source