Preparatory group. Senior preschool age. Children 6-7 years old
Application for children 6–7 years old “Van Gogh’s Sunflowers”
Application for children 6-7 years old . For work you will need: Look with children at Van Gogh’s works from the “Sunflowers” series Landscape sheet A 4 1 sheet of yellow paper A 4 1 sheet of black paper 2 rectangles 6x8 cm made of colored paper Scissors Glue Simple pencil Green felt-tip pen Glass,…
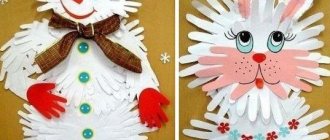
Master class on three-dimensional application “Grandfather Frost” for children of senior preschool age
Goal: to create a three-dimensional application “Grandfather Frost” using non-traditional materials – cotton pads and padding polyester. Objectives: - develop artistic and aesthetic taste and creative imagination, fine motor skills of the hands; — to develop the ability to work with non-traditional materials :...
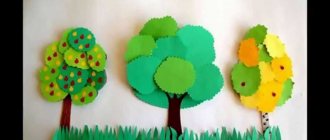
Types of applications made from natural materials
- Overlay applique. A simple look that does not require additional work with leaves - they are glued to a sheet of paper or cardboard, creating the intended plot. These can be animals, trees, mushrooms. You can add some details.
- Mosaic or modular application. This technique involves gluing leaves that are identical or similar in shape. This way you can make a bird's tail or fish scales.
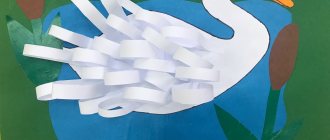
- Symmetrical applique. In this case, it is necessary to select similar leaves to create mirror images. This way you can make an image in water, a butterfly, a dragonfly.
- Ribbon applique. A type of symmetrical applique, but in this case you can make several similar images.
- Silhouette applique. The leaves are trimmed to create the desired pattern or shape.
Children become interested in applications and crafts even at the stage of collecting material. Kids like to collect leaves on the paths while walking, look for cones and chestnuts. Therefore, it will not be difficult to persuade your child to use all this to create a beautiful applique.
APPLICATION IN A PREPARATORY SCHOOL GROUP
Children of the seventh year of life are able to notice characteristic signs in objects and phenomena around them. They are distinguished by observation, the ability to compare and consciously remember the main thing. In the process of various activities, more subtle movements of the hand and fingers develop. This allows you to cut out and paste small parts and improve the technique of creating appliqués.
Program tasks
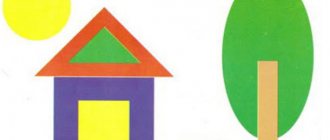
In this group, it is necessary to continue to clarify children’s knowledge about familiar geometric shapes.
It is also necessary to teach them to see, identify and correctly name polygons with different numbers of angles, to distinguish a rhombus from a square, a parallelogram from a quadrilateral, and a trapezoid. Thanks to the fact that children will acquire quite extensive knowledge about geometric shapes, they will learn to identify them in different objects and toys, they will better understand the designs of objects and will be able to use their knowledge in applique. Knowledge about shape and color will enrich children’s appliqué work and help make it more varied and meaningful.
Children need to be taught to differentiate the shades of the main spectral tones, continue to learn to distinguish between cold and warm colors, light and dark. Learn to correctly name shades, use figurative names (for example, poppy, scarlet, raspberry, cherry, etc.). It is important to teach children not only to distinguish and correctly name the colors of paper, but also to actively use color as one of the means of expressiveness in applications.
Children in the preschool group must continue to be taught orientation on the plane of a sheet of paper, achieving correct and accurate definitions. Particular attention should be paid to what children have learned poorly (for example, lower right corner, upper left corner). It is necessary to teach children to understand different terms: on the contrary, in pairs, at the same level
and others. Children's understanding of these terms will make it easier for the teacher to provide verbal guidance in class.
Much attention must be paid to the expressiveness of children's works, the transfer of dynamism, imagery, creative solutions in color, successful composition, and the development of children's individual abilities. It is also necessary to develop in children artistic taste, creative activity, and independence not only in the process of visual activity, but also in the formation of a culture of perception of works of art and the surrounding reality. Solving these important problems is impossible without expanding children's knowledge about color, shape, structure, proportions of objects, their characteristic features and relationships.
When defining the main program tasks, attention should be paid to the further complication of cutting techniques and to the imposition of higher demands on the quality of work. Along with this, a more difficult task must be solved: to transform scissors from a technical tool into a fine one. It is necessary to teach children how to draw with scissors, to master the skills of silhouette cutting without first drawing a contour line to convey the characteristic features of various silhouettes.
It is necessary to develop in children the ability to independently plan an image, begin work by cutting out and gluing the main large elements, gradually complementing the smaller ones and ending with details to convey characteristic features and create an expressive image. The demands on organizing the applique manufacturing process itself are increasing; work quickly, carefully, use rational cutting techniques, use paper wisely, and tidy your work area carefully.
Completion of the program
The number of classes in the preparatory group is again reduced to approximately 19. Appliqué classes are held once every two weeks. At the beginning of the school year, it is necessary to repeat and consolidate the cutting techniques that children mastered in the older group. Then children must master a new, more complex silhouette cutting technique.
The choice of lesson topics is determined by seasonal phenomena and events that children observe, as well as technical skills.
By performing applications with subject content, children learn to convey simple movements and find a successful pose. They cut out and paste various toys, household items, and animal figures. Using the technique of cutting out parts, children can depict cars, planes, ships, a dog, a cook, Pinocchio, the Snow Maiden, Santa Claus, and a rooster.
To reinforce the techniques of cutting out symmetrical shapes from paper folded in half, children are offered the following themes: “Parsley”, “Girl in a Hood”, “Cosmonaut”, “Skier”, “Matryoshka”, “Cipollino”. In object appliqué, the technique of silhouette cutting can be used (fish, rooster, hare, car, pigeon, bear, fox).
To decorate some object images with small figures and to add details, children should use the technique of cutting out accordion-folded paper. For example, children can decorate parsley, a matryoshka doll, and a girl in a hood with decorative elements.
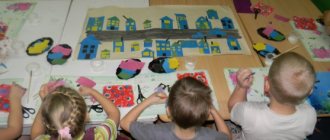
In classes in this age group, children are offered more applications with plot and landscape content. During the school year, children can perform various thematic compositions: “Golden Autumn”, “Festive Street”, “At the Bottom of the Sea”, “New Year’s Round Dance”, “Parsleys Dancing”, “Winter Landscape”, “Winter Entertainment”, “Zoo” , “Cosmodrome”, scenes from familiar fairy tales – “Kolobok”, “The Fox and the Hare”, “Teremok”, “The Stolen Sun”, trees in bloom, an icebreaker in the ice, the arrival of rooks, a meadow with flowers. With interest, children make silhouettes of various fairy tales to play shadow theater.
Children perform work in classes and in everyday life both individually and collectively.
Decorative applique takes on a more applied character in this group. During design classes, children model various crafts from paper - boxes, arrows, wallets, houses, Christmas tree decorations. They then decorate these crafts at will with appliqué patterns. For the holidays, children make greeting cards for parents, friends, and kindergarten staff. Based on the experience of children, they should be involved in the festive decoration of the group, in decorating the veranda and buildings on the site.
To create appliques, various cutting techniques with scissors and a method of tearing paper are used (depending on the theme).
Teaching methods and techniques
In everyday work, the teacher must organize an examination of various objects, toys, works of decorative and applied art, handicrafts, and examination of illustrations. In the process of examination and examination, he emphasizes the characteristic, figurative, expressive. For example, when examining a toy fox, children’s attention is drawn not only to the structure, magnitude relationships, color, shape, but also to the figurative characteristics: the fox is cunning, nimble, crafty. The teacher invites the children to look at the toy again and tell how these properties can be guessed from this toy. Children begin to associate the external signs of a fox with its figurative characteristics and notice that its muzzle is elongated, elongated, the ears on the top of its head are pointed, its body is elongated, its tail is not only beautiful, but also streamlined and long. While doing the appliqué, children remember this and achieve greater expressiveness in their work.
In classes, where necessary, examination of objects, toys, illustrations, and folk appliqué art products is used. Children learn to independently analyze what they perceive. Particular attention should be paid to the contour line of objects. Children are encouraged to trace the contour line from right to left, as it is easier to cut in this direction (this is especially important in silhouette cutting). Sensory analysis is aided by figurative verbal explanation. For example, when analyzing the outline of a rooster, you should start from the back; The rooster's back is arched, the neck is high, immediately turns into a small head, and then again a high neck, a chest like a wheel, an oval body, a rounded high tail. When cutting, children whisper (or silently) pronounce the sequence of actions.
Drawing children's attention to the visual and expressive characteristics of objects, they need to be encouraged to simultaneously think about cutting methods and the stages of work in general. It is important to activate children more and develop their independence.
The demonstration of cutting techniques should generally be partial. Children themselves can recall well-known techniques. In silhouette cutting, the teacher, resorting to demonstration, draws the children's attention to the contour line, to the spatial position and magnitude relationships, to the movements of the scissors. The resulting image from the teacher’s demonstration can be attached to a flannelgraph so that children can see it.
The word plays a leading role in classes in the preparatory group. The teacher, asking children questions, teaches them to think, reason, and find independent solutions. If necessary, you can use verbal reminders, instructions, and advice. For example, to perform the fairy-tale firebird, the teacher advises children to use warm paper colors (red, orange, yellow) in combination with some cold ones (purple or blue background) to enhance the impression of brightness and contrast. Tips can be used especially widely in plot, landscape applique and in appliqué according to design: the teacher recommends that children, before starting work, think about what will be in the image, what color paper is needed, what techniques should be used to cut out parts, etc. The teacher’s advice may relate to achieving greater imagery, expressiveness, finding a successful composition, as well as the order of work. For example, when making the applique “Bouquet of Flowers in a Vase,” it is important to tell the children that the cut-out vase must first be glued in half (only the lower part), then make up and glue the bouquet, and then smear the upper part of the vase with glue and cover the stems of the flowers with it.
Individual work in the preparatory group is of a slightly different nature than in previous groups. Using the cutting technique, children need less teacher supervision, so all the teacher’s attention is aimed at developing creativity, achieving expressiveness in work, and developing independence.
It is advisable to develop mutual assistance among children in the classroom. Sometimes it is necessary to seat children taking into account their skills, so that a child who has good cutting skills can help the person sitting next to him with advice and effective demonstration (in this case, it is necessary to give paper for training actions).
In individual work, instead of direct instructions, the teacher should more often use advice, express wishes, and ask indirect questions that stimulate the child’s independence.
When performing collective applications, it is necessary to more clearly organize the mutual assistance of children, find advice and wishes for each creative group of children, stimulate their independence, and encourage individuality.
View works
In the process of examining and analyzing the application, children need to be taught to notice what is figurative, characteristic, and expressive. It is necessary to teach them to independently find errors and explain their causes. It is necessary to develop in children the ability to appreciate aesthetically, paying attention to a successful color scheme, the beauty of the cut lines, and the overall quality of the work.
Children's work should not be removed immediately: they should be given the opportunity to see everything well, admire the applications, and exchange impressions.
The possibilities of using children's applications in the decoration of kindergartens, in the manufacture of various crafts for games and entertainment, and in preparing elements for activities with children are increasing.
SAMPLE CLASS NOTES
Second junior group
Application. "Elephant Juggler"
Program content. Learn to make an applique on ready-made elements, placing the silhouette of an elephant in the middle, and multi-colored circles freely throughout the entire sheet of paper (Fig. 1). Practice carefully gluing images and using equipment correctly. Arouse positive emotions in children when viewing works.
Rice. 1. Application from ready-made elements - an elephant juggler.
Methodology of conducting the lesson. Remind children about the circus, that different animals perform in it: dogs, monkeys, horses, elephants.
Show the children a toy elephant, tell them that he is also from the circus and can deftly throw colorful balls. Inform the topic of the lesson and show the children the silhouette of an elephant made of paper. Activating the children, show techniques for laying out an image (an elephant in the middle, and circles of different colors throughout the sheet). Call the child and invite him to show you how to stick an elephant on. Ask the children how to stick the mugs on. Offer to start working (first make a picture and then paste it). During the application, pay attention to the techniques of laying out and gluing forms, clarifying with individual children their knowledge of color, shape, and arrangement of figures. At the end of the lesson, admire the finished work with the children and find out what new they learned while doing the appliqué. Give an overall positive assessment of the activity, highlighting characteristic shortcomings or errors. Decorate a doll's corner, veranda, etc. with children's work.
Preparing for the lesson. The day before, talk to the children about the circus, look at illustrations depicting a circus, play with wind-up toys, imitating a circus. Cut out colored silhouettes of elephants, multi-colored circles (3-4 pieces for each child). Select a toy elephant and material for demonstrating work techniques. Prepare colored sheets for the background, equipment, glue.
Application. "Flags"
Program content. Learn to compose object images from two parts and carefully paste them (Fig. 2).
To consolidate children's knowledge about a rectangular farm, magnitude ratio and spatial arrangement.
Rice. 2. Creating an image from 2 parts – checkbox.
Methodology of conducting the lesson. Have a short conversation with the children about the festive decoration of the city for May 1st. Show the red flag and examine its structure, color, and shape of its parts. Inform the purpose of the lesson and, activating the children, show the techniques of making flags on a sheet of paper (first lay out the rectangles - large on one side, small on the other, then attach strips to them). Talk about the stages and quality of gluing (or call one child for a partial demonstration of gluing techniques). Then invite all children to make flags and carefully glue them. In the process of individual work, clarify knowledge about the shape, magnitude relationships, and location of images. Follow the gluing technique. At the end of the lesson, display all the work, note that the group has become elegant, festive from the red flags. Ask children about the quality of composing images and the quality of gluing. From children's works, alternating backgrounds by color, create a festive frieze and decorate the veranda with it (after class).
Preparing for the lesson. While walking along the street, pay attention to the festive May Day decorations of the city (village). Look at the illustrations that depict red flags, flowers, and balls. Prepare rectangles of blue and yellow colors (for the background), cut out pieces of a flag for each child (two red rectangles - large and small, stripes - yellow or brown), equipment, glue, a children's flag made of fabric.
Middle group
Application. "Ambulance"
Program content. Strengthen children's ability to make straight and oblique cuts, continue learning how to cut out round shapes. Learn to compose an object image and carefully glue it (Fig. 3).
Rice. 3. Image of the machine.
Methodology of conducting the lesson. Based on observations, talk with children about the ambulance, examine the toy, paying attention to the structure, parts, shape, color, size relationships, details. Ask the children how to cut out the main parts (make an oblique cut on a white rectangle - you get a body, cut windows, cut out the front glass, cut a strip for a cross, cut out wheels). Call two children and invite them to simultaneously show how to cut out round wheels. (Children demonstrate, and the teacher comments on their actions.) Ask the children about the order of cutting, composing an image, and gluing. If necessary, show techniques for laying out parts, but it is better, based on the experience of children, to limit yourself to verbal instructions. While performing the work, pay attention to the cutting technique (especially circles), remind and, in some cases, show. When examining applications, note the quality of cutting, drawing and gluing. Find out what the difficulties were and how they can be eliminated. Preparing for the lesson. During absenteeism, pay attention to the ambulance and talk about its purpose. Emphasize its light color, a red cross. Prepare paper blanks for each child (a white rectangle for the body, a blue stripe for the glass, a red stripe for the cross, two identical squares for the wheels, a colored background). Prepare equipment, glue, toy.
Senior group
Application. "Umbrella"
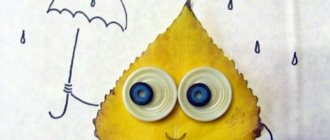
Program content. Strengthen children's ability to cut out several identical shapes at once from paper folded like an accordion to decorate the finished silhouette figure. Independently select paper colors for patterns depending on the color of the umbrella (Fig. 4).
Rice. 4. Decorating an umbrella using appliqué.
Methodology of conducting the lesson. Give the children a riddle
He reveals himself
He's covering for you.
Only the rain will pass -
It will do the opposite.
When the children guess the riddle, show the umbrella. Once again, repeating the riddle, open and close the umbrella. Children look at the colors and patterns on the object and say that umbrellas are different and beautiful. Show variable samples (different in color, pattern elements, arrangement of decorative forms), paying attention to the fact that the umbrellas are decorated in different ways. Clarify the order of work and the technique of cutting out elements for decorating an umbrella: choose colored paper to match the color of your umbrella, think about patterns, cut them out of strips of paper folded like an accordion, arrange the patterns beautifully, do the work neatly and beautifully. In the process of individual work, pay attention to the technique of cutting out identical shapes, the selection of color combinations, a successful composition, and the quality of gluing. At the end of the lesson, invite the children to admire the resulting applications, paying special attention to the manifestation of independence, the quality of cutting out paired shapes, successful color combinations, etc.
Preparing for the lesson. Talk with the children about the different colors and patterns of umbrellas. Involve children in cutting out colorful umbrellas using stencils. Prepare multi-colored strips of paper for cutting out elements for decoration, equipment. Make 2-3 variable samples, prepare a beautiful umbrella.
Application. "Cheerful Parsley"
Program content. Continue to teach symmetrical cutting from paper folded in half, without a drawn outline. Complete the image with details cut out piece by piece from paper folded like an accordion. Achieve expressiveness of work (Fig. 5).
Rice. 5. Making parsley from paper folded in half.
Methodology of conducting the lesson. The teacher tells the children that among their favorite toys there is one, very funny one, and invites them to guess who it is: “I am a funny toy, and my name is...” The children cheerfully add: “Parsley!” Everyone remembers together how different and funny parsleys can be, but they are always dressed in a bright suit, a funny cap, big shoes, etc. The teacher shows different costumes, paying attention not only to the colors, but also, most importantly, to the different positions of the legs and arms. Then he folds all the costumes in half and emphasizes the line of the silhouette (how the costume can be cut out in different ways, and the image of the parsley will depend on this - standing, dancing, jumping, etc.). You can ask children about techniques for cutting out a head, cap, collar, shoes, as well as cutting out decorations for a suit or cap. Then the children choose paper blanks and begin work. The teacher gives individual advice, reminds, and sometimes helps by showing. At the end of the lesson, a whole round dance of multi-colored parsley appears on the stand. Children look at the figures, talk about their expressiveness (cheerful, dancing, jumping, etc.), about the quality of the appliqués.
Preparing for the lesson. Look at the image of parsley in pictures and toys. Talk about the image, pay attention to colors and details. Prepare multi-colored rectangles (children's choice) for the parsley costume, various paper blanks (for the head, cap, for small shapes and details). Cut out several different parsley suits (with different positions of arms and legs). Prepare equipment.