How to sew an apron
First, choose the appropriate fabric for the apron.
In this case, it is waffle cotton fabric with a decorative pattern. Fabric consumption: from 1.0 m to 1.4 m, depending on how the coupon is placed on the fabric.
You will need tools: sharpened soap or chalk, ruler, measuring tape, tailor's scissors, thread, needles, safety pins.
Preparing for cutting
Before you start cutting on fabric, you need to decate the fabric, i.e. check for shrinkage, iron using steam, observing the temperature regime.
Next, lay the fabric out on a table or flat surface so that it is convenient for you to draw the pattern lines. The lines are applied on the wrong side of the fabric, but in our case, we will apply the lines on the front side, since the fabric has a pattern, so as not to make a mistake.
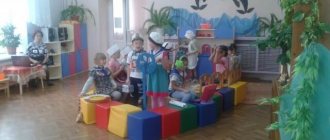
Lesson summary “Decorating an apron”
(Based on Tver embroidery)
Goal: to introduce children to the elements of Tver embroidery patterns. Practice drawing techniques with the end of a brush. Teach children to reproduce their plans and bring their plans to completion. To cultivate pride in our Tver region and respect for the work of embroiderers.
Previous work:
— who invented Tver embroidery (conversation);
- conversation based on illustrations;
— examination of samples of Tver embroidery;
— adding pictures with samples of Tver embroidery to the corner;
— a lesson on the topic “Acquaintance with Tver embroidery, the difficulties of embroiderers”;
— painting elements of Tver embroidery in free time from classes.
Materials for the lesson: a set of gouache paints, brushes, jars of water, brush holders, rags, paper napkins, paper aprons for each child.
Progress of the lesson.
The teacher enters the group in a Russian costume with a basket and sings the song “Red Sun”.
Children approach the teacher.
“Did you like the song? What was I singing about? How to call it in one word?
Yes, guys, our country Russia is good, beautiful - mother, our Motherland. It is also rich in skilled craftsmen. Since ancient times, people have learned to create such miracles that delight and decorate our lives. Here in our region there are such miracle masters. They asked me to give you this basket with their works. Let's see what's here?
The teacher lays out the embroiderers' work on the table, and the children examine them.
“Guys, what is this? What are they decorated with? What are the names of the craftsmen who embroider these wonderful things? What are they embroidering? What flowers do you see? What animals did you recognize? What color is the pattern?
Guys, the color red is joy and beauty, the kindness of the hearts that created these wonderful things. Only people with kind souls can create such patterns. And they work with a song, their soul sings. Embroiderers also add a little different color to the embroidery.
What elements are the patterns made of? Who came up with patterns for embroiderers? (artists) Guys, the artist comes up with the drawings, transfers them onto paper, and then through carbon paper onto fabric and gives them to the craftswomen. They embroider according to this design.
Oh, guys, there’s something else in the basket. Yes, it's an apron! After all, the artists asked me to come up with new patterns for embroidering aprons, otherwise they can no longer come up with new patterns. Shall we help them?
Notice where the patterns are located? (at the edges, in the corners, on the chest, etc.)
Look again at what elements the patterns for embroidering aprons are made of. I remind you that in order for the pattern to turn out beautiful, you need to draw with the end of the brush.
Take aprons and come up with your own unique pattern. Artists work at tables, and today you are artists.”
While children are working, you can quietly ask questions:
— what paint will you use to make the pattern bright and beautiful?
— what elements can be added?
- go and see what elements the pattern is made of.
The teacher's song "The Gilded Spinning Top" plays.
Analysis: the teacher praises each child: “the patterns turned out bright and kind. You painted in a good mood, and your soul sang!”
"Well done boys! Let us send the works in this envelope to the artists at the Tver Patterns factory.
It won't be long before you guys see your work on aprons in stores. They will also delight everyone with their beauty. Or maybe dad will buy mom such an apron for her birthday.
Go get dressed and let's go to the post office and drop the envelope in the box.
Theme options
According to the traditional drawing program for the middle group, the topic “Decorating a Sweater” is offered to students in November. This is logical, since the cold season comes when people change into warm clothes. The teacher is invited, at his own discretion, to replace this activity by decorating the skirt with a young lady’s haze. Nevertheless, it is quite possible to decorate a sweater with a Dymkovo pattern - then the topic of the lesson will sound more specific and the children will practice certain techniques of decorative and applied art.
Another option for decorative drawing is “Let's decorate a sweater with snowflakes” (this activity can be done when the first snow has already fallen, so it will be more interesting for the kids). At the same time, the teacher offers blanks (preferably blue, light blue, purple), and the children decorate them with simple snowflakes.
The theme can also be designated as “Lace Sweater”. To do this, the teacher prepares color templates in rich tones, which preschoolers decorate with white gouache - it will create the appearance of openwork knitting.
White paint realistically depicts the openwork knitting of a sweater
Shortly before one of these classes, the teacher offers the kids the topic “Decorating an Apron,” where they decorate a simpler piece (October). It is also advisable to practice with children in advance in decorating other simpler silhouettes, for example, a scarf, hat, napkin, handkerchief. Also very useful will be the preliminary application - “Decorate a napkin” (September): the children will be able to practice compositional skills (arrange the pattern not chaotically, but in a certain order, evenly filling the middle and corners with elements).
Decorative drawing lesson “Decorating an apron” in the middle group
Lyudmila Zolotareva
Decorative drawing lesson “Decorating an apron” in the middle group
Topic: “
Decorating an apron ” (
decorative drawing ) in
the middle group
Zolotareva Lyudmila Yurievna,
Moscow, GBOU School No. 717, d/s No. 447
Program content: teach children to make a simple pattern from elements of folk ornament; consolidate the technique of dipping, the rhythm: left - right - between them; develop color perception; cultivate independent creativity; activate in children's speech: pattern, pattern element, touching, red and green colors.
Equipment: apron , red and green gouache, water jars, napkins, brush stand (for each child, two samples of decorated aprons , Carleson, display board, equipment for displaying image techniques.
Apron styles for the kitchen
Once the fabric issue is resolved, you should choose your preferred style so that you don't get bored with it after a few months.
From the variety of styles, it is recommended to choose the most popular ones, which are traditionally used for sewing such products:
- A regular apron highlighting the bodice area. This is a rather bright and feminine kitchen accessory.
- A classic sundress made from a single cut. In it, both main components - the chest and the hem - form a single whole, for this they are cut out according to one template. But to sew the main part you need to use one type of fabric, and to create the ties and harness - another.
- Aprons in the form of a Russian scarf. They are usually diamond-shaped and decorated with small fringes.
- Apron-skirt. Among its features, it is worth highlighting the absence of an upper part; the hem of the apron is sewn by connecting three “floors of narrow” stripes into a fold;
- Apron in the “Marilyn” style. It is distinguished by a low-cut area and a fluffy hem. It is best to sew it from bright fabric with large polka dots.
- Traditional apron with lace border. It is made from linen and has a pocket on the chest.
- Apron made of thick denim. In addition to the main elements, it has a side satin pocket in the shape of a rectangle, strict and long.
Even a novice seamstress can create such creations with her own hands. But for this you will have to carefully consider the design of the apron. It doesn’t hurt to make changes to the standard style by decorating it with different decor - you can add lace and braid, and also sew bright pockets where you think is right. You can also abandon the rectangular shape of the hem and choose another one that seems more interesting to you - in the form of a triangle, an arc, or asymmetrical.
Making a pattern
Making an apron pattern with your own hands is very simple. You just need to follow the procedure:
- First you need to take measurements;
- We make a sketch of the future product;
- We draw up a drawing of the pattern, observing the dimensions, or you can use a ready-made model from the application with patterns, which can be found in many sewing magazines;
- Now the apron design needs to be transferred to the fabric, remembering to leave seam allowances to minimize mother waste;
- If you were able to complete all of the above steps without errors, then you can start cutting the fabric.
When making any thing with your own hands, the well-known folk wisdom becomes especially relevant: “Measure twice, cut once.” It follows from this that before you start cutting the fabric, check again that the contours of all the parts are transferred to the fabric correctly, and the grain threads and the pattern are in the right direction. To create versatile pieces, you will have to make two patterns in a mirror image or flip one so that you get the correct fabric pieces. Otherwise you will have two left or two right parts.
Often in old publications you can find instructions that an apron can be sewn in any shape, but it must have pockets. Many modern aprons have this element, but this does not mean that you will have to include it in the pattern of an apron you make yourself. It all depends on the housewife’s personal view of this element and her position regarding convenience. A pocket wouldn't hurt, because you can store useful little things in it. Others, on the contrary, will consider it inappropriate due to the fact that garbage will constantly accumulate there, which is high time to get rid of.
DIY apron
Most women are forced to spend hours in the kitchen performing various tasks. However, even here they want to look beautiful. By sewing an elegant apron, even a tired housewife can instantly turn into a tireless, radiant flylady. Everyone who is familiar with this popular system knows one of its key principles - it will be easy for a woman to cope with her household chores if she wears beautiful and comfortable clothes.
Exclusive models
Housewives who care about their appearance certainly have two aprons, one of which is used for everyday cooking, and the other is worn on special occasions. For example, you can put on an apron when guests are already sitting at the table, and you have not yet brought the dishes with which you are going to please them.
Naturally, a festive apron should have an appropriate design. The ideal color scheme is white. If you wish, you can add additional decor to it:
- shuttlecocks;
- frill
- lace trim.
Thus, it will no longer be just work clothes, but a flirtatious detail of the hostess’s toilet.
An interesting trend has been observed recently. Increasingly, we have to turn to long-forgotten things, abandoning soulless and uniform industrial products. Even a banal apron can be turned into a real work of art with the right approach. Exclusive decor can be created using a variety of techniques:
- satin stitch and cross stitch embroidery;
- applications;
- knitting;
- patchwork, etc.
Ideas from old magazines
A housewife does not always have enough ideas to create a truly beautiful and original apron for the kitchen. In this case, you should turn to old books on home economics or the Internet. For example, few people know that you can make an apron with your own hands from four large handkerchiefs or bandanas. And, given that the source material will have different colors, you can get a rather unusual color combination of kitchen utensils.
In the time of our grandmothers, women devoted a lot of time to careful housekeeping. Therefore, they did not throw away things that had served their purpose, but found new uses for them. For example, an ordinary men's shirt can become an excellent source material for making a kitchen apron. Many other interesting ideas for using old items can be gleaned from old magazines.
Work clothes for all family members
The choice of material and ideas for an apron are important and relevant issues for every housewife. But besides this, it is necessary to understand whether only the hostess will use it or whether other family members will also wear it. It's no secret that in some families men also have to perform women's duties in the kitchen. And, of course, the spouse will not experience great delight when he sees himself dressed in an elegant and flirty apron with lace frills.
Therefore, you need to immediately think through this moment and choose a pattern for an apron so that it looks beautiful on both a man and a woman. It is best for the apron or apron to be made from neutral-colored fabric. It can be green, blue, or different shades of beige.
Don't forget about children. You can sew special aprons for them - separate for boys and girls. A child who has his own kitchen clothes for work will feel more confident and will be able to realize his importance and usefulness, and parents will likewise be able to arouse children's interest in household chores.
OOD progress:
Educator: Hello, guys. Today a doll came to visit us, her name is Mila. But for some reason she is very sad?
Let's ask her why she is sad.
- Mila, why are you so sad, aren’t you glad to meet the guys?
- Well, I'm very glad. And I’m sad because guests are supposed to come to me tomorrow, I’ll bake a cake and I’m very afraid of getting my new dress dirty.
- No need to be upset. Come on, Mila, let's ask the guys what needs to be done to avoid getting dirty? (children's answers)
.
- That's right, guys, you need to put on an apron .
- Look, Mila, we have aprons and we are ready to help you. But they are not decorated . The guys and I will help you color it for you. Do you guys agree?
— I have several aprons with different patterns , let's look at them.
— What is this apron decorated with ? (stripes)
— Where are the stripes located on the apron ? (above and below the apron )
— Do you know how to draw a stripe ?
You need to place the entire bristle of the brush on the paper and draw a line from left to right without lifting the brush from the paper.
What color are the stripes on our apron , guys? (blue)
.
— What is the pattern between the stripes? (leaves and circles)
.
- Correct (leaves and circles)
.
How are they located on this apron ? (one piece of paper on the right, another on the left, and a circle between them)
.
- What great fellows you are, of course.
What color are the leaves? (green)
- Well done, green, of course. What about the circles? (red)
- Well done guys, the circles are red.
- To draw leaves for us , you need to attach the brush with all its bristles to the paper and remove it - now our leaf is ready.
- How to draw a circle ? (children's answers)
Okay, let's draw a circle and fill it in
— Let's look at the pattern of the second apron . Is it similar to the first one?
- That's right, guys, this apron has a different pattern . Three circles in the middle, and between them two leaves. aprons again , how are they similar?
— That’s right, the elements of the pattern are the same: leaves, circles and stripes.
— Tell me, where will you start decorating your apron ?
— That’s right, of course, with stripes, and between the stripes we’ll draw a pattern of leaves and circles.
The guys use these elements in the Dymkovo toy painting. The main feature of this painting is the arrangement of elements on a white background. The following elements are used in Dymkovo painting: stripes, cells, dots, circles, leaves, straight and wavy lines, etc. P.
Tile
Create a mosaic backsplash with your own design using small tiles in different colors. For example, in this case, dark brown floor tiles were needed.
You can also create a mosaic pattern by breaking large tiles into smaller pieces before attaching them to the wall. The result is similar to the previous one, but more chaotic, without clear lines.
If you like more formal shapes and colors, then pay attention to this combination of small tiles in white, brown and gray:
When using very small tiles, it seems that the colors transform into each other and shimmer. In the example in the photo, a dark color scheme was chosen, but with such tiles you can experiment with even the brightest colors.
The shape of the tile has a great influence on the result, for example, taking a hexagonal tile instead of a square one immediately achieves an original effect. It is especially good to take hexagonal tiles, which have some color transitions, like here from white to gray:
Using tiles you can achieve a 3D effect. To do this, lay the tiles not side by side at the joint, but overlapping each other, creating volume. For example, like in this case:
How to sew an apron 5th grade technology, in detail.
To begin with, as with sewing any product, you need to create a pattern. We have already told you above how to take measurements. So. Our pattern will consist of 2 rectangles 50*35 - the bottom of the apron, 20x22 cm - bib, 14x14 cm - pocket, 2 parts 6x40 cm for the straps and belt.
1. Fold the fabric in half. Pin the pattern onto the fabric using pins. We pin the top of the apron at a distance of 2 cm from the top.
2. Next, along the fabric, pin the remaining parts of the pattern, 1 cm each for a seam allowance.
3. Using chalk, pencil or soap, outline all the details of the future apron, adding 1 cm to the sides per seam.
4. After all the details have been applied to the fabric, they need to be cut out without breaking the pattern off from the fabric.
The apron is ready to open.
5. Let's start sewing the apron. Let's start with the straps. Fold each piece in half face to face. Next, take the iron and iron it thoroughly. Then take a ruler and, using a pencil, draw lines along the edge at a distance of 0.5 cm.
6. Next we sew the edges. We leave one narrow edge unstitched. This is necessary in order to turn the straps out.
7, Turn it inside out. We do the same with the second strap. After the parts have been turned out, they need to be ironed thoroughly.
8. Take the bib piece and unfold it. We place one part of the strap on the fold of the bib, and the second part on the edge, 1 cm from the edge.
9. Cover with the other half of the bib and pin in several places, namely: the top of the straps and on the side. You need to pin it on the side so that the strap does not get caught in the seam.
10. Sew the parts. The seam lines are indicated in the picture with black arrows.
11. Turn the bib inside out and iron it out. The bib is ready.
12. Take our pocket, secure it with pins and sew it on, leaving the entrance to the pocket open.
13. Fold the bottom of the apron 1 cm inward and stitch. For greater convenience, the seam can be ironed first.
14. After all the parts are ready, they need to be sewn together. Find the middle of the belt and the middle of the bib. We put the bib into the belt and sew it on. This is the detail you should get.
15. We sew the lower part of the apron in the same way.
Okay, let's iron everything. The apron is ready!
DIY children's aprons for the kitchen
If you sewed an apron for yourself, then it’s time to think about the children. Moreover, you don’t have to do everything yourself; you can involve the future owner in the process of sewing the apron. Try to bring him up to date - what fabric the apron pattern will be made from, what style it will have, how you will decorate the apron with a bib.
For a children's apron, a similar sewing technique is used as in the case of an adult apron. True, you should place more emphasis on decorating this product.
We sew an apron with a bib for a child with our own hands
The first step is to take your child's measurements. After this, based on the results obtained, draw up a pattern on paper. Next, you need to cut it out and attach it to the fabric, using chalk to mark the outline of the future product. Usually a satin ribbon is sewn onto the edges of a child's apron, so there is no special need for seam allowances.
When the main part of the apron is ready, you can add details. Although the pockets can be made classic, the baby will be pleased if you show your imagination here and make them in the form of fruit, for example, in the form of an apple or a pear. You can easily find the required template on the Internet.
Before you start sewing on the satin ribbon, you need to fold it in half, iron it and you’re ready to start. To make the edges of the apron look neat, it is necessary to make an edging seam on it. With the harness at the top of the apron, through which the child’s head will be threaded, proceed in the same way as with a satin ribbon - before sewing it, it must be folded in half.
To make pockets, you can choose a fabric that is different from the main part of the product, both in color and texture.
But you don’t have to stop there either. You can go further and decorate your apron with cross stitch on a special border. After this, the resulting elements can be sewn to the top of the apron.
Don’t forget that you are making an apron for a child, and therefore decorate it with appropriate decor - knitted flowers, butterflies made from buttons, funny animal appliqués.
Summary of GCD in the middle group in fine arts "Apron for Katya's doll"
Summary of educational activities in the middle group (4-5 years old) “Decorating an apron” on artistic and aesthetic development (drawing).
MBDOU No. 16, Vyborg
Prepared and conducted by Irina Vyacheslavovna Nikishina (educator)
Target:
Develop the ability to express your idea through drawing, using straight and rounded lines. To develop in children a sense of color and composition, to independently arrange elements of the ornament on the form (in the middle, along the edges, in a straight line).
Tasks:
Educational:
Expand and enrich children’s ideas about professions, tools, and labor actions. Develop the ability to express your ideas through drawing.
Developmental
: Develop the ability to construct complete answers, the ability to listen carefully. Develop memory, attention, logical thinking, fine motor skills.
Educational:
Cultivate respect for people of different professions. Foster feelings of responsiveness and mutual assistance. Raise children to be tidy: keep your work area in order.
Equipment:
apron silhouette, red, yellow, green gouache, water jars, napkins, brush stand, Katya doll, display board, equipment for displaying image techniques.
Individual work.
Progress of the lesson
Problem situation:
- Hello guys. Today the doll Katya came to visit us. But why is she very sad?
- Katya, why are you so sad, aren’t you glad to meet the guys again?
- Well, I really love coming to visit you. And I’m sad because guests are supposed to come to me tomorrow, I’ll bake a cake and I’m very afraid of getting my new dress dirty.
- Come on, Katya, let’s ask the guys what needs to be done so as not to get dirty?
- That's right, guys, you need to put on an apron.
- Look Katya, we have aprons and we are ready to help you. Here, only they are not decorated at all. The guys and I will be happy to color them for you. Do you guys agree?
- Guys, do we have aprons in our group? Let's all look at them together.
—What is this apron decorated with?
- That's right, leaves and flowers. How are they located on this apron?
- What a great fellow you are, of course, one leaf is on the right, the other is on the left, and between them is a flower. What do the flowers look like? (mugs). What color are they?
-How to draw a flower?
-Great, well done, let’s draw a circle and fill it in.
-How can we draw leaves?
-You need to attach the brush with all its bristles to the paper and remove it - our leaf is ready.
- Guys, what color are the strings on our apron? That's right, yellow.
- We will draw it with a thin strip, trying not to take our hands off the paper.
Apron for dad
In many families, men love to cook, and some even claim to be the best family chef. Therefore, such a man simply needs an apron.
We will sew it from polyethylene, like aprons for children and for mother.
We build a base pattern, substituting our own measurements.
Our sample pattern is made for sizes 52-54.
We cut out an apron and pockets from polyethylene and prepare the bindings.
Pocket width - 68cm, height - 25cm.
The width of the tape is 3.5 cm, and the length:
- 28 cm - for edging the top edge of the apron
- 172 cm - for edging the lower and side (straight) cuts
- 134 cm - for edging concave sections turning into ties (2 pcs.)
- 68 cm - for processing the upper edge of the pocket
- 25 cm - pocket partitions (2 pcs.)
We process the pockets and edges of the apron with trim.
The base of the apron is ready. Decorate with applique from bags and sew on letters.
Application
The picture of the cook was taken from the Internet and printed on A4 sheet.
We cut out a circle from bags folded 4 times, with a diameter of 32 cm.
In our version, the circle is made of two halves, since only narrow garbage bags remain in the rolls.
Next, we sewed a circle to the apron and then decorated the chef. But it's better to do the opposite. First, sew the chef's emblem onto the circle and only then attach the circle to the apron. This makes it more convenient to sew on a sewing machine and prevents creases from forming on the base of the apron.
The chef's face, hands, pants, boots, tie and buttons are made from multi-colored folders - file binders. The shirt, cap and letters are made from a thick white bag.
The eyes, nose and mouth were drawn with a black permanent marker that does not wash off.
The letters were typed on a computer, printed on paper and cut out. The height of the letters was 4.5 cm.
We traced the letters on a thick white bag, cut them out and stitched them onto cellophane tape. Then they sewed it to the product.
The apron for dad is ready.
So we have completed sewing aprons with our own hands for the whole family. They turned out beautiful, comfortable and original. Surely no one has such aprons.
The whole family is now dressed in a chef's uniform and can begin making culinary masterpieces. After all, preparing delicious dishes with a friendly family is great and fun.
We wish you inspiration and creative success!
Preparing for the lesson “Decorating an apron”
Decorative drawing classes for children aged 4–5 years are aimed at solving two main problems:
- develop brush skills,
- develop the ability to put together a pattern from simple elements.
Decorative drawing in the middle group is painting a blank with a brush and paints
Paints and base for painting
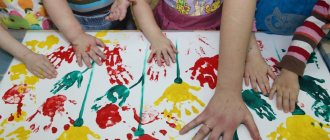
- Gouache is the best option for painting an apron. The paint picks up well on the brush (without water), goes on smoothly, and the patterns come out bright and clear. Gouache can be painted on a white or colored background, the decoration will not merge with the base.
- Watercolor is acceptable. But only for drawing on a dense white base. The teacher carefully monitors how the children collect water and paint to remove excess moisture, otherwise they will drip onto the drawing or the patterns will spread. Gouache is easy to apply to a brush, it is an ideal paint for five-year-olds
- The basis for drawing an apron is usually 1/2 A4 sheet: made of thick white paper, the teacher can pre-tint it with watercolors,
- from colored cardboard.
The teacher can cut out an apron blank for class
Sometimes children are asked to decorate apron blanks with colored pencils. It is not right. Colored pencils are used in the middle group for object drawing. In decorative drawing, kids can use a simple pencil to draw a stencil: they trace the apron on paper.
Techniques and drawing techniques
- Preliminary repetition and training of each technique: children “draw” circles and lines in the air with a dry brush,
- chalk on a blackboard (marker on a special board).
- leaves in a floral design: apply the brush with all its bristles to the paper and remove,
Important. The teacher monitors the completion of the practical task by the children. For those who have difficulty drawing, he shows techniques individually.
Children improve their gouache painting techniques under the supervision of a teacher
This is interesting. Painting an apron can be done with five-year-olds using an unusual technique. The guys will decorate the blanks using non-traditional materials and tools:
- wax crayons,
- cotton swabs or disks,
- pieces of sponge,
- fingers,
- stamps from vegetables or fruits.
It’s easy to make an unusual pattern on an apron by drawing with your fingers on wet paper
Combination with applique and modeling
When creating an “Apron” craft, drawing, applique, and sculpting techniques can be used. An apron painted with a pattern is perfectly complemented by various elements:
- pieces, strips of colored or wrapping paper,
- plasticine mosaic,
- strokes of plasticine,
- dried flowers, leaves,
- buttons, sequins.
The apron pattern can be complemented with a composition of autumn leaves, for example
Kids love decorating with stickers, glitter and other accessories. If access to these materials is opened at the beginning of practical work, the kids will make the craft in the form of an applique from all kinds of pieces and pictures. First, the children draw a pattern, and then the teacher brings a “magic box” with new decorations.
Individualization of tasks
Productive work and a good mood within the group are promoted by simple tasks aimed at satisfying the personal tastes and interests of the children:
- Take apart the apron blanks: round, triangular, with a frill - whoever wants which one.
- To decorate the apron, use colors and shades as desired.
- You can decorate the drawing with additional materials: applique, stickers.
For five-year-olds who show increased interest in drawing, the teacher complicates the overall task. For example, he asks to draw a flower arrangement in the center of the apron when the group draws one flower.
Children's work is not standard, each apron is unique and beautiful
Place of the lesson “Decorating an apron” in the drawing file
Decorative drawing in the middle group is conventionally divided into decorating blanks in the form of household items/clothing (sweater, mittens, dress, napkin) and painting in the style of folk crafts (Khokhloma, Gzhel, Dymkovo toy). The theme “Apron Decoration” is universal. Children can decorate an apron with a geometric/floral pattern or a folk ornament - this is determined by the teacher. A lesson is held in the middle of the school year, when the children study the topic “Clothing” and begin to get acquainted with folk art.
Theme options:
- "Mom's apron"
- "Magpie Apron"
- "Apron for Dymkovo toy"
- "A gift to my beloved grandmother."
While painting an apron for the Dymkovo young lady, the guys get acquainted with folk geometric patterns
Decorative drawing classes allow you to show children in a playful way that you can make plain things beautiful with your own hands or create a gift for a friend or relative. The introductory stage of the lesson is aimed at creating motivation in children to study patterns and create independent creativity.
Table: options for a motivating start to the lesson “Decorating an Apron”
For five-year-olds, it is enough to consider several figures with different options for painted aprons
Painting with stencils
Painting is a quick and easy way to update a kitchen wall. You can paint it in one or more colors. The last option is convenient and easy to implement using stencils. With their help, you can make a beautiful pattern or inscription, creating your own style.
For example, here the wall was painted black, and then the inscription was applied in white using a stencil.
You can also create geometric patterns. Moreover, in this case, you can make the stencil yourself using masking tape.
Master class on how to make patterns and drawings on the walls
And another option for stencil painting:
Also, painted walls can be decorated with additional decorative elements. For example, this kitchen apron was painted using stencils, and then hearts were glued on top, which go wonderfully with the chosen pattern:
Love the tile pattern but don't want to bother laying the tile? Then try options to imitate it. For example, here is a wonderful example of painted white tiles. All you need is paint and precise markings of the wall.
MAGAZINE Preschooler.RF
Summary of the lesson on artistic creativity “Decorating aprons with Dymkovo painting”Lyudmila Solomeina
Open lesson on artistic creativity “Decorating aprons with Dymkovo painting”
Goals and objectives:
Continue to introduce children to the Dymkovo painting pattern, consisting of circles, rings, dots, and dashes. Draw a pattern on the silhouette of the apron of the Dymkovo young lady.
Learn to draw lines with the end of the brush; dots - using a poke technique; with the whole brush - circles, rings.
Develop aesthetic perception, sense of color; the ability to use bright, rich colors of paints in Dymkovo painting: red, green, blue, yellow.
Cultivate interest in folk traditions and decorative and applied arts.
Create interest in the Dymkovo toy.
Activate words and expressions in speech: young lady, apron, Dymkovo pattern, poke, paint, burn, temperature, horizontal lines.
Previous work:
- examination of Dymkovo clay toys, illustrations of them, album “Dymka”
- painting silhouettes of Dymkovo horses and dogs on paper
- sculpting a duck with ducklings
- conversation about the technique of making Dymkovo toys
- independent work in the artistic creativity corner.
Material for the lesson:
- Aprons pre-cut by the teacher.
- Illustrations with Dymkovo painting.
- Illustrations with silhouettes of Dymkovo young ladies with white aprons
- easel
- gouache, brushes for painting.
Organization and methodology:
Children sit in a semicircle. The Dymkovo young lady enters.
- Hello guys!
-Who do you think I am? (Dymkovo young lady)
- What village do I live in? (in the village of Dymkovo)
- Who makes Dymkovo young ladies like me? (folk craftsmen)
- Guys, I can see from your attentive eyes that you know how folk craftsmen sculpt and paint Dymkovo toys. Do you know? (Yes)
Let's tell a fairy tale together. I'll start, and you help me:
- “A long time ago, far, far away, behind dense forests, behind green fields, on the banks of a blue river there stood a large village...” (Dymkovo). Once upon a time there lived people (craftsmen). Folk craftsmen loved their work and sculpted beautiful and funny toys from clay. What toys did you make? (children list the names of the toys: goat, lamb, horse, water-bearing lady). But they hid, look! (a magic flannelgraph screen opens, among the toys there are sample young ladies). What other toys haven't been named? (children's answers). Do you like these toys? What are they? (bright, beautiful, elegant, colorful). There are miracles in fairy tales; whoever recites a poem about a toy will . ” (children read poems about a horse, a young lady-nanny, a goat, a young lady-water-carrier) A voluminous toy appears from the chest on a tray.
The tale is told, but the deed is done.
—What were the toys made from? (made from clay)
— What color clay did you use? (red clay)
— After sculpting the figures, what did you do? (dried at room temperature)
- And then? (placed in a kiln at high temperature)
- What happened after the firing? (whitewashed with white paint and painted)
— What did they decorate Dymkovo toys with? (colored pattern)
— What paints did you use? (bright, red, blue, green, yellow)
— Look what elements the craftsmen used? Showing examples of painting. (circles, rings, dots, dashes)
The young lady shows on a sheet of paper drawing circles, rings, dots together with the children explaining how to draw.
— Tell me, is the pattern painted in one color? (different colors)
“Well done, guys, they helped me tell a fairy tale about Dymkovo toys.” And in fairy tales there are songs and round dances.
Physical education minute:
Round dance “Sudarushka” (to a Russian folk melody)
- Look, my girlfriends are waiting for you in bright sweaters and kokoshniks, but for some reason they are sad? (apron without pattern)
“Now I’ll turn you into folk craftsmen, and you’ll paint aprons for my girlfriends.”
The young lady says the magic words: “Crible, crable, boom”
- Go behind your workstations and work wonders, paint your aprons with a familiar pattern.
The young lady is doing individual work: Where will you start drawing?
What color of circles will you choose? How will you draw the rings? Where will you start drawing circles? etc.
Independent activity of children. Children paint silhouettes of Dymkovo young ladies.
Upon completion of the painting, you are invited to look at all the works.
Young lady: “Thank you guys, you decorated my girlfriends’ aprons so beautifully and neatly. We chose the right paint color and painting elements.
- What is the name of the pattern on the apron? (Dymkovo pattern)
- Well done boys. I will definitely come to you again with my Dymkovo friends.
| Next > |
DIY apron: exclusive models ↑
An elegant piece of kitchen wear can transform a tired housewife into a tireless and radiant lady.
In such outfits it is impossible to feel like a housewife who has a lot to do. In them a woman always remains a woman
If your sewing skills are above the “for dummies” level or you have knitting and crocheting skills, try to make something original and elegant.
A real craftswoman worked on the product
Some housewives recommend having two aprons: one for work, and the second for decorative, festive purposes. A day off in case of guests coming or for a bachelorette party in the kitchen.
White color is ideal for elegant clothes; it can be decorated with flounces, frills or lace trim; it will turn from work clothes into a flirty detail of the hostess's toilet.
The silhouette is straight and the style is the most simple, but the white color, embroidery and lace inserts turn it into a real outfit for the kitchen
Many types of handicraft are triumphantly returning to our lives, filled with soulless and uniform industrial products, and are replacing them. After all, the same apron can be turned into a unique work of art using different techniques: satin stitch and cross stitch, appliqué, knitting, patchwork.
This item won't protect you from dirt, but it looks truly elegant.
Made using the patchwork technique, it looks original, but its production requires certain sewing skills
Sewing an apron
Processing the apron skirt
Finish the side edges of the apron skirt using a closed hem stitch using a sewing machine. Then process the bottom section of the skirt in the same way. Select threads to match the color of the fabric. Before using the sewing machine, check the thread tension and stitch length. Don't forget to backtack the machine at the beginning and end of the stitching. You can, before starting to work on a sewing machine, fold the seams and lay hand running stitches, for the convenience of laying a machine stitch. After completing the work, remove the running stitches and iron all seams with an iron and steam.
Processing pockets
Fold the top edge of the pockets by 1.0 cm, and then fold them again by 2.0 cm. Pin them together, machine sew them 0.1-0.2 cm from the edge, and iron them. Then fold the sides of the pockets 1.0 cm and make hand running stitches, also fold the bottom edge of the pockets.
Sewing pockets
On the apron skirt, mark the location of the pockets with chalk lines, attach the pockets, pin them together, secure with hand stitches and machine stitch along the side and bottom edges by 0.1-0.2 cm. Be sure to put machine fastenings at the beginning and end of the stitching. Remove the basting threads, remove the pins, check the symmetry of the pockets and iron.
Location of pleats on the skirt
According to the model, the apron skirt has three counter pleats. We mark the location of the folds along the upper section of the skirt. To do this, divide the skirt panel in half and find the center of the apron skirt. The width of one fold in the cut is 18.0 cm, from the center of the skirt we set aside half the width of the fold (18.0/2 = 9.0 cm) in one direction 9.0 cm and in the other direction 9.0 cm. Then from the line edges of the central fold, set aside the width of the second fold (side) = 18.0 cm. In the same way, from the other edge of the central fold, set aside the third (side) fold = 18.0 cm. We mark three lines on the folds: central and two lateral.
Making pleats on a skirt
Next, we connect with pins, along the upper edge of the skirt, the side lines of the folds with the central ones, so that the folds of the folds meet each other. We lay a machine or hand running stitch along the folds 0.7 cm from the top edge of the apron skirt.
Processing the bodice of the apron
Process all sections of the apron bodice, except the bottom section of the bodice, in the same way as processing the apron skirt described above.
Processing the loop for the apron bodice
We bend the prepared part in half lengthwise with the right sides inward, combine all the cuts and corners, pin it together and stitch it on a machine with a seam width of 0.7-1.0 cm. In the middle of the stitch we leave a small gap in order to turn the loop right side out. At the junction of the stitches in the corners of the loop, it is better to put bartacks so that the corners do not spill out when turning them out. After the entire loop has been turned, you need to cut out the corners with scissors, not reaching the line 0.2 cm.
Now we turn the loop right side out, straighten the corners, sew the piping into the split (align the seams with hand stitches), secure the gap through which the loop was turned out with hidden stitches and iron it.
Sewing a loop to the bodice of the apron
We measure the required length of the loop, in accordance with your figure, sew one end, then the second end of the loop to the upper corner of the apron bodice. If your machine has a buttonhole function, you can sew the buttonholes on the apron bodice in the upper corners. And sew buttons onto the loop of the apron, thereby you can adjust the size of the apron by altering the buttons.
Connection of skirt and apron bodice
Fold the skirt and bodice of the apron with the wrong sides inward, combine the cuts along the bottom (bodice cut) and top (skirt cut), align the side seams of the skirt and bodice, pin together, baste with hand stitches, then sew on a machine with a seam width of 1.0-1, 5 cm. Remove the basting threads and iron the seam towards the bodice.
On the finished belt we find the middle of the belt, i.e. center. Then we apply the belt to the bodice of the apron, align the center of the belt with the center of the apron, so that the fold of the belt covers the seam connecting the bodice with the skirt by 0.1-0.2 cm. Pin the belt to the skirt, and then to the bodice of the apron. We make hand stitches first from the side of the skirt, then from the side of the bodice, sew on a machine 0.1-0.2 cm from the edge of the belt to the side seams of the apron.
Remove the basting threads, iron the seams with an iron and add steam. Check the quality of tailoring and correct any shortcomings.