From an early age, children begin to draw and pick up pencils. It is known that visual activities develop a child’s brain and fine motor skills well. This article tells you how to teach drawing simple flowers with petals in a vase to older children.
A fine arts lesson in kindergarten “Drawing a vase with flowers in the preparatory group” can be timed to coincide with the holiday of March 8, Mother’s Day or Teacher’s Day.
Pictures with flowers
GCD tasks
Goal: developing skills in depicting flowers on paper, teaching the basics of composition.
Tasks.
- Educational: learn to correctly place and depict flowers on paper, build a composition.
- Educational: to cultivate love for loved ones, accuracy in work, patience and perseverance.
- Developmental: develop imagination, imaginative thinking, develop a sense of beauty, train fine motor skills.
Equipment and materials: landscape sheet, simple pencil, eraser, brushes, paints (watercolors are recommended, but gouache can also be used), a jar for water, napkins. Images of large flowers (gerbera, chamomile, poppy, peony, cosmos, zinnia).
Handouts: album sheets, vase templates cut out of cardboard.
Audio recording: A. Vivaldi “Spring”.
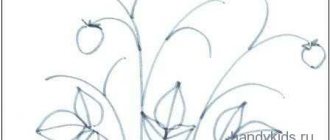
How to draw a snowdrop with a pencil step by step
Step one.
Let's start with simple lines. Let's first outline the dimensions (height and width) of the future flower. Mine is slightly smaller than a piece of A4 paper. Let's draw a curve indicating the stem. It looks like a palm tree. Step two.
Let's add some curvy lines at the top. Step three.
Now the same beauty, only from the side. Step four.
Let's move on to drawing the flower itself. Remember that we are , not Chinese characters, so try to make it more realistic. Step five.
Let's draw another leaf at the bottom. Step six.
Now I trace the outlines with a black pen and color it. Here's mine: (this is scanned)
Introductory conversation. Discussion of the topic
The teacher conducts a conversation with the children. Asks questions about what time of year it is? What holiday will be soon? Children remember that on this day it is customary to give gifts to all women in our country; they will love the flower painting they made with their own hands. The children's drawing can include tulips in a vase, roses, or other simple options for depiction in the preparatory group.
Important! The teacher invites the children to draw beautiful spring flowers for all the mothers and arrange an exhibition of drawings so that adults can look at the wonderful drawings.
First you need to look at the plants; children cannot draw them from life, so the teacher shows pictures with close-up photographs of flowers. You need to pay attention to the shape, it looks like a circle that consists of petals, ask the children what parts any flower consists of, in the middle they have a center in the form of a circle, specify the color, green leaves are attached to the stem. There are many beautiful plants around, but flowers are the most festive and brightest of them all; they will help create a joyful mood.
Important! If children draw tulips in a vase in the preparatory group or roses, then you need to select pictures with them, consider what shape the tulip has.
Didactic games on speech development for the middle group
Vase with Flowers
For those who want something more complex, the topic of how to draw flowers in a vase will be interesting. Here another element already appears - flowers, which also need to be depicted correctly. It is advisable to start with daisies or similar simple flowers.
Markings are made for the vase - a vertical central axis and horizontal sections for the bottom, top and expanding part.
The contour is outlined with lines, the bottom of the vase is drawn with an oval. The top of the neck can also be marked with an oval, or you can skip this step. This point depends on the colors and whether they will cover the neck.
Next you need to make a rough sketch for the flowers. The marking depends on whether they will be single or there will be a composition in the picture.
If this is a bouquet, then a circle is depicted above the top of the vase, inside which individual flowers are already drawn. To add volume and liveliness, some petals and leaves should cover the neck of the vase partially or completely. The buds and the level at which the flowers are located should also be different.
The next step is to add volume to the vase. Already in a familiar technique, dark places are shaded, thereby highlighting the light and shadows on the subject.
Colored pencils will help bring flowers to life. For greater brightness, you can outline the outline with markers of suitable colors.
Over time, when progress in drawing becomes more noticeable, you can create more complex compositions. Add fruit, more items, fabric, etc. But even by themselves, vases drawn with a pencil can become a full-fledged painting and decoration. Children will be able to create a beautiful card on their own and congratulate their mothers or grandmothers.
Practical part of the lesson
Stage 1. Pencil sketch
Children take a landscape sheet and place it vertically in front of them. Select a vase template, prepared in advance, and trace it with a simple pencil. The teacher shows in advance on the sheet where the template needs to be attached; before the child traces it, you need to make sure that the template is correctly positioned on the sheet.
Important! The teacher draws the children's attention to the fact that the template needs to be placed at the bottom of the sheet in the middle, so that there is plenty of space left at the top.
Using a simple pencil, mark the center of the flowers at the top and draw three small circles; you may need the help of an adult to mark the circles on the sheet. If your child fails to draw it correctly, you can erase it with an eraser and draw it again.
With the help of the teacher, children draw lines from the circles to the vase with a simple pencil; these will be flower stems; the line can be curved. The vase will be opaque, so the stems are drawn only to the top edge of the vessel.
Note! Children should be told not to put too much pressure on the pencil, draw the lines lightly, barely touching, otherwise the sheet of paper can be damaged and the pencil will be visible through the layer of paint.
Stage 1. Pencil sketch
Stage 2. Picture of flowers
Children take brushes. Both watercolors and gouache are suitable for this type of work; you should definitely repeat the rules of working with brushes with your children.
The teacher helps the children choose a bright color that mothers will be pleased to see; it can be orange, yellow, blue, red. The teacher selects orange and shows on a sample how to draw petals. You need to dip the brush in a jar of water, wet it slightly, and dip the tip in the chosen paint.
Important! Children need to be reminded that there is no need to wet the brush too much in water; excess water should be wiped off on the edge of the jar. Do not shake the brush; you must carefully apply the liquid with the tip of the bristles.
The teacher shows how to find the center of a flower, draw a loop around it, then paint it orange. Draw another loop nearby and also paint over it until they finish drawing all the petals around the center. The circle in the center is not painted over, left white. For the remaining gerberas, you can take a different color and draw the same petals around the center.
What should be in the fire safety corner in kindergarten
Now you need to paint over the middle, to do this you need to dip your brush in blue pigment and paint over all the flower cores.
Wash the brush again in water, pick up a grassy green color, draw it along the line outlined earlier, this is how you get a stem.
Note. The teacher reminds that you need to add plant leaves, ordinary semicircular leaves, to the stem.
Stems without leaves look unsightly and the flowers appear lonely. For each line you need to draw a leaf or two on the side. The teacher helps to draw an arc with a brush with green paint from above and below, and paint over the resulting leaf; you need to draw a line in the middle of the sheet. So we depict one leaf on each stem, or you can make several leaves. You need to look carefully at the stems, if there is empty space left, then you need to draw a leaf there to make the bouquet for mom seem more magnificent.
Stage 2. Flower image
Stage 3. Coloring a vase
The teacher reminds you that you need to paint the vase. To finish the drawing, you need to put yellow color on the brush, do not wet the sheet of paper too much. It is important to paint the pot without going beyond the contour line to make it look neat. When the moisture dries, you can decorate the vase with a pattern of your choice. Children take paint of a different color and draw a pattern of lines, dots and circles.
Note. For children who quickly completed the task, you can offer to decorate their vase with a pattern of peas, lines, dots, and sticks. To do this, the teacher needs to draw possible variants of the patterns in advance in order to clearly show the children what such an ornament might look like.
During the lesson, the music of A. Vivaldi “Spring” is played.
As the task progresses, the teacher monitors the correct observance of all stages of the work and provides assistance in the form of recommendations and brush movements. Ensures accuracy in work and correct application of paint, helps children if the paint has spread.
Stage 3. Finished drawing
Vase for beginners
It may seem that an ordinary vase is not something complex in terms of image. In fact, even here certain knowledge and skills are required. Therefore, it is important for beginners to understand and understand how to draw a vase step by step.
The basis of any drawing is a sketch. In this case, you need to make markings using axes. The central and main line will be a vertical straight line. It is limited from below and above by two horizontal segments. These are the basics of the future neck and bottom of the vase. The widest part and the narrowest point are also additionally indicated.
Straight light lines outline the outline. These markings are temporary, so there is no need to press hard on the pencil.
Inside the resulting limiters, the real outline of the vase is drawn. Smoother curved lines connect the main marking points.
For the neck and bottom, it is advisable to outline proportionate ovals, but you can also get by with smooth curved lines.
To create volume, the vase needs to be shaded or shadows applied to the places furthest from the light source. The density of the hatching depends on the distance of a certain part of the surface from the light.


