Necessary materials
As mentioned above, most crafts will only require paper. To ensure that your work turns out bright and of high quality, you should use office paper, as it is stronger than ordinary children's colored paper. But, like the rest of the world, the art of origami is developing and improving, so some products will require scissors and glue. For example, for modular origami you will need scissors in order to cut the paper into the necessary pieces.
For this type of oriental art, there are also special sets of square paper in pastel shades measuring 10x10 cm. But before buying such a set, you should first study the specific pattern: each craft needs its own size.
For ease of folding, a wooden stick is also used, but it can be successfully replaced by a regular pencil.
For kids, choose paper in brighter shades, but such that its color resembles the color of a particular animal. For example, orange paper is suitable for a fox, gray paper for a mouse, brown paper for a dog, and green paper for a frog. Then the lesson will become doubly interesting.
How to make a paper duck using origami technique
In this master class we will show you step by step how to make a duckling from single-sided yellow paper using the origami technique. Photo 1.
To make the duckling we prepared:
[*]a square of yellow single-sided paper with a side of 10 cm; [*]a rectangle of the same paper measuring 10x5 cm; [*]glue; [*]plastic eyes.
We will use a square to make the body of the duckling, and a rectangle will be needed to create its head. Let's start with the torso. To do this, fold the yellow square in half with the white side inward.
At the place of the fold we mark the middle, and then bend the sides at an angle (they must be symmetrical).
Then we bend these corners down again.
We make the same fold on the other side.
We will now bend the lower corners to the sides. At this stage, you can use glue to fix all the layers.
On the reverse side we see the resulting blank for the duckling's body.
To create the head, take a rectangle and fold it in half, with the white side on the inside.
Fold the bottom edge of the top layer up.
Then we make folds on the sides in the form of small triangles. Secure them with glue.
Then you need to bend these corners again as follows. Let's use glue again.
Fold the top corners to the reverse side. This is the template for the duckling's head.
We connect it to the body.
Add plastic eyes. Our paper duck is ready.
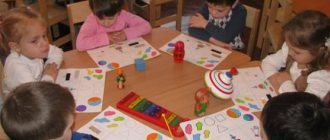
Summary of a lesson on construction with children of the second junior group “Den for a Bear”
Goal: Formation of socially significant moral qualities in children of primary preschool age.
Objectives: To repeat material about preparing wild animals for winter, to develop children’s speech, to repeat a poem about snowflakes, to develop responsiveness in children, to develop the ability to work with a construction set, to repeat knowledge of the basic colors and details of a construction set, to develop the ability to find a part from a description.
Equipment: Toy bear, envelope with a letter, large construction set, scarf, audio recordings of the Zheleznovs “Bus” and “The Bear is Dancing.”
Progress of the lesson
Guys, I came to work very early today, and the watchman gave me this letter. I read it and realized that I couldn’t cope without your help. Would you like me to read it to you?
"Dear Guys. Mishka-Toptyzhka is writing to you. I am still very small and do not understand what is happening around me. It became very cold outside. Squirrel says that winter will come soon. She dried mushrooms, berries, and stocked up on nuts. The bunny changed his gray fur coat to a white one. But I don’t know how to prepare for winter, for some reason I always want to sleep. Help me please!"
Guys, who is this letter from? What does Mishka - Toptyzhka write to us about? Why do you think he wants to sleep all the time now? What do bears do in winter? Where do they sleep? And Mishki-Toptyzhka has no den! I think we should quickly get on our magic bus and go help Mishka build a den. Do you agree?
Children turn around their chairs, the teacher-driver performs movements to the music of the Zheleznovs “Bus”.
Here we are in the forest, get off the bus. Guys, I don’t see Mishka. Look right, look left. You see? How can we find him in the forest? (Children offer options). Let's dance his favorite dance, he will hear and come to us!
Zheleznovs “The Bear is Dancing”
And here comes Mishka.
"Hello guys! Thank you for coming! You will help me now and tell me everything! Why did the squirrel dry the mushrooms and berries? Why did the bunny change his fur coat? How should I prepare for winter? Should I also change my fur coat? (No, bears sleep in winter!) Where should I sleep? But I don’t have a den..."
Guys, let's build a den for Mishka! What can we make it from?
Which construction set is more convenient for us to take in order to build faster: large or small?
The teacher gives each child the task of which construction piece to bring. For example: “Zhenya, bring a big red cube.” Children, under the guidance of a teacher, build a “den” together. The teacher asks to arrange the parts in a certain order, sorting by shape, color, and asks what the roof (scarf) can be made from. They put Mishka in the den and cover the top of the den with a scarf. Guys, to make Mishka warmer, we now need to cover the den with snow. We started learning a poem about snowflakes, let's tell it, stand around the den, repeat after me!
A snowball is quietly falling on a clearing, on a meadow,
Snowflakes and white fluffs are spinning,
They flew, rushed and lay down under the tree,
Snowflakes and white fluffs sleep quietly.
Children recite a poem in chorus and perform movements corresponding to the text.
Our snowflakes covered the entire earth with a blanket of snow. Mishka will be warm and cozy in his den; he will not be afraid of any frost. It's time for us to return to kindergarten. Take your seats on the bus quietly so as not to wake Mishka. I'll turn on the music quietly too. Ready? Go!
Here we are again in kindergarten! Where did we go? What were we doing in the forest? What did we litter the den with? And I have a little surprise for you! While you were getting on the bus, I took a photo of Mishka sleeping in our den. And I want to give it to you all as a souvenir. You can tell at home how you helped Mishka prepare for winter and color his photo (black and white drawing).
The teacher gives each child a drawing of a bear cub sleeping in a den, reading a poem by I. Tokmakova:
“Like there is snow on a hill, and snow under a hill,
There is snow on the tree, and snow under the tree.
And a bear sleeps under the snow. Hush hush. Keep quiet! »
Title: Lesson notes on construction with children of the second junior group “Den for a Bear” Nomination: Kindergarten Lesson notes, ECD / play activities Author: Svetlana Rudolfovna Rybchenko Position: teacher Place of work: Municipal educational institution “Elementary school-kindergarten No. 109 “Bukvaryonok” Location: Vologda
Date modified: December 2, 2015 Date published: December 2, 2015
Origami bunny - diagram for kids
By folding a few square pieces of paper we can make the bunny shown in this master class.
To make the craft we will prepare:
- 2 squares of orange single-sided paper;
- glue stick;
- scissors;
- decorative eyes;
- black felt-tip pen.
From one square we will make a head with ears, and the second orange square will be needed to create the bunny’s body. Let's start by folding the square diagonally.
Then we cut it along the fold line. We get 2 triangles. From one we will make a head, and the second triangle will be needed to create the bunny ears.
Let's start with the head. To do this, bend the top of one triangle so that the white side is on top.
Then we will bend another small corner on the muzzle.
Let's form the sides; to do this, bend the edges of the workpiece at a slight angle.
Additionally, we will make folds at the bottom.
We take the second triangle and start making ears from it. To do this, bend the top as follows.
Then you need to bend the right corner up.
Fold the left corner symmetrically. The completed folds can be glued. These are the ears for a bunny.
Glue them on the back side of the muzzle.
Let's start creating the body. To do this, bend the remaining square diagonally.
We bend the side corners of the resulting triangle upward.
Then fold back the small corners. These will be the paws of the future bunny.
To finally form them, you will need to carefully unfold the entire square, and then turn the small corners to the other side. Our bunny got these white paws.
We connect the head and torso together.
All that remains is to design the face. We do this with a black felt-tip pen and also glue on the eyes. We made such a paper bunny.
Hippopotamus
Photo: chelovechki.net: UGC
All you need to assemble origami is a thick sheet of A4 paper and scissors. Proceed with assembly like this:
- Fold the sheet into a square and cut off the excess.
- Fold the resulting square diagonally, clearly marking the fold line.
- Expand the sheet. Now fold 1/3 of the opposite corners towards the center, as shown in the diagram.
- Next, fold the craft along the first fold line.
- Fold the upper corner of the resulting triangle to the left.
- Now straighten and smooth the resulting pocket. This will create the head of a hippopotamus.
- Make the ears and mouth of the animal. To do this, fold the side and bottom corners with a step.
- Fold the corner of the body inward, forming a pocket fold. This will create the hind legs of a hippopotamus.
- Use scissors to make a rectangular hole in the middle of the body.
The origami hippo is ready. All that remains is to finish drawing or gluing on the animal’s eyes.
Owl using origami technique - diagram for kids
The origami technique can be both complex to make and simple, when even small children can handle the crafts. In this master class we will demonstrate an easy way to create an owl from a simple square of paper.
To make such an owl we need to take:
- square of single-sided brown paper;
- glue;
- orange felt-tip pen;
- a pair of large plastic eyes.
First, we must make diagonal folds on the square piece. To do this, fold the square in half, it takes the form of a triangle.
Then we make an additional fold along the other diagonal, after which we place the square with the white side up.
We pay attention to the vertical fold, or rather, to its upper half. This part needs to be visually divided into 3 parts, after which one third should be folded down. You can immediately use glue and fix this corner.
We bend the opposite bottom corner up so that it touches the top. Here again we take glue and fix this fold.
Now we bend the sides, do it symmetrically, this is how we made the owl’s wings.
We bend a small part of the previously bent corner in the opposite direction, this will be the owl’s beak.
Color it with an orange felt-tip pen.
Glue on large plastic eyes.
All that remains is to mark the plumage of our bird; for this we will use a black felt-tip pen.
Our paper owl is ready.
Dog
Photo: vishivashka.ru: UGC
This paper origami consists of two parts - the head and the torso. Therefore, you will need two squares of colored paper. Here are the step by step steps:
- Fold the square diagonally and turn the folds towards you.
- Bend the workpiece in half, mark a line and straighten it.
- Now make the dog's ears. To do this, bend the upper corners of the figure down.
- Bend the top corner of the head back, and the bottom corner inward using the pocket fold method.
- The head is ready. Move on to the torso.
- Bend the square diagonally and straighten it out.
- Turn the sheet towards you at an angle. Fold the two extreme side corners of the diamond inward.
- Bend the remaining corner at the bottom back.
- Fold the bottom two corners inward with a pocket fold.
- The body is ready. Now place the dog's head on the top corner.
Draw the doggie's eyes, nose and mouth. A cute pet comes out.
A very simple origami diagram - Mouse
Another simple craft for kids using the origami technique is a paper mouse. To make it, you can take colored paper of any shade, the main thing is that it is double-sided. You will need a square measuring 10x10 (you can take a different size, a larger one, to make folding easier). We do it according to the diagram:
At the end, glue on the doll’s eyes (you can draw them with a marker), and fix the folds with glue.
Please note: for babies it is better to use lighter paper to make it easier to fold. Thick paper holds its shape better, however, it can be difficult for a child to fold it in several layers.
Turtle
Photo: cherepahi.info: UGC
To form a paper turtle with your own hands, you will need paper and scissors. Do this:
- Fold the triangle diagonally.
- Turn the figure so that the folds are on top.
- Fold the two bottom corners to the main line.
- Pull the bottom corner to the top, forming a fold. Expand.
- Fold the top two corners of the diamond to the sides. You will get the front legs of a turtle.
- Cut the bottom of the diamond along the fold line. Also bend two corners, forming the hind legs of the animal.
- Now fold the top and side corners towards the center.
- Bend the top corner back, forming a stepped fold. This will make the head.
- Turn the craft over. The turtle is ready.
This is how you can create an entire zoo with your own hands using the origami technique. Simple diagrams will be understandable to both adults and children. Use plastic blanks for the eyes and noses of animals or draw them in with a felt-tip pen.
Origami frog
This origami jumping frog is great fun for little ones. Preschoolers (especially boys) love such entertainment very much. Especially if the craft is made of bright paper.
Just like for many other crafts, for this you will need a square with a side of 10x10 cm (you can take a larger one).
The diagram shows each step, so the craft should not cause you any misunderstanding. The arrows show how and where to fold the paper, and the dotted line shows the fold.
This frog has a small “tail”, by pressing the edge of which you can make the frog move forward - jump.
Simple origami animal patterns for kids
For the simplest crafts, a sheet of paper needs to be folded only a few times; for more complex ones, it needs to be folded along curved lines, which is completely beyond the power of a child. Therefore, we have selected very simple schemes according to which you can assemble the animal in a few minutes.
To work, you will need paper of the appropriate shade, a marker or ready-made doll eyes (then you will also need glue). We hope you will like our ideas and start creating origami with your child.