Cartoon hedgehog
The funny hedgehog has become the main character of children's cartoons more than once.
Hedgehog from Smeshariki
It’s understandable that children want to figure out how to draw their cartoon idol—the smart and funny hedgehog from Smeshariki.
- The body of the funny hedgehog from Smeshariki is drawn as a circle.
- A block letter “A” is written inside the circle with a slight slant. Its lines will determine the location of the arms and legs and will make it easier to draw the hero’s face.
It is planned to draw a hedgehog in motion, which means one leg should be drawn raised.
- The position of the hands is noted first.
- The outline of the eyes is drawn.
- The image of the right sole located below differs from the high raised sole of the left foot.
- The contour line of the hedgehog's needles is applied using a herringbone pattern. The upper cone with a downward expansion is a needle on the top of the head. From there the rest of the hedgehog's spines begin to appear.
- The nose is drawn in a triangular shape, two circles represent two eyes. A small ear is drawn on the side.
- A small triangle is drawn on the top of the head under the line of needles. It serves as a guide for where the eyebrows will be located.
- The contours of the arms and legs of the cartoon prickly character are drawn more accurately. In this case, a realistic image is not required, but special attention is paid to drawing the sole of the left foot.
- The work on the design of the nose and mouth is being completed. The teacher's drawing is used as a guide.
- Working on the eyes will complete the image of the hedgehog from Smeshariki. Circles with a large radius are drawn around the eyes. This is how the hero gets points. One scent is added to them to make the accessory look believable. Pupils and highlights appear in the circles of the eyes. Eyebrows are applied in short, wide strips.
- The hedgehog image is ready for coloring.
The first coloring option is to apply shading to the drawing to highlight the shadows. The drawing will be more fun if you use light-colored pencils.
Character from the cartoon "Hedgehog in the Fog"
Not only children, but also adults love the hedgehog from the cartoon “Hedgehog in the Fog.” He remains a favorite of more than one generation. Getting closer to your childhood friend is easy. Just follow the step-by-step lesson on how to draw a hedgehog in the fog.
- A conditional inclined line drawn in the center of the sheet is chosen as a guide when creating the image of a cartoon hedgehog.
- The general contour lines of the character are built around the line.
- Small details are added to the sketch to form the image.
- The eraser removes conditional auxiliary lines.
- The sketch is completed by adding spines and designing a pouch in the hedgehog’s paws.
- The hero of your favorite cartoon is colored with dark pencils.
Hedgehog curled up into a ball
A forest dweller with his eyes closed is unlikely to leave anyone indifferent to his person.
Draw this hedgehog in stages using a simple pencil.
- Use light lines to outline the contours of the head and torso. To do this, draw a horizontal oval and a vertical one underneath it.
- Pull the lower part of your head down a little. Erase the unnecessary line.
- Draw a nose on the elongated tip. If you want, you can mark the nostrils.
- In the form of two arched lines, mark the eyes, above them – barely noticeable eyebrows.
- Draw ears on the head. Inside the body there are four legs. Draw the hind legs like a foot, with claws at the ends.
- The front ones are in the form of ovals. Draw straight lines for your fingers.
- Using a zigzag line (zigzag down) we enclose all the drawn elements in an oval. These are needles.
- Color the cute predator with multi-colored pencils, using, for example, brown shades: the body and head are light brown, and the paws and needles are dark brown pencil.
- Draw eyes, nose, fingers, claws in black.
Thanks to this master class for beginners, you not only gained drawing experience, but also the experience of creative communication with your child if you drew with him.
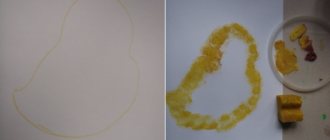
Lesson 2. Hedgehog in watercolor
This master class will show how easily and simply you can depict a hedgehog with paints.
Tools:
- paper (preferably a sketchbook - it has thicker sheets);
- a set of watercolor paints;
- brush of medium and small diameter.
Essential elements
- You need to put white paint on your brush and draw a small circle. Next, you should paint it with the same color.
- Now on the left side we add an elongated triangle muzzle to the resulting circle.
- We wash the brush from white and add a little black. This is necessary in order to indicate the body of the animal. We paint the white part with black, but do not touch the face. The body becomes dark gray in color. Let the workpiece dry a little.
- Now we paint black again and use short strokes in different directions to cover the entire back of the hedgehog with spines.
- Dip the brush into bright brown or dark orange paint and paint the animal’s face with it.
Drawing details
- Using the same color as the muzzle, we draw the short legs of the hedgehog.
- Using black paint we outline the tip of the nose, the round eye and the short line of the mouth. (this needs to be done with a brush of a smaller diameter)
- Using the same brush, he works on the needles again - now they will be a little thinner.
- The drawing can be supplemented with a mushroom, an apple or a leaf on the thorns of an animal. And around it add bushes of short grass.
Ready! A cute hedgehog is looking at you from a piece of paper!
Where to start drawing
In fact, it’s not difficult to portray a hedgehog; it’s enough to do it step by step. We always start a drawing by drawing an outline, outlining the main elements and points. It is convenient to use geometric shapes: circles, ovals, curved lines. For convenience, you can use checkered paper for the first time, and make the next picture on white paper.
As you can see, here is a simple outline, from which the body and head will then be made. All that remains is to finish drawing the eyes, paws, ears and needles.
Even children of preschool age can be taught to draw such a simple image, the main thing is to show them a picture of this animal or a cartoon before doing so. Show your child how to use a pencil correctly. It is better to take a semi-hard one, it does not leave strong streaks and can be easily erased with an eraser.
Simple instructions for kids
The drawing lesson does not take much time. If all actions are carried out step by step, then for children a 2-3 minute master class on how to draw a hedgehog will not be tiring.
- An oval is drawn in the center of the sheet.
- The figure is divided by a conventional line into two parts.
- One of the parts is sharpened by a protrusion added to it.
- The oval line adjacent to this protrusion is wiped off. This is how the outline of the hedgehog’s body emerges.
- The sharp tip is rounded off with a large bold dot.
- The features of the animal’s face are drawn: a mouth, an eye and an eyebrow above it.
- Dots are placed on the nose, they symbolize mustaches.
- Small legs are being drawn.
- The spines are first drawn with small teeth inside the second part of the oval, then with large teeth on top of the oval.
- The oval line inside the prickly “hair” is wiped off.
Image of a hedgehog standing on its paws
For school-age children, a step-by-step master class describing how to draw a more realistic hedgehog standing on all its legs is more interesting.
We adhere to the “nature” style
- A sheet of paper is covered with a grid.
- A large oval is drawn as a template for the body, and a small one for the head.
- The smaller oval overlaps the larger one with its borders.
- The legs are defined by four curved lines.
- The line connecting the head to the body forms the outline of the animal’s body.
- More lines are added to the paws, giving them thickness.
- The contour lines of the muzzle are drawn.
- Eyes, ears and a nose are drawn on the face.
- A conditional line is drawn along the growth line of the needles.
- Short teeth are drawn along the back, imitating needles. The hedgehog's belly and muzzle are depicted with strokes to make them fluffy.
- Toes are added to the paws.
- The animal cannot hang in the air. A ground line is drawn.
All auxiliary lines of the drawing are removed.
Hedgehog from Malysharikov
This is an easily recognizable character from the cartoon beloved by many children.
To beautifully draw an inquisitive hedgehog, follow these steps:
- Draw a circle. To achieve the greatest evenness, you can use a figured ruler, or trace a round object with a pencil.
- Inside, draw the glasses in the form of two smaller circles. Shade the pupils inside the glasses. Mark the arms of the glasses as straight lines extending from each side behind the head.
- Above the glasses, draw two small ovals - eyebrows.
- Under the glasses is the nose. Draw the nose in the form of a downward triangle. Round the top corners.
- Under the nose, moving upward, draw an arched line. Connect the ends of the arc by drawing another rounded line down. The result is a smiling mouth.
- Connect the tip of your nose to the middle of the top of your mouth with a straight line. Inside the mouth, mark the tongue.
- Move on to the paws. Draw the hind legs from the bottom of the circle in the form of elongated drops. On the sides there are two more legs, similar to the same drops.
- Label the ears. Draw needles using straight lines at the top of the picture, emphasizing the sharp corners.
- Complete the look with multi-colored pencils.
As you can see, drawing a charming know-it-all is quite easy.
Drawing a hedgehog step by step
- Start with the head. Draw an upward horizontal oval. Place the oval on a sheet of paper so that there is enough space on top for future needles.
- In the upper part, draw two circles - eyes. Inside each circle there is one more.
- Shade the inner circles (pupils) not completely. Leave a small shape (oval or circle) for highlight.
- A little lower draw the nose in the form of an oval. Shade it.
- Under the nose, in the form of an arc, draw a smile.
- Paws. Step back a little from the head line and place a small dot. It should be parallel to the nose.
- From this point in different directions, draw two arcs, as if you were going to draw a heart. Connect these arcs by drawing a straight horizontal line at the bottom.
- Torso. Connect the head and paws with a slightly rounded line.
- If you want, you can draw the hind legs. They should be located behind the body.
- Frame the resulting silhouette with needles.
Give free rein to your imagination by coloring the resulting drawing with colored pencils.
Stages of work:
Step 1.
In Adobe Photoshop, click File – New. Specify the dimensions of the sheet: height - 2000 px. and width – 1200 px. Click OK, after which a sheet will appear on which we will draw. Let's set up the brush: let it be black, with size 5. Draw a large circle in the middle of the sheet. From there we will continue building the body of the hedgehog, it will be more convenient to do it this way:
Step 2.
Now we add four circles of different sizes. The largest circle will be on the left, it will serve as the basis for the ear, the remaining two for the eye and one for the nose:
Step 3.
Let's draw the outline of the animal's muzzle. The hedgehog's nose and mouth become visible, as well as the inside of the ear:
Step 4.
We change the brush to a thinner one - 3. There are small needles on the muzzle, so we mark them along the edge. There will be two clear highlights on the left eye. Let's outline the boundary from which there will be a sharp transition to a dark tone:
Step 5.
Let's increase the brush size to 20. Let's sketch out the eyes and nose completely, only making a slight tint of tone. There is also a highlight on the nose, not as bright as on the eye, but it is visible:
Step 6.
Draw short needles and fur with a thin brush (3) under the ear and lower part of the body, outlining the contours of the body.
Let's add two front legs on which the hedgehog will rest. We remove excess lines with an eraser: Step 7.
We continue drawing small needles and fur on the animal’s face. Now you can remove the lines with the eraser tool that previously served as a sketch. On the right we add several long antennae extending far beyond the muzzle:
Step 8
Above the head we can add large needles (brush size – 9), which, due to the large number, overlap each other, as if pushing each other:
Step 9
From the ear to the back we will still draw large needles, but as they move away, we will make them paler (reduce the pressure). We do this because it's the background, it doesn't have to be the same as the foreground. This creates a volume:
Step 10
Draw the nose with small needles (brush - 3), which have a high density around the eye, on the bend of the muzzle, near the mouth and around the mustache:
Step 11
Let's draw a falling shadow under the hedgehog's body (around its paws). On top of it from the body, use the tip of the eraser to add strokes, creating needles:
Step 12
We have to make the ears voluminous using shading. The light falls from left to right, so the left side of the ear captures most of the shadow, and the right ear is completely absorbed by it:
Step 13
Let's add a shadow between the large needles.
It should be denser at the transition from small to large needles. Outline the paws, adding four sharp claws on each: Step 14. Between the ears we will also work out the shadow of the large needles. In this area we will detail it in more detail, because it is in the foreground that the viewer’s gaze falls first: