Summary of educational activities for the application senior preschool age “Birds of Migratory”.
Next we move on to the main part of our work. We are carving birds.
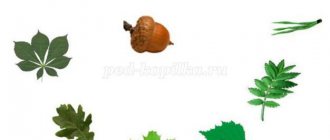
Look: I take a white rectangular sheet and fold it in half. Next, I apply the bird stencil to the fold, carefully trace it with a pencil and cut it out. I need to cut out six of these birds, because our birds fly in a wedge. I take a stencil of the sun, apply it to a sheet of paper, trace it and cut it out. I cut out clouds in the same way. Next, I place everything on a sheet of tinted paper and glue it.
But before we begin, let's prepare our hands for further work.
Finger gymnastics:
"Ten birds flock"
.
Sing it, sing it, sing along:
Ten birds are a flock. (Clap our hands)
This bird is a nightingale,
(We bend the fingers on the right hand one by one, starting with the little finger)
This bird is a sparrow.
This bird is an owl, a sleepy little head.
This bird is a waxwing,
This bird is a crake,
This bird is a little gray feather.
(We bend the fingers on the left hand one by one, starting with the little finger)
This one is a finch.
This one is a swift.
This one is a cheerful little siskin.
Well, this one is an evil eagle.
(Raise both hands up, fingers in the form of claws)
Birds, birds - go home!
(We wave our arms like wings, join our hands above our heads - the roof)
.
Repeat with children the rules of working with scissors
The scissors should be closed on the table.
They should be passed in rings forward, holding them by the closed blades.
When cutting paper in a straight line, the scissors are not spread wide and the ends are not brought together.
When making cuts, you must use the tips of scissors.
When cutting the sheet with scissors, do not tear it too far from the table.
When working with scissors, turn the paper or other material, but not the tool.
Small parts are not cut out from a large sheet of paper - this is inconvenient. It is better to cut a piece of the required format.
A cut in the shape of an acute angle is made in two steps.
If you make a cut along the fold line, then first unroll the paper.
Round parts are cut counterclockwise.
Now we can get to work.
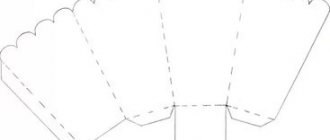
Educator: take rectangles of white paper, fold it in half. Take the bird stencils, place them correctly on the fold of the rectangle and trace with a pencil. Then carefully cut it out. Let's open it up and see what happens. We make 5 birds. Next, take a small square of white paper and a circle stencil, apply it to the paper, trace it and cut it out. This is our sun. We take the cloud stencil, apply it to the paper, trace it and cut it out. We place our parts on a sheet of colored paper. Let's create a composition. Carefully glue the elements. Add the beak to the birds (with a red felt-tip pen)
and eyes
(with a black felt-tip pen)
.
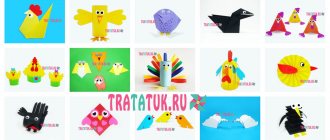
Making a migratory birds applique with your own hands
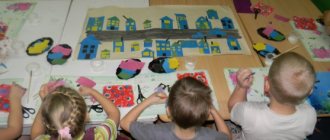
As an example, children are shown the work that last year's students in the senior group completed. The applique depicts clouds, the sun and birds cut out of paper. All the birds fly in one direction.
The teacher reminds students of the rules for working with scissors and glue. The birds on the applique are swans. They are quite difficult to cut out, so the teacher took care and cut out the swan template in advance. Children take turns tracing it with a pencil and cutting out their birds. They draw the sun and clouds themselves and cut them out. Then it’s time to work with glue. Kids carefully apply glue to the figures with a brush and glue them onto dark cardboard.
In autumn, the theme of birds can be expanded, taking into account the natural material available for creativity - these are all kinds of leaves. This brings up the idea of making a firebird out of leaves. It is very interesting. Firstly, this is a fairy-tale character, and secondly, no one has seen her, therefore, the flight of fancy is not limited. Still, the teacher shows an example, it is given below.
During the walk, the children collected leaves and now they lie in front of them on the table.
In addition to the leaves you will need:
- cardboard;
- brush;
- PVA glue;
- napkin.
Children carefully examine the example given to them and begin to select the leaves that suit them. Then they lay them out on cardboard and form a firebird. When you like the result, begin to carefully glue the leaves. The glue needs to be applied a little and pointwise so that the leaves do not become deformed. The applique needs to be left for a while so that the glue dries, and then you can admire it.
The most interesting bird appliques are made from bird feathers. A sketch of the future painting is being thought out. The first question to decide is where to get the feathers? It turns out that they are sold together with other accessories. There are even online stores where you can choose them without leaving your home. In short, you won’t have to chase roosters. The variety of feathers is amazing. Therefore, you must first decide what kind of bird it will be and choose feathers accordingly. For example, the firebird is selected, as in the figure. You can look at various books and pictures in them to choose the right character. Many people will probably be attracted to the firebird, but you can make simpler birds. However, it is clear that if you do more complex work, then simple ones will turn out.
To work you need to prepare:
- bright feathers of several colors;
- colored cardboard;
- white paper;
- scissors;
- PVA glue;
- brush.
Step-by-step instruction.
Now we begin to revive our bird. At the end of the tail we glue feathers of the color you like. There are no rules here. You need to rely on your mood and your taste. It will look something like this:
We retreat a couple of centimeters and glue the next row, guided by the same principles.
Let's move on to the wings. Like the tail, we gradually decorate first one and then the second wing using an overlay method similar to tiles. Each subsequent feather overlaps the previous one. If necessary, the feathers can be trimmed. The glue must be used carefully so as not to smear it and stain the feathers. Continue gluing feathers onto the body and head from bottom to top. Decorate the top of the bird with a tuft of feathers of a different color. Here's the result:
If you wanted to add eyes, claws, beak and other small details, you could use beads, leather scraps or plant seeds.
Feathers can be used to create many different designs. It doesn't have to be birds. These could be flowers, animals, houses with trees. It's easy to make a Christmas tree out of feathers. White feathers will make a snow-covered Christmas tree; if you want a green one, you can paint the feathers with brilliant green or any available paint.
The main thing is to let your imagination go free!
Feather birds
Feathers also make great bird crafts! For example, a craft made from a pine cone, paper and feathers will be an excellent interior decoration.
In order to make such a craft, we will need:
- Cone;
- Multi-colored feathers;
- Thick paper for making the head and paws;
- Glue gun.
Before starting work, the pine cone must be dried in the oven for 20-30 minutes. This will get rid of excess moisture and insects inside.
The dried cone can be painted with paints, or you can leave the natural color and texture. We glue the cut out parts of the paws to the bottom of the cone, and also glue the head to the pointed end of the cone. You can glue toy eyes to your head, or you can draw them yourself. Now all that remains is to attach the feathers. We carefully place them on glue. The more feathers there are, the more magnificent the bird’s “hair” will be.
Related article: How to sew women's thongs: pattern with description
There is also another way to make a bird from feathers.
We will need:
- 2 sheets of cardboard (white and any color);
- Glue;
- Scissors;
- Feathers.
Cut out the silhouette of a bird from white cardboard. In our case, this is the firebird. The silhouette, starting from the tail, must be covered with feathers. You can stick them on top of each other. Then we glue the cutout with feathers to colored cardboard. The painting can be framed and will be a great decoration for any room in your home!
Leaf craft
Making a firebird from leaves is not at all difficult, just take:
- Dry leaves;
- Glue;
- Paints;
- Glue gun;
- Cardboard for the base.
The first step is to prepare the cardboard for the base. You can paint it the color you want or choose a pre-colored one.
Next, prepare the leaves for the tail. To do this, select leaves that are suitable in color and shape, carefully place them on paper, paint each leaf with paint, and leave them until completely dry.
When the paint on the leaves has dried, glue them to the base. Apply a thick layer of hot glue to the cardboard, and also put dots on each leaf so that it sticks well. We lay the leaves on the cardboard as intended and press well. You can use a napkin to remove excess glue.
It's important to remember that hot glue hardens very quickly, so if there are visible marks left, you can paint them with the same paint as the leaves to help the colors blend together.
The next step is to create the body of the bird. For it you will need a dry leaf, different in color from the ones we chose for the tail. We glue it on top of the tail, and also press it tightly with a napkin so that the body sticks well to the leaves.
Related article: Knitted sneakers with diagram and description for newborns with photos and videos
Cut out the legs and eyes from a dark piece of paper or cardboard and glue them to the body of the firebird.
Paper birds
You can make an applique of migratory birds from paper using:
- Colored paper;
- Scissors;
- Glue;
- Paint;
- Cardboard for the base.
First, let's prepare the background. It will be blue skies with some clouds. To do this, take blue and white cardboard. We cut out small clouds from white cardboard and glue them to the blue background.
Next we make birds from paper. To do this, first draw silhouettes of flying birds on paper as shown in the pictures. The birds for your application can be anything - starlings, swans or others.
When the birds are cut out of colored paper, glue them to the cardboard. The finished picture can be supplemented with trees below, cut out of paper or drawn by hand.
You can also make an applique “Birds on Branches” from paper.
You need to take colored paper, scissors, glue and cardboard for the base.
From paper we cut out the details of the bird: body, tummy, wings, eyes, legs and beak. We also cut out a branch on which the bird will sit. When the parts are ready, glue them in order.
First, glue the branch to the cardboard, then the torso and tummy. Then paws so that the bird is sitting on a branch. Next we glue the head to the body, wings, place the eyes and beak. You can decorate the space of the painting at will with the sun, berries on a branch, clouds, and so on.