Preparing for an application on the theme “Home”
In the middle group, the preparation of materials for the application is carried out exclusively by the teacher. It is he who cuts out paper blanks for children in advance and selects other details. So, for the theme “Home” you will need the following materials:
- The basis is A4 paper (traditionally white, but to create a night or evening composition you can use black or dark blue cardboard). Of course, if collective work is planned, then the teacher prepares a large base - a sheet of Whatman paper, tinting it in certain colors (for example, sky and grass, asphalt, etc.).
- Directly details for applique. These are blanks for the wall of the house (a large rectangle or square), the roof (also a rectangle or square), a window (a strip that the children will cut into pieces or ready-made parts), doors, pipes (the last two elements appear at the request of the teacher). An interesting idea is to use not plain paper as a blank for the wall of the house, but pages of old glossy magazines with bright pictures. And for a night composition, an ordinary newspaper is also great (against a dark background it will look very unusual). You can also use paper with patterns. Often the reverse side of ordinary colored paper is decorated in this way.
- Other materials needed: glue, glue brushes, scissors, oilcloths, napkins.
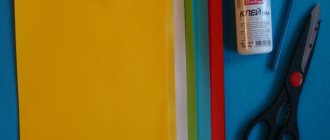
Blanks can be made not only from ordinary colored paper, but also from patterned paper, glossy magazines and even newspapers
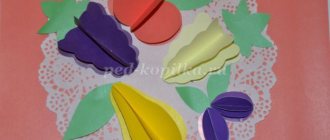
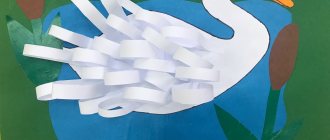
The teacher can offer preschoolers such unusual materials as cotton wool, cotton pads, napkins, sequins, foil, and confetti. For example, using halves of cotton pads, you can create an original design for the snow-covered roofs of houses and the snowdrifts near them. You can use confetti or shiny sequins to designate snowflakes.
To make the composition more original, the teacher can offer children unusual materials, for example, halves of cotton pads and ready-made foil snowflakes
But it’s still too early for middle school students to make houses out of pasta, straw, and cereals. This activity requires perseverance, fairly developed fine motor skills and is more suitable for older preschool age.
House applique made of colored paper
Home › Activities, child development
24.06.2019
Paper applique house. Today we will make two applications of a paper house at once. The first option is suitable for older children (little ones will need parental help): an applique multi-story house made of colored paper with opening windows and a door.
The second option is a simple paper applique for children (a house made of geometric shapes) suitable for kids. In the process of creating it, you can repeat geometric shapes (or start learning them if you haven’t started studying them yet).
I recommend cutting out the blanks for crafts in advance. For example, as I said earlier, once a week (on Sunday), I create a lesson plan for the children for the week. And I immediately prepare material for each day of the week (for appliqués, I cut out blanks, prepare coloring pages, if I need to print the material, I print it out, etc.
) This way, on the day of class, I don’t need to rush to print, cut, draw, etc. I just take out the blank and we start practicing.
Otherwise, if you don’t prepare everything in advance, the baby may lose interest in the activity and while the mother prints and cuts everything, the child will run away to play with other toys.
Interesting:
Car truck applique Ladybug applique Autumn forest applique for children
Applique house made of colored paper
What is needed to applique a house made of colored paper:
- A4 sheet (on which we will glue the house)
- Colored paper (for the base of the house and roof)
- Scissors (if a child is learning to cut on his own, it is better to purchase special safety scissors for children)
- Glue
Paper house applique
- Prepared materials for the house: a white sheet of paper and colored paper
- First we need to cut out the base for our house from paper: the roof and the wall.
- The next step is making the doors and windows. On a sheet of colored paper we draw windows and doors.
- Next we cut out the windows and doors. In order for doors and windows to open, we cut colored paper in places where windows and doors are marked on only three sides, and leave the fourth untouched.
- When the windows and doors are ready, we “open” them by bending them. And turn the sheet over with the wrong side up.
- Now you can hand the baby a blank so that he can coat the future house well with glue. Since we left the windows and doors “open” there will be no risk that the child will accidentally stain the wrong part of the house.
- After the house is well coated with glue, glue it to a white sheet and smooth it well so that there are no wrinkles or folds.
- Now you can start making the roof. We draw the future roof on a sheet of colored paper (we used a different shade of colored paper to make the roof).
- Cut out the roof. An older child may try to cut out the roof themselves.
- Next, lubricate the roof of the house well with glue.
- And glue the roof of the house made of colored paper to a white sheet, higher than the base of the house.
- If you wish, you can glue a pipe to the house by cutting out a small rectangle from colored paper and placing it vertically on a sheet of paper.
- You can draw people in the windows - the residents of the house, who will look out of the windows. For drawing, you can arm yourself with a felt-tip pen or pencils.
Our colored paper house applique is ready.
The simplest paper applique for children: Applique house made of geometric shapes
What is needed to applique a house from geometric shapes:
- Colored paper
- The sheet is white (on which we will glue the house). We make crafts on album sheets
- Glue
- Scissors
How to make a house applique
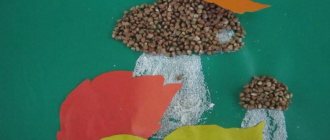
- We cut out simple geometric shapes for the house - two squares, a triangle and talk through the names of the shapes with the baby. This way, your baby will quickly remember the names of geometric shapes. In addition to the house, we glued the sun, clouds and a Christmas tree (to study such geometric shapes as an oval, a circle, and in the Christmas tree we clearly saw the difference between triangles in larger and smaller sizes). If you decide not to stop at the house, then you will additionally need to cut out a circle (sun), ovals (clouds) and triangles of different sizes (Christmas tree).
- We invite the child to coat the figures well with glue.
- We glue geometric shapes from colored paper to a sheet of white paper, creating a house (clouds, sun, Christmas tree).
- Smooth out the house so that there are no folds and wrinkles. The simplest paper applique for children (a house made of geometric shapes) is ready.
Source: https://7ya-mama.ru/applikaciya-domika-iz-cvetnoj-bumagi.html
Theme options
Appliqué at home is traditionally offered to middle school students in November. The theme according to the program is designated as “Big House” (two or three floors). But the teacher can slightly modify the key image:
- "Village house"
- “The house where I live” (the child creates an image of his own house - private or apartment).
- “House on the Hill” (especially if children live in the corresponding area).
- “Snow-covered house” (winter applique).
- “Cat House” or “Teremok” (based on a fairy tale).
In addition, the composition can be collective - “Houses of our city (village).”
Children can make appliqué on separate sheets of paper, which are then combined into a collective panel
Video: New Year's application “Snow-covered houses”
How to motivate children to be creative
An important part of a teacher’s job is to create motivation for creativity in preschoolers. Of course, in the middle group, game characters are actively used for this. For example, Dunno (a doll) appears in the group and reports that in his Flower City he learned to drive a car and broke many houses. His friends are offended by him, and the hero asks the guys to help build new beautiful buildings.
Dunno comes to the guys and says that he broke almost all the houses in Flower City when he was learning to drive a car.
Another option is that a sad boy Vanya (also a doll) comes to the preschoolers. He says that when he grows up, he really wants to become a builder - to build large brick houses. In the meantime, he would like to make houses out of paper, but he doesn’t know how.
You can start the lesson with a riddle about builders:
- Among the clouds on high, We are building a new house together, So that the people in it can live happily in warmth and beauty.
Then the teacher briefly talks with the children about this profession, emphasizes its importance, and asks the children who would like to build houses in the future.
If the lesson is based on the fairy tale “Cat House” or “Teremok”, then you need to remember the content of the work with the children, read out especially important points, and show illustrations. And watching a cartoon or a fragment of it will definitely inspire kids to get creative.
If the lesson is based on a fairy tale, you need to remember its content and look at the illustrations
Video: cartoon “Cat House” (1958)
Video: cartoon “Terem-Teremok” (1971)
You can first take your children on an excursion to nearby houses, especially if a new house is being built nearby.
Table: finger gymnastics “House”
| Text | Movements |
| Under the mushroom there is a hut-house, A cheerful gnome lives there. | Connect your palms with a hut |
| We'll knock softly | Tap the fist of one hand on the palm of the other hand |
| Let's ring the bell. A gnome will open the door for us and invite us into the hut-house. | The palms of both hands are facing down, fingers crossed; The middle finger of the right hand is lowered down and sways slightly |
| The house has a plank floor, | Place your palms down and press your edges together |
| And on it is an oak table. | The left hand is clenched into a fist, the palm of the right hand is placed on top of the fist |
| Nearby is a high-backed chair. | Point your left palm vertically upward, and place the fist of your right hand on its lower part with your thumb towards you |
| There is a plate with a fork on the table. And there are mountains of pancakes - a treat for the guys. | The palm of the left hand lies on the table and is directed upward, representing a plate, the right hand represents a fork: the palm is directed downward, four fingers are straightened and slightly spread apart, and the thumb is pressed against the palm |
Table: finger gymnastics “I want to build a house”
| Text | Movements |
| I want to build a house | Fold your arms together and raise them above your head |
| So that there is a window in it | Connect the fingers of both hands into a circle |
| So that the house has a door, | Place your palms together vertically |
| Nearby for a pine tree to grow. | We raise one hand and “spread” our fingers |
| It was sunny, it was raining, | First, we raise our hands up, fingers “spread”. Then we lower our fingers down and make “shaking” movements |
| And the tulip bloomed in the garden! | We put our palms together and slowly open our fingers - “tulip bud” |
Table: physical education
| Text | Movements |
| One two three four five. Let's build and play. | Children do jumping jacks |
| We are building a big, tall house. | Stand on tiptoes and stretch arms up |
| We are installing windows and roofing. | Show the window, the roof with your hands - clasp your hands above your head |
| What a beautiful house! | Extend your arms forward with a pointing gesture |
| And everyone lives together in it. | Squats |
Lesson summary “Applique “New houses on our street”
Application “New houses on our street”
Target:
Teach children to create a simple composition: arrange images of houses and additional objects on the sheet of paper in different ways. Reinforce cutting and pasting techniques and the ability to select colors for a composition. Develop creativity and aesthetic perception.
Materials and equipment:
colored paper, a sheet of white cardboard, glue stick, scissors, applique samples.
Progress of the lesson:
Guys, look outside the window. Spring has come outside. Every day the sun shines brighter and warmer. Zimushka-winter is leaving our lands. It's a pity for her to part with us. What should I leave her as a souvenir? Maybe memories of the city where she was visiting?
Guys, what is the name of the city in which we live? (children's answers)
Our city is big and beautiful. It has many houses, shops, hospitals, banks, hairdressers, schools and kindergartens.
Tell me, do you know what street our kindergarten is located on? (children's answers)
What street do you live on? (children's answers)
Every day you go to kindergarten along familiar streets. What do you see along the way? (children's answers)
There are many houses in our city and they are all different. What do you have at home? (roof, walls, windows, balconies, doors.)
Let's remember - who builds the house? (children's answers)
Who creates the house project? (a diagram or plan for building a house is created by an architect)
Who paints the walls? (painter)
That's how many people are involved in building houses! And today, working in pairs, you will try yourself in all these specialties. (the teacher divides the children into pairs)
We will make an applique of an entire city street. There is a lot of work, we need to work together, together.
Before we begin, let's warm up:
We are builders, we are building, (knock fist on fist)
We will build a lot of houses, (hands forward, spread to the sides)
Many roofs and ceilings, (arms in a triangle above your head)
Lots of windows, walls, floors (draw a square in front of you with your hands - window, arms to the sides - walls, sit down - floor)
Many rooms and doors, (stand up, arms up and down through your sides)
Elevators, stairs, floors. (hands on waist, bends to the sides)
The residents will have fun -
Housewarming in the new house! (walking in place)
Have a seat, guys. Look at the board, on my sheet of paper I made a road, houses, and planted trees from multi-colored paper. I ended up with a real city street. (show teacher's application)
Now, in pairs, think about what will happen on your street? Discuss with a friend what you want to create on your street, what the houses will be like.
You must agree on what color the buildings, windows, and roof will be. After the discussion, cut out a building from a sheet of colored paper. You can place it horizontally or vertically.
Windows: to do this, you need to cut a long strip, bend it in half, then in half again, unfold it and cut along the fold lines.
And remember, guys, that with partners who agree and distribute labor among themselves, things go well and construction ends on time.
Let's get to work (background music turns on).
(While doing work, the teacher approaches the children, asks what they have already done, what they will do next. For couples who cannot agree, the teacher helps to distribute responsibilities).
Look what beautiful streets we have! That's how many memories of the city Zimushka-winter will have! (works are posted on a magnetic board)
The houses stand in two rows,
Ten, twenty. A hundred in a row!
They look at each other with square eyes.
Tell me guys, what difficulties did you experience during the construction of buildings? (agree with each other, cut the roof, and so on)
Which jobs do you think were done more accurately? (children's answers)
Everyone did a great job. Now let's get our workspaces in order.
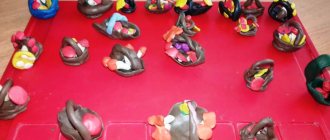
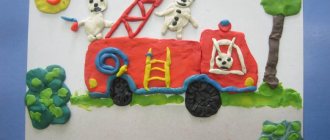
Photo gallery of children's works
Traditional house complemented by a chimney on the roof
Two-story houses are made according to the same scheme - two rectangles (floors), a triangular roof and yellow windows
The composition is made on an unusual black background, and the snow is made using a broken method
Children draw window elements with a pencil
Children glue their photographs to each window; the sun and flowers on the trees are made from wads of napkins.
In a three-story house, the roof and door are in harmony in color
Application based on a famous fairy tale - in the windows of the little house the children draw animal faces
By cutting out a house from paper, middle group students consolidate their understanding of the shape of surrounding objects and expand their horizons. The teacher can play on this topic using game motivation, offering the children unusual materials for work and some non-standard techniques.