Corner for cognitive development “Journey into space”
Anna Kuznetsova
Corner for cognitive development “Journey into space”
Starting from the senior group of kindergarten, we develop in children
educational interest in space . For this purpose, in our group, a
corresponding corner " Space "
.
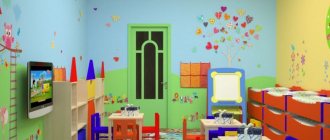
To form in children ideas about
the structure of the solar system and the names of the planets of the solar system
“Solar System” helps
. It's on the wall and
is a blue poster with nine
planets of the solar system and their orbits.
In the corner there is a lapbook “ Space ”, made directly by the hands of the group’s teachers.
In the corner there are illustrations on the theme of space , a selection of
photographs of scientists, astronauts and spaceships .
To obtain and consolidate knowledge about space, there is an artistic and
educational literature.
“Mysterious Space ” is also presented.
.
As a result of activities in the corner , they expand and systematize
children's knowledge about space , the concept of oneself as an inhabitant of the planet is formed
Earth, the vocabulary on the topic “ Space ” expands and becomes more active.
This activity promotes the development of logical thinking,
creative imagination, as well as children’s ability to establish causality
investigative connections between objects and phenomena.
Summary of a lesson on cognitive development “Travel on the map” Educational area: cognitive development Age group: preparatory. Types of activities: playful, constructive, motor.
Summary of an integrated lesson on the cognitive development of FEMP in the senior group “Journey to Space” Synopsis of an integrated lesson on the cognitive development of FEMP in the senior group Topic: “Journey to Space” Objectives: Educational:.
Abstract of educational activities on cognitive development in the preparatory group on the topic "Space" Synopsis of direct educational activities on "Cognitive development" in the preparatory group on the topic: "Space" Yulia Fursa.
Summary of educational activities on physical development in the senior group “Travel to Space” using fitballs MBDOU “Kindergarten No. 49 “Rucheyok” Summary of educational activities on physical development in the senior group Topic: “Travel to.
Summary of a lesson on mathematical development in the senior group “Journey into space” Summary of a lesson on mathematical development in the senior group. Topic: “Journey into space” Author: Team Tatyana Nikolaevna Purpose: formation.
NOD for cognitive development “Travel with Dunno.” Abstract of the GCD "Travel with Dunno" Program objectives: Educational: To educate and encourage: initiative, independence, goodwill.
GCD in the preparatory school group with a compensatory focus on speech development “Journey into Space” Municipal budgetary preschool educational institution, combined kindergarten No. 27, Uglegorsk, Sakhalin region.
Lesson on cognitive development “Journey along the Volga” MBDOU Kindergarten No. 49 “Jolly Dwarf” Chuvash Republic, Novocheboksarsk, Teacher: Korotkova Ekaterina Sergeevna A melody sounds.
Lesson on cognitive development “Journey to the Land of Knowledge” Summary of the final integrated lesson in the preparatory group “Journey to the Land of Knowledge” Purpose: Consolidation of mathematical concepts.
Source
Corner "Space" in the preparatory group
Elena Kudryashova
Corner "Space" in the preparatory group
Starting from the senior group of kindergarten space with children .
corner was designed . For a more effective assimilation of the material, a model of the Moon was designed. Also in our corner we have selected illustrations on this topic, folders and books. We have collected a selection of photographs of scientists, astronauts and spaceships . We try to organize joint educational activities with children quite often, making classes interesting, developing and educational. In the preparatory group , as a result of joint activities with children, a model of the solar system was made. During the activity, special attention was paid to the correct determination of the sequence and distance of the planets from the Sun, and the identification of other cosmic bodies in the Universe . Children continue their educational activities in their free time.
Binary lesson with presentation in the preparatory group “Space” Lebedyan city, Lipetsk region MBDOU combined type kindergarten No. 2 Summary of a binary lesson in the preparatory speech therapy group.
Abstract of the educational activity “Cosmos” in the preparatory group Integration of educational areas: cognitive development (formation of elementary mathematical concepts, familiarization with the environment.
Decoration of the “Space” corner
Anoskina Guzel Rafekovna
Decoration of the “Space” corner
Decorating a group room in a preschool institution for each teacher and parents becomes not just a responsibility, but also a creative process. It implements unique ideas and experiences.
I would like to present to your attention a master class on decorating “ Space corner in a group room .
The first thing you need to do is print out the 4 planets of the solar system on a color A size printer, two pictures of each planet.
The only thing is that we printed the planet Sun in a larger format.
Then cut them out in pairs as well.
Glued together, you can sign and laminate.
That's how easy and simple your corner is ready .
In addition, you can also add stars, comets, meteorites. but this is still in our work, and you have your invention and creativity.
Thank you for your attention, I will be glad if it is useful to anyone.
“St. George’s Ribbon” master class on decoration for May 9th We started preparing for Victory Day in advance. One of the symbols of Victory Day was the St. George ribbon. For decoration we needed a big one. “Field Mail” master class on decorating a window for Victory Day using the vytynanka technique Dear colleagues, I want to share with you the idea of decorating a window using the vytynanka technique for the upcoming Victory Day holiday. While I was drawing and cutting out... Master class for teachers on organizing and decorating a mini-vegetable garden on a windowsill Dear teachers, today I would like to share with you options for decorating a “Mini-vegetable garden on a windowsill.” For this you need everything. Master class on designing an information corner for parents in the “Locomotive” kindergarten Summer has flown by and a new school year has arrived. It's time to think about decorating a corner in the group. For this we need: squares for glue. Master class on window decoration “Spring is coming to us...” I invite you to another master class on aesthetic design in kindergarten. It has become a good tradition for us to decorate the window and staircase. Master class on decorating a music hall for the 70th anniversary of the Great Victory Our whole country was preparing to celebrate the 70th anniversary of the Great Victory. Now our children live in peacetime, but we, teachers, are trying. Window decoration for Victory Day. Master class on vytynanka with an emphasis on color. May 9th is approaching. Preparations for this important holiday are also taking place in our kindergarten. I bring to your attention a master class on vytynanka.
Source
"The Road to Space". Room decoration
“ Space ” with children in the preparatory group for school.
and an educational conversation about the wonderful world of the Universe.
To solve this issue, we turned to museum pedagogy as an innovative technology in the field of personal education of children, creating conditions for the immersion of the individual in a specially organized subject-spatial environment. We decided to create a mini-museum “ Road to Space ”.
outer zone is represented by exclusive exhibits made by me and the kindergarten staff from scrap materials and scrap materials. They embodied great creative potential, resourcefulness and painstaking work of the author and his assistants. Certain financial costs were also required to purchase individual materials, different types of paint and glue for painting, gluing and mounting exhibits.
Entering the small room of the mini-museum , everyone pays attention to the unusual coloring of the walls. It is made in different shades of blue, indigo and violet, which allows you to additionally create a feeling of an unexplored cosmic abyss . Volumetric exhibits placed on the walls and in the air enchant both small and large museum visitors: everything attracts their interested gaze.
We made the planets using the traditional papier-mâché technique. Balloons, balls, and hops of different diameters were used to create shapes. To create the required color scheme of the planets, water-based paint with the addition of colors was used, followed by a coating with colorless varnish, which ensures the durability of the product and the possibility of wet cleaning.
Models of the planets and the sun were attached to the wall with liquid nails.
Having examined the exhibits on the central wall, visitors notice an impressively sized structure resembling a rocket in the corner. The design and its size are determined by the need to disguise the ventilation pipe protruding to a large height. The base of the rocket is made of heat-insulating material. The rigidity of the structure was given by the shipping cardboard packaging from the refrigerator.
What is a museum without historical material! They enable the child to learn about events that occur long before their birth. Based on the fact that visual-figurative thinking predominates in preschoolers, we used the possibilities of a photo vernissage: the story of the “tour guide” organically complements the illustrative material. Depending on the tasks set by the teacher, the content of the photo exhibition may change: it could be a gallery of the first space “History of astronautics in faces ” or “From the life of an astronaut : one day in orbit”, “Why does man explore space ?” or “ Space objects in a photographic lens”, “ Space through the eyes of children ”, “Belka and Strelka in Space ”.
We fulfilled the main goals of organizing a developing subject-spatial environment: we maximally realized the educational potential of the space, ensured full communication and joint activities of children and adults. Our mini-museum fascinates, leaves a mark in the child’s memory, excites their consciousness and awakens cognitive interest.
We are sitting at home with benefit. Exhibition of children's works "Road to Space" Let's stay at home with benefit exhibition of children's works "Road to Space", dedicated to International Cosmonautics Day Goal: to create conditions for development. Photo report “The Road to Space” On April 12, our entire country celebrates Cosmonautics Day. In kindergartens and schools, various events are held for children for this holiday. Decorating the premises for March 8 “Surprise for Moms” Mother Nature, just waking up, brings us an amazing and gentle women's holiday, filled with flowers, smiles and feminine beauty. New Year's decoration of the premises Winter has come. Our most beloved and joyful holiday, New Year, is coming soon. According to the tradition that has long been established in our group, we decorate. Decoration of a group room Elena Olegovna Zolotovskaya Decoration of a group room. Hello, I looked at the design of the groups and decided to show how I designed mine. Decorating a bedroom Kindergarten is a second home for a child, in which he should feel at home. The environment fully contributes to this. Decorating the premises for May 9 It is important to preserve for centuries and pass on from generation to generation the memory of the Great Patriotic War, of tragic and heroic events. Decorating a room in a group room Hello, dear colleagues! Today I would like to share with you some ideas for decorating part of a group room. In Group.
Source
Registration of a site in a preschool educational institution. Blooming land "Cosmos" In the course of working on environmental education for preschool children and studying innovative approaches to creating an ecological and developmental space for the garden territory, we were faced with the task of expansion.
Article “Mini-Museum “Cosmos”” in the senior. » Mini-museum “Cosmos” in the senior group Modern preschoolers ask a lot of questions about space, stars, astronauts, since this topic, like everything unknown, incomprehensible, inaccessible to the eye.
Design of the “Space Zone” corner in the middle group Since ancient times, space has attracted people with its mystery and unknown. And for more than half a century, space research has been conducted. There are many mysteries hidden in this infinite.
Corner “Space” in the middle group In the corner, illustrations on the theme of space are selected, a selection of photographs of scientists, astronauts and spaceships is collected. To obtain and consolidate knowledge about space, there is a corner.
Publication “Decoration of the music hall of a preschool educational institution for graduation “Cosmic. “This year the theme of our prom was “Space.” On April 12, the whole country celebrated the anniversary of the first flight of the Soviet man Yuri Gagarin into space, and I, as a true patriot, loved it.
Formation of the group. Preparing for the Cosmonautics Day holiday On the eve of the World Aviation and Cosmonautics Day, the children and I began preparing for the registration of our group. I had a conversation about space, about the planets of the solar system. I talked about.
Decoration for Cosmonautics Day at a preschool educational institution Space has always attracted the attention of children. Even in the recent past, all children wanted to be astronauts; from early childhood they knew who Yu. Gagarin and V. Tereshkova were. Now everything is completely different.
Vegetable garden on the window “Space laboratory” In the preparatory group, the teachers and the children decided to create a space laboratory. The guys planted onions, beans, peas, zucchini, and flowers. We looked after the plants every day.
Decoration of the group with children's works for Cosmonautics Day Exhibition "Starry Sky". The purpose of the exhibition: the development of creativity, imagination, the formation of interest and knowledge in children about space. Children are always interested in space! In our group we have it on a string.
Photo report on the design of a photo zone for Cosmonautics Day. Design of a photo zone for Cosmonautics Day in a group. For the holiday dedicated to Cosmonautics Day, I made a photo zone for children and their parents in our group. The children happily “went to.
Source
Design of the space corner “Road to the Stars”
Nadezhda Dudnik
Design of the space corner “Road to the Stars”
This is the name of our space corner , which was jointly designed by the teachers of the MADOU “Kindergarten No. 21”
Engels, Saratov region Nadezhda Sergeevna Dudnik, Olga Dmitrievna Zagoruiko with the participation of Elena Zharkova.
The corner occupies two walls , a window and a ceiling.
On the left wall, the artist colorfully painted the space world : cartoon astronauts , aliens, space rockets and ships .
On the same wall there is a place for creative exhibitions of our students, where crafts and drawings of children, teachers and parents are placed. Once a year, on Cosmonautics , a creative competition is held in the garden, the jury selects the best drawing and craft, and the winners in various categories receive prizes.
We hung a blue curtain on the window, blue is the color of space , with gold stars , in front of the window on the floor there is a photo zone, figures of a rocket and an astronaut
and a mock-up of a rocket that can take off and land.
On the right wall there is information for older children, preparatory and senior groups. The wall depicts the solar system and the planets located on it with names, information about each planet, and an imitation of the Mir
.
Three-dimensional papier-mâché planets hang on the ceiling.
In our kindergarten we conduct excursions for children to the space corner , where our kindergarten children and guests learn a lot of interesting things and receive useful information.
Layout of a kindergarten for the traffic rules corner “The road to kindergarten” Purpose: To consolidate knowledge of traffic rules (pedestrian crossing, traffic lights); develop the ability to navigate the terrain; form the foundations of safety. Decorating the “Space” corner Decorating a group room in a preschool institution for each teacher and parents becomes not just a responsibility, but also a creative one. Decorating a Christmas corner With the onset of the New Year holidays, the soul itself is filled with a feeling of celebration. And we all suddenly want to share and create. Decorating a theater corner Our kindergarten “Beryozka” recently held a competition for the best design of a theater activity corner. Each group began to prepare. Decorating a theater corner Hello, dear colleagues! Today I continue the conversation about the design of the group. It's time for the theater corner. How interesting everything is happening. Decorating a theater corner “The theater is a magical world. He gives lessons in beauty, morality and ethics. And the richer they are, the more successful the development of the spiritual world is. ". Decorating a corner for parents “Winter” Decorating a corner for parents “Winter” While walking outside, introduce your children to nature. On a sunny day, draw children's attention to beauty. Design and filling of the traffic rules corner Good day everyone! I want to show you how my partner Svetlana Nikolaevna Peskova and I designed a corner according to the “Rules of the Road. Decorating the corner “Everything for girls” Hello, dear colleagues! Let me remind you today how we played with dolls in childhood. I had a doll house made from a big one. Decoration of the Cossack corner Good day everyone! I hasten to share with you a joyful event that happened in our group. On your first working day.
Source
Wall coverings in the space room
The walls continue the space theme; they can be decorated in different ways, using various techniques and materials:
- Cover with wallpaper. There are a lot of wallpapers on sale with images of ships or constellations; such wallpapers can easily be combined with plain ones.
It is convenient to use wallpaper for painting. This will hide uneven surfaces of the wall, and the wallpaper can be repainted up to 5-7 times. Walls in blue, silver, steel, and white colors look organic in a space room.
An interesting solution is a combination of wallpaper. For example, the wall near the bed is painted dark blue and decorated with drawings, and the wall near the desk is light. Fluorescent wallpaper looks original; it glows in the dark, replacing a night light.
- Liquid wallpaper and decorative plaster. Using these materials, it is easy to create interesting textured surfaces that imitate the unusual topography of alien planets. It’s easy to place drawings, stickers on top, or use stencils to apply an image.
- Plasterboard structures. Allows you to recreate in the nursery:
- a real star rocket control room with a control panel;
- decorate one of the walls with a porthole overlooking the surface of a mysterious planet;
- turn the wall into an interstellar ship control panel with levers and instruments.
The impression will be enhanced if the complex plasterboard structure is illuminated with hidden spotlights or LED lamps.
This design allows you to visually expand the boundaries of the room, giving it depth and volume.
- Photo wallpaper. The simplest and most win-win option. Space scenes with planets, aliens, rockets, star clusters will decorate the room, but it is necessary to maintain proportionality to the size of the picture and the dimensions of the nursery.
Design of the group “Space Corner”
Irina Kalinina
Design of the group “Space Corner”
Space has attracted and continues to attract the views and thoughts of man of all times. There are so many secrets, so many inexplicable and amazing discoveries and opportunities.
We tried to tell children about space as clearly and interestingly as possible.
I would like to present to your attention a corner in which information about space , astronauts , and celestial bodies is presented in an accessible form.
— create conditions for the development of curiosity in children in the process of getting to know space and space objects ;
- to form a holistic picture of the world in children;
— replenish the development environment for cognitive development;
— organize joint activities of children, teachers and parents.
For this purpose, in our corner we selected and manufactured:
— illustrations on this topic, didactic material;
- encyclopedias and books about space that the children brought from home;
— poems and riddles, a card index of sedentary games on the theme “ Space ”
;
— planetary caps for outdoor games, entertainment and free physical activity.
Educational activities are organized: appliqué, drawing, design, etc.;
— presentation of the “First in Space ”
;
- examining with the teacher illustrations of books about space , photographs of the first cosmonauts , designers;
— a Lego “ spaceship ”
;
- independent creative activity;
- participation in competitions together with parents.
Children continued their cognitive activities in their free time
Source
Crafts on the theme of space for kindergarten and school. Original DIY ideas for Cosmonautics Day
How are you, dear readers and guests of my blog? Did you have time to take a break from crafts for Easter? I think it’s not stressful to make something and do it with the kids. And now there is still one more holiday ahead - Cosmonautics Day. And it falls on April 12th. On the day when our Soviet cosmonaut Yuri Gagarin flew into space for the first time.
Usually this is a boyish theme - space. They really love inventing flying machines, saucers and rockets. But some girls are not far behind either. Still would! This is very exciting, and from waste and natural materials you can make such works that they will win any competition.
Let's look at a selection of interesting ideas. Most likely, they will give you some interesting thoughts and you and your children will create your own masterpieces. After all, there is room for imagination to run wild here. The work can include planets, satellites, flying vehicles, UFOs, rockets and much more.
I would like to note that I also get ideas from the Internet, from its publicly available sources. Basically, these are cool and original creations for kindergarten and elementary school children. Plus, I can recommend excellent options for paper airplanes in the note https://mognotak.ru/kak-sdelat-samoletik-iz-bumag.html
Well, here we go! As Yuri Gagarin once aptly said).
Interesting ideas on the theme of Space with your own hands
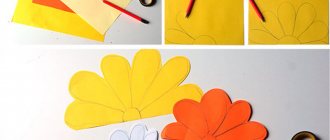
First, let's look at what can be made on this topic. For younger kids, it will be possible to make (with the help of their parents) such a layout from colored paper. All the planets of our Solar System are located on it. At the same time, of course, we teach the kids the names of the planets.
Application Solar System
You can make such applications from small plasticine balls. It’s better to draw such compositions first and even paint them with flowers. And then you can roll small balls and just stick them on.
After all, it’s really possible to submit it for a competition?
Squirrel in a rocket
We make figures of astronauts and a lunar rover from salt dough. I described a simple recipe here. This material is pleasant to work with for several reasons:
Russian cosmonauts and lunar rover
Children 4-5 years old can make simple paper rockets. This turns out to be a simple form of origami. And you can glue them onto a dark blue background, which will represent outer space.
Rockets in the universe
Let's make these funny aliens from toys, jars, tubes and plasticine.
Funny aliens
Another option for the competition using the modular origami technique.
We turn on our imagination and use everything: polystyrene foam, tree branches, foil, wire. Bushings will even be useful for making rockets.
Gagarin in flight
Plasticine composition with Saturn, stars, rocket and our green planet.
Milky Way
Cat in a hat from the planets of our solar system
I hope that we have already more or less chosen something for ourselves, that we will make it and move on.
Simple crafts for kids in kindergarten on Cosmonautics Day
I suggest making a rocket with the kids from a sleeve (you can even use toilet paper) and colored paper. It turns out such a long and stable little thing that can be placed on a blue background and next to an astronaut figurine.
Add some foil and you'll have a more realistic spacecraft.
Let's make a starship out of paper. You can do this simply according to the diagram below.
And here is the finished version. Color it as you wish.
Or we’ll make an unidentified flying machine out of thick paper. You can make several of these things and put them again on the blue sky.
Look how colorful and at the same time original UFOs we produce.
Let's use the baby's favorite toy - plasticine. It is pliable, soft and adheres well to almost any surface.
Here are some applications you can make with it in disposable plates.
Saucers - open space
Oh, and we parted ways! Let's sculpt a cute alien. It will look good next to a paper flying saucer.
Funny alien
Don't feel like folding paper? So let's blind her too, because there is a lot of plasticine!
When working with plasticine, the first thing you need to do is explain to children that this is an inedible material and should not be put into their mouth.
Alien and flying saucer made of plasticine
Crafts from plasticine
We offer ideas for modeling that will not leave anyone indifferent.
Astronaut made of plasticine and foil
This astronaut can become either an independent craft or part of a larger composition on the theme of an expedition to the moon or the conquest of space.
You will need:
- plasticine;
- foil;
- toothpicks;
- hot glue;
- black paper.
Progress:
- Roll from plasticine:
- 8 balls of the same size (legs);
- 8 balls slightly smaller in size (hands);
- oval (torso);
- ball (head);
- square (knapsack);
- 2 small balls (headphones on the spacesuit);
- oval base for the body and head.
- Wrap each piece tightly with foil.
- Place balls in foil for arms and legs on a toothpick so that the tip on one side remains free.
- Using the free end of a toothpick and using hot glue, attach the legs and arms to the astronaut’s body. Glue the backpack and headphones.
- Twist a long hose from foil to supply oxygen and glue it with one end to the helmet and the other to the backpack.
- Cut an oval out of black paper and glue it to the front side of the helmet - this will be the viewing glass.
The astronaut is ready!
Expedition to the Moon
Image source
We recommend this craft for both 4-year-old children and 40-year-olds. After all, even an adult will be interested in making the surface of the Moon with craters with his own hands and installing the Russian tricolor on it!
You can sculpt anything you have enough imagination for - from humanoids to a lunar rover. Don’t forget to tell your children interesting facts about our planet’s satellite while sculpting. Kids will especially love the fact that the first living creature to orbit the moon was a turtle.
Space idea made of paper and cardboard for April 12
From components such as paper and cardboard, it is easiest to do work for kindergarten and school. Because they are always present in any home. And also scissors and glue. If all this is available, then I propose to build such a composition from a flying spaceship, the sun and Saturn on a black background.
To work you need:
Manufacturing:
1. Cut the sleeve in half. At one end we cut off the edges to create the nose of the rocket.
2. From blue paper, cut out three blue cones, which we bend in the middle. These will be our rocket engines. We glue them to the uncut (back) part of the sleeve.
3. Glue the rocket onto a black background.
4. Cut out two petals from red and gold paper. This will be fire coming out from behind the ship.
5. Glue the flame and the cut out window.
6.Draw the sun on gold foil, and Saturn with a ring on silver foil. Cut out and glue both shapes onto black cardboard.
7. Apply glue to the background and sprinkle semolina on top. This is our milky way. Beautiful craft is ready!
Did you like the collage? If you have schoolchildren, you can make a flying luminous object below.
Flooring
A space-themed children's room should have appropriate flooring that will support the overall style of practical spaceship decoration.
The following are used as floor coverings in children's rooms:
- floorboards;
- parquet;
- laminate;
- multilayer linoleum.
To match the space design, the floor can be made either dark (dark brown, black, gray) or sandy white with a silver tint.
Important! When zoning the room, a comfortable soft carpet with low pile or velor covering is placed on the floor in the play area of the room.
The carpet can be either bright, with images of stars, planets, or a plain steel color.
A nuance: the puzzle carpet looks interesting, which the child can drag from place to place during the game.
How to make crafts from disks on a space theme?
CDs are already being thrown into the trash, but in vain. After all, this waste material is very suitable for souvenirs for Cosmonautics Day. Its shiny and round flat surface is very suitable for the production of unidentified flying objects.
Here is a second grader's masterpiece. She used the disk under a flying saucer with a very cute alien.
And this is the alien himself with antennas made of springs and foil.
Interplanetary taxi from the children from the preparatory group in kindergarten.
The cutest plate made of rhinestones and fluffy antennae.
ABOUT! And here is a whole group of funny humanoids with their own transport.)
And one more idea on how to use CDs.
Step-by-step 3D postcard in the form of a rocket
If you have never created three-dimensional postcards, here is a step-by-step method for you. Again, everything is as simple as two and two. Templates can be found at the end of my post.
We need:
Manufacturing:
1. Fold the A4 sheet in half. On the fold we draw half a rocket.
2. Part of the rocket in the photo below is marked with a dotted line. This means that we will not cut here. And we will cut out all the straight lines using scissors.
3. We try to do everything as carefully as possible.
4. We turn our spaceship inside. It will fold inward and the entire card will fold outward.
5. Draw the details of the ship: nozzles, porthole, nose and flame below.
6. Paint the background black with gouache. And the rocket itself in suitable colors.
Here you can get creative and make an astronaut’s face in the porthole window.
7. Draw beautiful flames.
8. Cut out different planets from colored paper. We glue them all over the background. You can also make stars from foil.
Voila! Our cool three-dimensional card is ready. We give it away for its intended purpose.
Making original works for a school competition
Let's be inspired by the ideas of the kids who won space-themed craft competitions. They all tried, working out every detail in their masterpieces.
Any available materials were used in the work. These are twine, foam balls as planets, glass pebbles, felt and much more.
International station
Composition of planet Earth, a rocket and two astronauts in outer space.
Russian cosmonauts
Solar System with satellite and planets.
And here is a magnificent model made from plastic bottles.
We use felt for voluminous applique.
Beautiful applique made from napkin balls.
To make it, you need to roll out many, many balls from colored paper napkins. But the work seems to be worth it!
The squirrel and the salt dough arrow are waving their paws at you).
A little imagination on the theme of the galaxy, starships and UFOs - and a wonderful work is ready for the competition!
Space crafts for school
When we hear about space-themed crafts, rockets, airplanes and stars immediately come to mind. We invite you to bring more original ideas to life.
UFO
Even though building a UFO seems like a very difficult task, we offer a simple and easy way. Such a craft will surprise school teachers and will definitely not go unnoticed at an exhibition of creative works.
You will need:
- 2 plastic bottles blue or green;
- 2 disposable plates;
- scissors;
- Styrofoam;
- hot glue;
- skewers;
- large beads;
- white cocktail tube;
- battery-powered garland (preferably with white light).
Progress:
- Trim the bottom of the bottles.
- In one of the plastic plates, cut a large circle in the center, slightly smaller than the diameter of the cut bottom of the bottle. Cut out a small circle in another plate.
- It is advisable to heat the edges of the cut bottom of a plastic bottle with an iron to even out the edges. This way the part will stick better to the craft.
- Apply glue to the edges of the cut bottom of the bottle and glue it to the plate where you cut out a large circle.
- Cut the foam into thin squares.
- Cut a strip from the remains of a plastic bottle and straighten it as much as possible.
- Glue the foam squares with a small distance from each other along the entire length of the strip.
- On a plate where a small circle is cut out, carefully poke 3 holes around it with scissors.
- Insert skewers into these holes, securing them with glue and beads. The skewers need to be attached not evenly, but so that they look slightly to the sides. These will be the legs of our UFO.
- Cut the white cocktail tube into 3 equal parts. Place each one on the “leg” of the UFO. If you don’t have a tube of the desired color on hand, you can paint the legs with white paint.
- Grease the tips of the legs with glue and put beads on them.
- Glue one of the strips of foam plastic along the diameter to the plate on which the legs were made.
- Place the garland inside, leaving the “tail” with batteries outside. Glue the top part - a plate with a bottle bottom.
The craft is ready. All that remains is to turn on the lights and go on a space adventure.
Saturn
To create a real planet with your own hands, you will need available tools. It should be noted that the craft will take a lot of time: in total, it will take about 2 days for the model of the planet to dry. Therefore, you need to take care of its production in advance.
You will need:
- PVA glue;
- brush;
- balloon;
- paper towel or white napkins;
- cardboard;
- paints.
Progress:
- Inflate the balloon.
- Using PVA glue, cover it with napkins, leaving a small space free at the “tail” (in order to later remove the ball from it).
- Let dry (about a day). Carefully burst the ball and remove it through the remaining hole.
- Cover the resulting void with paper. Let dry thoroughly (also about a day).
- Color the ball in the appropriate colors (yellow and orange shades). Leave to dry for 10-15 minutes.
- Make a ring out of cardboard (use a compass to measure the exact diameter).
- Attach the ring to the planet and color it.