Drawing with palms in the senior group: autumn still life. GCD summary, pictures for children, examples of children's work.
Palm painting is an unconventional painting technique that is commonly used with young children. But its capabilities are much wider. Today we will look at how you can use this non-traditional technique in teaching drawing to children of senior preschool age (senior and preparatory kindergarten groups).
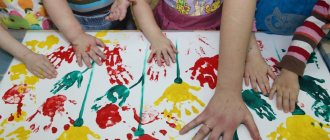
Palm painting technique. You will need paints with the consistency of liquid sour cream. The paint is either applied to the child’s palm with a wide brush, or poured into a flat plate into which the child dips his palm. Next, palm prints are made on the paper and they are completed to the desired image. You can finish painting with your fingers or with a regular brush.
Author of the summary: reader of "Native Path" and participant in our competition "Autumn Workshop of Children's Crafts -2015" Lebedeva Elena Nikolaevna, teacher of additional education and teacher-organizer (Moscow GBOU School No. 324 "Firebird" DP kindergarten No. 215 and No. 179 ).
Tasks
— introduce the work of artists who depicted autumn still lifes,
- introduce the basics of color science, teach how to identify cold and warm colors and use shades in your works, introduce the term “saturated colors”,
- strengthen children’s ability to mix watercolor paints, obtain shades of colors and use them in drawings,
— develop children’s compositional skills: learn to place a composition on a non-standard sheet of paper, independently build a composition of a drawing and work it out in color,
— encourage children to boldly experiment, using a palette to mix colors, to find their own vision of the beauty of shapes and objects.
Progress of the lesson:
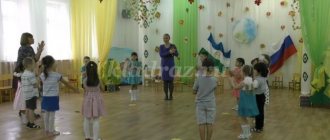
1. A sunbeam and asks for help.
2. Children are ready to draw a lot of rays from the sun to make it lighter, warmer, and the snow to melt faster. Showing a method of applying gouache to the palm and imprinting it on paper.
4. Evaluation of work. Reading poems
“
Sunshine , sunshine ” Sunshine , sunshine , Look out the window, Shine a little light, I’ll give you some peas!
Olga Chusovitina “Me and the Sun ”
The sun is shining through my window in the morning, which means it’s time for me to go to kindergarten. I quickly wash my face, brush my teeth myself, and I can hear the cheerful noise of birds outside the window. The birds are happy that spring has come,
5. Games with a sun bunny .
Synopsis of the physical education lesson “Let's go on a flight” (first junior group) Synopsis of the physical education lesson 1st junior group. “Let's go flying.” Venue: on the street. Objectives: 1. Strengthen the ability to perform.
Summary of the integrated lesson “Grandfather Frost’s Birthday!” (first junior group) Summary of the integrated lesson “Grandfather Frost’s Birthday!” (1st junior group) Tasks: Introduce children to the main character of the New Year. Summary of the integrated lesson “Needles for a hedgehog” (first junior group) Integration of educational areas “Artistic and Aesthetic”, “Speech Development”, “Cognitive Development”, “Physical Culture”. Synopsis of the integrated lesson “Oh, the red rowan tree” (first junior group) Synopsis of the integrated lesson “Oh, the red rowan tree” (first junior group). Program content: Expand your understanding of trees.
Abstract of the educational activity for drawing "Balloons" (first junior group) (2-3 years) Abstract of the educational activity for visual activities (drawing) "Balloons" First junior group (2-3 years) Objectives:.
GCD summary for drawing “Let's decorate a plate” (first junior group) GCD summary for drawing “Let's decorate a plate.” (first junior group) Integration of educational areas: • cognition • socialization;.
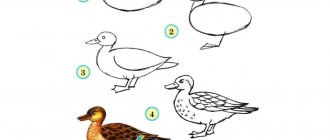
Summary of the modeling lesson “Mother Duck and Ducklings” (first junior group) Purpose: To arouse in children the desire to depict, sculpt; Develop fine motor skills and creative abilities; Continue to master some. Summary of the lesson on plasticineography “Ladybug” (first junior group) Program content: • Form children’s ideas about the inhabitants of their immediate environment, teach them to recognize and name animals by their bright colors.
Source
Preparing to paint an autumn still life
The teacher asks the children what time of year there are many bright and rich shades of warm colors in nature; nature literally breathes warmth. This time of year has always attracted artists, poets, and composers with its luxurious beauty; they admired this time of year and conveyed their admiration to people through their vision of the beauty of nature. How many famous people have left us their masterpieces in painting, poetry and music! What time of year do you think it might be? (autumn). What time of year is it now? What autumn months do you know?
What is the difference between early autumn and golden autumn? (In September, autumn is just beginning. The first yellow leaves appear on birches, maples bloom with yellow and red foliage. They say about such an autumn - early autumn. In October, all the trees dress up in autumn outfits, the leaves begin to fall. They say about such an autumn - golden, lush autumn ).
How do we know that late autumn has arrived? (In November, there is almost no foliage on the trees, there are frequent cold rains, frosts set in, and the first snow falls. This is called late autumn).
Autumn has its own colors. What colors of golden autumn do you know? (Red, yellow, orange, green, purple, warm, crimson, golden).
More useful materials for talking with children: A selection of poems about the colors of autumn for drawing classes with preschool children can be found here in the article about drawing an autumn forest using the technique of leaf prints on paper.
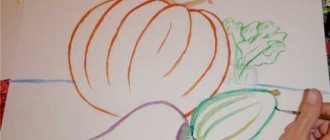
The teacher invites children to draw an autumn still life and shows how adult artists and children who are learning to be artists draw still lifes.
How to analyze these still lifes with children: The teacher shows the children a table with warm and cold colors and the still life invites them to think through what color palette the artist tells us about autumn in his still life. Does this painting have more warm or cool colors and shades?
At the end of the conversation, the adult asks: “What colors will you use to tell your story about autumn in your future still life? Think about it, and you and I will begin to draw an unusual autumn still life.
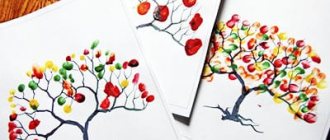
The still life will consist of maple leaves that stand in a vase. We will draw maple leaves using our palms.”
Precautionary measures
Small children get tired quickly; for the first time it is enough to practice for no more than 5 minutes . Further, the child’s attention will not concentrate on creativity. The first few lessons are an adaptation period. You should not set difficult-to-achieve goals while you need to conduct lessons in the form of a game. While drawing, children, with the help of their parents, will be able to study geometric shapes, names of colors, various animals and types of transport, even body parts.
It is important to properly prepare the workplace and monitor the baby. First you need to deal with the paints. If it is watercolor, then it is diluted with water to a paste-like state. Thick gouache should also be made more liquid. Finger paints are ready to use. You can add glitter to them to make drawing more interesting.
It is better to pour the material into a flat saucer or plate. It is difficult for kids to get paint out of a small jar with their fingers; it is much easier to scoop it out of a large bowl. It is recommended to place a bowl of warm, clean water nearby. The child will wash his hands in it in order to continue using a different color. You also need to place a towel nearby, which can be stained with paint.
It is not advisable to leave your baby alone during classes. A small child can be so inventive that he will paint more than just paper . The role of parents during creativity is to channel the children's energy. The mother or father must communicate with the baby, prompt or help him. But you need to be allowed to make mistakes. Let a child draw crookedly or ugly - this is how he still expresses his “I”.
If the baby is not yet a year old, then it is better to provide him with a floor instead of a table. It is advisable to remove the carpet from it and lay down oilcloth. It is also recommended to remove all items that a child could damage. Wardrobes and beds can also be covered with oilcloth, otherwise they may be painted. If parents are afraid that the baby will freeze, you can put a warm blanket under him.
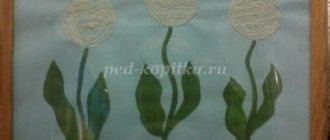
Drawing a mimosa with your fingers
The task will be interesting for children under 3 years old.
Prepare:
- blank drawing
- yellow paint
- glass of water
- a rag or napkins
You can draw a vase, twigs and mimosa leaves yourself or print a blank from the Internet.
- First, tell and show your child what you expect to see at the end of his work. Come up with a story about mimosa, when it blooms, what holiday it is given to your mother for
- Invite your child to draw flowers with his fingers, including those that have not yet bloomed. Help him play with shades of yellow paint for this purpose.
- At the end of the work, praise the child for his efforts. Save the drawing in an album or hang it on the wall in a frame.
We train our fingers, trace, draw, write
- This is the title of Alesya Zhukova’s book, which has been mastered and recommended by many parents of preschool and early school-aged children.
- Thanks to a moderate number of tasks, your child will learn to draw geometric shapes, write letters and numbers, count, and evaluate himself by the number of mistakes.
- Your help is still relevant. The tasks are different and may cause difficulties when you first get acquainted with them
The child will master:
- neat drawing technique
- correct and comfortable holding of a pen, pencil, brush
- alphabet and counting
You can purchase the book or find it in the public domain and print it before each lesson.
- Remember, you shouldn’t overload your child; if you notice fatigue on his paper, switch your attention to other activities, go for a walk or give his hands and eyes a rest
- So, we looked at the importance and relevance of regular finger painting classes for kids
- However, dear parents, focus more on the joy and pleasure of joint creativity with your child, rather than on results and achievements
Let your mutual understanding and healthy affection grow stronger every day!
Finger painting 2-3 years
After his second anniversary, the baby gets acquainted with geometric shapes and draws them.
In addition, he already speaks and is able to draw for a short time. The baby is already doing a good job with clear lines; he does not use his whole hand in the drawing process, but only his hand and fingers.
It is important to use both hands of the child so that his development occurs harmoniously.
Remind him, encourage him to use his other hand.
Make up stories before starting creative work with your child. For example:
- we draw snowfall, chicken, berries, apples - with this you encourage the baby to draw round shapes
- rain, a fence near the house, rails and sleepers - the baby learns to draw vertical and horizontal lines
- find a specific animal by coloring its silhouette
Other materials for practicing finger art will be:
- semolina, rice, buckwheat
- coffee beans
- Sprinkle a small amount of either of these on the lid of a shoe box.
- Engage your child in the game, be sure to praise him after the work is done
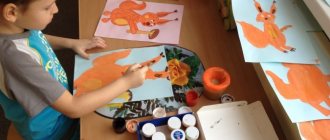
Finger drawing toys
- Toys surround the baby from the earliest days. That’s why the desire to draw them settles in the child’s head. It's so fun to depict a helicopter, a car or a bear with a doll walking in the forest or along a green meadow
- You will set the tone and help the baby during a creative flight
- Complete the small details and name the resulting toy. Write a short story about her and her adventures. So your baby will love to draw with you.
Here are some examples of finger painting of different toys:
Finger painting for little ones
The baby is interested in what is happening around him from the first moments of life outside his mother. And one of the main roles in this is given to tactile sensations, touching with hands.
Experts in the field of child development research recommend starting drawing with your baby from the moment he can independently hold his body in a sitting position.
Parents should prepare:
- a large sheet of paper, whatman paper, or a piece of wallpaper. The latter is even better because it has a textured surface that is pleasant to tactile contact.
- special children's paints for finger painting or prepared in advance at home
- clothes for the baby for creativity, which you don’t mind getting dirty. If the house is warm, then simply undress the baby. Don't be afraid that it will get dirty. Easy to clean children's paints
- musical background. Works from the classics will do. Watch your baby, you will find that one melody causes a storm of delight in him, and the second - thoughtfulness and calmer drawings
- your good mood and enough free time so that the process of joint creativity does not turn into a scheduled lesson
First, take the baby in your arms and place him in the middle of the sheet. Place 2-3 jars of paint. He will look at them, taste them, and make a few blots.
- You can encourage him to paint by dipping your finger in the paint and making a few dots/squiggles on the paper. This is how you demonstrate the moves and lead by example.
- It is important for a young artist to see that after touching the pen with paint, imprints and lines remain on the white sheet. For now this is enough for his perception
- Frequency of classes for babies up to one year old: twice a week for 5-15 minutes