Stages of drawing a birch tree for beginners
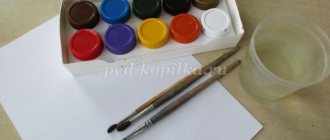
For the lesson, it is enough to prepare a landscape sheet, a simple medium-hard pencil and an eraser.
It is recommended to draw a lonely birch tree on a sheet located vertically. Then it is not difficult to place it entirely. If several trees are depicted, then the leaf can lie both vertically and horizontally.
For children, before drawing a birch tree, the lesson begins with determining its place on the sheet. So that the tree does not look torn from the ground, the same distance is removed from the upper and lower edges of the leaf. The same should be done with the side borders.
For a beginning artist, step-by-step progression will make the task easy.
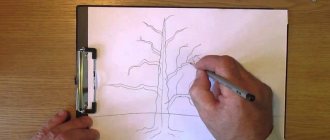
1. Work begins with drawing a birch trunk.
It does not prevent children and adults from remembering that a birch tree is always compared to a slender girl. Therefore, the table cannot be too thick. But still it is thicker at the bottom and tapers towards the top. Moreover, the peculiarity of birch is the bifurcation of the top of the birch.
2. Any tree has longer lower branches. They are thicker than the top ones. From the middle of the trunk to the crown, the branches are drawn evenly. Then the birch will be harmonious.
The trunk with the main branches is depicted first. Thin branches are already being drawn onto them. The top ones are directed towards the sun. And the lower they are, the more the branches smoothly fall down. They are said to have a weeping shape. The more small branches, the fluffier the birch will be.
3. The stains characteristic of birch are applied directly to the trunk. The lower first three main branches are decorated with small dash stripes.
It is also important for an artist to be observant. This quality will tell you how to correctly draw birch bark on the branches and trunk. If its trunk is white, then its branches are dark. To color them, a dark brown color is chosen. On the tree, the branches are not located strictly on the sides. Their image around the trunk will make the drawing more realistic.
Abstract on artistic and aesthetic development in the senior group “Russian beauty birch”
Transcript
1 Notes on artistic and aesthetic development in the senior group “Russian beauty birch” Integration of educational areas: “Artistic and aesthetic development”, “Cognitive development”, “Social and communicative development”, “Speech development” Objectives: 1) To develop the ability to perceive pictures , feel its mood, select epithets to describe the state of the weather (Artistic and aesthetic development") 2) Exercise children to depict a tree, convey its characteristic state, features of appearance (Artistic and aesthetic development") 3) Give an idea of the artist’s work. (cognitive development) 4) Contribute to the development of cognitive interest in artistic activities. (Cognitive development) 5) Instill love for native nature. (Socio-communicative development) 6) Be able to write a descriptive story based on a picture (speech development) Methods and techniques: -practical: round dance around a birch tree - visual: looking at a birch tree on walks, looking at illustrations of paintings - verbal: reading poems Materials and equipment: A set of illustrations and paintings depicting summer phenomena in nature, I. Levitan’s painting “Birch Grove”, sample drawing, audio recording “Seasons”, model of a birch tree, birch leaves, album sheets of paper, paints, brushes, palette Children’s activities Play Forms and methods of organizing joint activities Round dance around the birch Cognitive and research Observations, excursions.
2 Communicative Conversations, composing stories, creative retellings, composing and guessing riddles, situational conversations, questions Musical Listening to an audio recording of “The Seasons” Fine Drawing, creative activities in the art studio. Logic of educational activities Activities of the educator 1 Organizational moment. - Guys, what time of year is it now?... - Well done, of course it’s summer. - Guys, let's close our eyes and imagine that we are in the forest. What colors has summer painted everything around us? 2 Educator. Guys, this is how summer inspires poets. Summer, summer, fabulous summer! Miracles make you dizzy. Here in rainbow-colored chain mail islands emerge from the river! Summer, summer With an unsung song, hot grass is waiting for the rain. Together with the sun, in the haze of dawn, Pupils’ activities Children look at photographs and illustrations depicting summer phenomena in the forest, answer questions Children listen carefully to the poem, analyze what they heard Expected results Interest in the upcoming activity is formulated Increased emotional mood. The ability to listen to a work of fiction.
3 Islands Come Out of the River 3 Educator. (Draws the children’s attention to the illustrations) Now look how summer inspires the creativity of artists. Tell us what you see in these illustrations? - Well done, you notice everything wonderfully, you are good observers. Which summer month do you think is depicted in the paintings?... - Guys, nature is a wonderful teacher. Artists learn from her how to depict her beauty with the colors they see. Look at the tree painted in this picture? (Shows a birch tree). - Of course, this is our Russian beauty birch. Birch trees also grow near our kindergarten. Let's look at its image in the picture, remember what kind of birch you saw on the site? Children look at illustrations and paintings. Actively participate in the conversation, reason and answer the teacher’s questions. Examine the nature depicted in the picture. Ability to compose a short story about the artist’s work. An idea of the artist’s work has been formed. An aesthetic perception of nature has been formed, the ability to describe a natural object using expressive speech means.
4 4 Educator. - And there are poems written about the birch tree. I love the Russian birch, sometimes bright, sometimes sad, in a white sundress, with handkerchiefs in pockets, with beautiful clasps, with green earrings! I love her, elegant, dear, beloved, now clear, ebullient, now sad, weeping! They really described the birch tree beautifully, does it look like itself? Children answer the teacher’s question. Coherent speech develops in answering questions.
5 5 The teacher draws the children's attention to the picture. Educator: “Many years ago, a wonderful artist Isaac Levitan lived in our country. He loved Russia and painted paintings depicting its nature. Levitan's paintings are loved and known not only here, but also in other countries. The artist chose a variety of corners of nature; where he painted slender birch trees. Today we will look at this painting by I. Levitan “Birch Grove” Educator. — Why did the artist name his painting “Birch Grove”? — What do you think the artist wanted to tell us about birches? - Did he manage to do this? 6 Educator. Before you and I draw the beautiful birch tree, I want to invite you to relax a little and dance around the birch tree (a model of the birch tree is placed). The teacher distributes pre-prepared birch leaves, reads to the children. Children carefully examine the picture of birch trees. Children's answer options. Children, together with the teacher, dance around the birch tree. Improving the children’s ability to express their own opinions. Ensures children's need for movement, relieves muscle and mental tension
6 follow him through his movements. Once June was walking through a small river and mistook a birch tree for a girl. He went up to her and sat down on the bank. White, you look like you’re covered in snow. Here's a green leaf for you as a gift, As soon as you wave it, the day won't be hot. Here's another one you'll spread in the air, It will accept the dew by the full handful. The third leaf is noisier than these! He will sing songs at dawn, 7 Teacher. Guys, today I suggest you depict a birch tree in all its summer decoration. -Look at what color the birch foliage has been painted in summer? -What are the shapes of the leaves? - Now I’ll show you how to draw a birch tree trunk and its characteristic features, differences from other trees, have you guessed what distinguishes a birch tree from other trees?.. - That’s right, this is its trunk. (Shows the technique of drawing a birch trunk). -And now my little artists, go ahead. The image of a birch tree can be: Approach a birch tree and run your hand along the trunk several times. Hang a medium-sized sheet cut out of paper on the birch tree. Hang another sheet. Hang a third sheet. Children sit at the tables. Children perform work to the accompaniment of music and the recording “Seasons.” Fine art activities are intensified
7 add other details as desired, creating a plot. But don’t forget that the birch tree in your drawing is the main character 8 The teacher provides individual assistance. 9 Educator. Children, look at what a beautiful round dance our birch trees turned out to be. Which birch tree did you like best, why? - You guys all did great today, you worked like real artists. Having completed their work, the children lay them out on the tables in a circle. Children express their opinions on which of the drawings they liked best. A love for their native nature is instilled.
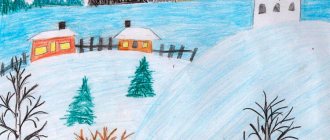
Winter birch
For winter, a drawing of a birch tree without leaves will be taken as the basis for coloring. There are many options for how to paint a winter birch tree. The simplest one is using a wax candle. To ensure that the wax is applied well to the entire image, small branches are not drawn too small.
1. With strong pressure on the candle, outline the trunk and all branches.
Wax lines on the sheet are visible at a certain angle. This will help you not miss a single branch. Snowflakes in the air and snowdrifts under a tree are drawn with wax.
2. Before you start painting with watercolors using the wet-wet technique, the entire sheet is moistened with water. To do this, use either a wide brush or foam rubber.
3. The entire sheet is filled with paints, moving down in multi-colored horizontal lines. By making smooth transitions from one color to another from top to bottom, it is possible to convey the color of the sky and dawn. At the same time, a snow-covered birch tree appears on the sheet. Children of any age are interested in watching this trick.
How to draw a birch
How to draw a birch? Even if you are a complete beginner artist, this will not be a problem, because you have a good and simple step-by-step drawing lesson from LessDraw. If you have already prepared everything you need for drawing (in our case, a pencil, an eraser, plain white paper and some materials for coloring the picture, for example, paints or colored pencils), then you can safely begin! You will definitely succeed.
First, let's draw a birch trunk, leaving a little space at the top and bottom. We try to make the lines neat and beautiful, and if something doesn’t work out, we correct ourselves with an eraser. Notice how slender the trunk of such a tree is - like a birch, it is not at all similar to the trunk of, for example, an oak. We make a smooth bend and a gradual narrowing towards the top.
Now we need to add additional branches. The lower the birch branches, the longer. Notice how they curve sharply towards the tip. Add the required number of branches and at the same time make sure that even at this stage the birch tree looks harmonious.
At this stage I make a few strokes, these will be the outlines of the crown. Next, I will erase these lines; I need them to build the shape of the crown and the overall volume.
Throughout this area, from the main branches we draw additional ones. They have the shape of a wave, several come from one branch at once and they are all of different lengths. As a result, you should end up with something like this.
Now we remove the extra lines and start coloring the trunk. A distinctive feature of birch is dark spots on the bark, and we definitely need to take this point into account in the drawing process. If you are planning to draw a winter birch, then you can stop at this stage - all that remains is to just finish drawing the bluish snow, landscape and get rid of unnecessary strokes. We will continue to draw.
Next, draw leaves on each branch separately. We started drawing birch leaves from below. You can use different shades of green, then the drawing will look very lively and healthy.
Gradually fill the birch branches with leaves. Try to draw leaves of approximately the same size; they may become only a little smaller than the standard ones at the ends of the branches.
Step by step we fill the entire crown. Birch leaves can also be drawn on top of the trunk, if some branches cross it, and behind it.
That’s all, as you can see, it’s very easy to draw a beautiful birch tree without any special skills, even a child can do it! The process is quite fast; you can complete it in 10-30 minutes, depending on your experience and materials used. Be sure to send your birch drawings in the comments!
Birch in summer
Summer birch is drawn with green leaves of different shades.
In reality, they do not differ from each other in size and shape. Long yellow earrings will add truthfulness to the picture.
Judging by the leaves drawn with an inclination in one direction, it is immediately clear that a birch tree is depicted in windy weather. The artist also tilts thin branches in the same direction. One side of the trunk is shaded to make the drawing more realistic.
Green birch looks beautiful against the backdrop of a mountain landscape, next to a river, a forest, or in a clearing with different flowers.
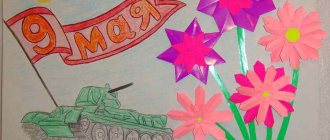
A painting with a swing on a birch tree, with children playing and a blue sky, as a symbol of peaceful life on earth.
Birch leaves
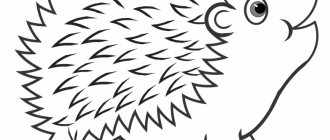
For autumn birch, the leaves are painted bright yellow and yellow-green. Lemon and light brown leaves are found. The picture will be enlivened by a hedgehog on the yellow grass under a tree and a clearing of growing boletus mushrooms.
Before you put your idea on paper, you need to figure out how to draw a birch leaf step by step.
- The drop shape is taken as a template for drawing a birch leaf. A center line is drawn in the center.
- In reality, the edges of the sheet have sharp teeth. They are applied along the contour of the drop, without strictly observing the symmetry of their pattern on the left and right sides. Veins run from the center line to the edges.
- The veins and teeth in the drawing should not be thick, but noticeable. A black pen is used to draw them.
- The middle of the leaf is painted yellow with a smooth transition to a salad shade before reaching the teeth.
- The strip closer to the teeth and the areas between the veins are painted green.
- The outline on the outside of the leaf and the veins are reinforced in the drawing with a black marker.
The image of one leaf is ready.
Summary of a drawing lesson in the preparatory group “Birch in Autumn”
Drawing lesson in kindergarten “Birch in autumn” step by step with photos.
Preparatory group Author: Andreeva Irina Emelyanovna, teacher, MADOU Kindergarten No. 9 “Alyonushka”, Birsk. Description: this master class is intended for preschool children, additional education teachers, and parents. Purpose: the work can be used as interior decoration or a gift. Intended for use by children aged 6 years and older. Goal: to strengthen children’s skills in drawing a birch tree. Objectives: - To consolidate children’s ideas about the signs of autumn; — Teach children to convey impressions of autumn in a drawing; - Cultivate accuracy, perseverance, cultivate love for native nature. Materials: palette, brush, glue, felt-tip pens, glass of water, napkin, orange cardboard, gouache, paper, scissors, birch tree template.
Progress of work
Organizational moment Guys, someone threw a letter through our window. Look at the letter. Maybe it’s a ray of sunshine. What tickles our face. Maybe it’s a sparrow. Dropped it while flying? Educator: Guys, do you want to know who wrote the letter to us? Educator: (reads the letter)
Hello guys! The forest boy is writing to you.
I want to ask you
a riddle , try to solve it. The field is empty, it's raining. The wind blows away the leaves. Fog is creeping in from the north, menacing clouds are hanging. Birds move south, barely touching the pine trees with their wings. Guess, dear friend, what time of year is it? -...
Children: autumn.
Educator: what signs of autumn do you know? Children: the sun rarely shines, birds fly south, the days get shorter, it rains often, it gets colder, animals stock up on supplies for the winter, animals change their coats. Educator: what happens to the trees in the fall? Children: leaves turn yellow, leaves fall off.
Educator: That's right. Leaf fall is an amazing and very beautiful natural phenomenon! In autumn the leaves change colors. And autumn trees dress in colorful, bright outfits. The first frosts arrive and leaf fall begins. This happens in September or October. Fallen autumn leaves cover the ground like a carpet and warm it in the cold winter. Lesovichok: I have another riddle . In a white sundress she stood in a clearing. The tits flew and sat on their braids.
Children: birch.
Educator: That's right, guys, this is a birch tree. She can be found everywhere, she is the first to populate new places and decorate the forest with lacy crowns. But the forest, consisting only of birches, is especially beautiful. Who knows what this forest is called? Children: birch grove.
Lesovichok: I really want to visit a birch grove. Educator: Lesovichek, now our guys will draw you a birch grove and you can take a walk there. Lesovichok: I’ll be only too glad. Fizminutka Birch trees have grown in the field It’s good to grow in the field! (Stretching - arms to the sides)
Each one tries, Reaches towards the sky, towards the sun.
(Stretching hands up)
A cheerful wind blew.
The branches began to sway immediately. (Children wave their hands)
Even thick trunks.
They bent down to the ground. (Hands on the belt, squat)
Right, left, back, forward.
This is how the wind bends the trees (Tilts to the right and left)
He turns them, he turns them.
When will there be rest (Rotation of the body)
The wind died down.
The moon has risen. There was silence. (They lower their arms to their sides)
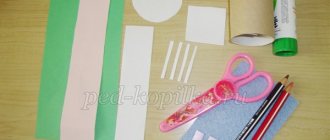
Educator: guys, let's draw a birch tree. Educator: We’ll make a birch tree like this.
We will need: a palette, a brush, glue, felt-tip pens, a glass of water, a napkin, orange cardboard, gouache, paper, scissors, a birch tree template.
Use a black felt-tip pen to draw a birch trunk
Cut a birch trunk along the contour
Glue the birch trunk onto the orange cardboard
Prepare yellow gouache
crumple the paper
Dip the paper into yellow gouache. Poke the gouache onto the birch tree.
You need to apply yellow gouache at the birch root
The work is ready!
Finger gymnastics Here are the trees: Maple, rowan, linden, Oak, birch, elm, Ash, poplar, spruce, fir, We meet you in the forest. (Children show the palms of both hands with their fingers unclenched. When listing the names of trees, children bend their fingers first on one and then on the other hand)
Independent activity of children (individual assistance). Lesson summary Teacher: how beautiful your birch trees turned out. Well done.
Educator: what is the name of the forest where only birches grow? Now Lesovichok will be happy to walk in the birch grove. You can also make autumn trees in other colors.
Autumn trees decorate our group’s corner of nature.
Presentation on the topic: Birch in autumn
We recommend watching:
Synopsis of a comprehensive lesson for children of the preparatory group on the topic: Autumn Synopsis of the educational instruction in drawing for children of the preparatory group of a preschool educational institution. Autumn rowan GCD on cognitive development in the preparatory group on the topic “Autumn” Summary of SOD in the preparatory group on the topic: Autumn
Similar articles:
Scenario of the autumn ball in the senior preparatory group of the preschool educational institution
Summary of an autumn walk in the preparatory group “Observing a sparrow in autumn”
Summary of an autumn walk in the preparatory group “Observing pigeons”
Summary of a walk in the preparatory group “Observing a poplar”
Summary of the walk in the preparatory group “Observing seasonal changes in November”
Image of a birch branch with leaves
After it is clear how to draw one birch leaf, it is not difficult to move on to the image of its branch.
- In the figure, one of the branches with small branches is selected.
- Several leaves and buds are added, as a decoration characteristic only of birch.
- The contours of the leaves are drawn with sharp teeth. The buds have their own texture.
- A black pen emphasizes the shapes of the leaves and the veins on them. The kidneys are not left unattended either.
- At this stage, the leaves and buds are painted in shades of green and yellow.
- To make the drawing more expressive, the teeth, veins and contours of the buds are re-drawn with a black marker.
Now you can cover the entire tree with leaves and decorate it with earrings.
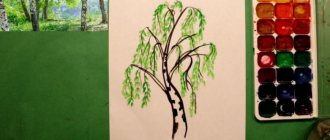
A simple way to draw a birch tree with gouache
It is difficult for children to cope with gouache at first. The drawing of a birch especially requires accuracy, because the trunk must remain white.
- Three strips of tape are glued onto a sheet of paper at an angle without much effort.
- The colors of the sky and dawn are applied to the sheet. Green, yellow, and orange spots imitating leaves are dotted around the stripes. The lower edge of the leaf is painted dark green.
- The tape is removed and white stripes appear on the leaf, which will be the basis for the birch trunk.
- The plastic paint edge is painted black. Without allowing it to dry out, black stripes characteristic of birch are drawn along the entire trunk.
- Small twigs are applied with a thin brush. The splendor of the tree depends on their number.