What techniques are used
Modern methodology contributes to the implementation of the educational task when performing work.
Note! A similar technique is considered for children from 3 to 4 years old. In addition, you can organize additional interesting activities with minimal financial costs.
What technique is used in practice?
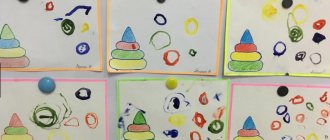
Drawing with cotton swabs
An unusual drawing technique develops a sense of rhythm and color. Cotton swab (stick) - a popular drawing technique is called the “poking method”. When creating a drawing, it is impossible to do without a cotton swab, container, and wet wipes. When creating a new material, little artists place a stick in a container of paint, and then apply imprints to the drawing.
Drawing on the theme “Mimosa in a vase” for senior and preparatory groups
Important! Young artists can depict a river, rainbow, grass, rain, snow, sun, tree, sky or something else.
When creating a drawing using a cotton swab on the theme “Trees when autumn comes,” the teacher must show the children how to properly hold this object in their hands.
Instructions: Children receive blanks of tree trunks with branches, cotton swabs, and paints.
Important! To make it easier for the children, you can mark the area of the drawing, indicating the exact location of the foliage.
Finger painting
To implement this method, you can do without certain material. For example, a teacher prepares paint in advance with wet wipes.
Note! Implementing teamwork based on this technique is a great idea for both educators and preschoolers.
The teacher takes into account the mental and physical characteristics of the children and prepares a topic for drawing in advance, for example, “Foliage of autumn trees.” The teacher provides the little artists with a template - a large tree.
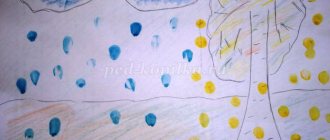
Other themes are also covered, such as “Winter” or “Summer is Coming.” In kindergartens, the finger painting “Snowflake” is most often created. To perform it, paints and pencils are used.
Instructions: The teacher distributes A4 sheets. The guys must draw a snowflake. To complete the work you will need a blue and white pencil.
Drawing with palms
This method is not the most accurate, since children must draw with their palms. Before creating a drawing, the teacher must prepare a shallow container of paint. Pour some water inside and drip some gouache.
Note! Using this method, you can easily create collective drawings, for example, “Fish in the Aquarium”, “Our Aquarium”, “Merry Matryoshka”, “Firebird”, “Winter has come”.
Instructions: The teacher shows the children the finished substrate. The drawing is created on a sheet with a blue background. The guys must completely dip their palm into the container of paint. Then the teacher calls on the kids to go to the table where the aquarium is located, stand in a circle and leave their imprint there with their thumb up or to the side.
There is no need to put a mark on the one that the first comrade has already put. The teacher also warns that the fish must be located at a certain distance from each other. Then make an eye for your fish using white paint. Dip your index finger into black paint, make a pupil and carefully draw a line near the mouth.
Drawing with soap bubbles
This technique is the most difficult. Here children will have to show their imagination (open mind). Before starting to draw with soap bubbles using the preschool method, the teacher prepares material in the form of liquid soap, baby shampoo, water, watercolors (food coloring), cocktail tubes, and spoons.
Drawing lessons on the topic “Our dear army” in kindergarten
Initially, the teacher prepares the mixture, and then pours the mixture equally into small glasses. You can prepare the paint by diluting soap with water (the ratio should be 10:1). After obtaining the mass, the addition of dye and a little gelatin or glycerin is required. Thanks to these components, the bubbles retain their shape for a long time. The finished mixture will have to be placed in a cool place (away from the sun) and kept for 2 days.
Important! It is recommended to strain the mass through cheesecloth. The finished mixture should be placed in the refrigerator for 10 hours. Having received the material, you can make a outlined and regular print.
Instructions: The teacher invites the children to take a sheet of paper, a container with soap solution, straws and disposable teaspoons. Children must blow into the tubes to create foam. Next, a mass of one color is collected and laid out on a sheet. The balls should be placed far from each other. Once the shape of each print is dry, children can add a string to each ball.
Drawing with stamps
Drawing with stamps can reveal the possibilities of using familiar objects as art material. This method promotes the mental development of the child.
Note! When drawing with a stamp, a child develops an interest in inventive art, which leads to increased self-esteem and the development of coordination of movements.
Foam rubber impression
The main goal of this method is to introduce students to an unconventional method of drawing using the “foam rubber imprint” technique, and to develop the ability to arrange the elements of a drawing on a sheet of paper.
Educational qualities: fosters a love of fine arts and nature.
Developmental qualities: to develop aesthetic perception, a creative attitude to work, attention, memory, spatial thinking, fine motor skills of the hands, a sense of composition, color, color perception, to form in children a stable interest in visual arts, creative imagination.
Lesson on non-traditional imaging techniques in the second junior group
Summary of a lesson on visual arts in the second junior group “The Spiny Hedgehog”
Program content: Objectives:
- Expand children's knowledge about hedgehogs (appearance, lifestyle, nutrition, habits).
- Introduce children to the color brown, reinforce the names of other colors.
- Teach carefully, listen and answer the teacher’s questions; enrich and
- activate the vocabulary: funny, snorts, puffs, curls up into a ball, mom is a hedgehog, dad is a hedgehog, children are hedgehogs;
- Develop muscles and fine motor skills of the fingers;
- Develop perception, compositional thinking;
- Experiment with art materials to depict a hedgehog’s prickly “fur coat.”
- . To develop the ability to find similarities between what is drawn and nature, and to enjoy the process of drawing.
- Cultivate interest and respect for living nature
- To instill neatness and independence in children, to create a friendly environment when working.
Materials for the lesson:
Pictures and illustrations about a hedgehog, a toy hedgehog, massage balls, brushes, paper with an outline of a hedgehog, cereal, paints, napkins, a sample with a picture of a hedgehog.
Preliminary work:
Examination of illustrations depicting a hedgehog.
Guessing riddles about forest animals Lesson progress.
The teacher takes out a box of massage balls.
- Guys, today the forest animals sent you a package. Let's see what's there. — These balls are not simple, but they are useful. You can play with them, ride them on your hand, give each other a massage. Forest animals want you to be healthy and cheerful. Look what color they are? Do you like them? What are they like? What do they have? Children: needles. Educator: I’ll tell you a riddle, and you listen to it carefully and guess. The teacher asks a riddle to the children about a hedgehog: An angry touchy-feely lives in the depths of the forest. There are a lot of needles, but not one thread. (Hedgehog)
So which forest animal has needles?
A game with a spiky ball.
Educator: Now let’s play with the hedgehog ball, sit down comfortably on the floor.
The teacher shows and the children repeat the movements. Hedgehog, prickly hedgehog, where are your needles? If I give you needles, the wolves will eat me! (roll the ball into the house). Educator: Guys, be quiet, you hear someone rustling. Let's see who it is? A toy hedgehog appears. - Hello, hedgehog. - Hello children! Educator: Hedgehog, why are you so sad, maybe something happened to you? Hedgehog: I slept all winter. And when it got a little warmer, I thought spring had come and woke up. Apparently I woke up early, my friends are still sleeping. And I really want to talk to them, play, but how do you live here, what are you doing in the kindergarten? Educator: -Guys, let's tell the hedgehog what we do in kindergarten. Children: (children's answers) - we play, walk, draw, sculpt, etc. Hedgehog: -I want to tell you guys and show you how hedgehogs live in nature. I even brought their photos. Would you like to see? Children and teacher: -Show us your friends, we really want to see! Looking at paintings about a hedgehog. A story about their lifestyle, appearance, nutrition, habits.
Educator: Children, do you like them?
(Yes). Tell me, what would hedgehogs do without needles? Why do they need needles? Children: they need needles to protect themselves from enemies. If they don't have needles, they will be eaten by wolves and foxes. Educator: What color are hedgehogs’ needles, coat, eyes, nose? Children: The fur coat is brown, the eyes and nose are black. Where are the hedgehog’s needles located? Children: on the back. Educator: What do they eat? What do you love most? Children: They love apples, berries, mushrooms. Educator: Well done! How can we help our hedgehog so that he doesn’t feel sad? Children's answers: you can draw him friends or make or cut out drawn hedgehogs for him, etc. Educator: Now let's make these hedgehogs for our friend, let him have many friends. And you are our hedgehog, my friend, look what our children can do. To do this, I invite you to the clearing of creativity. Look, guys, what objects do you see in front of you? Can we use them to help the hedgehog? Is it possible to use these items to draw friends for a hedgehog? What method can we use to draw? (poke, palm, plasticine-croup). O explanation .
Who will draw using the poke method?
Let us remember once again that the hedgehog’s spines grow only on its back, and its muzzle is without spines. We hold the brush with three fingers of our right hand by the metal tip, hold it straight, and our brush begins to jump along the contour of the hedgehog on the back. And who wants to draw with their palm? Take a close look at your hands. Place your palm on a piece of paper - Look! Imagine! Let your imagination run wild! Let's turn your palm into a hedgehog. Our fingers will be needles, and our palm and thumb will be the body of a hedgehog. We paint the palm and thumb brown. Fingers – in black, put your palm on the sheet. Here's our hedgehog. And who will make it from plasticine with cereals, then the outlines of hedgehogs are prepared on the tables, take the plasticine and smear it only on the back where the needles are located and then apply the cereal. And you will get such hedgehogs. Practical work for children.
Hedgehog: What fluffy needles hedgehogs get, how funny they are, and everyone is different. Well done boys! Educator: While the drawings dry, we will play a game. And then we’ll sit down and finish our funny hedgehogs. Come with us, let's play our hedgehog friend, we also want to be your friends. Fizkul Under a huge pine tree, In a clearing in the forest, A pile of leaves lies where a hedgehog with hedgehogs is running. (The hedgehog children run after the hedgehog teacher.) We will look around everything, (Turn their heads to the sides.) We will sit on the stumps. (They squat.) And then we’ll all dance together, (Children spin around.) We’ll wave our arms like that. (Waving their arms.) They waved, circled and hurried home. (They run to their seats.) Educator: Well done! Now we have had a little rest, and now we will quietly go to our places to continue finishing our hedgehogs. And now we will show our hedgehog friend what kind of friends we have made for him. Our friend is a hedgehog, do you like the hedgehogs that children made? Hedgehog: Yes, they are very interesting, I liked them. Now I have many friends. I will play with them while my friends are sleeping, when they wake up I will show them to my friends. Educator: Then take them with you to the forest and show them to your friends! Do you want the hedgehog to come to us again? Children's answers: Educator: Come to us hedgehog more often, and you will see what else our children can do! What animal did we meet in the forest clearing? What new have you learned? Name the drawing method we used today. Hedgehog: Goodbye, guys, I will definitely come to visit you again! Educator: Yes, and we will say “goodbye” to our guests! Well done boys!
Let us take as an example a lesson on retelling the story “Sister” by L. Kassil. Before reading the story, the teacher shows an illustration - the picture “Nurse” and asks what this picture is about (about how a nurse bandages a wounded soldier on the battlefield), what the children learned about the nurse by looking at this illustration (she is brave, courageous, saved the soldier’s life, bandaged him). Then the teacher reads the story. The beginning is read calmly, then alarming intonations appear in the voice. Reading the second paragraph (the appearance of the nurse) should reveal both the fighter’s joy and his still unextinguished anxiety. The dialogue must be read especially expressively, conveying the nurse’s confidence that the fighter Ivan Kotlov will live. In the last paragraph, it is necessary to intonationally emphasize the author’s attitude towards the heroine of the story (“Nice friend, brave girl Nadya Balashova!”). After reading, the teacher asks the children questions: what is this story about? (About how nurse Nadya Balashova saved a wounded soldier;) What happened in the battle with Ivan Kotlov? (He went into a dangerous battle, was wounded and already thought that he would die, but his sister carried him out of the bey’s field.) How does the author talk about the nurse Nadya Balashova? (She is small, strong; they shoot at her, but she crawls, and this is how she saved the wounded soldier Ivan Kotlov.) What do you like about Nadya Balashova? (She is brave, courageous, dexterous, strong, kind, caring.) The teacher tells the children that they answered the questions correctly, well understood the content of the story and the author’s attitude towards the heroine. “And now I’ll read the story to you again, and you listen carefully: you will tell it.” Then he calls 5-6 children. After each retelling, children are given an assessment of how the content and details of the story are conveyed. For example; “Yura spoke expressively, but his story is incomplete. He didn’t tell about Nadya Balashova, how she carried Ivan Kotlov on her and that she was small but strong.” If the story or fairy tale is small in volume, then the child recites the entire text. A longer work can be told in parts (the teacher outlines logically completed passages in advance). Children who find it difficult to retell can be asked questions (they are also outlined in advance). E.I. Tikheyeva, recognizing the benefits of auxiliary questions, warns educators against using too many of them. The question should be specific and not distract the child from the text being transmitted. Sometimes he prompts the child for the missing action of the hero, sometimes he tells the child the necessary word that accurately conveys the meaning of what is being communicated. The beginning of the form from 219 Lev Kassil. “Sister” Soldier Ivan Kotlov went into battle. Ivan was hit by a fascist bullet. It pierced my arm and hit me in the chest. Ivan fell. And the comrades went ahead to drive the enemy. Ivan lies alone in the snow. My arm hurts, it’s hard to breathe—the bullet in my chest is making it difficult. He lies and thinks: “My end is coming. I'll die now." And he closed his eyes. And I stopped thinking. Suddenly he hears: someone is quietly touching him. Ivan began to open his eyes, but it was not so easy. The eyelashes are frozen. One eye opened, then the other. He sees a girl crawl up to him with a red cross on her bag - a nurse from the detachment. He takes a bandage out of his bag and begins to bandage the wound - carefully so as not to hurt. “There’s fighting all around, and she crawled,” Ivan thought and asked: “Will I die?” - You will live, comrade. I'll bandage you now. - Thank you, sister! - says Ivan Kotlov. - Let me know your name. “Nadya’s name,” he answers, “Nadya Balashova.” She bandaged the wounded man, took his rifle, grabbed Ivan Kotlov with her hand and dragged him to a safe place. The Nazis shoot at her, but she just crawls and drags the wounded man. Small, but strong. And he's not afraid of anything. That’s how she saved Ivan Kotlov. Nice friend, brave girl Nadya Balashova. -What is the name of the main character of the story? -Who was she at the front? -Tell me, what is she like? The entire people stands up to defend our Motherland. -What do you know about your relatives? Are there military people in your family? End of form