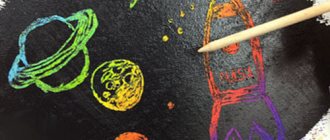
Modeling on the theme “Space” with preschool children : a step-by-step master class on making a plasticine picture on the theme of space.
On April 12 we will celebrate Cosmonautics Day. Today, for this day, we will make an amazingly beautiful plasticine picture with the children on the theme “Space”.
Children of senior preschool and primary school age can make this plasticine picture about space themselves. And younger children can help them.
Crafts for Cosmonautics Day in kindergarten from plasticine
It has long been proven that manual exercises are very useful for children, especially before school age. Fine motor skills of the hands perfectly develop both hemispheres of the brain. Which subsequently affects both learning and memorization of acquired, new knowledge. What else can you do to keep your child busy, if not making crafts from plasticine?
So, on the eve of such a holiday as Cosmonautics Day, I propose to hold a unique exhibition of children's crafts dedicated to space, stars, astronauts and various planets. At the same time, telling how our universe works, which planet is a satellite of the earth. That in exactly one year our planet makes a complete revolution around the sun. By the way, even the sun is the same star as many other planets without extreme space.
And then the guys can come up with their own composition and mold it from plasticine.
You will find even more crafts here Cosmonautics Day crafts from paper and cardboard with templates or DIY Cosmonautics Day crafts for kindergarten + master class.
The first series of crafts will be dedicated to the beautiful view of outer space:
By clearly showing your child the planets and telling them about the unique features of each, you will not only prepare a beautiful craft, but also learn the structure of our solar system.
What you will need for this:
- Colored cardboard - one sheet of black;
- Plasticine - one pack.
Let's get started:
First of all, mix yellow, red and orange colors to apply the flame of the sun.
The first planet of our solar system is Mercury. It is practically not replete with different colors, so a mixture of white and black plasticine will be enough. Using a needle we pierce several holes. We attach it next to the sun.
The second is Venus. It is larger than the previous specimen, and the color still has brown streaks.
Our globe is attached next. For it we use blue color with green continents.
The moon is attached next to the earth; it is a satellite of our planet.
Mars is coming next. It is more fiery, the colors used are the same as in the sun: red, orange and yellow.
Then Saturn. There is an orange, white and brown tint. More striped, like a tiger cub.
Jupiter is done in a similar way, but multi-colored rings from blocks of ice and boulders are added.
Uranus is not as large as the previous two planets, but the coloring is substantially done. It is prepared from blue and purple shades.
Neptune is blue in color and the same size as Uranus.
The planets can be arranged similarly to the placement in outer space, or, on the contrary, they can be arranged in a single row of planets.
In the craft below, the planets are presented along with meteorites and satellites.
A flying astronaut admiring the beautiful view of his home planet.
Beautiful view of starry space.
The solar system is also presented, which is also labeled for ease of understanding.
Conquest of space by the creation of human hands.
Mastering new achievements.
For a more realistic preparation of the picture, use any cereals as decoration.
Just picture the planets in vacuum.
Plasticine Belka and Strelka are rushing to conquer the moon.
Mini space on skewers, a great option for a preschool exhibition.
Look how limitless a painting made using this technique looks.
And another version of our most beautiful solar system.
Next we’ll talk a little about a man in space, or in other words, an astronaut. It can be depicted using completely different techniques, voluminous or flat, large or small. It depends only on your desire.
Master class on sculpting an astronaut
It’s not at all difficult to prepare, especially for children’s hands. Therefore, I advise you to create such a cosmic miracle.
All you need is plasticine of different colors.
Material is taken in four colors:
- Blue,
- White,
- Red,
- Yellow.
Each is divided into pieces from which we roll into balls. White will be needed for the face, arms and legs. We put our feet in the form of boots.
Blue-red cakes are placed on them one after another. We sculpt the tummy, palms and parts of the face. Let's put it all together. If desired, blind the eyes, mouth and nose. Now the astronaut is ready!
Here is a rocket flight in space with a meeting of unknown creatures.
But our famous friend personally conquers airless space.
And here’s how in the future it will be possible for every inhabitant of the earth to travel to the moon.
Many spaceships gathered to chat.
A beautiful picture of travel between planets.
Our guys never get tired of walking around space.
I would also like to fantasize a little on the topic of aliens. No one has seen them live, but it’s so interesting to come up with their appearance, habits, and flying units. And every time a new copy comes out. Sometimes with one eye, sometimes with eyes and ears, sometimes with one leg, sometimes without a skeleton at all.
You will need:
- Plasticine - packaging in different colors;
- Plastic plates - a couple;
- Float - one;
- Plastic boxes for chocolate eggs - two pieces;
- Blue cardboard - one sheet;
- Candy lid – one piece.
Let's get started:
First, we make aliens out of plastic boxes. You can create completely different ones. For example, I completely covered one with plasticine and sculpted one eye. From the second I made an interesting yellow man. We will fasten the plates to each other.
We attach one alien inhabitant to the top of the improvised flying saucer. Cut a hole in the plastic lid. Glue it on top, above the alien.
Glue white stars on blue cardboard made of white plasticine. At one end we install a flying saucer, at the other end we attach a man.
That's all, you can decorate the flying unit at your discretion by adding silver stars or symbols.
Just as unusual alien inhabitants look absolutely extraordinary, their ships can be of completely different shapes and sizes, with or without legs, round or oblong in appearance. Let the child build his own invention.
But here is an interesting picture depicting both astronauts and inhabitants of other planets.
Look how scary it is, but in fact this is a very kind humanoid. And he smiles broadly at you.
What would I say about these creatures? They are intimidating and formidable. Capable of conquering any planet. It's good that they are made only from plasticine. But by giving them a plasticine smile, you can radically change their mood and turn them into the kindest alien creatures.
Look at the variety of humanoids a child is quite capable of creating on his own. Sometimes their imagination is an order of magnitude broader and more interesting than the fictional world of an adult.
And if, in addition, you take dry plant preparations or straws for juice, then you can make even more unearthly creatures.
And let them wander across the surface of your table, looking at each other in surprise.
And if it’s not on your table, but on a plasticine picture, that’s even better. There are even more design options for your imagination.
Plasticine paintings attract with their originality and volume.
But they playfully stick out their tongue, as if saying, let's play, buddy!
This is not all that could be described and shown to you, but I think this is not necessary. Call your child and together you come up with ideas for crafts and plasticine paintings. This is not only your communication, but also incredibly powerful development of the child’s brain. Which will definitely have a beneficial effect on development and learning in later life. But the most important meaning in life for most parents is to give a powerful impetus to the life and maximum development of the child. And it is joint creativity that perfectly fulfills this function.
MAGAZINE Preschooler.RF
Summary of a lesson in artistic modeling on the topic: “Space travel”Additional education teacher Dyakova M.A. MAU DO "House of Children's Creativity" Pechora 2016 - 2017
Goal: Formation of the foundations of patriotic education.
Tasks:
Educational:
- Gaining insight into the structure of the spacesuit
- Gaining experience in costume modeling
Educational:
- Development of cognitive interest in Cosmonautics Day and space exploration.
- Ability to plan your activities
- Development of creative self-expression, independence and imagination.
Educational:
1. Formation of patriotism, a sense of pride for the Motherland.
Type of lesson:
Thematic, complex (cognitive and developmental activities; artistic and aesthetic).
Lesson form:
Group, individual.
Forms and methods of work:
- Visual: presentation.
- Practical: modeling method.
- Verbal: conversation.
- Partial search: independent work.
Teaching methods:
- visual (auditory and visual) - viewing the presentation
- verbal - conversation
- informative
- problematic - exploratory - understanding the artistic image and searching for techniques and methods of execution
Progress of the lesson:
1. Organizational:
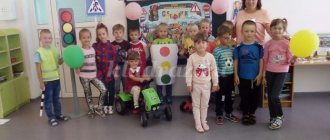
— Do you know what holiday we celebrate on April 12? (children's answers).
— That's right, Cosmonautics Day or International Day of Human Space Flight.
On this day in 1961, the planet's first cosmonaut launched on board the Vostok 1 spacecraft. Who is he? (Children's answers) Yuri Alekseevich Gagarin.
2. Main stage:
— And now I suggest you watch the presentation about this flight.
View the presentation (slides 1-9).
— Guys, what qualities do you think Yuri Gagarin had? (courage, determination, endurance, etc.)
Guys, have you guessed what the topic of our lesson is? (answer options: space, astronauts, space flight, etc.) The topic of our lesson is “Space travel” . Do you want to go on a space journey? I will be the captain of our ship, and you will be the astronauts. And we'll go on a rocket! (ready rocket). We have a rocket, are we in the mood to win? Eat! But something is still missing. What? (leading questions; children’s answers: special clothes, astronaut suit). That's right, spacesuits!
Let's see what a spacesuit is and what it is needed for.
View the presentation. (10-18 slides)
3. Verification stage:
- So why do astronauts need a spacesuit? (For protection from an aggressive external environment; creating an environment similar to that of Earth; heating; providing oxygen; protection from meteorites).
— What color was the space suit of the first cosmonaut, Yuri Gagarin? (Orange)
- Guys, do you remember what parts the spacesuit consists of? Name them. (Helmet, gloves, soft parts, pipeline, safety rope, control panel and others).
-Well done boys! You watched and listened carefully and learned a lot about spacesuits!
Now you know what they are and why astronauts need them.
I initiate you into level 1 astronauts and solemnly present you with an image of a spacesuit, but in order to go on a space journey, we need to finalize our suit. Our spacesuits may vary in color and suit details. But remember the qualities of astronauts, they will help us in our work: independence, resourcefulness, the ability to finish a job, accuracy and precision.
Do you think you have these qualities? Then get to work! In 15 minutes our spaceship sets off on its journey!
4. Practical part of the lesson: (explanation of the task).
— To build yourself a spacesuit, take the blanks, evenly distribute the plasticine over them, add any parts necessary for the astronaut, which can be made from flagella strips, balls, you can use rolling and chopping techniques. Then glue your photo to the helmet and stick a plasticine roller around it. Glue the porthole on top of the roller.
After 15 minutes:
-Guys, who is ready to have their spacesuit checked by the ship's captain?
I see everyone is ready to conquer the vastness of space!!!!
Take your seats and fasten your seat belts!
5,4, 3, 2, 1, Start!
(video of the ship launch, views of the Earth from space accompanied by “cosmic” music, slide 20)
And here we are in space! It's time to leave your mark! Take your image and attach it to a planet or rocket. And this planet is the planet of your mood! If you are in a good mood, take a yellow flag and attach it to the Mood planet, if you are in a normal mood, take a red flag, and if you are in a bad mood, take a blue flag.
Reflection:
Now sit down in your seats and please rate whether it was difficult or not for you in the lesson. Select and paint 1 section of the circle.
flags made of toothpicks and self-adhesive boom, a cup with markers, plates with faces (sad and happy) in which to put flags, a background - space, a rocket, portholes - from bottles, blanks, print out photos of children and cut them out, glue stick, presentations, projector, color. Pencils, music)
| Next > |