Autumn has arrived and brought with it many pleasant moments: gold appeared on the trees and bushes, the sky was covered with fluffy clouds, animals and birds began to scurry about, getting ready to survive the cold and winter cold. And in the fall, students met with their school friends. The children's schedule took up most of the time with lessons and preparation for school. Children from kindergarten have holidays and educational activities dedicated to autumn themes. There they act out skits, go on excursions, and paint autumn as they see it.
That's what we'll talk about today. After all, autumn inspires, I want to talk about how special this time is. Autumn is beautiful, it gives many warm days and amazing moments. This is exactly what is worth drawing!
Drawing on the theme of autumn in pencil
Drawing with a pencil is very simple. Can be used:
- drawing technique (look at the original and repeat every stroke exactly),
- or simply retake the image and transfer it to your own sheet of paper (this is when a blank sheet of paper is superimposed on the picture and drawn with a pencil along the contours and individual details of the image),
- a pencil allows you to convey shadow and light, volume and texture of an object (due to shading).
Well, if something doesn’t work out, you can easily fix it with an eraser.
Pencil drawings can be monochrome or color. How can a simple pencil convey the gold of autumn leaf fall, the crimson of sunset and the aroma of fallen leaves? Easily! If you use pictures typical of autumn, your memory will “complete the picture” itself. For example, a heap of leaves depicted on paper that lies under a tree will remind you how great it is to toss these leaves, how they quietly fall and spin, and how they rustle under your feet when you walk on them.
See examples of drawings for sketching in the gallery:
For reference! A pencil drawing is a work done by:
- with a simple pencil;
- a set of colored pencils;
- one of the colored pencils.
The children themselves can choose how it is convenient for them to draw autumn, and what colors will convey what they see.
Master class on how to draw autumn with a pencil.
Author
1. First, draw a sketch with a simple pencil. For example, an alley in a park, on the sides of which trees appear one after another. A person can walk along the alley under an umbrella.
2. Draw the contours with a felt-tip pen. We erase the pencil.
3. Color with colored pencils, shading or pastels. First we paint the crowns yellow.
4. Then shade one side with light brown.
5. Here and there we apply green spots on the bushes and on the ground. All that remains is to color the silhouette of the girl.
Pencil drawing
The autumn theme is very broad and involves not only a bright landscape with golden leaves, but also the sad time of late autumn. A simple pencil is perfect for depicting this time of year. A step-by-step drawing lesson will help even those who do not have artistic talent cope with the task.
For drawing you will need:
- album sheet,
- eraser,
- simple pencil.
Autumn landscape in pencil
The order of drawing.
- The first step is to mark the horizon line on the landscape sheet and set the perspective in the form of a conditional diagonal line.
- In the foreground, tree trunks should be marked with confident lines. It is important that the trunks are of different sizes and have a slight slope. Just like in living nature.
- To make the drawing more realistic, you should mark the bank of the river going into the distance. Another option would be a trail or road. This technique allows you to create perspective.
- The next step will be the image of the second bank of the river or the edge of the road.
- In a drawing, the smallest details are important. The base of the trunks should be marked with wavy lines. These mounds will help visually tie the trees to the ground in the drawing.
- The image is complemented by small branches on trees and bushes of grass near the river bank.
- Fallen leaves are drawn in detail.
- Shading marks the shadows at the base of the trees.
- When depicting late autumn, special attention should be paid to shading. The drawing should have a blurred background, since late autumn is very damp and cloudy. And the details in the distance are not visible, but are shrouded in a light haze of fog.
- Heavy gray clouds should be indicated in the sky.
- Use checkboxes to mark a flock of birds flying low above the ground.
- Additionally, hatching indicates the river bank, shadows on the ground from mounds and grass bushes.
- Tree trunks are made dark; they should stand out a little from the main background, as in nature. In late autumn, the bark is saturated with moisture and this causes it to become dark in color.
A simple pencil sketch on an autumn theme does not have to depict an autumn landscape. A thematic sketch may contain a drawing of a bouquet of autumn leaves, a still life of vegetables or fruits, mushrooms in a basket. A sketch of an umbrella on a bench in an autumn park looks original.
Sketch on an autumn theme
Based on the step-by-step description of the work, it is not difficult to draw an umbrella on a bench.
- The first step is to draw the bench with straight lines, located slightly at an angle to create perspective.
- After this, an oval marks the dome of the open umbrella lying on the bench.
- The umbrella is complemented by drawing the handle and knitting needles.
- The bench is “installed” on its legs.
- The spokes should also be drawn on top, indicating that they stretch the dome material.
- In the background you need to draw trees and a lantern.
- Mark puddles on the ground with strokes and depict fallen leaves.
- Then you need to perform detailed shading of the drawing.
- What is in the foreground should be clearly indicated. The background is made more blurry.
- Additional sharp strokes can depict rain.
Easy autumn drawings for kindergarten
Drawing is a favorite pastime of even the smallest toddlers. Yes, sometimes it is difficult for children to clearly draw something specific. They lack experience and confidence. That is why this section presents works that are understandable to children. These pictures are easy to repeat. They don't have a lot of small details that toddlers usually miss.
You can use various tools to make leaf prints: corks, paper tubes, toothbrushes, kitchen sponge, cotton swabs, palms, real leaves. Kids love making prints.
The main theme of these drawings is autumn. And to highlight the beauty of this time of year, kids are invited to get acquainted with the bright palette of autumn colors. Children will also appreciate the fact that autumn allows freedom of choice of colors:
- Green;
- Yellow;
- Brown;
- Red;
- Brown.
And also blue, lilac and black. That is, it will not be difficult for kids to draw a real autumn.
Autumn drawing master class for children 2-5 years old.
Author
You will need:
- White pencil
- Thick soft brush
- Gouache
1. Using a white pencil on a blue sheet, draw the silhouette of a tree and grass.
2. Mix yellow paint with a small amount of paint. We put a large amount of paint on the brush and “poke” it on the crown.
3. Add more yellow, and again poke the brush randomly across the crown.
4. Mix white with yellow and ocher (or light brown), and also add green. We draw grass with strokes.
5. Add a darker green to the mixture and paint dark strokes on top of the grass.
6. Mix white, a little brown and blue. We get light gray and draw a birch trunk.
7. Now we apply pure yellow spots to the crown.
8. If desired, draw clouds.
9. Use brown and blue to make stripes on the birch trunk.
Progress of the lesson.
Guys, listen to A. Pleshcheev’s poem and think about what autumn season the author is talking about :
The rain keeps pouring down
Gets wet under the window
Are you happy from this picture painted by the poet ?
-That’s how different autumn ! Either bright, elegant, or quiet, sad, grey. Today we will draw such an autumn . What colors will you need for this - warm, bright or cold, gray?
-Look at the picture depicting late autumn . what color is the sky? - What are the trees like?
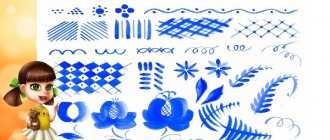
Now I will tell you how to get these soft colors. You have palettes on your tables; artists use these palettes to compose paints. And you will do it. To get gray paint you need to add a little black paint to white. If you paint clouds , then take blue paint and add a little black and white paint to it, stir them on the palette. The color of the grass in late autumn also lost its brightness - it is brown. Take green paint and add a little yellow and brown to it - you get a brown color.
- so, first you need to put the right paint on the palette, and then draw it on a sheet . Think about your painting and get to work.
After finishing the drawing, the works are displayed for viewing.
Work plan for the non-traditional drawing circle “Magic Pencil” Name and goals of the lesson:[/u] 1. Let’s get to know each other! – I am Queen Brush Goals: Journey to the land of colors To instill a love of creative activity.
The program of the circle for artistic activities in non-traditional techniques “Gnome Workshop” Perspective-thematic plan Lesson topic Objectives Material Month October “Parents meeting” To acquaint parents with the specifics of the work of the circle about the types of fine arts.
Source
Video on how to draw a drawing of “autumn colors” for sketching
For those who like to draw pictures, there is a special section in this selection of autumn pictures. In fact, it is not so easy to copy a landscape from a ready-made sample. Here you need to consider:
- every detail
- sizes of individual items,
- the scale of the whole picture,
- naturalness.
In addition, the choice of color is at your discretion. Therefore, pictures copied from the sample can be safely considered independent works. It is you who bring the landscape to life, showing how brightly the sun shines, how the wind “walks” and how the foliage rustles.
It is worth paying special attention to the selection of colors for the design of the work, the name of which speaks for itself: “autumn colors.” Autumn is diverse, you can’t count the colors and shades in which the sky, bushes, trees and withered grass are painted. The entire color palette can fit on one sheet of paper when it comes to fall colors.
Drawing on the theme of golden autumn with colors
When it comes to golden autumn, the first thing that comes to mind is yellow with its variety of shades, from sand and lemon to the color of ripe tangerine. But this is not entirely true. And just as gold glitters and shimmers with all the colors of the rainbow when a ray of sun hits it, so the golden season can be not only yellow, but also red, and orange, and bright blue, and deep green. All these colors should form the basis of the work about the foliage shimmering in the last warm rays of the sun.
What will help make the drawing even brighter? Paints! They are the ones who are able to color a picture so as to accurately convey the beauty of autumn days. The paints produce richer colors and are easy to mix and match.
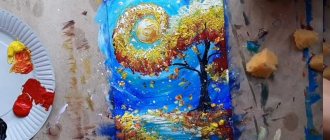
I offer a simple and very beautiful work on the theme “Golden Autumn”.
Author
Materials and tools:
- Acrylic or gouache
- Paper – watercolor or any thick sheet
- Brushes
- Sponge
Stages of work:
1. Using a large brush, pick up thick white paint and draw a circle. We take a little blue with some water and apply it along the edges, mixing a little with white. We continue to draw a circle, expanding it.
2. We should get a circle with darker edges and a light circle in the center. To do this, take blue, without mixing with white, and apply further, moving away from the white center. The blue blends smoothly into the blue to create a beautiful gradient.
3. Draw a horizon line - about ¼ of the sheet. We paint over everything above in a circle.
4. Using horizontal strokes, apply dark blue to the bottom of the sheet.
5. Apply horizontal strokes of yellow color in the center. It mixes a little with blue, turning out greenish.
6. Apply white on top of the yellow with light horizontal touches, going down to the bottom of the sheet.
7. Using a thin brush and liquid black paint, draw a tree trunk from the horizon line. We draw with curved thin lines. Do not forget that the tree itself and each branch are always thicker at the base and thinner towards its tip.
At the base we draw roots going into the ground.
8. Tear off a piece of sponge, pick up rich red, mixing it a little with yellow. By applying a sponge and sharply tearing it off, we apply paint. We set the trajectory as if the leaves are twisting around the moon.
9. Apply foliage to all branches with a sponge. We also apply fallen leaves on the sides below.
Now take a lighter color with a sponge and apply it on top of the red along the edge. In some places we leave a dark red color.
10. Take an even lighter, almost white one and make prints on top.
11. Using a brush, turn the tip of the curled ponytail into a moon.
12. Chaotically apply thick paint and a brush to the falling leaves.
13. The final touch is the stars. Apply semi-liquid white to the brush and splash the paint from the brush onto the drawing with your finger.
14. On the water below we enhance the white strokes - the reflection of the moon.
Summary of an art studio lesson on charcoal drawing techniques “Late Autumn”
Elena Skvortsova
Summary of an art studio lesson on charcoal drawing techniques “Late Autumn”
Art studio lesson notes
charcoal drawing technique
«Late fall»
Goal: To develop in children the ability to express their perception of the world around them using various artistic materials.
1. Continue to introduce a variety of visual materials.
2. Develop basic skills in working with coal.
3. Foster love for native nature.
4. Improve creativity and creative thinking.
Materials: sheets of thick A4 paper, jars of water, brushes, watercolors, charcoal, paper napkins, rags, Illustrations of graphic works in different genres of fine art: portrait, landscape, still life, sketches and charcoal sketches ;
How to draw an autumn landscape for children
What is landscape? In fact, the landscape is not just the nature outside the window. Have you seen how artists are looking for exactly that piece of nature that they will paint on canvas? They should like the view, the angle, and the lighting. Sometimes the character of nature is reflected in the most inconspicuous picture. And this suggests that the artist saw beauty and was able to convey it in all details, color and light.
How can children master this science? Very simple. You need to show your child a couple of pictures of a beautiful autumn landscape and tell him what makes this picture special. For example:
- In one picture there is a tree strewn with golden foliage. Although the artist painted the leaves as a “cloud,” he highlighted several individual leaves as an accent and drew every detail on them.
- On the other there is a river, which is visible from a high hill, already covered with yellow-brown-green foliage. And it is the shine of the river, and the way heavy autumn clouds are reflected in it, that makes the landscape special.
- And on the third everything is simple: trees, bushes, grass. And only how low the sun is and how it sparkles like sunbeams in the tree branches decorates the landscape.
Kids quickly grasp such details. A little training and they will succeed!
Master class on how to draw autumn trees and sky.
Author
I offer a simple option for children. You will need:
- Brushes
- Paints
- Wet wipes
- Plastic bag
1. We make the background with watercolors. Using a large brush, apply transparent yellow, blue, a little red, apply randomly.
2. Take a damp cloth and smear the paint stains, while the cloth absorbs excess water.
3. On a separate sheet of paper, apply random spots of gouache paint. We make them with the touch of a large brush.
4. Apply clean water to the bottom of the sheet. We turn it over and apply our blank of paint stains to the wet part of the sheet, smoothing it with our hands. And we remove the leaf.
5. If you shoot by the top edge in the middle, you will get a static forest, and if you shoot by the uppermost corner, you will get the effect of wind in the forest.
6. It remains to draw the tree trunks. We do this in two shades of brown to make the picture more voluminous.
7. Let's draw rain. Take a wide brush and remove excess water from it. We put white gouache on the tip and apply strokes with diagonal light movements.
8. Using a thin brush and dark gouache we depict a key of birds that fly away to the south.
9. We put a simple plastic bag on our hand and apply gouache on the bag in spots. Let's crumple the bag a little in our hand.
Now we apply this package in different places of our trees with sharp jerky movements. This is how we get leaves. The forest becomes more alive.
Autumn in watercolor
In order to paint an autumn picture in watercolor, you can start the creative process with a pencil sketch. With light lines you can outline the perspective, the horizon line and the alley framed by trees and stretching into the distance.
To work you need to prepare:
- landscape sheet or watercolor paper,
- paints,
- pencil,
- brush,
- a glass of water.
Operating procedure.
- Outline the main lines of the future drawing with a simple pencil. For convenience, you can draw the details in more detail.
- Below the horizon line, paint the background gray, applying the helmet with uneven strokes. The middle of the picture should be lighter.
- Draw the distant plan in a dark color, indicating the forest area. There is no need to draw details, simulating a limited view due to autumn fog.
- Use black paint to paint the tree trunks framing the alley stretching into the distance.
- The further the trees are from the observer, the lower and less clearly drawn they are.
- Apply strokes of yellow paint to outline the tree crown.
- After the drawing has dried, use light strokes to indicate the reflection of the trees on the wet asphalt of the alley.
The autumn theme for drawings is very diverse and is an inexhaustible source of inspiration. You can embody an artistic idea using paints, colored or simple pencils. Basic drawing techniques will help bring creative ideas to life.
Drawings of autumn leaves and an autumn bouquet for school
Trunks and branches of trees and bushes remain throughout the year: in winter, summer, and spring. But it is the leaves that eloquently indicate the time of year and the mood of nature. Poems are written about the gold of autumn leaves, they are so beautiful. The leaves are incredibly beautiful all together on the tree. And every single leaf is incredible.
It is very convenient to make prints of leaves collected in the forest:
Author https://www.youtube.com/watch?v=TOlGIlRSYFI
1. Paint is applied to the leaf, it’s beautiful if you make a slight gradient, that is, paint the leaf yellow on top, then orange, and green at the base.
2. Turn the leaf over and print it well on the paper.
3. It’s so simple and beautiful, even without knowing how to draw, you can convey the autumn mood on paper.
4. Spray the bottom with orange paint using a toothbrush.
5. At the top we make the sky in the same way. We finish drawing tree trunks, bushes, fallen leaves and birds.
Another simple option. Place different collected leaves under the white sheet. Shade the top with crayons or simply outline all the veins.
Oak, maple, birch, ash and acacia leaves. They are all different shapes and color differently with the arrival of autumn. For example, oak leaves remain green for a long time until they begin to turn brown at the edges. Ash is the first to welcome autumn with its bright yellowness. The maple turns red. A strong tree, and it has such bright colors.
Pictures from this collection will help your children better prepare for school and kindergarten competitions and assignments. And the kids themselves will be able to better understand and “see” how wonderful this time is! Preparations for school continue. By subscribing, become a regular visitor to the site so that creative activities are easier and more interesting for your children.
Drawing with pencils for children from 3 years old
The next work will be no worse than the previous one, but we will do it with the help of colored pencils. A set in a box will definitely be found in every home or in the nearest stationery store. They are easy to use and are recommended for inexperienced toddlers to start their creative activities with. Let's depict a stunning autumn forest on canvas.
Be sure to take your child to this park; he will probably be happy to swim in the fallen leaves. In the meantime, let’s take a walk in his painted version, believe me, it’s even better, because we’ll make it!
We draw an autumn forest in stages:
- A wave extending beyond the boundaries of the canvas denotes mounds. We duplicate it a little lower, expressing the foreground.
- We place three triangular trunks at the same distance. Try to express them as similar to each other as possible.
- We put caps of crowns on the elements, somewhat reminiscent of fluffy clouds.
- We shade the characters from left to right in orange, red, yellow tones. Let the fidget do this completely independently.
- We fill the first wave with a reddish pigment, and decorate the part in the foreground with a bright yellow pencil.
- Fill the trunks with brown and shade the background with blue pigment. We make quick diagonal movements, bypassing the drawn composition.
- Using a contrasting color scheme, we highlight the foliage with dots and the blades of grass with stripes. Let's mark a couple of black birds in the corner with ticks.
The autumn landscape is ready, it is perfect for a competition or a thematic exhibition. And what’s more, it will take away all the awards and sympathy from the audience.
Another lesson on how to simply draw an autumn tree:
Examples of drawings on the theme of autumn for a child to draw for school
All manuals recommend that young artists sketch pictures at first. This will allow you to sharpen your hand and develop a creative eye. By repeating an endless number of works, you will soon be able to create them yourself! Your hands will create magic and your brain will generate great ideas. In the following selection you will find options for children's images using different techniques. Go for it!
- Three autumn trees against the background of a river: a colorful version of the picture
- A lonely tree on a yellow background is suitable even for the smallest children:
- Trees in yellow and red on a green hill:
- Cute hedgehog with apples: drawing for kindergarten
- Bench in the autumn park:
- Another idea for a drawing on the theme of autumn for the junior or middle group of a kindergarten: this option can be depicted by simply dipping your fingers in different colors, the children will simply be delighted!
- Girl in the autumn forest
- Forest mushrooms:
- Autumn road:
- An interesting idea for drawing a sparrow in yellow tones:
You can also draw a bullfinch; older children will definitely love this idea.
- Squirrel on a stump:
Autumn can also be painted with acrylic, here is a video master class on this topic: