The craft that emerged in the city of Gorodets, Nizhny Novgorod province, became one of the main assets of folk art of the 19th century. The creativity that arose from the decoration of carved spinning wheels has become bright and memorable, and its originality still attracts drawing lovers today. Gorodets painting - step-by-step drawing, a detailed explanation of each step in the traditional painting algorithm can be found here.
Features of Gorodets painting
The main difference between this craft is its content. Each element of the image serves as a storyteller, painting not only a visually appealing series, but also an entire story. The apotheosis of the meaningfulness of Gorodets painting is genre scenes. They are free and quite conventional in nature, sometimes even bordering on caricature. But at the same time, they are very interesting to look at and “read.”
In Gorodets painting, realistic motifs often coexist with idealized ones. The images of animals and birds are very decorative. On painted items you can see lions and leopards, which, naturally, were exotic animals for Russia. But even the usual horse appears on the painted board as a hot, strong, and at the same time graceful animal, his pose is proud and warlike, and he himself appears not as a draft force, but as a royal animal.
It is not uncommon for Gorodets painting to have paired images, elements facing each other.
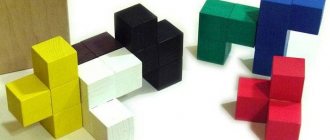
It is not uncommon for Gorodets painting to have paired images, elements facing each other. Where the plot requires it, the artist uses the motif of a magnificent curtain. The most preferred colors: bright red, expressive green, deep blue, black. The painting is done with a brush; no preliminary drawing is applied. The technique involves both broad strokes and the finest lines, the virtuosity of drawing which requires skill and experience.
Application "Gorodets salt shaker" for children 5 - 7 years old. Templates. Master class with step-by-step photos
Application “Gorodets salt shaker” for children of the senior preparatory group of a preschool educational institution.
Step-by-step instructions with photos Author: Ramzaeva Irina Vasilievna, teacher at MADOU kindergarten No. 64 in Balakovo, Saratov region. Description: I offer you application material for children of senior preschool age on the topic “Gorodets Salt Shaker”. This master class will be useful for educators and parents when studying the topic of Russian folk crafts. Purpose: applique from colored paper of a wooden salt shaker with a Gorodets pattern.
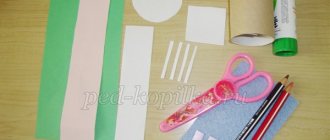
Goal: To develop children’s ability to create applicative patterns based on Gorodets painting. Objectives: To ensure the consolidation of children’s knowledge about Gorodets painting as a type of folk decorative and applied art. Arouse interest in the manufacture of household items decorated with Gorodets patterns. Strengthen the ability to cut circles of different sizes and flowers along the contour; teach children to fold the sheet like an accordion carefully so that the corners connect to each other; teach how to transfer a template onto a sheet of colored paper. Develop children's creative abilities and spatial thinking. Cultivate accuracy in work, perseverance, and the desire to complete the work started. Materials and tools needed for work: colored paper, scissors, glue - pencil, simple pencil, marker or felt-tip pen, ready-made silhouettes of a salt shaker.
Progress
In blue bathings, in red buds, large and small green leaves They brought a casket from the city....
(Gorodets). In the city of Gorodets they make beautiful things that are needed in the household. These are kitchen boards, salt shakers, bread bins, spice boxes, etc. They are decorated with floral patterns (roses, roses, daisies, leaves), magical birds, horses. Such elegant things serve not only for storing food, but also decorate the interior of the kitchen. We start by cutting out the templates.
We transfer the templates to colored paper: yellow – salt shaker; green - leaves; for rosan: circle (diameter 5.5 cm) - pink (blue), rosan - white and red (blue), circle (diameter 1.5 cm) - white, circle (diameter 1 cm) - red (blue); for bathing: circle (diameter 3.5 cm) – blue (pink), circle (diameter 1cm) – blue (red), “zhizhka” – white.
Cut out the yellow salt shaker.
Cut out a blue circle with a diameter of 5.5 cm for the rose and a pink circle with a diameter of 3.5 cm for the bath, glue: a blue circle at the bottom of the salt shaker, and a pink circle at the top.
We cut out the white and blue roses, and glue them at the bottom of the salt shaker onto the blue circle: first the white rose, and then the blue one.
Cut out and glue onto the blue rose first a white circle with a diameter of 1.5 cm, and then a blue circle with a diameter of 1 cm.
We cut out a red circle with a diameter of 1 cm and a white “zhivka”, glue it to the pink circle in the upper part of the salt shaker.
Fold a strip of green paper into an accordion shape (2 pieces), trace a leaf stencil, and cut it out.
We glue green leaves: in the lower part of the salt shaker - three leaves to the right and left of the rose (we start with the middle leaf), then in the upper part of the salt shaker - two leaves to the right and left of the bath.
We trace the outline of the salt shaker with a marker.
This is what the finished work looks like.
And these are the works of children.
Gorodets patterns, What a joy for the eyes.
Craftswomen are growing up, maybe among us! I. V. Kadukhina Thank you for your attention!
We recommend watching:
About the benefits of using chants Do-it-yourself visual aid for kindergarten “How to set the table.” Master class with step-by-step instructions Teacher and parents: interaction via the Internet Organization of a subject-development environment in a preschool educational institution on the topic: Folk crafts
Similar articles:
Waldorf kindergarten
Adaptation of children in kindergarten
Theater training for little artists: developmental exercises, trainings, scripts
Required materials2>
If you are just starting to paint using the Gorodets painting technique, you will need a basic beginner’s set: brushes of different sizes and different materials (the main requirement is that your hand should be comfortable working with this tool), gouache or acrylic paints.
There is no need to draw a sketch on the product itself that will be painted. But for beginners, such a stage will not be superfluous if the hand does not yet work confidently enough with paint. Therefore, you will need both a pencil and an eraser. You will need water to wet the brush and a palette to test the color.
The standard method is to start with a sketch on watercolor paper, when a picture is drawn in detail on the sheet, which will then decorate the wooden product. This “gets the hang of things”, gives the artist confidence, and reduces the risk of mistakes.
Working with Templates
Stencils are often used in cases where it is necessary to speed up or simplify the process. They can also be useful in classes with preschoolers and technology lessons in 2nd grade. Templates for Gorodets painting are cut out by children or a teacher.
In institutions of additional education, as well as in secondary schools, lessons are provided on folk crafts, in particular, painting. The teacher can choose the form of the activity at his own discretion, including deciding whether the children will draw according to templates, without them, or cut and glue appliqués.
Classes in both cases are conducted in a similar way, but there are also differences.
Lesson with applique
Work with appliques begins with the fact that during recess children prepare napkins, scissors, backing sheets, colored pencils and glue. The teacher shows slides, tells how Gorodets painting differs from other types, talks about kupavka, rose, rosana and chamomile, as well as other elements. Then the children get acquainted with the plan for making a painted tablet. To create an application they need to do the following:
- cut out leaves and roses;
- make a drawing;
- glue the elements to the cardboard;
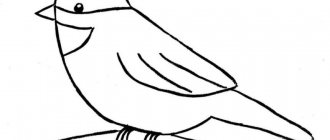
- cut out the bird;
- glue it;
- complete the missing details;
- bring the drawing to life.
Master class in Gorodets painting
Elements of Gorodets painting in stages - you definitely need to learn this, because the sequence of execution is very important in traditional creativity. Copyright inclusions should be minimal.
Underpainting
To put it simply, underpainting is the rough basis of the future image. These are the main elements that will become the center of the picture. If you decide to paint, for example, a wooden cutting board, then the first spot of color on it will be the underpainting. Unless, of course, you are planning to make a colored background on the board. Then you work on the background first, let it dry thoroughly, and then you start painting the underpainting.
We start by drawing the background
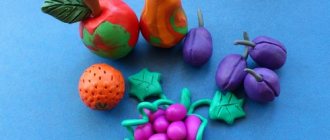
Let's say that the main elements of the first work will be flowers - flowers that are often found in Gorodets painting. Below the center, maintaining compositional balance, you draw three circles. Two are deep blue, one (central) is pink. Next, you take blue and red colors, and draw smaller circles on the tops of these circles, which will slightly overlap the main circle.
This completes the first stage. Even a child can handle underpainting (sometimes they say underpainting, this is also correct), but it is not always very easy. The point is precisely that the circles should be even, that you need to learn how to draw them immediately using paint on the background and that, most importantly, they should become the compositional center of the work. If balance does not happen, any subsequent decoration will be in vain.
Tenevka
At this stage of Gorodets painting, the artist draws the petals. By the time the petals are drawn, the circles made at the underpainting stage should be dry. When the paint has dried, paint the petals with bright contrasting paint.
Draw them without haste - although they should not be mathematically accurate and even, strong deviations in the drawing of the petals violate the compositional harmony of the image. The petals can match the color of the small circle on the underpainting. This is not necessary, but usually this combination is well perceived against the general background.
It's time to make the leaves and twigs. And here, too, you need to remember about symmetry: it makes the work beautiful, it is characteristic of the Gorodets craft, therefore any other experiments would not be appropriate here. Beginners should not take on complex greenery decorations: start small, with a couple of leaves on the sides of blue flowers, and with small stems strewn with leaves at the top of these flowers.
When you become more confident in your writing, you can make the patterns more complex. But first you should learn to draw accurately, symmetrically, with good control of color and shape. There are no double strokes in this painting, therefore, even in children’s hands, the basic techniques of the craft come to life and are mastered by novice artists.
Step-by-step analysis of the painting
All drawings are performed in several stages, and in a strictly defined sequence. Don’t be scared, because in fact, everything in Gorodets technology is logical and harmonious. To beautifully decorate products, not only for yourself or as a gift to loved ones, but also for sale, you do not need to be a talented craftsman. The product will turn out more interesting if you successfully select a cutting board template for Gorodets painting. The contours of the product can follow the shape of an apple, pear, eggplant, fish, swan, or pig. All this can be easily drawn on paper, after which all that remains is to transfer it to plywood and cut out the product with a jigsaw.
Image of flowers
It is enough to acquire some skills, learn to hold a brush and confidently apply strokes. The stages that make up the painting:
- underpainting;
- petal guidance;
- revivals.
The underpainting is the circle on which the entire flower drawing is built. Blue, red, pink, blue and cherry paint are used for it. The picture is dominated by warm shades, and blue tones occupy no more than a quarter.
The petals are drawn only when the first element (circle) has dried well, otherwise the paint will smudge. They can be lighter or darker than the underpainting, the main thing is to provide contrast.
Animations - strokes, dots and edging . The details are so named because thanks to them the picture seems to come to life, becoming voluminous and expressive. To make animations, use squirrel brushes No. 2 and 3. The noses of the flowers are decorated with a white border and the same dots, and the strokes are arranged randomly. Lives are usually white, less often black.