Volumetric craft with a rocket
For children's crafts, space, you can use plain paper. If you don’t want to make an applique and want to diversify the finished product, you can try the following option.
For it you will need:
- Colored paper or cardboard. It's better to take cardboard, it's denser. Or take colored paper and glue it onto some kind of base to increase the density;
- Sushi chopsticks or long skewers;
- Glue;
- A container where you can place the composition;
- Filling for the container. Plasticine or polyurethane foam will do - anything that can be used to fix the skewers so that they stand.
Progress:
- Using the stencil you need to cut out several stars, a rocket and a planet. It is better to cut out two parts for each figure, so that later you can glue them together by inserting a base between them;
- If desired, the rocket can be decorated by gluing additional elements on it or drawing something;
- Then you need to glue the cut out parts onto a stick;
- Now all that remains is to install the figures in the container and fix them there.
The result is a rather interesting composition that can be brought to an exhibition or placed on a shelf as a decoration.
Making souvenirs from felt
And now we’ll sew a green alien. Many people will definitely like this craft.
You will need: green, blue and black felt, green, black and white sewing threads, gold beads No. 10, foam rubber or cotton wool, sewing needle, marker, glue.
Work process:
1. Prepare the templates first and then transfer them onto the fabric.
2. Then follow the step-by-step instructions below to sew the weirdo.
Let's see what else you can create from this wonderful material called felt:
The easiest thing to do is cut out the silhouettes, then glue them onto the background.
For older children, and for those who sew well, of course, voluminous crafts will be advantageous:
The last work will, of course, require the help of adults.
Space idea made of paper and cardboard for April 12
From components such as paper and cardboard, it is easiest to do work for kindergarten and school. Because they are always present in any home. And also scissors and glue. If all this is available, then I propose to build such a composition from a flying spaceship, the sun and Saturn on a black background.
To work you need:
- Cardboard with a black background about 30*25 cm;
- Toilet paper roll;
- Colored paper;
- Gold and silver foil;
- Semolina;
- Scissors;
- PVA glue;
- Pencil.
Manufacturing:
1. Cut the sleeve in half. At one end we cut off the edges to create the nose of the rocket.
2. From blue paper, cut out three blue cones, which we bend in the middle. These will be our rocket engines. We glue them to the uncut (back) part of the sleeve.
3. Glue the rocket onto a black background.
4. Cut out two petals from red and gold paper. This will be fire coming out from behind the ship.
5. Glue the flame and the cut out window.
6.Draw the sun on gold foil, and Saturn with a ring on silver foil. Cut out and glue both shapes onto black cardboard.
7. Apply glue to the background and sprinkle semolina on top. This is our milky way. Beautiful craft is ready!
Did you like the collage? If you have schoolchildren, you can make a flying luminous object below.
Drawing
Of all kinds of artistic creativity, the theme of astronautics is best expressed in a drawing.
You can depict a rocket, as well as spaceships, lunar rovers, satellites. Kids are just starting to use paints, but older children can do more serious work.
Preschoolers should be asked to draw a drawing of an astronaut in a helmet, a rocket, and the earth:
- We divide the sheet into three parts and roughly outline where the figures will be.
- On the right side we draw a large round head, a rectangular body, arms and legs in voluminous clothes.
- Inside the circle we draw a square - a spacesuit. Let's draw the person's face.
- On the left we draw a round earth. You can draw a circle according to the template to depict the continents.
- At the top of the picture is a spaceship, we draw it small, it is in the background, the child will do it himself: a triangle, a circle.
- A cord stretches from the ship to the astronaut’s spacesuit, draw a line. Our hero in outer space!
- You can decorate with colored pencils, crayons: Blue earth, a bright astronaut suit, everything is at the child’s discretion.
It is advisable to paint over the entire sheet of the drawing, without leaving any white spots.
With younger schoolchildren, you can depict more complex objects, use a palette, and mix paints.
Having depicted satellites, ships, planets with a simple pencil, you need to paint over them with suitable colors, in addition to this, we make the background of the picture from mixed colors, for example, blue, cyan, a little red, mix, paint over the surface, you get a mysterious space.
Or you can start the image not with objects, but with the background: paint a sheet of paper blue and purple, add blue, white, spray white, yellow paints, when dry, draw white objects on a beautiful background - an astronaut, a ship, a planet. The drawing is a miracle!
Astronaut helmet
Very often in photos of space crafts you can see that some parents even build an entire astronaut suit for their child.
In fact, it’s quite easy to do, you just need to use your imagination. In addition, even the most unusual materials can be used.
To create a helmet you will need:
- A large number of newspapers;
- Balloon;
- Glue;
- Paints or colored paper to decorate the finished product. Foil may also come in handy.
Operating procedure:
- The helmet will be created using papier-mâché technique. For this purpose, a ball is taken to act as a mold. You need to inflate it to such a size that it forms the basis for the helmet. If the craft will then be put on the head, this must be taken into account;
- Then the ball is covered with newspapers in several layers, always leaving a hole at the bottom for the head. There is no need to leave an opening on the side; it will then be cut out of a single piece. Each layer must dry to make the structure strong;
- When everything is dry, you can deflate the balloon. The dense layer of newspapers will remain the same shape;
- Now you can cut out the hole for the face. You need to measure and draw it on newspapers, and then carefully cut it out;
- The next stage is decoration. The helmet needs to be painted several times or wrapped in foil. An insert is made for the hole from a transparent material or left empty.
The helmet for the costume is ready. If you wish, you can complete the remaining parts, or you can limit yourself to just this.
Video on how to make a flying saucer from a disk
I found another cool video, and it’s hosted by a child. So be sure to show it to your kids and let them make a cool craft for Cosmonautics Day themselves.
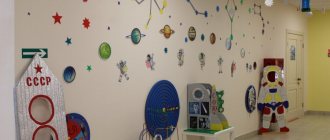
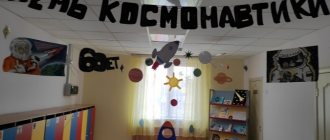
And a few more pictures for your creativity: