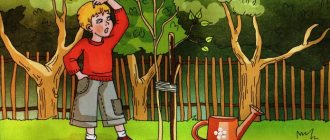
How to make a Dunno hat?
Dunno is a well-known and beloved character by many children from Nikolai Nosov’s fairy tale, about whom many cartoons have already been created and many books have been written. This good-natured character interested many children at one time. Therefore, if you need an original carnival costume for a holiday or a matinee for your child, the Dunno costume is perfect for this purpose. But this costume will not be complete without the main attribute - a big blue hat. In today's article we will tell you how to make a Dunno hat with your own hands.
How to make a Dunno hat with your own hands?
To make this masquerade hat you will probably need some sewing knowledge, as well as a fair amount of patience. However, it is worth the effort. A properly made hat will not lose its shape even after washing and can serve you for many years.
So, we will need:
• Silk fabric crepe-satin (blue).
• Isolon (no more than 5 mm thick).
Let's start making!
1. First, we cut out the necessary details - two large circles from crepe-satin, one from non-woven fabric and one from isolon for the brim of the hat. One blank of isolon and two of crepe-satin for the cap, and 10 strips of crepe-satin and isolon for the tassel.
2. Take the first crepe-satin piece and glue the non-woven piece on top.
3. Then place an isolon piece on top with a hole made in the center and secure it with pins. Cut out the inner circles using the top pattern in the bottom materials.
4. Using a sewing machine, sew the edges across, creating cross beams.
5. Turn the workpiece over and steam the satin scrap from the isolon. Since isolon is sensitive to high temperatures, this should be done very carefully.
6. Now take the second piece of crepe satin, place it underneath, secure all the pieces with pins and grind them together. A central hole should also be cut from the lower scrap-satin blank.
7. Using scissors, carefully cut out the isolon from the allowance and then turn it right side out.
8. Now turn the brims inside out and fasten them together to then attach them to the cap. Create a slight tension between the two (duplicated and non-duplicated) brim pieces. In order for the fields not to sag, it is necessary that the duplicated part has a slight overlap; in this case, the non-duplicated part will be stretched and prevent the fields from sagging.
9. Now you can start making the cap. Connect two pieces of crepe-satin and isolon together and grind off the edges. Repeat the same with the second piece of crepe-satin (for the inside of the cap).
10. Cut ten thin strips of crepe-satin - blanks for the tassel, and insert them into the upper part (with isolon) of the cap.
11. Use pins to pin and then sew the brim and cap together.
12. Sew the inner part of the cap to the inside. Finally, sew an elastic band to the two sides of the inside of the cap.
The bright and elegant Dunno hat is ready! It is suitable for both adults and children, and you can be sure that it will make an unforgettable impression on children at a children's party.
Shirt and trousers: sew or buy?
Not every child's wardrobe has yellow pants and an orange shirt. If time is running out and you don’t have any sewing skills, you can buy a ready-made shirt or choose from those available. Before buying such a bright item, you should think about whether the child will wear it in everyday life?
You can replace the shirt with a bright red T-shirt. But such a simple approach will not be appropriate at all events. Therefore, it is better to prepare for the event in advance and sew a shirt with your own hands.
Sewing a shirt is not as difficult as it seems. You can find the simplest pattern on the Internet. Then you need to take basic measurements from your child and transfer the pattern to the fabric using a piece of soap or sharpened chalk. Dunno's shirt does not have traditional buttons, so you can make the simplest fastener on the back.
Sewing a children's shirt with your own hands, video:
The pants are made from thick but light fabric (the child will be hot in thick pants indoors). You can choose a long model or shorts. The simplest pattern is transferred to fabric in the same way as for a shirt. It is worth choosing a model with an elastic band - they are easy to sew, and a child of any age will be able to dress himself.
In addition, Dunno trousers must be complemented with straps with large buttons (green or blue). They can play a decorative role or hold the pants themselves on the child.
A version of the Dunno costume for a girl may include a bright yellow skirt. And some little fashionistas may prefer wide shorts or harem pants. Otherwise, the girl's look is no different from the boy's suit.
Character Features
Dunno is the name of the mischievous little guy from the fairy-tale city of Flowers. He has a tiny stature and a large head with a small nose.
Author Nikolai Nosov accurately describes the appearance of this little boy:
- Bright blue hat.
- Canary yellow trousers with straps.
- Orange shirt.
- Green tie.
One gets the impression of a very contrastingly and flashily dressed hero. It’s simply impossible not to notice this. A child in such a suit will definitely cause a sensation at a children's party and will feel confident.
Read: Infant development
If you wish, you can slightly change the color palette of the costume, but the brightness and contrast must be preserved!
We complement the image with accessories
Let's talk about the two main accessories of the Dunno costume, a tie and a hat.
We offer two master classes on how to make a Dunno hat with your own hands: one will be made from fabric, the second from paper.
Hat. Option 1
- crepe satin blue,
- interlining,
- filler (for example, isolon up to 5mm).
Make a pattern: two circles, one wider, the other the diameter of the head. Cut out two pieces from fabric, 1 piece from non-woven fabric and 1 piece from foam rubber or isolon. This is for the fields.
Now the cap: 2 parts made of fabric, 1 made of isolon.
Lay out the parts: fabric, interlining, insulation.
Cut a circle in the middle and stitch radii along the diameter. Then fold the second piece of fabric on top.
Turn out the brim, then you need to attach the cap.
Sew an elastic band at the bottom for convenience. The hat is ready!
Hat. Option 2
The Dunno hat is made from paper as follows. You will need colored cardboard, or white and blue paint.
For tools, prepare scissors, a ruler, and a compass.
Measure a distance equal to the width of the brim and cut out a circle. If a large compass is not at hand, a pencil and thread will do.
Using a small compass, draw two circles around the diameter of the head and a slightly smaller one for attaching the cone.
Cut into strips and bend them upward.
Cut out a cone and glue over the brim.
Paint with paint or felt-tip pens, or cover with fabric.
Tie
A Dunno tie can be easily and quickly made from paper.
You will need a sheet of colored paper: use a contrasting color to the shirt. Fold as shown in the diagram.
DIY Dunno hat: paper and fabric
The Dunno costume must include a hat. It can be made either simply from thick cardboard or from fabric on a wire or cardboard base. The easiest way to make this costume element is from cardboard, but such a fairy-tale character hat will not last long.
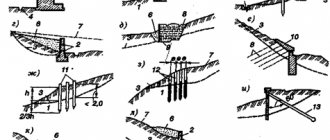
To make a blue hat exactly like the fabulous Dunno, you need to prepare scissors or a stationery knife, Moment glue or high-quality double-sided tape, thick cardboard (blue or white, which can then be painted) or ordinary Whatman paper.
First you need to make a blank. On the cardboard you need to draw an even circle with an allowance for the margins. In the photo below, the central circle is the circumference of the child’s head, and a segment of 20-25 centimeters is the brim of the hat, which can be made wider. The main thing is that they do not interfere with the child, especially if he has to participate in competitions, dance or perform some other active role at the holiday.
The second part of the hat is the cone. Here you must leave an allowance in order to glue the base of the headdress and glue it to the brim (the last allowance is not in the picture). Additionally, you can cut out “hair” from bright yellow cardboard and glue it to the bottom brim of the hat for the Dunno costume. The fairy-tale character's blue hat is ready.
What and for whom can a suit be useful?
The character Dunno is fictional and fabulous.
According to the plot of the book, he is a cheerful boy who does not want to live up to his name and thinks outside the box. He is kind, mischievous and friendly. That is why both boys and girls want to be like him.
There can be many reasons to dress up as Dunno. The main thing is that the child not only puts on the costume, but also understands the character traits of this hero. This is another opportunity to reread the work and discuss it with the whole family. Even a small child will be able to be interested in this wonderful book.
The image of Dunno will be appropriate at any event:
- New Year's party in kindergarten or school.
- Children's birthday. The costume can be worn by either the birthday boy himself or any of the guests.
- Any costumed event (for example, a holiday based on fairy tales).
- Theatrical performance in the school theater.
Dunno shirt: how to sew, pattern, recommendations
The shirt is the most difficult element of a suit to sew from scratch. First you need to take all the necessary measurements and make a pattern - this is the most difficult and important step. You may have to tinker with the basics of patterning and sewing, but in some cases the game is worth the effort.
In its “raw” form you should have a back, a yoke, two shelves, two sleeves, a stand, cuffs and a pocket. Be sure to leave a seam allowance of one and a half to two centimeters. All parts must be joined together using a shirt seam on a machine.
If everything seems too complicated, you can make a Russian folk shirt - this option looks no worse than the classic one, but is much easier to make. To match the look, it would be appropriate to sew bright buttons onto the fabric down from the neckline.
To make a Russian shirt for a boy, you need to measure the distance from the shoulder to the middle of the thigh, arm circumference, hip circumference, arm length, neck length. Next, you need to model a shirt pattern of a suitable size using the sample above. All parts (including seam allowances) need to be cut out and sewn on a machine.