Abstract of GCD on drawing using plasticineography technique On the topic “Animals of the North. Penguin"
Transcript
1 FEDERAL STATE BUDGETARY PRE-SCHOOL EDUCATIONAL INSTITUTION “CHILD DEVELOPMENT CENTER - KINDERGARTEN 120” Abstract of GCD on drawing using plasticineography technique On the topic “Animals of the North. Penguin" Developed and conducted by the teacher of the First qualification category Glushach Tatyana Aleksandrovna
2 Novosibirsk. Plasticineography is an unconventional modeling technique, which is expressed in “drawing” with plasticine more or less convex in volume (bas-relief) images on a horizontal surface. Plasticineography is one of the relatively recent emergence of a new genre in the visual arts. Plasticineography classes contribute to the development of such mental processes as: attention, memory, thinking; contribute to the development of perception, spatial orientation, sensorimotor coordination of children, that is, those school-significant functions that are necessary for successful learning at school. By doing plasticineography, the child develops manual skill, strengthens hand strength, the movements of both hands become more coordinated, and the movements of the fingers are differentiated, the child prepares the hand for mastering such a complex skill as writing. Plasticineography is becoming increasingly popular in kindergartens these days. This is not only a pleasant leisure activity, but also a whole area of creativity, which has its own types and techniques. It is gaining more and more attention from teachers, since it allows you to solve many developmental and educational problems during the game. But what is especially important is that the child has the opportunity to create a beautiful work of art with his own hands. Plasticineography develops children's creativity (primarily visual), because with the help of this technique you can create an original, unique image with vivid expressiveness. GOAL: Continue to teach children to work with plasticine and cardboard, create a penguin figure, convey the expressiveness of the image; develop children's imagination and imagination; consolidate the techniques of plasticineography - smoothing, smearing, pressing, mixing different colors of plasticine to obtain the desired shade of color; cultivate accuracy in work and use plasticine sparingly. Continue to learn to understand and analyze the content of the poem. Vocabulary work: Arctic fashion, shirtfront, short ponytail, tailcoat.
3 Methodological techniques: - Verbal: reading M. Glazkov’s poem “Penguins”, conversation on the content of the poem; — Visual: looking at a penguin (pictures of penguins, toys), conversation; display with explanation; — Doing work by children; — Result Individual work: with Misha, Danil M., Maxim, Diana. Demonstration material: pictures of penguins (royal), toys. Handouts: blue cardboard, a simple pencil, a penguin stencil, white, black, yellow, brown plasticine, stacks, napkins for wiping hands from plasticine. NODE PROGRESS: Examination of a penguin (picture and toy). Conversation - Who is this? - Where does he live? - What parts of the body and what color? Reading the poem by M. Glazkov “Penguins” The penguin people have Antarctic fashion: And at any time of the year All penguins walk like this: They wear white shirtfronts, They wear black pants, They wear a very short tail, They wear a very long tailcoat. Conversation on the content of the poem: - What is said in the poem? — What do penguins wear? Explanation of words: Antarctic fashion, shirtfront, short ponytail, tailcoat.
4 PHYSICAL MINUTE: Penguins are waddling along a huge white ice floe, one after another, all in single file, in a circle, one after another. Barefoot in the snow. Here comes the sea, stop - stop, turn your face in a circle. Let's start preparing. To catch a crustacean in the water, puff out your cheeks. You need to get some air. Spread your wings - arms along the body, fingers spread. And spread out the feathers. Repeat 2-3 times. Guys! To prepare our hands for work, and so that they don’t freeze in Antarctica, let’s do a hand massage. And another resident of the Northern Country, Mishka, will help us make it. The bear is warming its paws with us, each finger in order, so we’ll warm the big one, we’ll rub it with you, and we won’t forget the pointer. We’ll go up and down more than once,
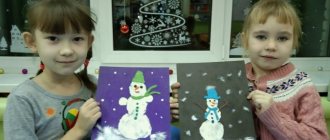
5 We will rub the middle one diligently, Probably the most cold of all. Let's not forget the nameless one. We will rub harder. And we’ll rub our little finger. We feel very sorry for him. Well, now we are ready to go. Today we are making a “photograph” of a penguin using the plasticineography technique. Sample showing and explanation: You have a cardboard penguin stencil. You need to trace the penguin onto cardboard and use plasticine to make the belly white, the back and legs black, the shirtfront and “cap” on the head yellow, and the beak brown. You can also use white plasticine to make ice floes, snow ridges, and snow. We do all this using the techniques of smoothing, smoothing, and pressing (I remind you by showing). All these techniques are already well known to you, since this is not our first work in the technique of plasticineography. Doing work by children. Individual assistance for children.
6 RESULT: - Tell me, please, what did you do in class today? — What techniques did you use to complete the work? — What did you like most about the lesson? Well done. All the penguins turned out very wonderful, neat and beautiful. Now we will hang the portraits on our stand. Thanks to all. You can be free.
About the benefits of plasticineography classes with preschool children
It is no secret that aesthetic taste, the ability to accept and evaluate different areas of life are laid at an early age. Any type of artistic creativity only contributes to its development. Helps to form the correct, and most importantly, your own opinion about many things, specific objects. Teaches you to reflect your individual vision of objects in your own works. Creative activities develop abilities, intelligence and creative thinking.
Decorative plasticineography is one of the types of art that promotes the development of fine motor skills. When working with plasticine and small parts, children focus their attention, develop coordination of movements, and develop the ability to consistently perform point operations with their fingers. This is because plasticineography classes involve the nervous, visual, skeletal and muscular systems.
According to research from the Institute of Physiology of Children and Adolescents, 1/3 of the human brain is occupied by the projection of the motor system of the hands, bordering the speech zone. This suggests that the child’s speech development is directly related to the development of fine motor skills.
In addition, working with plasticine helps reduce muscle tension. This is a kind of massage of the fingertips and palms, helping to relax the nervous system, relieve stress, and correct the psycho-emotional state of the child. It’s no wonder that preschool children get real pleasure from working with plasticine.
Tasks and purposes of plasticineography
The preschool education program includes a number of requirements for teaching activities in kindergartens (Federal State Educational Standard No. 1155) and is aimed at developing the personal and creative abilities of children. In plasticineography classes, preschool children feel like inventors of something new, unknown, show imagination, and use their imagination. As a type of decorative and applied art designed to give children new knowledge and skills, plasticineography copes with the task:
- Children receive basic knowledge and skills in working with plasticine using samples. They master new techniques for rolling balls, twisting flagella, flattening, smearing, and leveling the sticky mass.
- They learn: to correctly distribute individual elements, character figures, plots on the surface of the sheet; sequences of actions; oriented choice of color palette.
- Children are instilled with a love of work. Developed: concentration, perseverance, accuracy, patience, the desire to complete the work started.
- Children develop thinking, three-dimensional vision, artistic taste and interest in various types of art.
- Pupils develop: communication skills, the ability to work in a team, the ability to evaluate the work of a partner, the desire to provide all possible assistance if necessary.
- Hands are being prepared to master writing.
What you need to practice plasticineography: materials and tools
- As a base: thick paper, cardboard, or plexiglass, transparent plastic, with or without a pattern applied to it.
- Plasticine.
- Stacks, toothpicks, rolling pin, syringes, various stamped molds.
- Material for decoration: beads, seed beads, grains, seeds of various plants, small shells, tree leaves, etc.
- Substrate (board) for modeling. Paper napkins for wiping hands.
- Acrylic varnish, if you plan to coat the work.
Open lesson on art "Plasticineography"
Open lesson on fine arts in grade 6 “B”.
Akkol Secondary School No. 4
Teacher: Belozerova E.N.
Subject :
Painting techniques. Drawing pictures with plasticine (plasticineography).
Target :
to activate the knowledge of students, introduce and teach how to perform paintings with plasticine.
Tasks: 1
. Educational: introduce unconventional drawing techniques.
2.
Developmental: develop creative thinking, imagination, attentiveness, sensory and motor skills of the hands, eye, perseverance, patience, accuracy of execution.
3.
Educational: to form a correct idea of plastinography.
Lesson type
: lesson is a game.
Methods:
explanatory, visual, practical, group work.
Equipment :
interactive whiteboard, plasticine, boards, stacks, colored cardboard, handouts.
During the classes:
- Organizational part: greeting, checking the presence of students, checking the readiness of students and the classroom for the lesson - 2 minutes.
- Divide into 3 groups using colored cards (children sit down) come up with a team name -2 min. Jury selection.
- Checking your understanding of the topic of the last lesson using the cartoon “Plasticine Crow” - 2 min
- Explanation of new material (slide show) - 8 min
1DRAWING WITH PLASTICINE is an art at the intersection of two classical visual genres: “flat” painting and three-dimensional image, that is, sculpture. Plasticine is a most fertile material for an artist, but it seems that it is not yet sufficiently appreciated.
If you know and use the secrets of plasticine , you can create not just crafts, but real paintings from plasticine - from thin canvases, almost indistinguishable from painting, to convex bas-reliefs.
2Our next lesson at the drawing school is devoted to another non-traditional technique of fine art - artistic plasticineography.
Plasticineography is a technique whose principle is to create a molded picture with plasticine on a paper, cardboard or other base, thanks to which the images are more or less convex, semi-volume.
Plasticine is a plastic and soft material for children's creativity, which has the ability to take and hold a given shape.
3Plasticine (different colors).
Plastic boards for performing work.
Stacks.
Cardboard (plain and colored), preferably thick.
You can also creatively use any dense surface: wood, glass, plastic.
Waste material - for creating fantasy game images: paper of different textures, candy wrappers, seeds, grains, buttons, plastic containers, etc.
- 4. making decorative moldings of various shapes, • pinching, • flattening, • pulling parts away from the general shape, • tightly connecting parts by smearing one part to another, • and even mixing different colors of plasticine to obtain intermediate shades - the technique of “pouring one color into another".
- First task: paint a still life on the handout as shown on the slide, -10 min. Show work for evaluation by the jury. Perform targeted rounds.
- Second task: color the winter landscape on the handout, using mixing different colors of plasticine to obtain intermediate shades - 10 min. Display of works for evaluation by the jury. Perform targeted rounds.
- Third task: listen to the melody; after listening to the melody, express your associations in a three-dimensional drawing on the disk (slide show) - 8 minutes and talk about your drawing. Perform targeted rounds.
- Lesson summary - 3 min: reflection
— What is the name of the topic of today's lesson?
-What is “plasticineography”?
— In what ways can you apply imprints on a drawing?
-What other materials can be used in plasticineography?
The jury's word. Rewarding.
Grading for the lesson.
D/Z: make a drawing from plasticine on the theme: “My Kazakhstan” for the exhibition.
Cleaning workplaces and offices