Drawing lesson “Flowers for Mommy”
- January 24, 2013
Competition “My Pedagogical Initiative - 2012”
Nomination “Methodological work in preschool educational institutions”
Group: second youngest.
Educational field: "Artistic creativity."
GCD type: combined.
Goal: to familiarize children with non-traditional drawing techniques (tamponing).
Tasks:
1. Educational:
- Fine: learn to convey the image of a flower, structure and shape using non-traditional drawing techniques - printing with a paper ball and finger painting.
- Technical: master the technique of performing work using the padding method and finger painting.
- Compositional: improve compositional skills in arranging an object in the center of the sheet.
- Color: teach to use color as an artistic means of expression; consolidate knowledge of yellow and green colors.
2. Developmental: develop creative imagination, memory, speech, small muscles of the hands.
3. Educational: to cultivate neatness, aesthetic taste, to cultivate interest in actions with paper, paint, love and care for the closest person - mother, the ability to complete a task;
Didactic tools:
- Demonstration: a picture of a flower.
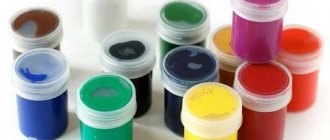
- Handouts: sheets of paper for drawing, sheets of paper for making balls, plates with yellow and green gouache, tray, napkins.
Connection of GCD with other educational areas: “Cognition”, “Communication”.
1. Organizational moment.
Guys, please come to me. Let's play. Finger gymnastics:
Our hands are like flowers, Our fingers are like petals. The sun wakes up - the flowers open. In the dark they will sleep very soundly again.
2. Motivational- target stage.
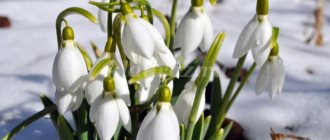
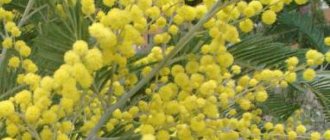
A wonderful time of year is coming - spring. Nature is waking up from a long sleep: the sun is shining warmer, the snow is melting, the first flowers are appearing in thawed patches! (Show a picture of a flower).
The spring holiday of mothers is coming soon - March 8th. Do your mothers love flowers? Let's give your mothers a gift, draw flowers.
3. Perception of the subject.
Look what a beautiful flower. What colour is he? Here is the leg on which it stands. What is it called? What colour is he? What's on the stem? What color are they?
4. Explanation of work methods.
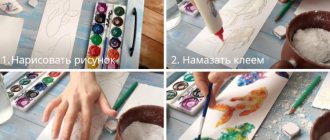
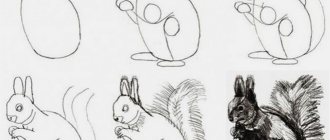
4.1. A detailed demonstration of how to do it: we will draw a flower with a paper ball, for this I will take a sheet of paper, crumple it and roll it between my palms. It turned out to be a ball. I dip the ball in yellow paint and apply it to the top of the sheet, putting the ball into the tray. The result was a yellow flower. Then I dip my finger in green paint and draw a long straight line from top to bottom of the flower. The result is a stem. Again I dip my finger in green paint and draw short lines upward from the side of the stem. These are leaves. I wipe my finger with a napkin. Look what a beautiful flower I made. Guys, come to me and we'll play.
4.2. Phys. minute “Flowers grow in the meadow”:
Flowers of unprecedented beauty grow in the meadow. (Stretching - arms to the sides) Flowers are reaching towards the sun. Stretch with them too. (Stretching - hands up) The wind blows sometimes, But it’s not a problem. (Waving hands) The flowers bend down and lower their petals. (Bends over) And then they get up again And still bloom.
4.3. Questions for clarification. Now take a seat at the tables. Let's repeat what will we draw first? What color will we paint the flower? What will we draw then? What color will we use to paint the stem and leaves?
5. Practical work.
5.1. Finger gymnastics.
Let's draw a beautiful flower together. First you need to prepare a ball of compressed drawing paper. Take 1 sheet of paper. We crush it with our hands and roll it between our palms.
We squeeze a sheet of paper and knead our palms. We try, we roll together, we turn it into a ball. Let's not let him get bored, We will draw for him.
Well done, you've made a paper ball.
5.2. Corrective and individual work. You can draw a flower. I monitor and help children who have difficulties. Let me remind you that we start drawing the flower at the top of the leaf.
5.3. Analysis of children's works. How great you did it. Guys, bring all your flowers to the first table. What did we draw? And for whom? Look how beautiful they turned out.
6. Summing up. Well done, you did a good job! It turned out to be a beautiful gift for mom. In the evening, when mothers come for you, give them your flower. Your moms will love it.
Making paper balls
Productive activity
Summarizing
Bibliography:
- G. I. Davydova “Non-traditional drawing techniques in kindergarten”, Moscow, “Scriptorium Publishing House 2003”, 2008
- Basic general education program of preschool education From birth to school. Ed. N. E. Veraksy, T. S. Komarova, M. A. Vasilyeva. - M.: MOSAIC-SYNTHESIS, 2010.
Author: Natalya Andreevna Terentyeva, teacher of the MKDOU “Kindergarten of a combined type No. 27” of the Asbestovsky urban district. 2 years of teaching experience.
Ways to Draw Beautiful Flowers
Chapter IV
TRAINING METHODOLOGY
CHILDREN DRAWING IN DIFFERENT
AGE GROUPS
First junior group
The teacher of the first junior group faces the following tasks: to instill in children an interest in drawing; teach them to be attentive in class; familiarize students with materials and supplies for drawing; teach how to hold a pencil correctly, not put it in your mouth, and draw only on paper; move the brush easily (without pressure), follow the movement of your hand and adjust the pressure, pick up paint onto the entire bristle of the brush, squeeze out the excess and rinse the brush in water; teach to distinguish and remember colors (red, blue, yellow, green), recognize and name the image of an object by color; develop in children the ability to recognize drawn objects, teach them to talk about what the child has drawn himself; learn to establish a relationship between the image of an object and the drawing process itself; learn to draw objects and phenomena, both shown by the teacher and from memory.
Classes are conducted in subgroups. The first subgroup includes children with unstable attention. They sit restlessly, interfere with each other, listen to the teacher inattentively, do not accompany the drawing process with speech, and do not distinguish colors well. These are children with insufficient preparation.
The second subgroup is kids who can concentrate for only 3-4 minutes during an explanation, listen to the teacher and understand the instructions he gives to the whole group. The speech of these children is still passive. Drawing is not accompanied by words, but they can answer the questions: What is drawn? What is this? They distinguish primary colors, but do not name them, but only find them.
Children with a high level of preparation for visual arts are selected for the third subgroup. Their attention is more stable, their speech is expressive. Children communicate not only with each other, but also with adults. They understand the teacher’s explanation, focus on the explanation for 4-5 minutes, begin to plan their actions, and express a thought in a sentence. Drawing is accompanied by speech.
In the first half of the year, the teacher works with each subgroup separately. The duration of classes in the first and second subgroups is 5-8 minutes, for the third - 10-12.
80 II half of the year the first and second subgroups can be combined. The duration of classes increases to 12-15 minutes.
Classes with the whole group can be carried out only at the end of the year, when the children learn to listen to the teacher and follow his instructions.
Considering that the small muscles of a child’s hand get tired quickly, it is advisable to start training with painting with a brush. Children learn to hold a brush easier and faster than a pencil. When kids learn to hold a brush relatively well, they can be allowed to work with pencils.
Children master the educational material of the first junior group in three stages. The first stage includes familiarization with art materials. The second is the children’s actions as directed by the teacher, completing the drawing they started. The third is the creation of images under the guidance of a teacher and independently. In the first half of the year it is better to go through the first and second stages, in the second half - the last. Teaching children should always be visual and effective. The teacher's demonstration of the drawing sequence must be accompanied by explanations of the corresponding actions.
It is still too early to demand that children at this age be able to analyze shape and convey the similarity of an object in a drawing. While drawing, children's main attention is drawn to the nature of the movements. Children learn that they should draw with a pencil or paint on paper. The result is simple images that they perceive and name.
During the 81st half of the year, the teacher introduces children, first of all, to materials (paper, paint), accessories (pencil and brush), teaches technical techniques: correctly hold a pencil and brush (at a distance of 3-4 cm from the pointed end), use paints and a brush, move a brush without pressure, pick up the entire pile of paint, squeeze out the excess on the edge of the dish, rinse the brush, lightly move the pencil over the paper, follow the movement of your hand with your eyes. The child needs to be explained how to sit at the table correctly, told that he should only draw on paper, that he should not knock with a pencil, or crumple the paper. The teacher teaches to recognize and name images in drawings made by adults, to establish a connection between the image and the drawing process.
There are various techniques for teaching children to draw individual objects: step-by-step explanation and demonstration of what is depicted; explanation as a whole; partial and complete demonstration of the image; verbal instructions; individual work; completing the drawing of the object (the teacher begins, and the children finish drawing, for example, adding strings to balloons); directing the child to draw (to prevent him from helplessly manipulating the pencil, you need to take the child’s hand in yours and work together).
Kids are captivated by the movement of the hand and the line that appears on the paper. From straight lines, the child gradually moves on to drawing circles. From a combination of lines and circles, images of specific objects emerge, to which children give names. Kids get great pleasure when their drawing is in some way similar to some object. At this age, they do not draw according to design. Simply by drawing lines, they suddenly find similarities between these lines and real things.
Drawing on a theme Drawing on a theme
“Let’s feed the bird” “Let’s feed the bunny some grass”
In order for drawing to be a visual activity, and not manipulation of a pencil, it is necessary to direct the children’s attention to creating images (as shown by the teacher and independently). First, children are asked to draw objects that do not require an exact representation of the shape.
Indicative tasks for the first half of the year: drops of water, grass, snow, drip-drip rain, footprints, leaves, paths, streams, strings with balls (finishing the strings), balls rolling along the path (finishing the path), snow falls on the path (finishing the snow) , footprints of a dog on the path, legs walking along the path.
In a lesson on the topic “Let’s feed the bird,” children learn to draw grains with pencils, wax or oil crayons. To maintain interest in the lesson and create a more colorful picture, the teacher can draw or paste a picture cut out from an old magazine or textbook. You can do the same in the classes “Let’s feed the bunny grass,” “Rain outside the window,” “The rain waters the grass.” Children will master pencil skills, and the teacher will create a cloud or grass using the cut-out appliqué technique to create a more complete artistic image.
In the second half of the year, the teacher teaches children to draw horizontal and vertical straight lines from left to right,
Collage on the theme “The rain waters the grass” Drawing on the theme “Rain outside the window”
from top to bottom, intersect them, round off the lines with a brush and pencil.
| Drawing on the theme “Let’s wind a ball” |
Children are required to more accurately depict objects using lines and circles of different sizes (with and without demonstration). Working in the second half of the year with two subgroups, the teacher resorts to a holistic or step-by-step explanation and provides individual assistance.
Indicative tasks for drawing with a brush and pencils: streams, waves, columns, sticks, paths, ribbons, a window, cells, a fence, a scarf, balls of thread, balls, balls, snowballs, the sun, a snow woman, etc.
Mastered drawing techniques are reinforced by using several techniques simultaneously. So, in a lesson on the topic “Summer Tree”, children “wind” the crown with chalk, draw a trunk with a brush, and use fingerprints (“pointillism”) to depict the ground. Next time, it is proposed to draw the crown of the tree with a wad of rag using the same “winding” movements (“Tree”).
The content of classes can be enriched through the use of co-creation techniques between an adult and a child.
Drawing on the theme “Tree” Drawing on the theme “Summer tree”
Drawing on the theme “Autumn tree-1” Drawing on the theme “Autumn tree-2”
To practice dipping techniques, in one of the classes, children are asked to print leaves with their fingers on a tree that was drawn by an adult (the teacher or one of the parents at the teacher’s prior request).
At the end of the work, to encourage the child, stick a hedgehog or other animal on his drawing (“the hedgehog really liked your tree, and he decided to live on your drawing”). In the next lesson, to draw leaves, use the technique of brushing (see Fig. “Autumn Tree-2”).
In accordance with the program, in the 3rd year of a child’s life, he needs to be taught to distinguish and name colors (red, yellow, green, blue), sizes (large, small). To interest children in drawing, the teacher draws simple objects during the game, offers to determine what is depicted, and, while drawing, explains his movements.
If the lesson is organized correctly, children will willingly work
However, when a child does not want to draw, he should not be forced, and students who are interested in drawing can be given the opportunity to work in their free time.
In the second half of the year, children draw according to plan. They choose the topic themselves.
Butterfly decorated with pieces of wood drawing
colored paper crumpled paper
While drawing independently, children can also be encouraged to experiment with figurative and non-figurative materials. For example, have children draw the crown of a tree using a wad of crumpled paper. To do this, dip a ball of paper in a saucer of paint and make an imprint around the trunk and branches of the tree drawn by the teacher.
Collaging is the most effective form of creativity for preschool children. The process of making a collage allows them to explore the visual possibilities of various materials and gain emotional and sensory experience in working with various textured surfaces. After all, collages combine dissimilar materials, located not only in the plane, but also in space.
Try working with small pieces of cut or torn paper (you can use colored advertising catalogs, candy wrappers). Try using them to depict a “cheerful” tree or a butterfly.
The “Christmas tree” collage can be made before the New Year on a sheet of paper, stick colored triangular paper on it and invite the children to decorate it with lanterns - dab it with the end of a round brush (see collage "Christmas tree-1") or draw twigs - short sticks with the entire bristle of a thin brush (see collage "Yolka-2"). For the “Winter Tree” collage you will need a real tree branch. Attach it to the paper with tape. Cotton wool will serve as snow on the collage.
Collage “Christmas tree-1” Collage “Christmas tree-2” Collage “Winter tree”
The “Cockerel” applique is decorated with brush painting (the technique of applying the entire bristle of the brush and its end).
Today, air felt-tip pens (blopens) are sold in stores. They can also be used in the classroom. Cut out a snowflake, place it on a blank sheet of paper and blow on the snowflake through the blowen. Droplets of paint will be sprayed onto the paper. When you remove the snowflake, a snowflake-shaped silhouette will remain on the sheet. This brings great joy to the children. Instead of blopens, you can use any small brush with paint that is sprayed onto the snowflake.
Drawing on the theme “Hide the Bunny” Collage “Snowman”
When drawing with colored pencils (grass, posts, sticks, etc.), the child must name the objects and the color of the pencil. To practice your pencil skills, you can use various shadings. For example, during the “Hide the Bunny” lesson, the teacher gives the children sheets of paper with a picture of a colored bunny (red, green, blue). To prevent the fox or wolf from finding the bunny, you need to hide it - shade a sheet of paper with a pencil of the same color as the bunny. For this type of work, it is better to give small size paper.
Children's interest in the activity will increase if you print potato matrices with them. Complete the image of the snowman with “snow” made of cotton wool and a bucket of colored paper, and draw a “face” for him with a marker.
During the “Forest” lesson, children are given triangular-shaped potato matrices and explained that one corner must be directed upwards and the other two downwards, otherwise the Christmas tree will be upside down or crooked. At first, you need to hold the child’s hand and direct its movement, especially when drawing Christmas trees consisting of two and three triangles. Mushrooms printed with potato matrices can be supplemented with a grass pattern with a brush, and a flower can be supplemented with applique (“Mushrooms”, “Flower”) -
Drawing on the theme “Forest” Drawing on the theme “Mushrooms”
Drawing on a theme Drawing on a theme
“Flower” “Let’s feed the bunny carrots”
The activity “Let's feed the bunny with carrots” combines several techniques. Children can easily depict a bunny using a cardboard stencil and a foam rubber poke. Invite the children to dip a poke in the paint and make marks inside the stencil. Carrots can be depicted using the technique of dipping with a brush. Just choose a brush of the appropriate size and shape for this. Let the children paint the grass with a thin brush. Using the stencils presented in the figure, you can illustrate the fairy tale “Kolobok”. Experiment with your little ones using other materials. For example, beets can be drawn with a piece of boiled beets.
In order for a child to be able to draw leaves, rain, a path, a stream, he must be taught to boldly press the brush to the paper. Rain and streams are painted with the tip of the brush, and the path is painted with the entire pile. The teacher teaches children to hold the brush in their right hand with three fingers, hold the paper with their left hand, pick up and squeeze out excess paint on the edge of the dish, and draws the children’s attention to the fact that the brush leaves marks on the paper.
Children in the first junior group are introduced to the colors red and green. They draw polka dots, balls with strings, and the sun with colored pencils and paints.
Invite them to “string beads on a string” with you. You draw a string with a pencil, and the children print colorful beads.
The teacher teaches how to close the line of a circle, continues to consolidate children's knowledge of red and green colors and the ability to use a brush and paint. The children are introduced to round objects. Improving skills in working with gouache, the teacher leads the child to the simplest reproduction of the plot, suggesting the following topics: “Snow is falling,” “Clouds in the sky,” “The sun is shining,” etc. The drawing can be done on tone paper.
Second junior group
The teacher of the second junior group faces the following main tasks: to instill in children an interest in drawing, to train attention and observation, to cultivate an aesthetic attitude to reality: they should be taught to sit correctly at the table, to hold their body and hands correctly. Children should learn to use a pencil and a brush (hold it correctly, move it freely, without unnecessary pressure), carefully draw paint onto the brush (squeeze the excess on the edge of the dish), guide the brush only behind the lint, rinse it and dry it with a napkin. The teacher introduces children to the properties of paints, teaches them to paint with paints of two or three colors, teaches them to distinguish, name and use colors in their work (red, blue, green, yellow, brown, black, white), to know their shades (pink, blue, gray ).
The teacher must awaken in the child the desire to choose his own color and use color spots as the basis for the expressiveness of the drawing; learn to independently embody your own ideas in a drawing, distinguish and name the shape of objects, their sizes. He introduces children to the constructive structure of simple objects, gives them the idea that a form can consist of separate parts (by demonstrating objects that consist of two or three parts, identical in shape, but different in size). The teacher teaches the compositional correctness of placing a drawing on a sheet of paper, drawing straight lines from top to bottom, left to right, crossing them, drawing curved lines, connecting straight lines and curves, and also closing them; teaches children to draw objects of round, rectangular and triangular shapes.
In accordance with the program, the teacher offers children the following topics for drawing: columns, rain, ribbons (long and short), paths, a checkered scarf, a fence, stairs, a Christmas tree, balls (large and small), bagels, balls, balls of thread, rings, Christmas tree covered with snow, Christmas balls on strings, Christmas tree decorated with balls, snow woman, house, snow woman near the house, toy cart, green grass, red flags, red and yellow flowers, colorful flags, colorful balloons, trees with green leaves, the sun is shining through the window, a funny snowman, a cheerful bun rolling along the path, dandelions in the grass, impressions of the holiday, autumn, summer, winter and spring nature.
When explaining a particular task, the teacher demonstrates and describes the object, drawing the children’s attention to its shape and characteristic features, shows the sequence of the drawing, and talks about the composition. Before drawing, you need to not only show the children an object and tell them about it (flag, ball, etc.), but also let them play with it.
At the end of the lesson, children are taught to put away the materials they have used.
Drawing classes in the second junior group are held once a week. Duration - 12-15 minutes. Children work with pencils and paints. Half of the drawing lesson is independent work by design. Drawing by design will be introduced in the first quarter. Although deep
Three-year-old children do not yet have any ideas, but they have already learned some drawing techniques: they independently place the image on paper and begin to think creatively. In such classes, children consolidate the ability to correctly use a pencil, brush, paints, and apply previously learned techniques for depicting individual objects.
In order to focus children's attention on the main thing - the shape of the object - during object drawing classes, the teacher must use various techniques: visual, verbal, playful (pictures, riddles, poems on the topic).
An effective means of teaching in the second younger group is the consistent demonstration of image methods. Children need to see the entire process of drawing. But this should not be addressed in every lesson, so as not to interfere with the development of initiative and independence of preschoolers. It is advisable to show the sequence of drawing an object during an explanation of a new task or when the children, in the opinion of the teacher, have not sufficiently mastered the material. If children draw from memory, it is not worth showing the entire sequence of drawing the model. It is not necessary to always use partial display, so as not to accustom children to redrawing. It is necessary to trust them more and provide them with the opportunity to independently consolidate acquired skills and abilities.
The teacher should use verbal teaching methods (explanation, instructions, encouragement) that activate children’s attention throughout the lesson. So, first he explains the task to the children, shows the sequence of the image of the object, accompanies each movement with a word, checks whether they have forgotten how to hold the brush correctly.
In order for children to better perceive information about the shape of an object, they should also turn to appliqué, modeling, and design. For example, children first recreate round shapes using appliqué, sculpt them from clay, and only then learn to draw. Before drawing such complex objects as, for example, a flag, a house, etc., children assemble them from ready-made parts. Such a connection between drawing and other types of visual activity will help the child better understand everything related to the shape of an object and correctly recreate it in a drawing.
At the end of the lesson, the teacher analyzes the completed drawings. Children 3-4 years old do not yet know how to notice flaws, so you should not evaluate their work negatively. The baby develops interest in the works of other children a little later, and at this stage he is more interested in his own drawing and the adult’s positive attitude towards the result of his work. Drawings should be viewed in a playful way. The teacher arranges the drawings so that the children can make up a story based on them.
In the first quarter, children of the second younger group must repeat the material covered. In order to consolidate skills and abilities, some tasks can be given again, but in a different technique and on a different topic.
Three-year-old children continue to be taught to draw straight lines (top to bottom, left to right), intersect lines, and close them into rounded shapes. Having learned to draw lines, kids will be able to draw objects of simple shapes on paper. Children of this age find it easier to draw vertical lines than horizontal ones. You need to start with short vertical lines (for example, drawing rain). In order for preschoolers to better master drawing skills, tasks must be gradually made more complex and connected with children's impressions and observations. In this case, children must draw objects taken from the environment.
In the second quarter, you should continue to train your child’s hand in drawing round models. Pupils are asked to recognize, name and depict similar objects, and place them on a piece of paper. You should start with shallow models, for example, with pea candies. Based on the knowledge and skills acquired by children in the 1st half of the year, in the 3rd quarter it is already possible to teach them to depict rectangular-shaped objects, and not only to poke them, but also to paint over the parts that make it up in a characteristic color, without going beyond the outline of the object. With the help of the teacher, the child determines the shape and color of the flags, names their components: pole, panel.
In the fourth quarter, the teacher relatively rarely shows the sequence of drawing objects, limiting himself to verbal explanations and reminders. It would be worth repeating that when drawing straight lines with a pencil, you need to draw the lines lightly and do not press too hard on the pencil. It’s also a good idea to reinforce the concepts of “long” and “short”.
The teacher should teach children to draw straight and inclined lines with a brush (lightly, without pressure), thick and thin lines. Thin lines are drawn with the tip of the brush, thick (wide) ones, pressing on the entire pile. It is necessary to remind children that the intensity of the color of gouache paint depends on the pressure of the brush, and on the thickness of the paint itself.
Drawing fruits and vegetables in a jar (the teacher prepares the silhouette of the jar in advance) is an excellent exercise for children in drawing round objects with paint and painting over images.
To teach children how to place objects on a piece of paper, have them draw flowers. It is necessary to train the child’s hand in drawing round shapes (flower petals), straight and inclined vertical lines (stems, roots, grass).
Middle group
The middle group teacher faces the following tasks: to strengthen children’s interest in drawing; develop their powers of observation, attention, memory, sense of color, rhythm, form, independence; teach children to draw simple-shaped objects and highlight their main parts; teach to distinguish, name and correctly use colors: red, blue, green, white, yellow, black, brown, orange, as well as their shades: pink, blue, gray, light green.
Children should learn to draw from memory, perform tasks creatively, learn to correctly place an image on a piece of paper; children at this age should work with a pencil and a brush: draw a line smoothly, without pressing, change the direction of the lines, draw with three or four colors; the teacher must constantly improve children’s ability to draw objects based on straight (vertical and horizontal), inclined, broken, curved and arcuate lines; learn to draw objects using knowledge of their geometric shape (round, rectangular, triangular, oval) and colors, combine images of two or three objects in a drawing, combine colors to create expressive images.
Children must learn to convey the proportional relationship of two objects in size (large - small, high - low); learn to convey in drawings the impression of autumn, winter, spring, summer natural phenomena, holidays, the New Year tree; Children should be able to independently fold and put away materials, correctly analyze and evaluate their work and the drawings of other children.
Themes of lessons for this age should be: fruits, vegetables, flowers, autumn and spring trees, colorful balls, a house decorated with flags, a house with a fence, a tree near the house, a Christmas tree, a snow woman, a New Year tree, a snow maiden, a doll, a bird, phenomena nature, a bun meeting a bunny (bear), chickens walking on the grass, a girl on a walk.
A drawing lesson in the middle group is held once a week. The teacher uses playful, verbal and visual teaching techniques in the classroom.
For each lesson, he must think about how to talk about the subject, in what sequence to analyze its details, and what questions to ask the children. In order for children to better understand what shape an object has, it is necessary to give them the opportunity to play with the model and trace the contour with their finger. Everything related to the shape of an object, its characteristic features, is well absorbed by children during educational games and exercises on the topics: “Gegetable shop”, “Toy store”, “What is the same and what is different?”, “Magic bag”, “Find a round and oval shape”, etc. To help children learn and remember colors, you can also play educational games: “Who can find the ring faster?”, “Rolling balls,” “Passing balls,” etc.
Children need to be introduced to various subjects during walks, excursions, and viewing paintings. If it is not possible to show some objects in real life, you can study their shape from toys and pictures.
In the middle group, as in the younger group, the teacher sometimes shows the sequence of the entire image of the object. It is better to do this while explaining what shape the object has, and not very often, since children should learn to work independently and not redraw. A full display of the image should be resorted to only during the examination of new material; in other cases, you can partially show how to draw individual details of the object.
In the middle group, drawing continues to be a game and all game techniques work. Children, for example, enjoy drawing Christmas tree beads to decorate the New Year tree; carrots to treat the bunny, etc.
So that pupils learn to depict objects
independently, in order to better develop their attention, memory, sense of color and shape, you can give tasks to draw from the imagination (snow woman, trees in winter, mushrooms, balloons, birds) and from time to time - from memory.
The concept of the shape of an object is closely related to such concepts as circle (sun), oval (egg), triangle (kerchief), sphere (ball), cube (cubes). Children will more accurately reproduce the shape if they recognize the difference between an oval and a circle (an oval is an egg, the body of a bird, a plum, a nut; a circle is a cherry, Christmas balls, a coin), a square and a rectangle (a square is a scarf or tile in the bathroom; a rectangle is a window , book, door).
In the middle group, the requirements for technical skills also increase. The teacher teaches children to paint over planes with a pencil and paint (the pencil should not come off the paper, and the brush should follow the bristles), teaches them to apply strokes in one direction, and paint with two to four colors.
In the first quarter, in the middle group, children are taught to draw objects of round, rectangular and triangular shapes, as well as objects consisting of straight and round shapes. At the first lessons, the teacher suggests drawing colorful balls, balls that roll along the path. In the future, the children are taught not just to draw already familiar objects, but to link them with the seasons. In the summer, for example, children draw berries, flowers, rainbows, in the fall - fruits, vegetables, mushrooms, in the winter - a snow woman. The teacher draws the children’s attention not only to the shape of objects, but also to the color.
In the second quarter, drawing objects of steep, oval and combined shapes continues. At the same time, the drawing of rectilinear models is improved.
In the 3rd quarter, it is necessary to strengthen the ability of preschoolers to accurately determine the shape of an object. This facilitates an independent search for images of those models that they have not yet drawn, but whose structure is based on already known forms. Themes for such drawings should be taken from the life around them, so that children learn to convey their impressions of what they see (spring nature, trees with swollen buds, the first green leaves, houses decorated with flags, etc.). The teacher teaches how to arrange two or three objects in one drawing, connecting them with a common design.
In summer, children are not given new material. During the lessons, they only consolidate their acquired drawing skills and improve their pencil and brush techniques. Kids independently make drawings on the theme “Summer”, based on the plots of fairy tales, short stories, poems, sayings, riddles, songs, and draw what they see for themselves.
The teacher pays special attention to improving drawing techniques, reminds how to fill a shape with paint without going beyond the outline, shows how to draw with an additional color or tone, and talks about the color features of nature.
The topics become more and more complex: “Apples and plums on a tray”, “Vegetables on a plate”, “Mushrooms”. Children are explained that tribes can be drawn on white and colored paper with gouache. First, the shape is drawn with a brush, then it is filled with color. The teacher names the mushrooms: butterdish, chanterelle - edible, fly agaric - poisonous.
In the second half of the year, children in the middle group can be offered to work on a graphic drawing made with colored pencils. The children are explained that the main elements of the image in such a drawing are line and stroke. A stroke is a short line. The pressure when shading should be light, the movements should be uniform and leisurely. The pencil should touch the paper not with the end of the lead, but with its side. The strokes can be narrow and wide, rare and frequent, dark and light. Horizontal, vertical and slanted strokes produce a lighter tone, while cross strokes produce a darker tone. In addition, by crossing strokes of two colors, you can get a third color. For example, blue and yellow crossed produce green.
Children should pay attention to the fact that to enhance the color it is not at all necessary to press the pencil hard on the paper. It is better to repeat the shading, applying the strokes tightly to one another. To get a light tone, the shading should be sparse.
It is much easier for children to shade inside the outline. At first, it is worth offering them silhouettes to work with, which they can color with colored pencils. Stencils are also useful for decorative painting based on folk crafts.
Pencil drawing is very important for the development of fine motor skills of a child's hand. Small tasks on the topic: “Let’s decorate a mitten”, “Matryoshka dress”, “Bookmark for a book” will also be useful. E.N. To develop motor memory and small muscles of the hand, Potapova suggests giving children rulers with stencils of geometric and other shapes, making images from them and shading them. If desired, children can complement them with a free drawing without a stencil.
Kids love coloring ready-made drawings. If you invite them to color the toys “Cat”, “Lion”, “Circus Elephant”, then the children will try to do it carefully and then play with them. Pay attention to the paw circles on the kittens and the lion and the nose circle on the elephant. These circles should be cut to the size of children's fingers so that children can play by inserting their fingers into the holes.
Children improve their ability to draw trees by depicting, for example, first a Christmas tree covered with snow, then a Christmas tree and falling snow (on colored paper), and finally a Christmas tree in summer.
Tree image options
When teaching children to draw animals and birds, the teacher asks them to first name the shape of their body and head, then shows them the drawing sequence, naming the parts of the body and their shape (body - oval, head - round, beak, tail).
Toys that are simple in shape and structure are taken as a model of animals and birds.
1
Live by the rule: IS THERE NOT MUCH THING IN THE WORLD EXISTING? It is no coincidence that I emphasize that the space in your head is limited, but there is a lot of information around, and that your right...
WHAT HAPPENS IN ADULT LIFE? If you are still connected to your mother in the wrong way, you are avoiding separation and independent adult existence...
What Causes Trends in Stock and Commodity Markets Freight Train Theory Explained My first 17 years of market research consisted of trying to figure out when...
System of Protected Areas in the USA The study of specially protected natural areas (SPNA) in the USA is of particular interest for many reasons...
Didn't find what you were looking for? Use Google search on the site:
On the topic: methodological developments, presentations and notes
We present to your attention a summary of a lesson on the development of sensorimotor abilities in children of the second younger group.
Program content: Teach children to hold a brush correctly, pick up paint, draw with it lightly touching the tip of the brush to a sheet of paper. Introduce children to brown paint. Develop interest in images.
Summary of organized educational activities in the educational field “Artistic and aesthetic development” “Drawing” for younger children.
Summary of direct educational activities on artistic and aesthetic development (drawing) for children of senior preschool age Topic: “Maple leaves.”
Objectives: - develop understanding of contextual speech - lead to the compilation of short descriptive texts; - involve children in playful and verbal interaction with peers; - develop word creativity and words.
Developing the ability to reflect in a drawing the impressions of the Victory Day.
Source
Summary of a drawing lesson in the 2nd junior group “Beauty Violet”
Anna Tyurikova
Summary of a drawing lesson in the 2nd junior group “Beauty Violet”
Direct educational activities on artistic creativity in the educational field of drawing (the use of non-traditional drawing techniques) with children of the 2nd junior group on the topic “Beauty Violet”.
Goal: to help expand children's knowledge about indoor plants, strengthen cognitive interest in nature, and develop creative imagination through artistic images.
Tasks:
Developmental: Develop the ability to experiment. Develop aesthetic perception, attention, creativity, fine motor skills.
Educational: To cultivate neatness, perseverance, and love of nature.
Materials for classes: a doll, a violet in a pot, a photograph of a blooming violet, a paper silhouette of a violet scented with something fragrant, white sheets of paper with pots and leaves already glued on, blue gouache, small sheets of paper.
Preliminary work: looking at indoor violets, looking at photographs of violets, gluing the pot and leaves onto a sheet of paper.
Introductory part
A beautiful doll named Violet comes to visit the children.
-Hello guys! My name is fairy Violet. I slept so soundly in one flower. But then a ray of sun tickled me and woke me up. Where did I end up? How big is the room? Is this a greenhouse? (children's answers)
Main part
-Is this a kindergarten? There are so many children here! I'm going through something. Do you know how to care for flowers? How will you do this? After all, we are very picky flowers (children’s answers)
Summary of drawing lesson “Indoor plants. Flower in a pot"
Dinara Kuvaikina
Summary of drawing lesson “Indoor plants. Flower in a pot"
Abstract Artistic and aesthetic development on the topic: “
Indoor plants ” “
Flower in a pot ” Purpose: To form an idea about indoor plants , about the bright individual features of their appearance.
Educational: Summarize and supplement children's knowledge about indoor plants .
Developmental: Develop aesthetic perception, attention, creative abilities.
— To develop the ability to hold the hand correctly, coordination of movement and fine motor skills of the hands.
Educational: To cultivate neatness and perseverance, respect for plants , love for nature.
Gaming: didactic game “collect a flower ”
, surprise, physical activity
“ Flowers grow ”