Summary of a design lesson for the senior group of kindergarten
Summary of a design lesson Topic: “The guys rush to the aid of Smeshariki.”
Topic: “The guys rush to help Smeshariki.”
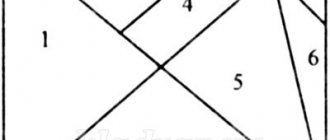
Program content: 1. Learn to sequentially analyze a contour diagram: 1) recognize the depicted object; 2) determine the locations of its main parts; 3) “try on” (i.e. correlate with the space of the diagram and with each other) the building details proposed to reproduce the building; 4) Dissect the contour diagram in accordance with the idea of the possible design of the object. 2. Learn how to build using a ready-made graphic model. 3. Continue to teach how to independently complete the object, using familiar construction techniques. 4. Continue to teach children to analyze an object, highlighting the details of the building material and their spatial arrangement. 5. Reinforce the correct use in speech of words such as front, back, front, side, etc. 6. Develop attention, memory, imagination. 7. Cultivate friendly relationships and a desire to help comrades. Methods and techniques: Game, examination, questions, comparison, encouragement, musical accompaniment. Material: Demonstration: Contour diagrams of objects on a larger scale than children’s diagrams, dissected diagrams of the same objects; Handout: Construction set for each child, contour diagrams, small toys, 2 pencils (simple and colored). Differentiated approach: 1 subgroup - an undivided diagram of the object is given. Subgroup 2 - a partially dissected diagram of the object is given. Individual work: Help Nikita Sh., Alena S., Tanya P. with the construction of a building; help Ksyusha, Katya, Vadim in analyzing the scheme. Preliminary work: Reading “Builders” by S.Ya. Marshak, looking at photographs of various houses, excursions along the streets of the microdistrict to examine buildings, building houses from building materials, getting acquainted with unfinished schemes. Connection with other types of activities: Speech development: introduction to the active vocabulary of the names of construction parts, gaming activity: role-playing game “Construction”.
Progress of the lesson:
— Guys, today we have a design lesson.
There is a knock on the door. - Oh, guys, someone is coming towards us. Yes, it was the Postman who brought us a letter. Something must have happened. I'm reading the letter. - Guys, this letter came from Smesharikov. Nyusha and Barash write that they wanted to build new houses, but it rained and some lines on the drawings were blurred. Smeshariki really ask you to help them understand the drawings and build new houses. Shall we help you guys? — Guys, look carefully at the diagrams and think about what it is? — Which part of the house is shown in the diagram? I'm inspecting the circuit. - This is a house (I trace the entire diagram with my hand). — What parts might the house depicted consist of? (Pointing to the lower part). - Right. Well done! What goes behind the foundation? — What is on the walls? - Fine. What else does the house have? — Guys, our diagrams, as you already said, show only the facades of houses, i.e. front view, what else does the house have that we don’t see in this diagram? — Could there be windows on the side walls? — What could be on the back wall? - That's right, guys. - Guys, let's remember what parts of the construction set we used to build houses with you in class. - Think about what parts the house shown in the diagram might consist of: What parts can be used to build a foundation? — What parts can you use to build the walls of a house? - Fine. What can the ceiling be made of? - Well done! What part is needed to build a roof? - Guys, now I suggest you complete the details that make up the house on your diagrams with a simple pencil. I check and help children who find it difficult to complete a task. Clarifications are made to the diagram with a colored pencil. I invite one child to come out and tell what the house shown in the diagram consists of and complete the diagram (child of the 2nd subgroup). — Nikita, tell us what the house shown in your diagram consists of? - Well done, you explained everything in detail, completed the diagram, and all the guys checked whether they completed the task correctly. - Okay, now let's rest a little. Physical education minute. We planed, we planed. The boards became smooth.
We sawed, we sawed, so that everyone would be even. We stacked them in a row, nailed them down with a hammer, and it turned out to be a new house. - Well, now we have completed plans and construction can begin. Just don’t forget that our diagrams show only the facades of houses, and we will build entire houses. - Let's start building houses. - Guys, if all your houses are the same, then Smeshariki will be bored living here. Design decorations for your home. During construction, I help with questions and advice. I draw attention to the quality of the construction. - What wonderful houses we have turned out to be. All different. So we built and built. Finally, we built. Look what kind of house everyone will feel comfortable in it. Come, come, live in our house. - Well done, guys, you tried very hard and helped Smeshariki. Look how happy they are (showing toys). Now let’s resettle the city residents into their homes and have a housewarming party. Smeshariki will also give you colorful circles. Whoever succeeded will place a red circle near his house, a yellow circle - the construction was not entirely successful, a blue circle - they did not cope with the task at all. The teacher picks up Smesharik. “I’ll go see what kind of house Nikita built.” Nikita, how many floors are there in your house? How can you get to the second floor? Who will you place in your home? Why did you put a red circle near your house? -Which of you guys has the longest house? What parts did you use to build the longhouse? Why did you make such a long house? What kind of circle did you put near your house? Why? — And I also want to go visit Lera. What do you think is interesting in Lera’s house? With the help of Smeshariki, the teacher helps the children play with the buildings. - Yes, we will help. We need to help everyone. Especially those who have had a misfortune. - These are house plans. — The diagram shows the facade. — The lower part of the house is the foundation. - These are walls. — There are windows on the walls. — The house has a roof on top. — The house still has side walls and a back wall. - Yes. — There may be a door on the back wall. - From cubes, plates, bricks, triangular prisms, bars, half-cubes. — The foundation can be built from plates. — The walls of the house can be built from cubes or bricks. — The ceiling can be made of plates. — To build a roof you need a triangular prism. Children complete the details on their diagrams. — This diagram shows a house. The foundation of this house consists of a plate. The walls stand on the foundation. They are also made from plates. There is a plate ceiling on the walls. A roof is placed on the ceiling - a rectangular prism. — This diagram shows a house. The foundation of this house consists of bricks. There is a wall on the foundation. The wall is made of two bricks and a cube. There is a brick ceiling on the wall. The roof is a rectangular prism. There is a path leading from the house to the mailbox. It is also made of bricks. There is a mailbox near the house. It is made of bricks and cubes. Jerks your arms up. Jerks your arms to the sides. Bend forward, hands on the belt. Walking in place. Squats. Walking in place. Jumping in place. Children complete the task. Children sort out the circles of the desired color. - Two floors. The second floor can be reached by elevator. There is an elevator in my house. - Because everything worked out for me. — I extended my house using bricks and cubes. My house can accommodate many guests. — This house is interestingly decorated. Let's repeat together where we will start construction. - Where do we start building ours - Let's start building from the foundation. — Are we going to build the foundation from a long house? - What will we build the foundation from? — How are we going to install the plates? — What will we build next? — What is located on the ceiling? — Guys, what can you use to build the side and back walls of a house? - Okay, now let's rest a little. plates. I'll put it on the wide, long side. Then we will build walls from plates. — We will place two plates at the edges on the short narrow sides and we will place one plate in the middle also on the short narrow side. — Next we will build a ceiling from a long plate. Let's put it on the walls - plates with a wide long side. — We will put a roof on the ceiling. Let's make it from a triangular prism. - From cubes, from plates. Download Summary of a design lesson for kindergarten
We recommend watching:
Summary of a design lesson on the topic “Making toys.” Senior group Three-dimensional design from paper in kindergarten. Master class Construction game for children of senior preschool age Notes on cognitive development (construction) in the 2nd junior group
Similar articles:
Consultation for parents “Construction from building materials”
Summary of OOD on constructive-model activities for children of the senior group
OOD on constructive model activities for children of the senior group “Let's help Lego men in building the city”
Author: Marina Nikolaevna Vlasyuk, teacher, MDAU Kindergarten No. 8 in Svobodny Goal : To develop children’s modeling abilities using Lego constructors. Objectives : - Teach children to design: according to a model, a scheme, according to the conditions set by adults, the plot of the game; lay out symmetry; — Develop figurative and spatial thinking, hand motor skills, consistency in performing actions, and the ability to express one’s idea; — Cultivate a desire to interact in a small group of peers. Equipment : Letter from Lego men; Lego Duplo construction sets; a plate with an image of one half of butterflies from a Lego constructor on it; house plans made from Lego Duplo; Lego men. Preliminary work : - enrichment of the subject-development environment through constructive and model activities - familiarization with the main building parts of the Lego constructor - independent design according to plan from different types of constructor - familiarization with design using Lego
Hod OOD
The teacher shows the letter to the children and tells them that the postman brought it to the kindergarten.
He opens it and reads to the children: - Hello children of the “Butterflies” group, residents of Lego City are addressing you. The fact is that a real tornado passed through our Lego country and broke all the houses in which we lived. We need your help. — Guys, are you ready to help Lego men restore destroyed houses? - But Lego City is located in a fairyland, and to get there, you need to walk along a magical path that consists of LEGO parts. If we find the magic bricks, we will assemble the road to Lego Land.
- I’ll start building a path and lay two bricks, but be careful: on the left you can only put those bricks that are similar in size to my brick, and on the right you can put those bricks that are similar in color to my brick.
Now you must continue building the magic road. Children lay out bricks according to the teacher’s model, commenting on the activity. — What size is your brick? why does it need to be put here? — Have you all placed your bricks? The road is ready! “So that no one gets lost on the way, let’s hold hands tightly, like Lego pieces.” You can hit the road. We’ll take all our friends with us to Lego Land
- Guys, but the gates to the magical land are closed, we’ll need a key, what should we do?
Where can I get the key? (children's guesses) - Build it from a construction set, a Lego key! Children construct a key based on their ideas about the subject and their imagination. - Well done, you completed the task successfully, you came up with interesting clues. Let's turn the key three times, we'll get into a magical land (turn with the constructed key)
- The gates have opened!
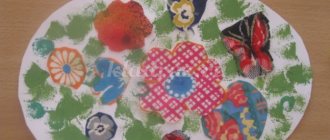
We are with you in a magical land. I suggest you relax a little and play with the butterfly. Visual gymnastics “Butterfly” (attach the butterfly to a pointer and follow the text, children follow with their eyes) In the morning the butterfly woke up, stretched, smiled.
Flew to a flower, (left) To a clearing (to the right), to a meadow (to the left) Rolled down the rainbow (from left to right and back) Stopped at the river, Spun around the river. (up. down. up. down) - Guys, it’s magical The butterfly will help us overcome the water obstacle, it will take us to the other side, but the butterfly is missing one wing.
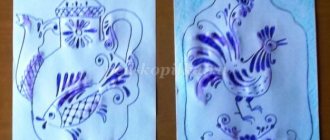
you need to lay out the second wing, symmetrical to the first. Children lay out the second half of the butterfly in turn, maintaining symmetry. - Well done, the butterfly is ready, and we can fly on it to the Lego men. - Guys, look, we are met by residents of a destroyed city, how sad they are, they still have photographs, (offer to look at samples of houses). These are the beautiful houses the little people had and we need to restore them. Divide into pairs, choose your favorite photo of the house, think about what Lego pieces you will need. “But before we get to work, let’s stretch our fingers.” Finger gymnastics. Lego is a smart game (we squeeze our fingers),
attractive, cunning
(hands to the sides)
.
It’s interesting to play here (circle of hands)
, Build, compose, search
(fist to fist, clap, glasses)
I invite all friends
(we call with our hands)
Build a house as soon as possible.
Children, divided into pairs, build houses according to the model; the finished houses are placed on a prepared plate. — Guys, the houses are ready. It's time to invite residents into their new homes. Children take Lego people and move them into built houses. - Let's admire our beautiful city. Maybe we can come up with a name for the city? Guys, you are great! You turned out to be very good builders - It’s time for us to return home. Let's say the magic words: “Turn around yourself, and you will find yourself in kindergarten.” Reflection: — Guys, what will you tell your moms and dads? friends? when will you come home? did you enjoy our trip? Maybe something caused you difficulty?
We recommend watching:
Summary of a lesson on cognitive development for the senior group on the topic: Friendship Lego construction for the development of speech in preschoolers A creative project on Lego construction in kindergarten. Senior group Regulations on holding a competition-exhibition on Lego construction and robotics for preschoolers
Similar articles:
Lesson notes for the senior group of kindergarten. Kingdom of Three Minerals