Drawing winter with preschoolers: step-by-step master classes, collection of ideas.
In this article you will find step-by-step master classes on drawing winter with preschool children using different techniques:
- drawing winter with gouache,
- we draw winter using the grattage technique,
- painting with salt.
Master classes will help teachers and parents conduct drawing classes in kindergarten, children's studio and at home.
Master class 1. Drawing winter with gouache with preschoolers
Author of the master class: Vera Parfentyeva, technology teacher, head of the children's art circle, reader of "Native Path". In the article, the photo shows drawings of children - students of Vera's studio.
Materials and tools for drawing
To complete a winter drawing, you need to prepare for your child:
- album sheet,
- paints (watercolor or gouache),
- brush (you need a wide flat brush),
- round brushes No. 1 -2, 4-5.
Children's age
This drawing can be drawn by children aged 5 years and older (senior preschool and primary school age.
How to draw winter with children: step-by-step description
Step 1. Prepare the background. To do this, you need to apply several strokes of blue, red, yellow, purple (can be green) paint with a wide brush. Then put white paint on the brush and stretch the color. Until the desired background is obtained, in which one tone transforms into another.
Step 2. Draw the outlines of the trees.
— Apply white paint to a round brush No. 4 or 5, and holding the brush vertically, first point out the contours of two trees in the center of the sheet (or do it using the poking method). The trees consist of three tiers in the form of a month-like figure or “cloud”. Start drawing from the bottom tier. Make the middle and upper tiers smaller relative to each other.
— Mark round “clouds” for the bushes on the sides of the trees.
— Using the poking method, fill in the inside of each “cloud.”
Step 3. Draw snow caps on the trees.
Mix white and black paint on the palette to get a light gray color and also dot the white “clouds” with a gray tint (shadow on the snow caps).
Step 4. Draw trunks and branches of trees and bushes.
Using brush No. 1 or 2, draw thin lines on tree trunks between the tiers of the crown and trunks of shrubs.
Paint the tree trunks with black paint, carefully so as not to touch the crowns.
Draw branches from the trunk.
Step 5. Draw snow on tree trunks and snowdrifts.
- Use white paint to apply thin lines along the trunks of trees and shrubs.
- Under the trees, outline the contours of the snowdrifts with a brush No. 5 and fill the “drifts” with white paint.
Step 6. Draw falling snow.
Spray the finished drawing with white paint, brushing it over the brush, simulating falling snow. How to draw falling snow “spray” You are shown in the photo.
Our drawing is ready. Try to depict winter in a drawing! Good luck in your creativity!
And below is an example of a child’s drawing based on this master class. It was drawn by Nastya (7.5 years old).
Example 3. Inhabitants of the winter forest
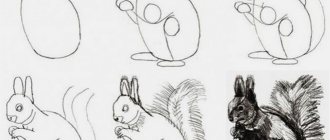
What else does drawing “Winter” involve? The older group of kindergarten is already old enough to portray animals. Albeit a little schematically, without any particular nuances. But such children will already be able to pay attention to the details. So, in this case there should also be an element of learning: which animals stay in the forest in winter, and which ones hibernate or hide in holes until spring. If you have to draw “Animals in Winter,” in the older group, children can draw squirrels, hares, wolves, and foxes. If you want to depict a bear, in this case you need to draw a cross-section of its den. That is, you can depict a sleeping bear, and there are snowdrifts around it. And your favorite animal will be in the picture, and it will be clear that the formidable forest dweller is sleeping at the indicated time of year.
Winter landscape: children's drawings
To help your child draw a landscape, draw his attention to the trees, snow, and ground while walking. Show what colors are inherent in the sky, clouds, and earth. The ground is not necessarily covered with white snow; the ground cover has several shades. Teach your child to pay attention to little things and then his drawings will be more realistic.
The older the children, the more small details they can depict.
Winter landscapes are very different from summer ones; they have some kind of mystery and charm. It doesn’t take much effort or skill to show winter on a piece of paper. But this activity helps develop creative thinking and imagination. Winter nature is prone to changes, and you can notice them to depict them on a sheet.
Winter landscape: pencil drawing step by step
The main colors of the winter pattern are blue, blue, and white. Pencils can be used to show finer details. Trees are usually depicted with a dark trunk and branches with bluish snow on them.
To draw such a landscape, we will need:
- Colour pencils
- Eraser
- Simple pencil
- White sheet of paper
We draw snowdrifts and the outline of a thick oak tree with large branches.
Near the oak tree we will draw three circles of different sizes that will represent a snowman.
We give the snowman a personality - we draw eyes, a mouth and a nose. Let's depict his hands in the form of sticks with twigs.
You can draw a bird feeder on a tree, and we’ll show another bird on a branch.
Stepping back a little from the snowman, let’s draw a triangle, which will then grow into a Christmas tree.
Next, draw branches on the Christmas tree and a bullfinch on top of the branch.
In the background we depict Christmas trees in the distance.
Now you can erase the auxiliary lines and draw the main ones
Let's color the branches of the Christmas tree green, and show a snowball on top with blue.
We will depict the tree trunk in brown, and we will show the snow in blue and blue colors.
On the oak tree, be sure to depict the veins in a darker color than the entire trunk was painted.
Painting a winter landscape with paints
The winter forest plays with different colors - from light blue to dark blue. At night, nature looks especially gorgeous in winter. Moonlight falls very beautifully on the snow cover.
You can paint such a landscape with watercolors.
You can draw a gouache forest in a few steps, which are not as difficult as it might seem. When you look at the finished landscape, you don’t understand how you can depict shadows, mountains, snow and sunset like that. But with step-by-step explanations everything will be much easier.
How to draw winter trees
www.o-detstve.ru
The crowns of these trees are made using a plastic bag. Dip it in paint and blot it in the right places - that’s the whole secret of “snow caps” for trees.
cs311120.vk.me
Finger painting is suitable for kids. Dip your index finger into thick gouache and generously sprinkle snow on the branches!
masterpodelok.com
Unusually beautiful snow-covered trees are obtained using cabbage leaves. Cover a leaf of Chinese cabbage with white gouache - and voila! This painting looks especially impressive against a colored background.
www.mtdesign.ru
No cabbage - no problem. Any leaves with pronounced veins will do. You can even sacrifice your favorite ficus. The only BUT, remember that the juice of many plants is poisonous! Make sure your child doesn’t taste his new “brush.”
ua.teddyclub.org
The trunk is a handprint. And everything else is a matter of minutes.
www.maam.ru
orangefrog.ru
A favorite technique for many is blowing paint through a tube. We create “snowiness” using the little artist’s fingerprints.
www.blogimam.com
Not everyone will guess how this charming birch grove is drawn. The resourceful artist used masking tape! Cut strips of the required width and glue them onto a white sheet. Paint over the background and remove the paint. Draw the characteristic “dashes” so that the birch trees become recognizable. The moon is made in the same way. Thick paper is suitable for these purposes; the tape should not be too sticky so as not to damage the top layer of the design.