What to do with a child when he is sick, or what interesting crafts for children can a kindergarten teacher come up with? In kindergarten, children often perform various tasks that help develop fine motor skills and imagination and are used for cognitive purposes.
To teach children to understand household items and tell them about the purpose of each item, a good option would be applique dishes , which are easy to do with a child of any age. It is enough to open our master class, designed for beginners, and step by step follow the recommendations indicated in it.
Tea sets for children made of colored paper
You can create many interesting crafts on the topic of dishes. Most of all, kids like variations with moving parts that they can play with. You can do this kind of work in a junior group, or in a middle group - in the end you should get a picture like this:
It is also suitable for preschoolers. The teapot in the kettle moves, you can also pour sugar with spoons and stir it.
To make such a miracle with your own hands, take cardboard, glue, colored paper and scissors. First you need to print a stencil on which the service will be glued, and prepare parts from colored paper - draw cups, spoons, a teapot with a teapot, cut them out along the contour. The step-by-step procedure is as follows:
- Make a tablecloth by gluing a beautiful design along the edges of the cardboard;
- Spread the blanks with glue along the edges and glue them to the base;
- Carefully insert the teapot and spoons.
Enjoy the result!
Application “Plates for Fedora”
LESSON SUMMARY ON DECORATIVE APPLICATION Topic: “Plate for Fedora” Tasks:
— To develop children’s ability to place pattern elements in the center of a round shape and along the edges, combining them differently in color and shape. - Continue practicing cutting the square diagonally to get two triangles, cut a circle from the square, and an oval from the rectangle, gradually rounding their edges, cut the rectangle in the middle to get two squares. — Reinforce safety rules when working with scissors. — To develop aesthetic perception, the ability to see beauty. — Develop children's creativity. — Develop hand-eye coordination.
EQUIPMENT
: “Beautiful Dishes” slides, plates cut into pieces, cut out squares and rectangles on serving plates, white paper plates, glue stick, napkins, scissors, audio recording of calm music, tape recorder.
Move
Educator: - Guys, yesterday I was walking around the city and went into a store, there were such beautiful dishes in the windows that I couldn’t resist and started taking pictures of them, and now I want to show you these photographs.
(slide show)
There is a knock on the door. The postman comes in:
— Hello, receive the parcel and sign for it.
The teacher takes the parcel, the postman leaves.
The teacher draws the children’s attention to the colorfully decorated box, opens it and takes out a letter, the letter says “From Fedora.”
Educator:
Guys, this is a letter and a parcel from the same Fedora, from whom all the dishes ran away.
The teacher reads the letter: “Hello guys, I had a problem - all the plates broke. Woe, Fedora, woe!”
Educator:
Fedora's grief again The lesson didn't serve her well. There is no order in the house again, and again there is commotion.
All the dishes have broken. There are no plates, but the food is Fruits, vegetables, foodstuffs, all scattered all over the place!
Educator:
And there’s something else here! Guys, Fedora again took up the old ways - she didn’t spare the dishes, she broke all the plates, look, only the fragments remained (show the broken dishes).
Educator:
It’s a pity for Fyodor - she really loves to invite guests, but there are no plates. How can I help her?
(Problematic situation).
Suggested solution:
-Buy new plates.
- Give yours.
V. – But Fedora wants the plates to be exactly like the ones that crashed.
Children: - make new plates for Fedora.
V. – Of course. Your hands, although not very big yet, already know how to create beauty. You make the plates for her yourself, she will be delighted.
Then, go to our workshop, where everything is ready for work. But in order to make plates for Fedora, we must find out what patterns were on the broken plates. To do this you must put the pieces together.
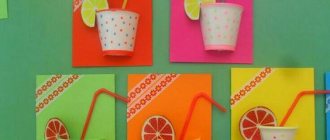
Bright cups-postcards
There are also more interesting designs for creating tea accessories that are suitable for children from 3 years old. They will be interested in creating, for example, a beautiful card for mom on March 8th with an applique on the theme of dishes - in this style: To make such beauty, you will need: white paper, a ready-made drawing or template, scissors, glue, colored pencils or paints. Then follow the instructions:
- Carefully cut out the heart and cup template.
- Fold the cup in half and bend the piece along two lines to make a saucer. You have created a beautiful applique – a cup on a saucer.
- Spread the saucer halves with glue and secure them.
- Glue a heart on top.
- Color the craft - for example, as in the photo. The gift is ready!
You can make such a surprise for a grandmother, sister, aunt or friend - in any case, the baby will be pleased to make such an applique himself.
Tear applique for developing fine motor skills
Making a cup
Among the many examples, there are also options that will interest older children. In a preparatory group, for example, you can do the following work - it will contribute to the development of communication abilities in children: You can independently find on the Internet and print ready-made samples - for example, if you have an average group, this option is preferable, because children of this age often lack perseverance. Hand out ready-made samples to the children and ask them to color them with pencils, markers or paints. At the same time, you can play out an interesting scene with a visit and preparing a table where everyone will have a cup of tea waiting for them.
Video: Making a jug
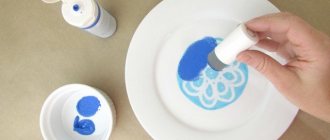
Summary of organized children's activities using the application “Let's decorate a plate”
Objectives: To develop children’s ability to place a pattern along the edge of a circle, correctly alternating the shape in size; make a pattern in a certain sequence: at the top, bottom, right, left - large circles, and between them - small ones; strengthen the ability to apply glue to your uniform; develop a sense of rhythm and independence.
Equipment: glue, brushes, napkin, oilcloth, brush stand, white cardboard plate with a diameter of 18 cm, 4 paper mugs with a diameter of 4 cm, 4 mugs with a diameter of 3 cm and 4 mugs with a diameter of 2 cm.
Progress of organized children's activities
Children enter the group, form a circle and greet each other.
Educator: Guys, you noticed that we have guests today, but look around.
Children: (Greet greetings) Knock on the door. The doll Katya comes in.
Doll: Hello guys (sad).
Children: Hello Katya.
Educator: Katya, what happened to you, why are you so sad?
Doll: It’s my birthday soon. My girlfriends will come to visit me, and I have only one beautiful plate of you. (We show the children a beautiful plate.)
Educator: Guys, let's help Katya and decorate some plates for her.
Children: Yes, we will help.
Educator: First, let's look at Katya's plate. Guys, what shape is the plate?
Children: The plate is round.
Educator: What is located in the center of the plate?
Children: There is a circle in the center of the plate.
Educator: What color is the circle in the center of the plate?
Children: Red.
Educator: Well done! How are the circles positioned along the edge of the plate?
Children: The circles are located along the edge of the plate and they are of different colors.
Educator: Well done! Please note that there is an alternating pattern on the plate. Large and small circles, different colors (yellow and green). What colour?
Children: Yellow and green.
Educator: To make the plates beautiful, listen carefully to how to work correctly. I take a brush, hold it correctly with 3 fingers like this, dip the bristles of the brush in glue and smear the white side of the red large circle and place it in the center of the plate. I remove the sticky glue with a napkin. Now take the yellow circle and apply glue to the back of the yellow circle and glue it to the top of the plate. We also glue the next circle below. I will glue the next circles on the right and left. And now I will glue small green circles between the large ones.
Educator: Katya, did you like the plate?
Doll: Very much.
Educator: Guys, sit down at the tables and before you start work, let's stretch our fingers.
Finger gymnastics “Friendship”
The girls and boys in our group are friends.
You and I will make friends with little fingers.
One, two, three, four, five - start counting again.
One, two, three, four, five - we're done counting.
Educator: Let’s stretch our fingers and start doing our work, try laying out your pattern on a plate.
Educator: Whoever laid out the pattern begins to glue it. Children decorate plates. (The teacher helps those who have difficulties.)
Educator: We finish work, tidy up our workplace, and Katya will go and look at your work.
(The teacher with the Katya doll approaches each child.)
What did you decorate today? (I decorated the plate.)
What shape is the plate? (The plate is round.)
For whom did we decorate the plates? (We decorated plates for Katya’s doll.)
Educator: Guys, let us cover the table with a tablecloth and place our plates.
Doll: Thank you guys. And now guys, I invite you to play.
Game "Loaf".
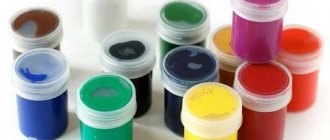
Ideas for decorating tableware applications
Coffee applique
Looking for more challenging options? You can use not only paper - for example, here’s a work - appliqué of a cup of coffee from coffee beans:
Not quite childish, but if you look at it together with mom and dad, it will be interesting.
Fabric applique
In the older group, you can use pieces of multi-colored fabric for appliqué. For example, you can end up with these cute teapots:
The technique for making it is simple. It is enough to prepare the fabric - any will do, as long as it is colorful and not very thick - and stick it on the stencil along the pre-drawn outline.
Application made of colored paper and cotton wool
This type of application is suitable for young children. You need to make blanks that can be fashionably painted or decorated. The kid collects and glues the prepared elements and then makes steam from the cotton wool.
Children's applique – Teapot and teaware
I suggest you consider a composite applique made of cardboard and colored paper “Teapot”.
For kids, you need to cut out all the necessary details in advance, and children 5-6 years old will be able to do it themselves, using downloaded template files from our website, and for decoration - a visual example of a picture of a teapot.
In this application I used my own template. For you and your child, we have drawn printable files “Teaware”. The set of files consists of templates: teapot, mug, saucer, teaspoon, pie dish. I believe that such templates will be of help to educators in children’s educational institutions. Let's first look at making a simple version of the applique for five-year-old children.
To apply the teapot we will need:
• Colored cardboard; • Template of teapot parts; • Colored paper; • Album (1 sheet for the base); • Glue; • Scissors; • Pencil.
Attention! The child must do the craft entirely himself. Your task is to control, explain and give hints.
MANUFACTURING PROCESS.
Using the template, we will transfer the details of the teapot onto cardboard. The base of the teapot is yellow, and the spout, handle, bottom and part of the lid are red. Photo-1.
Carefully cut out all the parts of the teapot. Photo-2.
At this stage, you can invite your child to make a teapot from parts themselves.
This task develops a holistic perception of the subject.
If the child is at a loss, offer him a sample as a hint. Photo-3.
Let's start assembling the teapot.
We will use a landscape sheet or a sheet of white cardboard as a base for the applique.
First, glue the container itself (circle), then glue the part of the teapot spout to it.
All that's left is to glue the handle! Photo-4.
Next we glue the red bottom of the teapot and the first part of the lid.
At the end, we glue the last part of the lid and the circle - the handle. Photo-5.
The base of the teapot is ready! To decorate the pot-bellied teapot, cut out several circles from colored paper. Photo-6.
Now let's decorate the teapot to your taste with multi-colored circles - peas, arranging them randomly, or making up your own pattern from them. Photo-7.
(
Templates come with decorations such as stickers or decals.
).
We have a bright and elegant teapot! Please bring some cups - we'll drink tea!
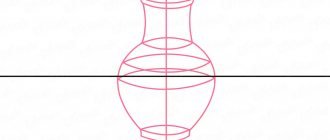
How to make a flat object visually voluminous?
In this joint work, we are examining not only the topic “Dishes”. The teapot is pot-bellied, remember?
And after completing the craft, you should definitely draw the children’s attention to this word. Such a word will amuse them and arouse visual interest.
In our application example, and of course, in the template files, attention is paid to highlighting (giving) volume to flat parts. After all, visual volume is created not only by details, but also by their location in an application or drawing.
This makes the object look flat. Let's attach an oval-shaped part. So what's going on? A flat object, as if by magic, looks three-dimensional (round, like an inflated balloon).
Why is the oval black? Black color can mean emptiness, and we may have coffee or tea in our cup. What's in the kettle? Black tea is brewed in a very hot kettle. Be careful!
For children, this is the simplest, most understandable and visual explanation. In their next creative works, they will definitely try to make their own appliqué or drawing with a volumetric effect. In any case, they will definitely want to experiment!
Download “Teaware” file templates.
ONLINE VIEW: tableware.pdf
— If you do not have a program for reading PDF files (Russian version), download it from the official website. — Free program “ Adobe Acrobat Reader DC”
» — A program for reading, printing and reviewing PDF files.
The files are distributed free of charge in electronic PDF format, and only on the website www.asreda.com.
Not for commercial use. Article on the topic: “ Samovar template for applique .”
Article on the topic: “ Finger Theater. Felt geese ."
Article on the topic: “ Sew a phone from felt and learn numbers .”
__________________
© Anastasia Obolentseva, for www.asreda.com
Comments on posts are temporarily disabled.
✉ MESSAGE TO THE AUTHOR - for registered users.
Collective application “Tea drinking with a samovar”
This is a great idea for a collective applique, when each of the children comes up with their own design and decorates the cup.
The samovar is practically not used today; it is a rare, ancient, but nice object that reflects the spirit of the times. The process of creating from colored paper, fabric or any other available material will delight the kids. The samovar can be combined with a tea set.
A detailed description of the work process is as follows:
- Make preparations (cups, bagels, samovar).
- Take whatman paper and cover it with napkins - you’ll get a tablecloth.
- Then place a cut out samovar on it with a bunch of bagels glued on.
- Let children choose a color for the cup, color them, and cut and glue them.
Summary of a lesson on appliqué in the senior group “Cup and Saucer”.
Transcript
1 Summary of a lesson on appliqué in the senior group “Cup and Saucer”. The use of technologies for the development of children's creativity, information and communication technologies. Goal: To acquaint children with ceramic dishes, with the material from which they are made, to teach them to distinguish between different shapes of dishes, and to introduce them to one of the ways of decorating dishes: painting. Objectives: 1) Teach children to independently determine the initial shapes for cutting out cups and saucers in a symmetrical way. 2) Continue to teach techniques for cutting out flower shapes from paper folded in half (connecting parts to depict a decorative flower that is more complex in structure). 3) Develop the ability to combine applique with painting (cut out large parts of the flower from colored paper folded in half, and draw small parts with a felt-tip pen). 4) Continue to promote mastery of curved cutting techniques. 5) Develop aesthetic perception and imagination. Materials: The teacher has a cup and saucer with rounded walls; table (3-4 flowers in a side position), paper for showing cutting techniques. Children have a thick colored square sheet of paper, for a cup a square is 10x10 cm, for a saucer a rectangle is 12x3 cm; multi-colored squares, green, red, blue markers, scissors, paste, napkin, oilcloth, glue brush. Progress of the lesson: Part 1. Organizational. P. Let's look at painted porcelain dishes, which are made from special clay.
2 What is this? (this is a cup and saucer) Any product first originates in the artist’s workshop. The artist decided to create a cup. What could it be? (Low and round. Straight, like a glass. Similar to a barrel). And he came up with comfortable handles for the cups: curly, intricate. And also painting. I came up with it and drew everything on paper. It turned out beautifully! Then the artist sculpted a cup out of plasticine so everyone could see what it would look like. Now it can be sent to the factory. Here, some craftsmen make the shape of a cup based on the artist’s model, others paint it, and still others send it to a special kiln for firing. And only then the cup is ready. Tea and table sets, teapots, candlesticks, sugar bowls, and oil dishes are made at the porcelain factory. Look at several cups and saucers with your children. P. What are the cups decorated with, what elements are in the pattern? (flowers, twigs with berries, leaves, etc.) the pattern combines large flowers and thin twigs. How is the edge of the dish shaped? (border). P. Today we will cut out a cup and saucer and decorate it with a pattern. What shape is the cup? (tall cup, widening towards the top). What shape is the saucer? (low, wide). Both the cup and the saucer have rounded walls. Tell me, what shape will be the initial shape for the cup? (square). What shape will be the initial shape for the saucer? (rectangle). 2
3 Part 2. Task: fold the square in half and cut out a cup with rounded edges. The handle for the cup can be cut separately using scraps of paper from the original shape. Fold the rectangle in half and cut out a saucer with rounded edges. Glue the cut out cup and saucer onto a sheet of paper so that the saucer slightly covers the bottom of the cup. Post a table with approximate elements of the pattern. P. Several flowers and twigs are pasted and drawn on the table, which can be used to decorate dishes. Large parts of the flower will need to be cut out of colored paper folded in half, and small parts will need to be drawn with a felt-tip pen. The branches are thin, so they need to be drawn. (Show the children how to cut out and draw one of the flowers shown on the table), for example the second. Glue the flower in an inclined position, draw a curved stem and several branches nearby. Draw stamens on the flower. P. Everyone can decorate their cup with any flower and any branches from those shown on the table. But you can come up with an unusual flower yourself. 3
4 4
5 Part 3. Final. Game exercise. Place 4-6 appliqués with the images facing down in the middle of the table. For those who still have their work, invite them to take turns taking one of the appliqués lying on the table and placing theirs on the easel. P. Interesting to know if they are different from each other? Compare and name the differences in the shape of the products, if any, and in the patterns on the cups (ask 2-3 people). 5